android开发--布局三(微信布局)
微信主界面

我们布局应该从局来看,如上图,我们可以分为三个大的LinearLayout,再从LinearLayout嵌套其它布局,从而做出界面
文件
主界面代码:
<LinearLayout xmlns:android="http://schemas.android.com/apk/res/android"

    android:layout_width="match_parent"

    android:layout_height="match_parent"

    android:orientation="vertical" >

    <!-- 头部 -->

    <LinearLayout

        android:layout_width="match_parent"

        android:layout_height="wrap_content" >

        <include layout="@layout/top"/><!--引用其它布局-->

    </LinearLayout>

    <!-- 中间 -->

    <LinearLayout

        android:layout_width="match_parent"

        android:layout_height="wrap_content"

        android:layout_weight="1">

    </LinearLayout>

    <!-- 底部 -->

    <LinearLayout

        android:layout_width="match_parent"

        android:layout_height="wrap_content" >

        <include layout="@layout/buttonr"/><!--引用其它布局-->

    </LinearLayout>

</LinearLayout>
为了代码的维护和简洁,我们可以引用其它的布局,如上图, <include layout="@layout/buttonr"/>引用已经完成的布局
顶部
我们添加一个LinearLayout布局的文件


顶部界面

这个布局我们可以用一个大的LinearLayout再嵌套一个小LinearLayout
代码
<?xml version="1.0" encoding="utf-8"?>

<LinearLayout xmlns:android="http://schemas.android.com/apk/res/android"

    android:layout_width="match_parent"

    android:layout_height="50dp"

    android:background="#21292c"//背景色

    android:orientation="horizontal" >

    <TextView

        android:id="@+id/textView1"

        android:layout_width="wrap_content"

        android:layout_height="wrap_content"

        android:textSize="22sp"//字体大小

        android:textColor="#FFFFFF"//字体颜色

       android:padding="10dp"

       android:text="@string/app_name" />

     <TextView

        android:layout_width="0dp"

        android:layout_height="wrap_content"

        android:layout_weight="1"

    />

  <LinearLayout

        android:layout_width="wrap_content"

        android:layout_height="match_parent"

        android:gravity="center" >

        <ImageView

            android:id="@+id/imageView2"

            android:layout_width="30dp"

            android:layout_height="30dp"

            android:layout_marginRight="10dp"

            //图片

            android:src="@drawable/fdj" />

        <ImageView

            android:id="@+id/imageView1"

            android:layout_width="30dp"

            android:layout_height="30dp"

            //图片

            android:src="@drawable/barbuttonicon_add" />

    </LinearLayout>

</LinearLayout>
底部界面:如上所示添加LinearLayout布局文件,会涉及到一个控件的运用RadioGroup控件

RadioButton和RadioGroup的关系:
1、RadioButton表示单个圆形单选框,而RadioGroup是可以容纳多个RadioButton的容器
2、每个RadioGroup中的RadioButton同时只能有一个被选中
3、不同的RadioGroup中的RadioButton互不相干,即如果组A中有一个选中了,组B中依然可以有一个被选中
4、大部分场合下,一个RadioGroup中至少有2个RadioButton
5、大部分场合下,一个RadioGroup中的RadioButton默认会有一个被选中,并建议您将它放在RadioGroup中的起始位置
主要代码
<RelativeLayout xmlns:android="http://schemas.android.com/apk/res/android"

    android:layout_width="match_parent"

    android:layout_height="match_parent" >

<LinearLayout

    android:layout_width="match_parent"

    android:layout_height="wrap_content"

    android:orientation="horizontal"//水平

     android:layout_alignParentTop="true"

    >

     <RadioGroup android:orientation="horizontal"//水平

             android:layout_width="match_parent" android:layout_height="wrap_content">

             <RadioButton

                 android:layout_width="0dp"

                 android:layout_weight="1"//权重

                 android:layout_height="wrap_content"

                 android:drawableTop="@drawable/four"//引用外部文件

                 android:checked="true"

                 android:text="@string/xiao"

                 style="@style/text"

                 android:button="@null"//去掉前面的圆点

                 android:gravity="center"//居中

                 />

             <RadioButton

                 android:layout_width="0dp"

                 android:layout_weight="1"//权重

                 android:layout_height="wrap_content"

                 android:drawableTop="@drawable/tuo"//引用外部文件

                 android:text="@string/tong"

                 style="@style/text"

                 android:button="@null"//去掉前面的圆点

                 android:gravity="center"//居中

                 />

             <RadioButton

                 android:layout_width="0dp"

                 android:layout_weight="1"//权重

                 android:layout_height="wrap_content"

                 android:drawableTop="@drawable/three"//引用外部文件

                 android:text="@string/ss"

                 style="@style/text"

                 android:button="@null"//去掉前面的圆点

                 android:gravity="center"//居中

                 />

             <RadioButton

                 android:layout_width="0dp"

                 android:layout_weight="1"//权重

                 android:layout_height="wrap_content"

                 android:drawableTop="@drawable/one"//引用外部文件

                 android:text="@string/wo"

                 style="@style/text"

                 android:button="@null"//去掉前面的圆点

                 android:gravity="center"//居中

                 />

         </RadioGroup>

</LinearLayout>

</RelativeLayout>
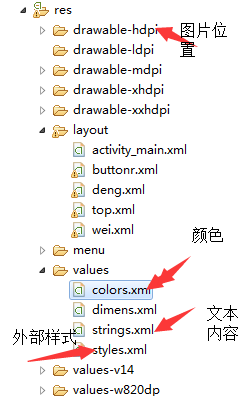
添加外部文件
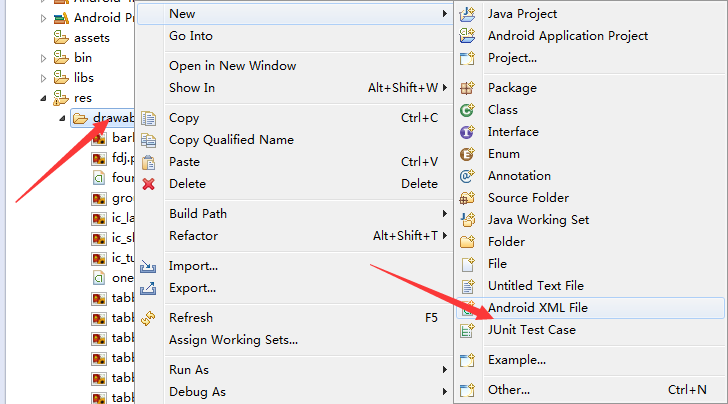

外部文件内容:添加四个这样的文件,分别对应四张图片,如果选中的的话,图片会变动
<?xml version="1.0" encoding="utf-8"?>

<selector xmlns:android="http://schemas.android.com/apk/res/android" >

    <item

        android:state_checked="true"//选中是tabbar_mehl这个图片

        android:drawable="@drawable/tabbar_mehl"></item>

<item

    //没有选中是tabbar_me图片

    android:drawable="@drawable/tabbar_me"></item>

</selector>
添加字体变色的文件,如上添加
颜色文件代码
<?xml version="1.0" encoding="utf-8"?>

<selector xmlns:android="http://schemas.android.com/apk/res/android" >

    <item android:state_checked="true"

        android:color="@color/green"></item>

    <item

        android:color="@color/grey"></item>

</selector>
添加外部样式

字体颜色
<?xml version="1.0" encoding="utf-8"?>

<resources>

    <color name="grey">#999999</color>

    <color name="green">#07bb07</color>

</resources>
  <style name="text">

        <item name="android:textColor">@drawable/text</item>

    </style>
底部就做好了
在主界面布局分别引用这些分布局,界面就做好了。我们应该多多实践,多看下关于属性的书和资料.
最新文章
- 不同类型的指针+1之后增加的大小不同(a,&a的地址是一样的,但意思不一样)
- Three.js + HTML5 Audio API 打造3D音乐频谱,Let’s ROCK!
- C# Questions
- 直接请求URL调用 axis webservices
- windows下安装laravel简单步骤以及碰到的问题
- .Net下简单地实现MD5加密
- Autolayout 第三方开源库
- 基于Vue全家桶制作的的高仿美团APP
- logback读取src/test/resource下的配置文件
- Leetcode_删除排序数组中的重复项
- 查看Android应用包名、Activity的几个方法
- Google Maps V3 之 路线服务
- loj#3 -Copycat
- git log 查看提交记录,参数:
- Mac mysql sql_model引起的问题
- The Unique MST POJ - 1679 最小生成树判重
- SSH项目搭建(四)——Maven的pom.xml配置
- a=a++问题引发的思考
- <c:if></c:if>用法-转载
- 一次经典的tcp三次握手