Python 学习笔记(6)--常用模块(2)
一、下载安装
下载安装有两种方式:
yum\pip\apt-get
或者源码
下载源码

解压源码

进入目录

编译源码    python setup.py build

安装源码    python setup.py install
注:在使用源码安装时,需要使用到gcc编译和python开发环境,所以,需要先执行:
yum install gcc python-devel
安装成功后,模块会自动安装到 sys.path 中的某个目录中,如:/usr/lib/python2.7/site-packages/time&datetime
 import time

 # print(time.clock()) #返回处理器时间

 # print(time.altzone)  #返回与utc时间的时间差,以秒计算

 # print(time.asctime()) #返回时间格式"Fri Aug 19 11:14:16 2016"

 # print(time.localtime()) #返回本地时间 的struct time对象格式

 # print(time.gmtime(time.time()-800000)) #返回utc时间的struc时间对象格式

 # print(time.asctime(time.localtime())) #返回时间格式"Fri Aug 19 11:14:16 2016",

 #print(time.ctime()) #返回Fri Aug 19 12:38:29 2016 格式, 同上

 # 日期字符串 转成  时间戳

 # string_2_struct = time.strptime("2016/05/22","%Y/%m/%d") #将 日期字符串 转成 struct时间对象格式

 # print(string_2_struct)

 # struct_2_stamp = time.mktime(string_2_struct) #将struct时间对象转成时间戳

 # print(struct_2_stamp)

 #将时间戳转为字符串格式

 # print(time.gmtime(time.time()-86640)) #将utc时间戳转换成struct_time格式

 # print(time.strftime("%Y-%m-%d %H:%M:%S",time.gmtime()) ) #将utc struct_time格式转成指定的字符串格式

 #时间加减

 import datetime

 # print(datetime.datetime.now()) #返回 2016-08-19 12:47:03.941925

 #print(datetime.date.fromtimestamp(time.time()) )  # 时间戳直接转成日期格式 2016-08-19

 # print(datetime.datetime.now() )

 # print(datetime.datetime.now() + datetime.timedelta(3)) #当前时间+3天

 # print(datetime.datetime.now() + datetime.timedelta(-3)) #当前时间-3天

 # print(datetime.datetime.now() + datetime.timedelta(hours=3)) #当前时间+3小时

 # print(datetime.datetime.now() + datetime.timedelta(minutes=30)) #当前时间+30分

 # c_time  = datetime.datetime.now()

 # print(c_time.replace(minute=3,hour=2)) #时间替换
python中时间日期格式化符号:
- %y 两位数的年份表示(00-99)
- %Y 四位数的年份表示(000-9999)
- %m 月份(01-12)
- %d 月内中的一天(0-31)
- %H 24小时制小时数(0-23)
- %I 12小时制小时数(01-12)
- %M 分钟数(00=59)
- %S 秒(00-59)
- %a 本地简化星期名称
- %A 本地完整星期名称
- %b 本地简化的月份名称
- %B 本地完整的月份名称
- %c 本地相应的日期表示和时间表示
- %j 年内的一天(001-366)
- %p 本地A.M.或P.M.的等价符
- %U 一年中的星期数(00-53)星期天为星期的开始
- %w 星期(0-6),星期天为星期的开始
- %W 一年中的星期数(00-53)星期一为星期的开始
- %x 本地相应的日期表示
- %X 本地相应的时间表示
- %Z 当前时区的名称
- %% %号本身
Python函数用一个元组装起来的9组数字处理时间:
| 序号 | 字段 | 属性 | 值 |
|---|---|---|---|
| 0 | 4位数年 | tm_year | 2008 |
| 1 | 月 | tm_mon | 1 到 12 |
| 2 | 日 | tm_mday | 1到31 |
| 3 | 小时 | tm_hour | 0到23 |
| 4 | 分钟 | tm_min | 0到59 |
| 5 | 秒 | tm_sec | 0到61 (60或61 是闰秒) |
| 6 | 一周的第几日 | tm_wday | 0到6 (0是周一) |
| 7 | 一年的第几日 | tm_yday | 1到366 (儒略历) |
| 8 | 夏令时 | tm_isdst | -1, 0, 1, -1是决定是否为夏令时的旗帜 |
Time 模块包含了以下内置函数,既有时间处理相的,也有转换时间格式的:
time.altzone 返回格林威治西部的夏令时地区的偏移秒数。如果该地区在格林威治东部会返回负值(如西欧,包括英国)。对夏令时启用地区才能使用。
time.asctime([tupletime]) 接受时间元组并返回一个可读的形式为"Tue Dec 11 18:07:14 2008"(2008年12月11日 周二18时07分14秒)的24个字符的字符串。
time.clock( ) 以浮点数计算的秒数返回当前的CPU时间。用来衡量不同程序的耗时,比time.time()更有用。
time.ctime([secs]) 作用相当于asctime(localtime(secs)),未给参数相当于asctime()
time.gmtime([secs]) 接收时间辍(1970纪元后经过的浮点秒数)并返回格林威治天文时间下的时间元组t。注:t.tm_isdst始终为0
time.localtime([secs]) 接收时间辍(1970纪元后经过的浮点秒数)并返回当地时间下的时间元组t(t.tm_isdst可取0或1,取决于当地当时是不是夏令时)。
time.mktime(tupletime) 接受时间元组并返回时间辍(1970纪元后经过的浮点秒数)。
time.sleep(secs) 推迟调用线程的运行,secs指秒数。
time.strftime(fmt[,tupletime]) 接收以时间元组,并返回以可读字符串表示的当地时间,格式由fmt决定。
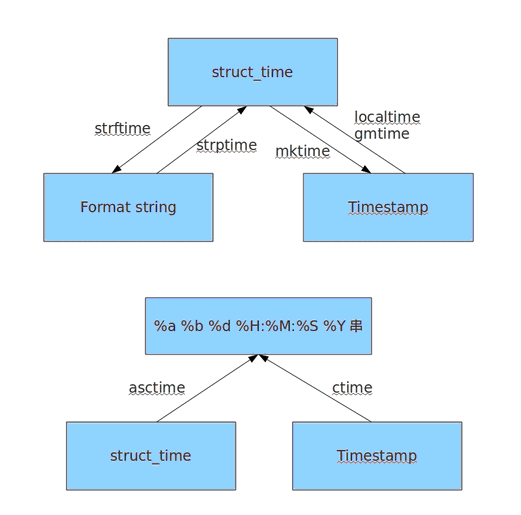
time.strptime(str,fmt='%a %b %d %H:%M:%S %Y') 根据fmt的格式把一个时间字符串解析为时间元组。
time.time( ) 返回当前时间的时间戳(1970纪元后经过的浮点秒数)。
time.tzset() 根据环境变量TZ重新初始化时间相关设置。
time模块的重要属性
time.timezone
属性time.timezone是当地时区(未启动夏令时)距离格林威治的偏移秒数(>0,美洲;<=0大部分欧洲,亚洲,非洲)。
time.tzname
属性time.tzname包含一对根据情况的不同而不同的字符串,分别是带夏令时的本地时区名称,和不带的。
时间转换的过程
random模块
生成随机数的模块
 import random

 print(random.random())

 print(random.randint(1,2))

 print(random.randrange(1,10))

 生成随机验证码

 import random

 checkcode = ''

 for i in range(4):

     current = random.randrange(0,4)

     if current != i:

         temp = chr(random.randint(65,90))

     else:

         temp = random.randint(0,9)

     checkcode += str(temp)

 print checkcode
shutil 模块
高级的 文件、文件夹、压缩包 处理模块
shutil.copyfileobj(fsrc, fdst[, length])
将文件内容拷贝到另一个文件中,可以部分内容
 拷贝部分代码的示例

 def copyfileobj(fsrc, fdst, length=16*1024):

     """copy data from file-like object fsrc to file-like object fdst"""

     while 1:

         buf = fsrc.read(length)

         if not buf:

             break

         fdst.write(buf)
shutil.copyfile(src, dst)
拷贝文件不拷贝权限
shutil.copymode(src, dst)
仅拷贝权限。内容、组、用户均不变
shutil.copystat(src, dst)
拷贝状态的信息,包括:mode bits, atime, mtime, flags
shutil.copy(src, dst)
拷贝文件和权限
shutil.copy2(src, dst)
拷贝文件和状态信息
shutil.copytree(src, dst, symlinks=False, ignore=None)
递归的去拷贝文件
例如:copytree(source, destination, ignore=ignore_patterns('*.pyc', 'tmp*'))
shutil.rmtree(path[, ignore_errors[, onerror]])
递归的去删除文件
shutil.move(src, dst)
递归的去移动文件
shutil.make_archive(base_name, format,...)
创建压缩包并返回文件路径,例如:zip、tar
- base_name: 压缩包的文件名,也可以是压缩包的路径。只是文件名时,则保存至当前目录,否则保存至指定路径,
如:www =>保存至当前路径
如:/Users/wupeiqi/www =>保存至/Users/wupeiqi/ - format: 压缩包种类,“zip”, “tar”, “bztar”,“gztar”
- root_dir: 要压缩的文件夹路径(默认当前目录)
- owner: 用户,默认当前用户
- group: 组,默认当前组
- logger: 用于记录日志,通常是logging.Logger对象
ConfigParser
 # 注释1

 ; 注释2

 [section1]

 k1 = v1

 k2:v2

 [section2]

 k1 = v1

 import ConfigParser

 config = ConfigParser.ConfigParser()

 config.read('i.cfg')

 # ########## 读 ##########

 #secs = config.sections()

 #print secs

 #options = config.options('group2')

 #print options

 #item_list = config.items('group2')

 #print item_list

 #val = config.get('group1','key')

 #val = config.getint('group1','key')

 # ########## 改写 ##########

 #sec = config.remove_section('group1')

 #config.write(open('i.cfg', "w"))

 #sec = config.has_section('wupeiqi')

 #sec = config.add_section('wupeiqi')

 #config.write(open('i.cfg', "w"))

 #config.set('group2','k1',11111)

 #config.write(open('i.cfg', "w"))

 #config.remove_option('group2','age')

 #config.write(open('i.cfg', "w"))
shelve 模块
shelve模块是一个简单的k,v将内存数据通过文件持久化的模块,可以持久化任何pickle可支持的python数据格式
import shelve

d = shelve.open('shelve_test') #打开一个文件

t = 123

t2 = 123334

name = [,"rain","test"]

d["test"] = name #持久化列表

d["t1"] = t      #持久化类

d["t2"] = t2

d.close()
xml处理模块
xml是实现不同语言或程序之间进行数据交换的协议,跟json差不多,但json使用起来更简单,不过,古时候,在json还没诞生的黑暗年代,大家只能选择用xml,至今很多传统公司如金融行业的很多系统的接口还主要是xml。
xml的格式如下,就是通过<>节点来区别数据结构的:
 <?xml version="1.0"?>

 <data>

     <country name="Liechtenstein">

         <rank updated="yes">2</rank>

         <year>2008</year>

         <gdppc>141100</gdppc>

         <neighbor name="Austria" direction="E"/>

         <neighbor name="Switzerland" direction="W"/>

     </country>

     <country name="Singapore">

         <rank updated="yes">5</rank>

         <year>2011</year>

         <gdppc>59900</gdppc>

         <neighbor name="Malaysia" direction="N"/>

     </country>

     <country name="Panama">

         <rank updated="yes">69</rank>

         <year>2011</year>

         <gdppc>13600</gdppc>

         <neighbor name="Costa Rica" direction="W"/>

         <neighbor name="Colombia" direction="E"/>

     </country>

 </data>
xml协议在各个语言里的都 是支持的,在python中可以用以下模块操作xml
 import xml.etree.ElementTree as ET

 tree = ET.parse("xmltest.xml")

 root = tree.getroot()

 print(root.tag)

 #遍历xml文档

 for child in root:

     print(child.tag, child.attrib)

     for i in child:

         print(i.tag,i.text)

 #只遍历year 节点

 for node in root.iter('year'):

     print(node.tag,node.text)
修改和删除xml文档内容
 import xml.etree.ElementTree as ET

 tree = ET.parse("xmltest.xml")

 root = tree.getroot()

 #修改

 for node in root.iter('year'):

     new_year = int(node.text) + 1

     node.text = str(new_year)

     node.set("updated","yes")

 tree.write("xmltest.xml")

 #删除node

 for country in root.findall('country'):

    rank = int(country.find('rank').text)

    if rank > 50:

      root.remove(country)

 tree.write('output.xml')
自己创建xml文档
 import xml.etree.ElementTree as ET

 new_xml = ET.Element("namelist")

 name = ET.SubElement(new_xml,"name",attrib={"enrolled":"yes"})

 age = ET.SubElement(name,"age",attrib={"checked":"no"})

 sex = ET.SubElement(name,"sex")

 sex.text = ''

 name2 = ET.SubElement(new_xml,"name",attrib={"enrolled":"no"})

 age = ET.SubElement(name2,"age")

 age.text = ''

 et = ET.ElementTree(new_xml) #生成文档对象

 et.write("test.xml", encoding="utf-8",xml_declaration=True)

 ET.dump(new_xml) #打印生成的格式
re 模块
re模块用于对python的正则表达式的操作。
字符:
. 匹配除换行符以外的任意字符
\w 匹配字母或数字或下划线或汉字
\s 匹配任意的空白符
\d 匹配数字
\b 匹配单词的开始或结束
^ 匹配字符串的开始
$ 匹配字符串的结束
次数:
* 重复零次或更多次
+ 重复一次或更多次
? 重复零次或一次
{n} 重复n次
{n,} 重复n次或更多次
{n,m} 重复n到m次
1、match(pattern, string, flags=0)
从起始位置开始根据模型去字符串中匹配指定内容,匹配单个
- 正则表达式
- 要匹配的字符串
- 标志位,用于控制正则表达式的匹配方式
2、search(pattern, string, flags=0)
根据模型去字符串中匹配指定内容,匹配单个
3、group和groups
 import re

 a = "123abc456"

 print re.search("([0-9]*)([a-z]*)([0-9]*)", a).group()

 print re.search("([0-9]*)([a-z]*)([0-9]*)", a).group(0)

 print re.search("([0-9]*)([a-z]*)([0-9]*)", a).group(1)

 print re.search("([0-9]*)([a-z]*)([0-9]*)", a).group(2)

 print re.search("([0-9]*)([a-z]*)([0-9]*)", a).groups()
4、findall(pattern, string, flags=0)
上述两中方式均用于匹配单值,即:只能匹配字符串中的一个,如果想要匹配到字符串中所有符合条件的元素,则需要使用 findall。
5、sub(pattern, repl, string, count=0, flags=0)
用于替换匹配的字符串
相比于str.replace功能更加强大
 content = "123abc456"

 new_content = re.sub('\d+', 'sb', content)

 # new_content = re.sub('\d+', 'sb', content, 1)

 print new_content
6、split(pattern, string, maxsplit=0, flags=0)
根据指定匹配进行分组
 content = "'1 - 2 * ((60-30+1*(9-2*5/3+7/3*99/4*2998+10*568/14))-(-4*3)/(16-3*2) )'"

 new_content = re.split('\*', content)

 # new_content = re.split('\*', content, 1)

 print new_content

 content = "'1 - 2 * ((60-30+1*(9-2*5/3+7/3*99/4*2998+10*568/14))-(-4*3)/(16-3*2) )'"

 new_content = re.split('[\+\-\*\/]+', content)

 # new_content = re.split('\*', content, 1)

 print new_content

 inpp = '1-2*((60-30 +(-40-5)*(9-2*5/3 + 7 /3*99/4*2998 +10 * 568/14 )) - (-4*3)/ (16-3*2))'

 inpp = re.sub('\s*','',inpp)

 new_content = re.split('\(([\+\-\*\/]?\d+[\+\-\*\/]?\d+){1}\)', inpp, 1)

 print new_content
hashlib
用于加密相关的操作,代替了md5模块和sha模块,主要提供 SHA1, SHA224, SHA256, SHA384, SHA512 ,MD5 算法
 import hashlib

 # ######## md5 ########

 hash = hashlib.md5()

 hash.update('admin')

 print hash.hexdigest()

 # ######## sha1 ########

 hash = hashlib.sha1()

 hash.update('admin')

 print hash.hexdigest()

 # ######## sha256 ########

 hash = hashlib.sha256()

 hash.update('admin')

 print hash.hexdigest()

 # ######## sha384 ########

 hash = hashlib.sha384()

 hash.update('admin')

 print hash.hexdigest()

 # ######## sha512 ########

 hash = hashlib.sha512()

 hash.update('admin')

 print hash.hexdigest()
以上加密算法虽然依然非常厉害,但仍然存在缺陷.
即:通过撞库可以反解。所以,有必要对加密算法中添加自定义key再来做加密。
 import hashlib

 # ######## md5 ########

 hash = hashlib.md5('898oaFs09f')

 hash.update('admin')

 print hash.hexdigest()
python 还有一个 hmac 模块,它内部对我们创建 key 和 内容 再进行处理然后再加密
 import hmac

 h = hmac.new('wueiqi')

 h.update('hellowo')

 print h.hexdigest()
最新文章
- [BI项目记]-BUG处理
- 从客户端(Content="<EM ><STRONG ><U >这是测试这...")中检测到有潜在危险的Request.Form 值。
- ios基础篇(二十五)—— Animation动画(UIView、CoreAnimation)
- 关于echart横轴颜色 纵轴颜色 以及文本颜色的修改
- Jenkins的Publish Over FTP Plugin插件参数使用
- AP_总体业务及方案
- php---分组函数group_concat()
- D3.js 完整的柱形图
- ZOJ 3810 Pretty Poem 分类: ACM 2015-05-17 14:40 83人阅读 评论(0) 收藏
- SQL Server 跨库连接
- HDU-4639 Hehe 简单DP
- C#编程使用到的几种调试方式
- winform利用委托delegate进行窗体间通信,相同标题已经存在??
- Angularjs Material
- 关于table布局的推荐使用原因
- 只需几分钟跟小猫学前端(内含视频教程):nodejs基础之用express、ejs、mongdb建设简单的网站
- php学习----数据类型2
- linux crontab定时器
- oracle-rman-2
- IIS短文件名泄露漏洞检测