转:VS2010调试NUnit测试项目 (Running or debugging NUnit tests from Visual Studio without any extensions)
If you write unit tests and use NUnit test framework this may be helpful. I decided to write this simple step by step project configuration because I tend to set it up on every new project but keep forgetting all its details of how to do this. Setting it up is simple and a one-time only process for each test project.
Getting NUnit
You can always get NUnit test framework directly from the web on http://www.nunit.org/ and install it on your machine but it may be better to use a more solution-specific approach by usingNuGet NUnit package that installs it only in a particular solution. Getting it using NuGet can either be done as outlined on the linked package page by using package manager console or using the package manager GUI by doing this:
- Right-click on project in Visual Studio Project Explorer; a popup context menu appears;
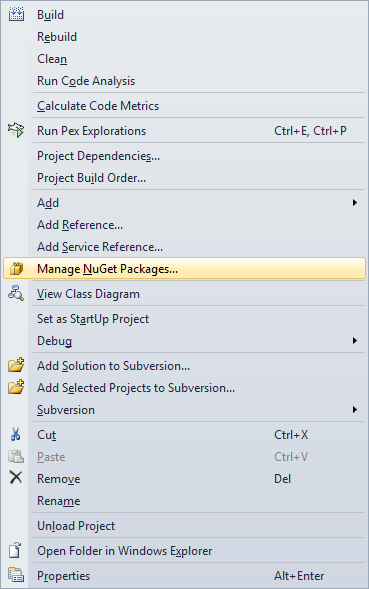
- Click on Manage NuGet Packages... menu option which will open package manager simple to use GUI;
- Wait for the dialog window to load packages from the web repo and then select NUnit;
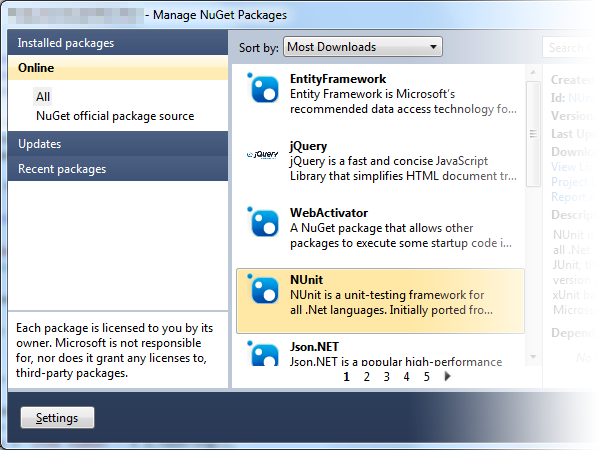
This will automatically add NUnit library and tools to your solution folder and add relevant assembly references in your test project. Having a solution-specific NUnit version makes it future proof if newer NUnit versions are not backwards compatible. So one less thing to think about.
Executing unit tests
NUnit is a fine library, but it offers no Visual Studio integration per-se. It has an external program compiled either as a console app or a GUI. It runs your unit test assembly and executes any unit tests within.
Developers not having additional non-free Visual Studio tools usually run NUnit GUI tool and run those tests manually. But it's much easier if you can easily just hit F5 or Ctrl-F5 in Visual Studio that would compile unit tests and run the NUnit GUI tool automatically for you while also executing all unit tests on application start. The good thing is that you can also debug your unit tests this way in case you wanted to check something that seems to be invalid in your test code.
Project configuration
In order to automatically start NUnit test runner GUI tool you have to follow these steps to configure your test project to be capable of running/debugging unit tests:
- Open your test project properties by right-clicking on project in Visual Studio Project Explorer ans selecting option Properties...;
- Select Debug tab in project properties window;

- Set Start action as Start external program and point it to your local solution NUnit package installation; if you used NuGet package this is where you'll find your NUnit folder:
your solution folder\packages\nunit2.5.10.11092\tools\nunit.exeOf course with the right NUnit version in folder name. - Set Command line arguments to point to your test project assembly file like:
YouTestProjectAssemblyName.dll /run - Set Working directory to point to your test project's debug folder like:
YourTestProjectFolder\bin\Debug - Save project configuration properties and you're done;
I usually also configure my solution so that I set Startup project as Current selection. This makes it possible that hitting F5 runs my currently selected project. If I have a unit test file open it will run (start debugging) my unit test project, but if I'm currently working on ie. my web application file, it will automatically start debugging my web application. 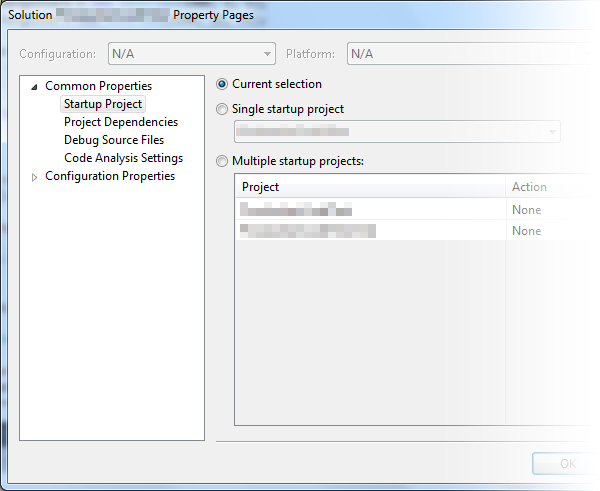
Debugging test assemblies compiled for .Net 4.0
If you're trying to debug your test assembly that is compiled for :net version 4.0 or later you may have problems hitting your breakpoints. Visual Studio simply says that no debug symbols have been loaded for your assembly. The problem is that NUnit is running under .Net 2.0, but your test assembly is compiled for .Net 4.0.
To still keep the capability of automatically running your tests by hitting F5 you will have to edit nunit.exe.config that's in the same folder as nunit.exe test runner GUI. All you have to do is to add these three lines directly under <configuration> configuration element:
1: <startup>
2: <supportedRuntime version="4.0" />
3: </startup>
This is all you need to know to configure your project to run NUnit unit tests directly from Visual Studio by starting NUnit test runner GUI. If you have any additional suggestions regarding this, please leave your comment below.
最新文章
- Markdown语法
- 关于Memcached一致性hash的探究
- 视频聊天APP
- MUI(4)
- suse linux 命令
- [转]linux 查看系统信息命令
- java的读文件操作
- [Linux]可用于管道操作的命令
- 从零开始学ios开发(四):IOS控件(1),Image View、Text Field、Keyboard
- js基础第二天
- as3调用外部swf里的类的方法
- How to let gedit of linux display "space"
- T-SQL 一次插入多行数据
- magento中取不同store中的产品数据
- HTML与HTML5复习标签汇总
- 新人学习selenium哪些资源比较有帮助?
- 一步步教你开发、部署第一个去中心化应用(Dapp) - 宠物商店
- 【刷水】之USACO2008资格赛(Bzoj1599-1603)
- Oracle day05 建表_约束
- 2017湖湘杯复赛writeup