通知栏消息(Notification)初步
2024-09-26 12:38:44

Notification是用来在通知中心中显示信息的,这里讲解了其最简单的使用方式。
关于PendingIntent和Intent的区别可以参考这篇文章:http://blog.csdn.net/zeng622peng/article/details/6180190
MainActivity.java
package com.kale.notification; import android.app.Activity;
import android.app.Notification;
import android.app.NotificationManager;
import android.app.PendingIntent;
import android.content.Intent;
import android.os.Bundle;
import android.view.View;
import android.view.View.OnClickListener;
import android.widget.Button; public class MainActivity extends Activity { static final int NOTIFICATION_ID = 0x123;
NotificationManager nm;
@Override
protected void onCreate(Bundle savedInstanceState) {
super.onCreate(savedInstanceState);
setContentView(R.layout.activity_main);
//获取系统服务来初始化对象
nm = (NotificationManager)getSystemService(NOTIFICATION_SERVICE); initView(); } private void initView() {
// TODO 自动生成的方法存根
Button b1 = (Button)findViewById(R.id.button1);
b1.setOnClickListener(new OnClickListener() { @Override
public void onClick(View arg0) {
// TODO 自动生成的方法存根
sent(arg0);
}
});
Button b2 = (Button)findViewById(R.id.button2);
b2.setOnClickListener(new OnClickListener() { @Override
public void onClick(View arg0) {
// TODO 自动生成的方法存根
del(arg0);
}
});
} public void sent(View source) {
//设置点击后启动的activity
Intent intent = new Intent(MainActivity.this,MainActivity.class);
//将Intent封装进PendingIntent中,点击通知的消息后,就会启动对应的程序
PendingIntent pIntent = PendingIntent.getActivity(this, 0, intent, 0); Notification notification = new Notification.Builder(this)
.setAutoCancel(true)//点击通知后,自动消失
.setTicker("在顶部状态栏的提示信息")//在顶部状态栏中的提示信息
.setSmallIcon(R.drawable.ic_launcher)//设置顶部状态栏的小图标
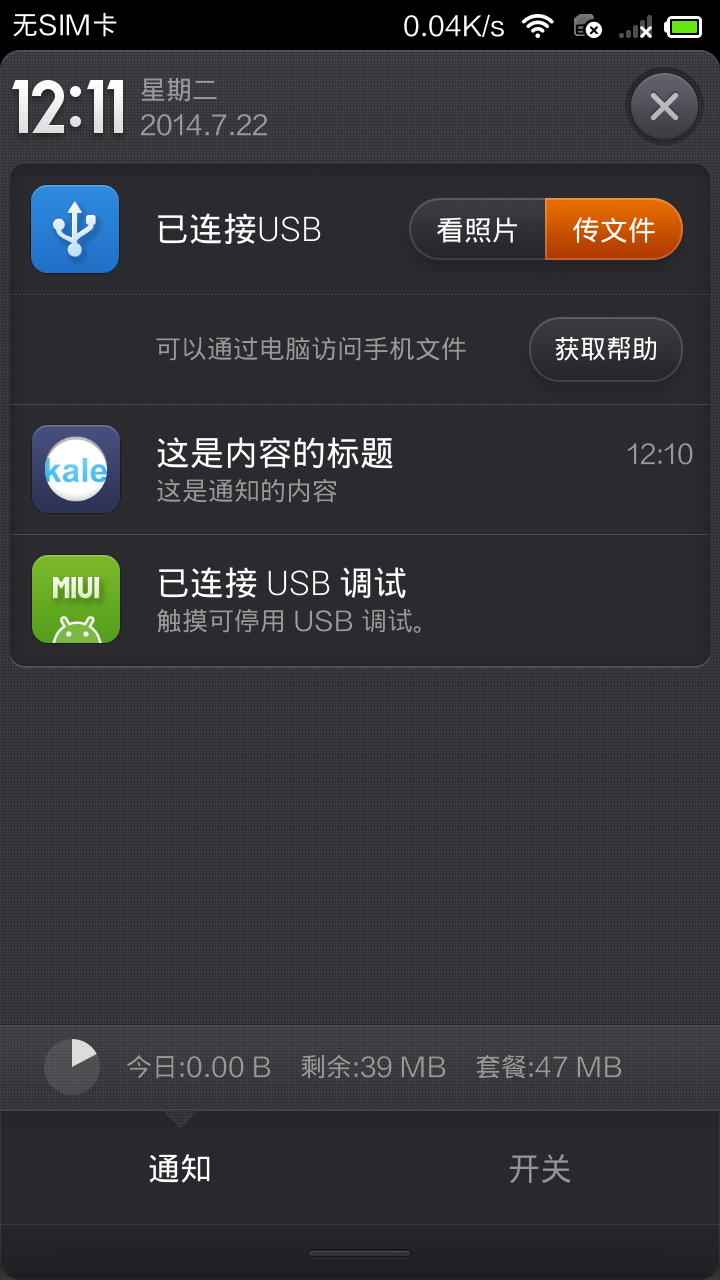
.setContentTitle("这是内容的标题")//设置通知中心的标题
.setContentText("这是通知的内容")//设置通知中心中的内容
.setDefaults(Notification.DEFAULT_SOUND|//设置使用默认的声音
Notification.DEFAULT_LIGHTS|//设置使用默认的LED
Notification.DEFAULT_VIBRATE)//设置使用默认的振动
//.setVibrate(new Long[] {0,50,100,150}) 设置自定义的振动
/*.setSound(Uri.parse("file:///sdcard/click.mp3"))*/
.setWhen(System.currentTimeMillis())
.setContentIntent(pIntent)//该通知要启动的Intent
.build();
//发送该通知
nm.notify(NOTIFICATION_ID,notification);
} public void del(View v) {
//取消通知
nm.cancel(NOTIFICATION_ID);
} }
补充内容(来自:http://www.oschina.net/code/snippet_270292_14489):
NotificationManager常用方法介绍:public void cancelAll() 移除所有通知(只是针对当前Context下的Notification)public void cancel(int id) 移除标记为id的通知 (只是针对当前Context下的所有Notification)public void notify(String tag ,int id, Notification notification) 将通知加入状态栏,标签为tag,标记为idpublic void notify(int id, Notification notification) 将通知加入状态栏,标记为id常量:DEFAULT_ALL 使用所有默认值,比如声音,震动,闪屏等等DEFAULT_LIGHTS 使用默认闪光提示DEFAULT_SOUNDS 使用默认提示声音DEFAULT_VIBRATE 使用默认手机震动 以上的效果常量可以叠加,即通过notification.defaults =DEFAULT_SOUND|DEFAULT_VIBRATE; notification.defaults |= DEFAULT_SOUND <!-- 闪光灯的权限 -->
<uses-permission android:name="android.permission.FLASHLIGHT"/>
<!-- 振动的权限 -->
<uses-permission android:name="android.permission.VIBRATE"/>
布局文件(仅仅就是两个按钮 ⊙﹏⊙b汗)
<RelativeLayout xmlns:android="http://schemas.android.com/apk/res/android"

    xmlns:tools="http://schemas.android.com/tools"

    android:layout_width="match_parent"

    android:layout_height="match_parent"

    android:paddingBottom="@dimen/activity_vertical_margin"

    android:paddingLeft="@dimen/activity_horizontal_margin"

    android:paddingRight="@dimen/activity_horizontal_margin"

    android:paddingTop="@dimen/activity_vertical_margin"

    tools:context="com.kale.notification.MainActivity" >

    <TextView

        android:id="@+id/textView1"

        android:layout_width="wrap_content"

        android:layout_height="wrap_content"

        android:text="@string/hello_world" />

    <Button

        android:id="@+id/button1"

        android:layout_width="wrap_content"

        android:layout_height="wrap_content"

        android:layout_below="@+id/textView1"

        android:layout_marginTop="18dp"

        android:layout_toRightOf="@+id/textView1"

        android:text="发送" />

    <Button

        android:id="@+id/button2"

        android:layout_width="wrap_content"

        android:layout_height="wrap_content"

        android:layout_alignRight="@+id/button1"

        android:layout_below="@+id/button1"

        android:layout_marginTop="47dp"

        android:text="取消" />

</RelativeLayout>
最新文章
- 【原创翻译】初识Unity中的Compute Shader
- stanford coursera 机器学习编程作业 exercise 5(正则化线性回归及偏差和方差)
- children和childNodes的区别
- Word文档增加快捷键
- MySQL —— 程序连接时的驱动名称和URL
- Page Scroll Menu (页面中锚点菜单)
- Python数据结构——栈、队列的实现(二)
- Code Smell那么多,应该先改哪一个?
- 比较两个字符,相等输出yes,不相等输出no
- 使用Qt Style Sheets制作UI特效
- poj1503---大数加法
- adb server is out of date. killing... ADB server didn't ACK * failed to star
- Contest Balloons
- Python之数据序列化(json、pickle、shelve)
- two sum II
- ElasticSearch Index 速度优化 (官方翻译)
- 彻底卸载MySQL服务
- Django请求生命周期
- CentOS7+CDH5.14.0安装全流程记录,图文详解全程实测-4配置NTP服务
- No enclosing instance of type is accessible. Must qualify the allocation with an enclosing instance of type LeadRestControllerTest (e.g. x.new A() where x is an instance of ).
热门文章
- 【LOJ】#6433. 「PKUSC2018」最大前缀和
- ps -aux与ps -ef
- 【Ray Tracing in One Weekend 超详解】 光线追踪1-6
- 初识thinkphp(4)
- 设计模式-装饰者模式(Decorator Pattern)
- BZOJ.4909.[SDOI2017]龙与地下城(正态分布 中心极限定理 FFT Simpson积分)
- 11、Redis的持久化(RDB、AOF)
- GitLab目录迁移方法
- spring cloud 学习(8) - sleuth & zipkin 调用链跟踪
- Bugzilla Error message: couldn't create child process: 720003: index.cgi