部署TiDB集群
2024-09-05 16:41:49
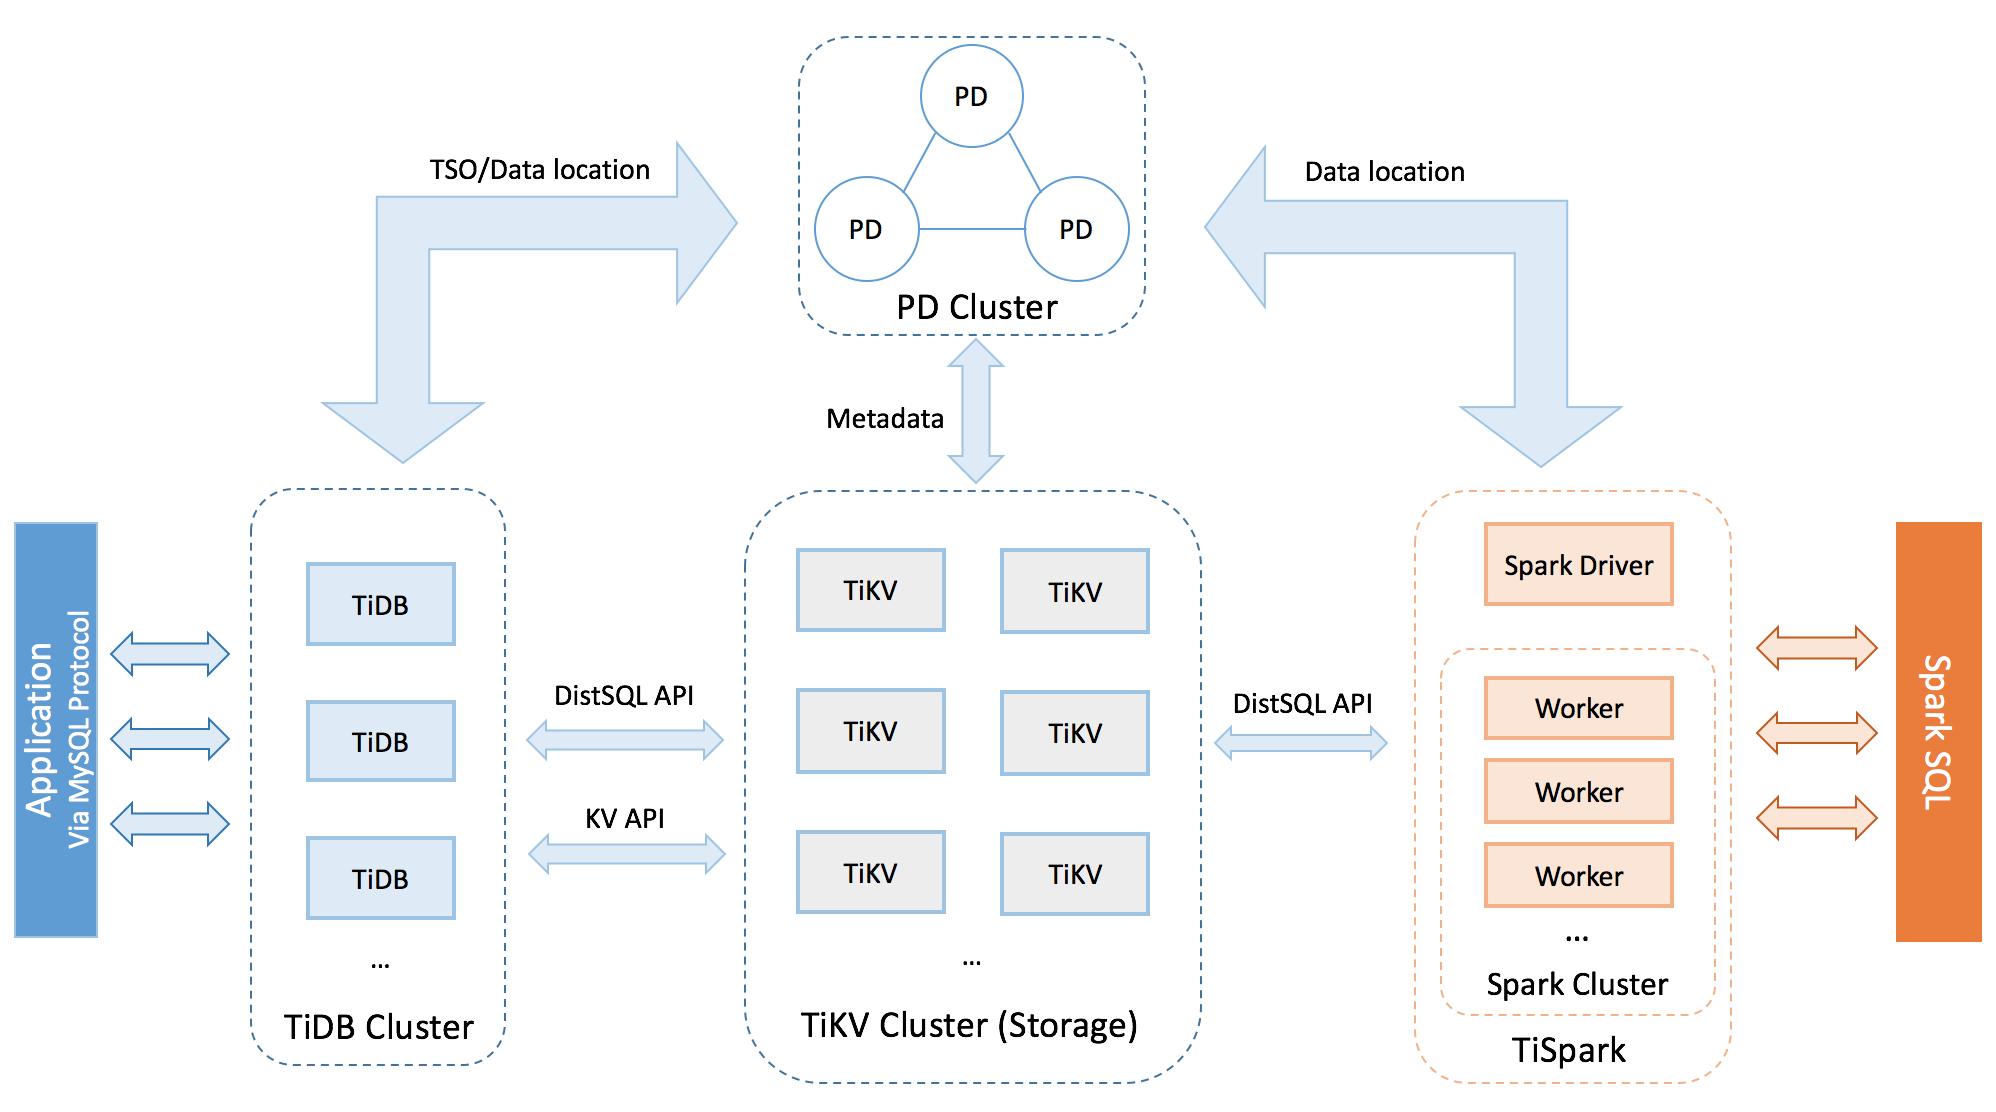
架构图
节点规划
120.52.146.213	Control Machine

120.52.146.214	PD1_TiDB1

120.52.146.215	PD2_TiDB2

120.52.146.216	PD3

120.52.146.217	TiKV1

120.52.146.218	TiKV2

120.52.146.219	TiKV3
软件要求
CentOS 7.3 (64 bit) or later with Python 2.7 installed
1、在控制节点上安装依赖软件
# yum -y install epel-release git curl sshpass

# yum -y install python-pip
2、创建 tidb 用户
# useradd tidb

# passwd tidb
3、配置sudo权限
# visudo

tidb ALL=(ALL) NOPASSWD: ALL
4、切换用户,生成SSH-KEY
# su - tidb

$ ssh-keygen -t rsa
5、下载 tidb ansible 项目代码
$ git clone -b v3.0.4 https://github.com/pingcap/tidb-ansible.git
6、安装ansible和相关依赖
$ cd /home/tidb/tidb-ansible

$ sudo pip install -r requirements.txt

$ ansible --version
7、配置SSH互信
$ cd /home/tidb/tidb-ansible

$ vi hosts.ini

[servers]

120.52.146.214

120.52.146.215

120.52.146.216

120.52.146.217

120.52.146.218

120.52.146.219

[all:vars]

username = tidb

ntp_server = pool.ntp.org

$ ansible-playbook -i hosts.ini create_users.yml -u root -k
8、安装NTP
$ cd /home/tidb/tidb-ansible

$ ansible-playbook -i hosts.ini deploy_ntp.yml -u tidb -b
9、挂载磁盘(这一步可以在装系统的时候就准备好)
# fdisk -l

# parted -s -a optimal /dev/sdb mklabel gpt -- mkpart primary ext4 1 -1

# mkfs.ext4 /dev/sdb

# lsblk -f

# vim /etc/fstab

UUID=c51eb23b-195c-4061-92a9-3fad812cc12f /data1 ext4 defaults,nodelalloc,noatime 0 0

# mkdir /data1

# mount -a

# mount -t ext4

/dev/sdb on /data1 type ext4 (rw,noatime,nodelalloc,data=ordered)
10、根据集群架构修改 inventory.ini
## TiDB Cluster Part

[tidb_servers]

120.52.146.214

120.52.146.215

[tikv_servers]

120.52.146.217

120.52.146.218

120.52.146.219

[pd_servers]

120.52.146.214

120.52.146.215

120.52.146.216

[spark_master]

[spark_slaves]

[lightning_server]

[importer_server]

## Monitoring Part

# prometheus and pushgateway servers

[monitoring_servers]

120.52.146.214

[grafana_servers]

120.52.146.214

# node_exporter and blackbox_exporter servers

[monitored_servers]

120.52.146.214

120.52.146.215

120.52.146.216

120.52.146.217

120.52.146.218

120.52.146.219

[alertmanager_servers]

120.52.146.214
11、下载部署包到本地
$ ansible-playbook local_prepare.yml
12、初始化系统环境修改内核参数
$ ansible-playbook bootstrap.yml
13、部署tidb集群
$ ansible-playbook deploy.yml
14、启动集群
$ ansible-playbook start.yml
15、访问集群
$ mysql -uroot -h 120.52.146.214 -P 4000

Welcome to the MariaDB monitor.  Commands end with ; or \g.

Your MySQL connection id is 182

Server version: 5.7.25-TiDB-v3.0.4 MySQL Community Server (Apache License 2.0)

Copyright (c) 2000, 2018, Oracle, MariaDB Corporation Ab and others.

Type 'help;' or '\h' for help. Type '\c' to clear the current input statement.

MySQL [(none)]> show databases;

+--------------------+

| Database           |

+--------------------+

| INFORMATION_SCHEMA |

| PERFORMANCE_SCHEMA |

| mysql              |

| test               |

+--------------------+

4 rows in set (0.00 sec)
参考:
https://pingcap.com/docs/v3.0/how-to/deploy/orchestrated/ansible/
https://docs.ansible.com/ansible/latest/cli/ansible-playbook.html
https://dev.mysql.com/doc/mysql-yum-repo-quick-guide/en/
最新文章
- CentOS利用inotify+rsync实现文件同步
- linux下XAMP集成开发环境搭建流程总结
- 自己的兼容IE系列的console.log
- ssm框架web.xml中filter配置问题
- webForm练习1(地区导航)
- yii框架中保存第三方登录信息
- mysql开启general log的方法
- 【Warshall_Floyd】
- 在代码中创建Drawable资源
- SQL Server 锁的 8 种类型
- linux开机自启动服务优化设置命令
- TF.learn学习
- 中科曙光I620-G15服务器登录密码破解
- 变量类型-Tuple
- anyalarm
- 008_falcon磁盘io计算方法
- Python 经典类和新式类
- 【CF434E】Furukawa Nagisa's Tree 点分治
- php – Laravel 5查询关系导致“调用成员函数addEagerConstraints()on null”错误( 转载)
- 安装setuptools