spring boot 使用elasticsearch
在文章开始之前我们先来介绍一下elasticsearch 是一个分布式的 RESTful 风格的搜索和数据分析引擎。
- 查询 : Elasticsearch 允许执行和合并多种类型的搜索 — 结构化、非结构化、地理位置、度量指标 — 搜索方式随心而变。
- 分析 : 找到与查询最匹配的十个文档是一回事。但是如果面对的是十亿行日志,又该如何解读呢?Elasticsearch 聚合让您能够从大处着眼,探索数据的趋势和模式。
- 速度 : Elasticsearch 很快。真的,真的很快。
- 可扩展性 : 可以在笔记本电脑上运行。 也可以在承载了 PB 级数据的成百上千台服务器上运行。
- 弹性 : Elasticsearch 运行在一个分布式的环境中,从设计之初就考虑到了这一点。
- 灵活性 : 具备多个案例场景。数字、文本、地理位置、结构化、非结构化。所有的数据类型都欢迎。
一.安装elasticsearch
这里我们将window 的安装,其实linux 应该都差不多,首先在官网下载安装包,解压好我下的是6.5版本的https://www.elastic.co/cn/downloads/past-releases#elasticsearch大家可以在这里选择版本进行下载修改config下的elasticsearch.yml
# ======================== Elasticsearch Configuration =========================

#

# NOTE: Elasticsearch comes with reasonable defaults for most settings.

#       Before you set out to tweak and tune the configuration, make sure you

#       understand what are you trying to accomplish and the consequences.

#

# The primary way of configuring a node is via this file. This template lists

# the most important settings you may want to configure for a production cluster.

#

# Please consult the documentation for further information on configuration options:

# https://www.elastic.co/guide/en/elasticsearch/reference/index.html

#

# ---------------------------------- Cluster -----------------------------------

#

# Use a descriptive name for your cluster:

#配置集群名字

cluster.name: my-cluster

#

# ------------------------------------ Node ------------------------------------

#

# Use a descriptive name for the node:

#节点名

node.name: node-1

#

# Add custom attributes to the node:

#

#node.attr.rack: r1

#

# ----------------------------------- Paths ------------------------------------

#

# Path to directory where to store the data (separate multiple locations by comma):

#

#path.data: /path/to/data

#

# Path to log files:

#

#path.logs: /path/to/logs

#

# ----------------------------------- Memory -----------------------------------

#

# Lock the memory on startup:

#

#bootstrap.memory_lock: true
#这两个配置是为了让header可以连接elasticsearch

http.cors.enabled: true

http.cors.allow-origin: "*"

#

# Make sure that the heap size is set to about half the memory available

# on the system and that the owner of the process is allowed to use this

# limit.

#

# Elasticsearch performs poorly when the system is swapping the memory.

#

# ---------------------------------- Network -----------------------------------

#

# Set the bind address to a specific IP (IPv4 or IPv6):

#

network.host: 0.0.0.0

#

# Set a custom port for HTTP:

#端口号

http.port: 9200

#

# For more information, consult the network module documentation.

#

# --------------------------------- Discovery ----------------------------------

#

# Pass an initial list of hosts to perform discovery when new node is started:

# The default list of hosts is ["127.0.0.1", "[::1]"]

#

#discovery.zen.ping.unicast.hosts: ["host1", "host2"]

#

# Prevent the "split brain" by configuring the majority of nodes (total number of master-eligible nodes / 2 + 1):

#

#discovery.zen.minimum_master_nodes:

#

# For more information, consult the zen discovery module documentation.

#

# ---------------------------------- Gateway -----------------------------------

#

# Block initial recovery after a full cluster restart until N nodes are started:

#

#gateway.recover_after_nodes: 3

#

# For more information, consult the gateway module documentation.

#

# ---------------------------------- Various -----------------------------------

#

# Require explicit names when deleting indices:

#

#action.destructive_requires_name: true
解压完后进入bin目录运行elasticsearch.bat文件便可开启服务器了,访问http://localhost:9200/出现如下界面就说明你的elasticsearch安装好了

当然我们如果仅仅使用elasticsearch的话肯定是不太方便的,官方给大家提供了一个可视化界面工具elasticsearch-head-master,下面介绍该插件的安装方法
二.elasticsearch-head-master安装
head插件是基于node.js的所以我们要先下载node.js 才可以安装head插件,大家可以在下面网址下载该插件https://github.com/mobz/elasticsearch-head.git这里得注意的是head的版本得跟elasticsearch的版本一致,否则可能会报错。
解压后修改Gruntfile.js如下:
connect: {

            server: {

                options: {

                    port: 9100,

                    hostname: '*',

                    base: '.',

                    keepalive: true

                }

            }

        }
然后修改_site中的app.js文件如下:
    init: function(parent) {

            this._super();

            this.prefs = services.Preferences.instance();

            this.base_uri = this.config.base_uri || this.prefs.get("app-base_uri") || "http://localhost:9200";

            if( this.base_uri.charAt( this.base_uri.length - 1 ) !== "/" ) {

                // XHR request fails if the URL is not ending with a "/"

                this.base_uri += "/";

            }

            if( this.config.auth_user ) {

                var credentials = window.btoa( this.config.auth_user + ":" + this.config.auth_password );

                $.ajaxSetup({

                    headers: {

                        "Authorization": "Basic " + credentials

                    }

                });

            }
然后在elastic head 目录下运行如下命令:第一次运行的时候需要安装npm 命令 输入 npm intall 命令 安装
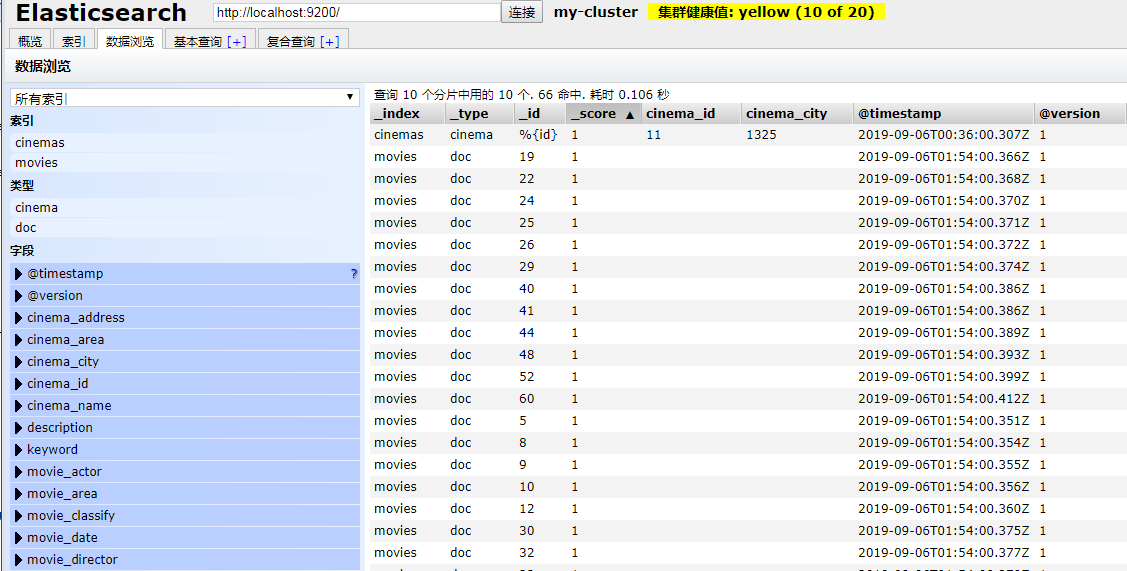
然后启动 npm run start 启动 服务便可以直接访问localhost:9200 便可以看到如下界面:

这里我就不具体说该界面的具体用法,大家自己去探索,elasticsearch的查询速度很快,特别对于大量数据更能看出其优势,但是对于大量数据我们又怎么进行插入呢。下面介绍一个官方推荐的数据库同步工具 logstash
三.logstash 同步mysql 数据库
首先在官网上下载logstash 下面给出地址https://www.elastic.co/guide/en/logstash/7.3/logstash-7-3-1.html,值得注意的是这里需要跟你的elasticsearch 的版本一致,否则会报错
下载完后进入bin目录因为该插件需要将mysql 的数据输入,然后输出到elasticsearch中所以需要下载logstash-input-jdbc、logstash-output-elasticsearch插件。执行如下命令logstash-plugin install logstash-input-jdbc ,logstash-plugin install logstash-output-elasticsearch
在安装的过程中可能会如下错误:
安装好了后再logstash 的config目录下面创建jdbc.conf文件,这个文件命名是我自己命名的,具体配置如下:
input {

  jdbc {

    # mysql相关jdbc配置

    jdbc_connection_string => "jdbc:mysql://localhost:3306/cinema?useUnicode=true&characterEncoding=utf-8&useSSL=false"

    jdbc_user => "root"

    jdbc_password => "123456"

    # jdbc连接mysql驱动的文件目录,可去官网下载:https://dev.mysql.com/downloads/connector/j/

    jdbc_driver_library => "E:/mavenware/mysql/mysql-connector-java/5.1.39/mysql-connector-java-5.1.39.jar"

    # the name of the driver class for mysql

    jdbc_driver_class => "com.mysql.jdbc.Driver"

    jdbc_paging_enabled => true

    jdbc_page_size => "50000"

    jdbc_default_timezone =>"Asia/Shanghai"

    # mysql文件, 也可以直接写SQL语句在此处,如下:

    #where update_time >= :sql_last_value

    statement => "select * from movies"

    #statement_filepath => "./config/jdbc.sql"

    # 这里类似crontab,可以定制定时操作,比如每分钟执行一次同步(分 时 天 月 年)

    schedule => "* * * * *"

    #type => "jdbc"

    # 是否记录上次执行结果, 如果为真,将会把上次执行到的 tracking_column 字段的值记录下来,保存到 last_run_metadata_path 指定的文件中

    #record_last_run => true

    # 是否需要记录某个column 的值,如果record_last_run为真,可以自定义我们需要 track 的 column 名称,此时该参数就要为 true. 否则默认 track 的是 timestamp 的值.

    use_column_value => true

    # 如果 use_column_value 为真,需配置此参数. track 的数据库 column 名,该 column 必须是递增的. 一般是mysql主键

    tracking_column => "update_time"

    #这里要指定类型不能可能会报错

    tracking_column_type => "timestamp"

  #这里是存储最后一次运行的时间

    last_run_metadata_path => "./logstash_capital_bill_last_id.txt"

    # 是否清除 last_run_metadata_path 的记录,如果为真那么每次都相当于从头开始查询所有的数据库记录

    clean_run => false

    #是否将 字段(column) 名称转小写

    lowercase_column_names => false

  }

}

output {

  elasticsearch {

    hosts => "localhost:9200"

    index => "movies"
#这里的字段是索引唯一标识的主键,字段名根据自己的表进行修改,不能相同

    document_id => "%{movie_id}"

    template_overwrite => true

  }

  # 这里输出调试,正式运行时可以注释掉

  stdout {

      codec => json_lines

  }

}
在bin 目录下运行如下命令logstash -f ../config/jdbc.conf ,这里我实在window命令下运行的 如果在linux 中./logstash -f ../config/jdbc.conf 即可,这里需要找到jdbc.conf文件,可以使用绝对路径也可以跟我一样使用相对路劲。运行之后便可以看到的elastsicsearch中多了很对数据了如下所示:
值得注意的是,只要你一直开着logstash 那么这个工具就会根据你给定的条件定期的更新索引,所以我们在表中一般都是加一个update_time字段这样就可以进行实时更新了
竟然我们索引已经创建好了那么我们就希望能用在项目中了
四.spring boot 中使用elasticsearch
我使用的是maven版本控制工具,所以首先得添加如下依赖:
 <dependency>

            <groupId>org.springframework.boot</groupId>

            <artifactId>spring-boot-starter-data-elasticsearch</artifactId>

            <version>2.0.2.RELEASE</version>

        </dependency>
下面是我的yml的配置文件,如下:
spring:

  data:

    elasticsearch:

      cluster-name: my-cluster

      #节点的地址 注意api模式下端口号是9300,千万不要写成9200

      cluster-nodes: localhost:9300

      repositories:

        enabled: true

  mvc:

    view:

      prefix: /WEB-INF/jsp

      suffix: .jsp

server:

  port: 8088
这里注意的是端口号不要写错了不是9100,而是9300,这里因为我要使用jsp所以我配置了jsp的视图解析器如果你用的是themleaf模板就完全不需要了
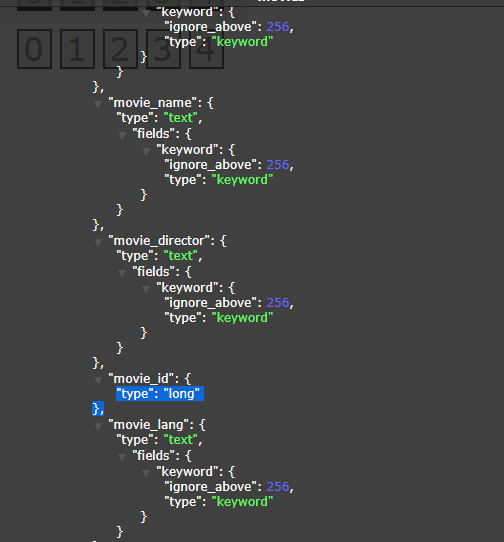
下面是我的实体类:
package com.lwc.pojo;

import org.springframework.data.annotation.Id;

import org.springframework.data.elasticsearch.annotations.Document;

import org.springframework.data.elasticsearch.annotations.Field;

import org.springframework.data.elasticsearch.annotations.FieldType;

@Document(indexName = "movies",type = "doc",shards = 1,replicas = 0, refreshInterval = "-1")

public class Movies {

    /**

     *     index:是否设置分词

     *     analyzer:存储时使用的分词器

     *     searchAnalyze:搜索时使用的分词器

     *     store:是否存储

     *     type: 数据类型

     */

    @Id

    private Integer movie_id;

    @Field(store = true,index = true,type = FieldType.Keyword,searchAnalyzer = "ik_smart")

    private String movie_name;

    private String movie_time;

    private String movie_date;

    @Field(store = true,index = true,type = FieldType.Keyword,searchAnalyzer = "ik_smart")

    private String movie_area;

    private String movie_lang;

   @Field(store = true,index = true,type = FieldType.Keyword,searchAnalyzer = "ik_smart")

    private String movie_director;

    @Field(store = true,index = true,type = FieldType.Keyword,searchAnalyzer = "ik_smart")

    private String movie_writer;

    @Field(store = true,index = true,type = FieldType.Keyword,searchAnalyzer = "ik_smart")

    private String movie_actor;

    @Field(store = true,index = true,type = FieldType.Keyword,searchAnalyzer = "ik_smart")

    private String movie_type;

    @Field(store = true,index = true,type = FieldType.Float,searchAnalyzer = "ik_smart")

    private Float movie_mark;

    private String key_word;

    private Integer movie_size;

    private Integer movie_classify;
get 和set 方法我就不贴出来了,节省空间,这里名字一定要跟索引的名字要对齐
下面试dao层的代码:
package com.lwc.dao;

import com.lwc.pojo.Movies;

import org.springframework.data.elasticsearch.repository.ElasticsearchRepository;

import org.springframework.stereotype.Repository;

@Repository

public interface MovieDao  extends ElasticsearchRepository<Movies,Long> {

}
因为spring boot 的jpa 已经帮我们实现了elasticsearch 的基本方法,就像hibernate 的jpa 一样我们只需要定义一个接口然后继承ElasticsearchRepository<Movies,Long>就可以了,这里接口中有两个泛型,一个是定义实体类的类型,另外一个则是定义索引主键的类型
这里我的主键名字叫 movie_id 所以我定义的主键名字是long 类型
下面是我的服务层:
package com.lwc.service;

import com.lwc.dao.MovieDao;

import com.lwc.pojo.Movies;

import org.elasticsearch.index.query.QueryStringQueryBuilder;

import org.springframework.beans.factory.annotation.Autowired;

import org.springframework.stereotype.Service;

import java.util.ArrayList;

import java.util.Iterator;

import java.util.List;

@Service

public class MovieService {

    @Autowired

    private MovieDao movieDao;

    public List<Movies> findMovies(String keyWord){

        QueryStringQueryBuilder qsq=new QueryStringQueryBuilder(keyWord);

        //这里是添加查询域,就是输入关键字后的搜索字段

        qsq.field("movie_area").field("movie_director").field("movie_writer").field("movie_actor").field("movie_type").field("movie_name");

        Iterator<Movies> iterator=movieDao.search(qsq).iterator();

        List<Movies> list=new ArrayList<Movies>();

        while(iterator.hasNext())

            list.add(iterator.next());

        return  list;

    }

}
下面是控制层代码:
package com.lwc.controller;

import com.lwc.pojo.Movies;

import com.lwc.service.MovieService;

import com.lwc.vo.SearchVo;

import org.springframework.beans.factory.annotation.Autowired;

import org.springframework.stereotype.Controller;

import org.springframework.web.bind.annotation.RequestBody;

import org.springframework.web.bind.annotation.RequestMapping;

import org.springframework.web.bind.annotation.ResponseBody;

import org.springframework.web.bind.annotation.RestController;

import util.ChineseUtil;

import java.util.List;

@RestController

@RequestMapping("/movies")

public class MoviesController {

    @Autowired

    private MovieService movieService;

    @ResponseBody

    @RequestMapping("/getMovies")
  //这里的searchVo 是一个映射类主要是为了接收前端传过来的信息

    public List<Movies> getMovies(@RequestBody SearchVo searchVo){

        String keyWord=searchVo.getKeyWord();

        List<Movies> list=null;
     //这里主要是为了判断是否包含中文,因为我使用的是keyup事件当输入拼音的时候也会输入拼音是的字符,所以添加了这个检查,对纯英文好像不太友好

        if(ChineseUtil.hasChineseByReg(keyWord))

           list= movieService.findMovies(keyWord);

        if(list !=null)

        for(Movies movies:list)

            System.out.println(movies.getMovie_name());

        return list;

    }

}
下面是界面代码:
<%--

  Created by IntelliJ IDEA.

  User: Administrator

  Date: 2019/9/6

  Time: 16:39

  To change this template use File | Settings | File Templates.

--%>

<%@ page contentType="text/html;charset=UTF-8" language="java" %>

<html>

<head>

    <title>Title</title>

    <script type="text/javascript" src="/jquery.js"></script>

</head>

<body>

    <script type="text/javascript">

        $(function(){

            $("#name").keyup(function(){

                var name={keyWord:$("#name").val()};

                var json =JSON.stringify(name);

                $.ajax({

                    url:"/movies/getMovies",

                    type:"POST",

                    dataType:"json",

                    data:json,

                    contentType:"application/json;charset=UTF-8",

                    success:function(data){

                        alert(data);

                        $.each(function(i,n){

                        })

                    }

                })

            })

        })

    </script>

    输入电影名:<input type="text" id="name">

<div class="movies">

    <ul class="movieList">

    </ul>

</div>

</body>

</html>
ul div 是为了放置查询出来的电影,但是博主很懒,等过段时间在来补,其实elasticsearch还有一个主要功能就是智能分词
五.智能分词器配置
首先在https://github.com/medcl/elasticsearch-analysis-ik 下载好这个插件然后将这个插件放置到如下目录中:
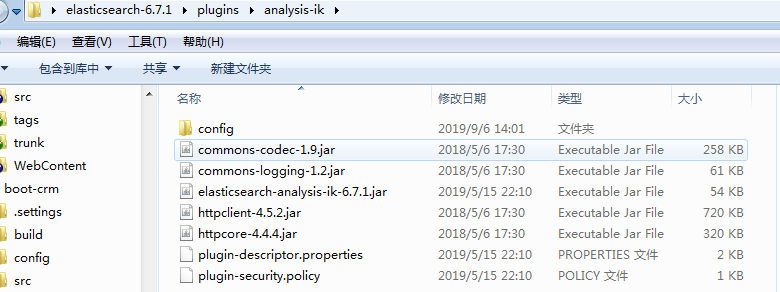
那个analysis-ik是我自己创建的目录,放置后从起elasticsearch

看到了图中的就说明你ik 分词器已经配置好了,接下来便是测试分词器了,在测试之前我们需要了解一下两个配置的意思
IK分词器有两种分词模式:ik_max_word和ik_smart模式。
1、ik_max_word
会将文本做最细粒度的拆分,比如会将“中华人民共和国人民大会堂”拆分为“中华人民共和国、中华人民、中华、华人、人民共和国、人民、共和国、大会堂、大会、会堂等词语。
2、ik_smart
会做最粗粒度的拆分,比如会将“中华人民共和国人民大会堂”拆分为中华人民共和国、人民大会堂。
下面是对ik分词器进行测试,我们可以直接用head 进行查询:
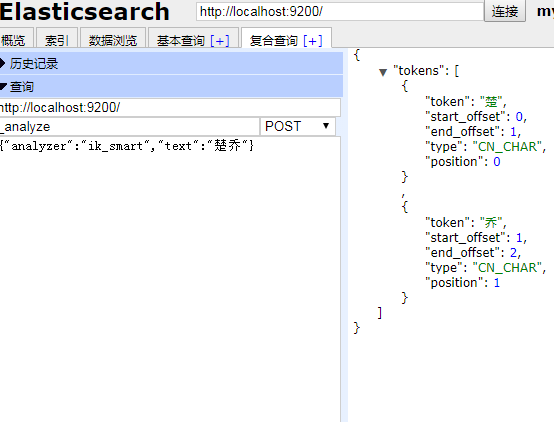
我们可以看到分词器可以对中文进行智能分词,然后对分完的词进行搜索,返回相应的结果集
最新文章
- java中使用MD5加密技术
- MongoDB使用小结:一些不常见的经验分享
- 如何在R语言中使用Logistic回归模型
- 我的c++学习(5)switch语句详解
- Hadoop question list
- apex-utility-ai-unity-survival-shooter
- VMware安装CentOS后网络设置
- 优化php性能的一点总结
- tab切换插件开发
- python中的赋值与深浅拷贝
- json字符串转json对象,json对象转换成java对象
- leetcode-判断回文数,非字符串算法(java实现)
- Fetch和ajax的比较和区别
- 线程的synchronized、volatile及原子操作
- ssh: connect to host xx.xx.xxx.xxx port 22: Connection refused
- AtCoder Regular Contest 066 F Contest with Drinks Hard
- jQuery获取子元素个数的方法
- js 四种调用模式和this的关系总结
- Ionic模版的使用
- javascript保存excel