ActiveMQ 发送和接收消息
2024-08-25 02:34:09
一、添加 jar 包
<dependency>

    <groupId>org.apache.activemq</groupId>

    <artifactId>activemq-all</artifactId>

    <version>5.11.2</version>

</dependency>
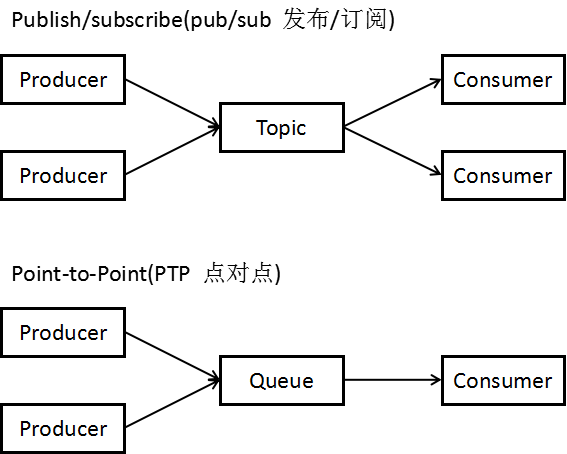
二、消息传递的两种形式
1、点对点:发送的消息只能被一个消费者接收,第一个消费者接收后,消息没了
2、发布/订阅:消息可以被多个消费者接收 。发完消息,如果没有消费者接收,这消息会自动消失。也就是说,消费者服务必须是启动的状态。( topic 消息在 ActiveMQ 服务端默认不是持久化的,可以通过配置文件配置持久化 )
三、点对点发送消息
/**

 * 点到点形式发送消息

 * @throws Exception

 */

@Test

public void testQueueProducer() throws Exception{

    //1、创建一个连接工厂,需要指定服务的 ip 和端口

    String brokerURL = "tcp://192.168.25.129:61616";

    ConnectionFactory connectionFactory = new ActiveMQConnectionFactory(brokerURL);

    //2、使用工厂对象创建一个 Connection 对象

    Connection connection = connectionFactory.createConnection();

    //3、开启连接,调用 Connection 对象的 start 方法

    connection.start();

    //4、创建一个 Session 对象。

        //第一个参数:是否开启事务(一般不开启,如果开启事务,第二个参数没意义);

        //第二个参数:应答模式。自动应答或者手动应答,一般是自动应答

    Session session = connection.createSession(false, Session.AUTO_ACKNOWLEDGE);

    //5、使用 Session 对象创建一个 Destination 对象。两种形式 queue、topic。

    Queue queue = session.createQueue("test-queue");

    //6、使用 Session 对象创建一个 Producer 对象

    MessageProducer producer = session.createProducer(queue);

    //7、创建一个 Message 对象,可以使用 TextMessage。下面两种方式都可以

    /*TextMessage textMessage = new ActiveMQTextMessage();

    textMessage.setText("hello ActiveMQ");*/

    TextMessage textMessage = session.createTextMessage("hello ActiveMQ");

    //8、发布消息

    producer.send(textMessage);

    //9、关闭资源

    producer.close();

    session.close();

    connection.close();

}
四、点对点接收消息
/**

 * 点对点接收消息

 * @throws Exception

 */

@Test

public void testQueueConsumer() throws Exception{

    //1、创建一个 ConnectionFactory 对象连接 MQ 服务器

    String brokerURL = "tcp://192.168.25.129:61616";

    ConnectionFactory connectionFactory = new ActiveMQConnectionFactory(brokerURL);

    //2、创建一个连接对象

    Connection connection = connectionFactory.createConnection();

    //3、开启连接

    connection.start();

    //4、使用 Connection 对象 创建一个 Session 对象

    Session session = connection.createSession(false, Session.AUTO_ACKNOWLEDGE);

    //5、创建一个 Destination 对象。queue 对象

    Queue queue = session.createQueue("test-queue");

    //6、使用 Session 对象创建一个消费者

    MessageConsumer consumer = session.createConsumer(queue);

    //7、接收消息

    consumer.setMessageListener(new MessageListener() {

        @Override

        public void onMessage(Message message) {

            //8、打印结果

            TextMessage textMessage = (TextMessage) message;

            try {

                String text = textMessage.getText();

                System.out.println(text);

            } catch (JMSException e) {

                // TODO Auto-generated catch block

                e.printStackTrace();

            }

        }

    });

    //9、等待接收消息。( 接收到消息后才网下面执行。关闭资源 )

    System.in.read();

    //10、关闭资源

    consumer.close();

    session.close();

    connection.close();

}
五、广播发送消息
/**

 * 广播发送消息

 * @throws Exception

 */

@Test

public void testTopicProducer() throws Exception{

    //1、创建一个连接工厂,需要指定服务的 ip 和端口

    String brokerURL = "tcp://192.168.25.129:61616";

    ConnectionFactory connectionFactory = new ActiveMQConnectionFactory(brokerURL);

    //2、使用工厂对象创建一个 Connection 对象

    Connection connection = connectionFactory.createConnection();

    //3、开启连接,调用 Connection 对象的 start 方法

    connection.start();

    //4、创建一个 Session 对象。

        //第一个参数:是否开启事务(一般不开启,如果开启事务,第二个参数没意义);

        //第二个参数:应答模式。自动应答或者手动应答,一般是自动应答

    Session session = connection.createSession(false, Session.AUTO_ACKNOWLEDGE);

    //5、使用 Session 对象创建一个 Destination 对象。两种形式 queue、topic。

    Topic topic = session.createTopic("test-topic");

    //6、使用 Session 对象创建一个 Producer 对象

    MessageProducer producer = session.createProducer(topic);

    //7、创建一个 Message 对象,可以使用 TextMessage。下面两种方式都可以

    /*TextMessage textMessage = new ActiveMQTextMessage();

    textMessage.setText("hello ActiveMQ");*/

    TextMessage textMessage = session.createTextMessage("hello ActiveMQ");

    //8、发布消息

    producer.send(textMessage);

    //9、关闭资源

    producer.close();

    session.close();

    connection.close();

}

六、广播接收消息
/**

 * 广播接收消息

 * @throws Exception

 */

@Test

public void testTopicConsumer() throws Exception{

    //1、创建一个 ConnectionFactory 对象连接 MQ 服务器

    String brokerURL = "tcp://192.168.25.129:61616";

    ConnectionFactory connectionFactory = new ActiveMQConnectionFactory(brokerURL);

    //2、创建一个连接对象

    Connection connection = connectionFactory.createConnection();

    //3、开启连接

    connection.start();

    //4、使用 Connection 对象 创建一个 Session 对象

    Session session = connection.createSession(false, Session.AUTO_ACKNOWLEDGE);

    //5、创建一个 Destination 对象。Topic 对象

    Topic topic = session.createTopic("test-topic");

    //6、使用 Session 对象创建一个消费者

    MessageConsumer consumer = session.createConsumer(topic);

    //7、接收消息

    consumer.setMessageListener(new MessageListener() {

        @Override

        public void onMessage(Message message) {

            //8、打印结果

            TextMessage textMessage = (TextMessage) message;

            try {

                String text = textMessage.getText();

                System.out.println(text);

            } catch (JMSException e) {

                // TODO Auto-generated catch block

                e.printStackTrace();

            }

        }

    });

    System.out.println("topic消费者");

    //9、等待接收消息。( 接收到消息后才网下面执行。关闭资源 )

    System.in.read();

    //10、关闭资源

    consumer.close();

    session.close();

    connection.close();

}
最新文章
- Android调用系统照相机
- 如何自学Android
- js实现各种常用排序算法
- hdu Flow Problem (最大流 裸题)
- C++中的const详解
- 基于zookeeper的远程方法调用(RMI)的实现
- BZOJ 1061: [Noi2008]志愿者招募 费用流
- Visual Studio Team Foundation Server 2015(TFS 秘钥、序列号)
- Javascript常见全局函数
- 安装、配置JDK的步骤
- linux内核--中断和中断处理(一)
- tk.mybatis.mapper.provider.SpecialProvider.<init>()
- 4月11日java多线程4
- Velocity ${} 和$!{}、!${}区别
- Git要点
- eclipse没有server选项
- C#中的特性(Attributes)
- C#学习-面向对象语言都有类
- Python3正则表达式(4)
- CoreData 数据库更新,数据迁移