UIButtonType各个类型的解释:
UIButtonType各个类型的解释:
typedef NS_ENUM(NSInteger, UIButtonType) {

    UIButtonTypeCustom = ,

    UIButtonTypeSystem,

    UIButtonTypeDetailDisclosure,

    UIButtonTypeInfoLight,

    UIButtonTypeInfoDark,

    UIButtonTypeContactAdd,

    UIButtonTypePlain,

    UIButtonTypeRoundedRect = UIButtonTypeSystem

};
UIButtonTypeCustom:
官方:No button style.
解释:自定义的按钮(无样式)UIButtonTypeSystem:
官方:A system style button, such as those shown in navigation bars and toolbars.
解释:系统样式UIButtonTypeDetailDisclosure:
官方:A detail disclosure button.
解释:细节详情样式UIButtonTypeInfoLight:
官方:An information button that has a light background.
解释:按钮图片为i字母(info)亮的信息类型UIButtonTypeInfoDark:
官方:An information button that has a dark background.
解释:按钮图片为i字母(info)暗的信息类型
注意: iOS7及之后,只有在设置showsTouchWhenHighlighted为YES的时候,DetailDisclosure的外观和InfoLight/InfoDark不同(测试的时候我并没有看出来什么不同,如果你看出来了,劳烦告诉我),其他情况下都相同
UIButtonTypeContactAdd:
官方:A contact add button.
解释:加号(➕)按钮类型UIButtonTypePlain:
官方:A standard system button without a blurred background view.
解释:没有模糊背景视图的标准的系统按钮 不过只支持 tvOSUIButtonTypeRoundedRect = UIButtonTypeSystem:
官方:A rounded-rectangle style button.
解释:方形的圆角形式的按钮,在iOS7后被废弃,现在需要使用border的方式来做到效果
注意:(UIButtonTypeRoundedRect已废弃, UIButtonTypeRoundedRect的枚举值为1 !
相关代码
#import "QiButton_ButtonTypeViewController.h" @interface QiButton_ButtonTypeViewController ()
@end @implementation QiButton_ButtonTypeViewController - (void)viewDidLoad {
[super viewDidLoad];
self.title = @"UIButtonType";
[self buttonType];
} #pragma mark - Private functions
- (void)buttonType {
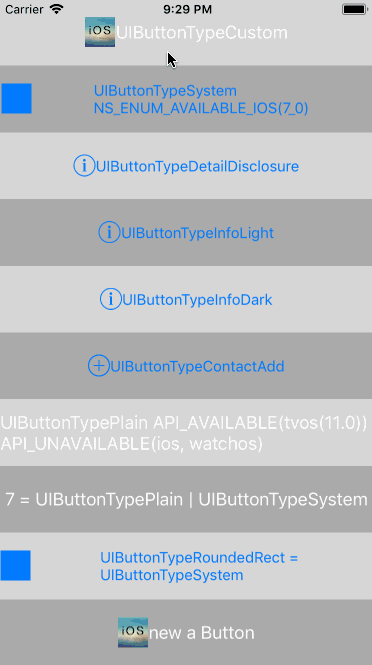
NSArray <NSString *>*buttonTypes = @[@"UIButtonTypeCustom",
@"UIButtonTypeSystem NS_ENUM_AVAILABLE_IOS(7_0)",
@"UIButtonTypeDetailDisclosure",
@"UIButtonTypeInfoLight",
@"UIButtonTypeInfoDark",
@"UIButtonTypeContactAdd",
@"UIButtonTypePlain API_AVAILABLE(tvos(11.0)) API_UNAVAILABLE(ios, watchos)",
@"7 = UIButtonTypePlain | UIButtonTypeSystem",
@"UIButtonTypeRoundedRect = UIButtonTypeSystem",
@"new a Button"];
CGFloat btnHeight = [UIScreen mainScreen].bounds.size.height / buttonTypes.count; for (NSInteger buttonTypeI = ; buttonTypeI < buttonTypes.count; buttonTypeI ++) {
UIButton *buttonTypeBtn = [UIButton buttonWithType:buttonTypeI];
// 设置最后的一个按钮 new的方式创建
if (buttonTypeI == buttonTypes.count - ) {
// 经测试 打印的btn.buttonType 为 UIButtonTypeCustom 观察button的显示样式也是如此
buttonTypeBtn = [UIButton new];
[buttonTypeBtn setImage:[UIImage imageNamed:@"smallQiShareLogo"] forState:UIControlStateNormal];
[buttonTypeBtn setImage:[UIImage imageNamed:@"smallQiShareLogo"] forState:UIControlStateHighlighted];
} else if(buttonTypeI == buttonTypes.count - ) {
/** 注意UIButtonTypeRoundedRect = UIButtonTypeSystem 真正的值为 1 而不是7
如果以 [UIButton buttonWithType:7] 方式创建UIButton
相当于 [UIButton buttonWithType:UIButtonTypePlain | UIButtonTypeSystem];
*/
buttonTypeBtn = [UIButton buttonWithType:UIButtonTypeRoundedRect];
[buttonTypeBtn setImage:[UIImage imageNamed:@"smallQiShareLogo"] forState:UIControlStateNormal];
[buttonTypeBtn setImage:[UIImage imageNamed:@"smallQiShareLogo"] forState:UIControlStateHighlighted];
} else if(buttonTypeI == UIButtonTypeCustom || buttonTypeI == UIButtonTypeSystem || buttonTypeI == UIButtonTypeRoundedRect) {
[buttonTypeBtn setImage:[UIImage imageNamed:@"smallQiShareLogo"] forState:UIControlStateNormal];
[buttonTypeBtn setImage:[UIImage imageNamed:@"smallQiShareLogo"] forState:UIControlStateHighlighted];
} else if(buttonTypeI == UIButtonTypeDetailDisclosure || buttonTypeI == UIButtonTypeInfoLight || buttonTypeI == UIButtonTypeInfoDark) {
buttonTypeBtn.showsTouchWhenHighlighted = YES;
}
[self.view addSubview:buttonTypeBtn];
buttonTypeBtn.frame = CGRectMake(., buttonTypeI * btnHeight, CGRectGetWidth(self.view.frame), btnHeight);
buttonTypeBtn.backgroundColor = (buttonTypeI % ? [UIColor lightGrayColor] : [UIColor colorWithWhite:0.8 alpha:0.8]);
[buttonTypeBtn setTitle:buttonTypes[buttonTypeI] forState:UIControlStateNormal];
buttonTypeBtn.titleLabel.numberOfLines = ; [buttonTypeBtn addTarget:self action:@selector(buttonTypeButtonClicked:) forControlEvents:UIControlEventTouchUpInside];
}
} #pragma mark - Action functions - (void)buttonTypeButtonClicked:(UIButton *)sender {
sender.selected = !sender.selected;
} @end
最新文章
- ElasticSearch第二步-CRUD之Sense
- node10-mongoose
- Nodejs在centos下的安装
- Javascript中substr和substring的区别
- 安卓、java开发软件官网和相关不错的网站软件下载地址
- 【智能家居篇】wifi在智能家居中的应用
- (转)最小二乘法拟合圆公式推导及vc实现[r]
- Android自定义带标题边框的Layout
- 施用 maven shade plugin 解决 jar 或类的多版本冲突
- composer 安装和修改中国镜像
- 【Windows 10 应用开发】如何防止应用程序被截屏
- python cookbook第三版学习笔记 一
- CPU和GPU的差别
- oracle-获取数据库中所有表的注释 comments
- 【读书笔记】【深入理解ES6】#13-用模块封装代码
- 【learning】一般图最大匹配——带花树
- 纽约工作日志流水账 Day 2
- 组件_ UIToolbar
- springboot 整合 redis
- $Django importlib与dir知识,手写配置文件, 配置查找顺序 drf分页器&drf版本控制