使用Typescript重构axios(二十三)——添加withCredentials属性
0. 系列文章
1.使用Typescript重构axios(一)——写在最前面
2.使用Typescript重构axios(二)——项目起手,跑通流程
3.使用Typescript重构axios(三)——实现基础功能:处理get请求url参数
4.使用Typescript重构axios(四)——实现基础功能:处理post请求参数
5.使用Typescript重构axios(五)——实现基础功能:处理请求的header
6.使用Typescript重构axios(六)——实现基础功能:获取响应数据
7.使用Typescript重构axios(七)——实现基础功能:处理响应header
8.使用Typescript重构axios(八)——实现基础功能:处理响应data
9.使用Typescript重构axios(九)——异常处理:基础版
10.使用Typescript重构axios(十)——异常处理:增强版
11.使用Typescript重构axios(十一)——接口扩展
12.使用Typescript重构axios(十二)——增加参数
13.使用Typescript重构axios(十三)——让响应数据支持泛型
14.使用Typescript重构axios(十四)——实现拦截器
15.使用Typescript重构axios(十五)——默认配置
16.使用Typescript重构axios(十六)——请求和响应数据配置化
17.使用Typescript重构axios(十七)——增加axios.create
18.使用Typescript重构axios(十八)——请求取消功能:总体思路
19.使用Typescript重构axios(十九)——请求取消功能:实现第二种使用方式
20.使用Typescript重构axios(二十)——请求取消功能:实现第一种使用方式
21.使用Typescript重构axios(二十一)——请求取消功能:添加axios.isCancel接口
22.使用Typescript重构axios(二十二)——请求取消功能:收尾
23.使用Typescript重构axios(二十三)——添加withCredentials属性
24.使用Typescript重构axios(二十四)——防御XSRF攻击
25.使用Typescript重构axios(二十五)——文件上传下载进度监控
26.使用Typescript重构axios(二十六)——添加HTTP授权auth属性
27.使用Typescript重构axios(二十七)——添加请求状态码合法性校验
28.使用Typescript重构axios(二十八)——自定义序列化请求参数
29.使用Typescript重构axios(二十九)——添加baseURL
30.使用Typescript重构axios(三十)——添加axios.getUri方法
31.使用Typescript重构axios(三十一)——添加axios.all和axios.spread方法
32.使用Typescript重构axios(三十二)——写在最后面(总结)
1. 前言
在实际项目开发中,前端代码和后端代码往往是跑在两个不同的端口上,前端的请求要访问后端的api,就成了跨端口请求,也就是跨域请求。而浏览器为了安全起见,会根据同源策略禁止这种跨域请求。在同域的情况下,我们发送请求会默认携带当前域下的 cookie,但是在跨域的情况下,由于浏览器的限制,默认是不会携带请求域下的 cookie ,而我们通常请求中是需要携带cookie的,这就需要在XMLHttpRequest对象上配置withCredentials属性,将其设置为true即可,官方的axios在请求配置对象中为我们提供了设置这一属性的选项,接下来,我们也要在我们的axios中提供这一选项。
添加这一选项非常简单,我们只需在请求配置对象config中加上该属性,然后在发送请求时判断是否配置了该属性,如果配置了我们就在XMLHttpRequest对象上将该属性进行配置即可。
OK,接下来,我们就来实现它。
2. 修改 AxiosRequestConfig
给请求配置对象config中添加withCredentials属性之前,我们需要先在src/types/index.ts中的配置对象的接口类型定义AxiosRequestConfig上添加该属性的定义,如下:
export interface AxiosRequestConfig {

  // 新增

  withCredentials?: boolean;

}
3. 添加请求判断逻辑
接口定义好之后,我们只需在发送请求之前,判断用户是否配置了该属性,如果配置了,就把配置的属性值添加到XMLHttpRequest对象上即可,我们修改src/core.xhr.ts中的xhr函数,如下:
const { /*...*/ withCredentials } = config

if (withCredentials) {

  request.withCredentials = true

}
OK,这样withCredentials属性配置选项就添加好了,接下来,我们就编写demo来看看效果。
4. demo编写
在 examples 目录下创建 addWithCredentials目录,在 addWithCredentials目录下创建 index.html:
<!DOCTYPE html>

<html lang="en">

  <head>

    <meta charset="utf-8" />

    <title>addWithCredentials demo</title>

  </head>

  <body>

    <script src="/__build__/addWithCredentials.js"></script>

  </body>

</html>
接着再创建 app.ts 作为入口文件:
import axios from "../../src/axios";

axios.post("http://192.168.1.2:3000/api/addWithCredentials", {}).then(res => {

    console.log(res);

  });

axios.post("http://192.168.1.2:3000/api/addWithCredentials", {}, {

      withCredentials: true

    }).then(res => {

    console.log(res);

  });
在本demo中,我们发送两个请求,一个请求配置了withCredentials属性,一个没有。理想情况下,没有配置withCredentials属性的请求就携带不了cookie,自然也就接收不到服务端返回的cookie内容;而配置了withCredentials属性的请求可以携带cookie,那么它就可以收到服务端返回的cookie内容。后面我们可以通过结果来验证现在的猜测。
接着在 server/server.js 添加新的接口路由:
// 添加withCredentials

const cookieParser = require("cookie-parser");

app.use(cookieParser());

const cors = {

  "Access-Control-Allow-Origin": "http://192.168.1.2:8000",

  "Access-Control-Allow-Credentials": true,

  "Access-Control-Allow-Methods": "POST, GET, PUT, DELETE, OPTIONS",

  "Access-Control-Allow-Headers": "Content-Type"

};

router.post("/api/addWithCredentials", function(req, res) {

  res.set(cors);

  res.json(req.cookies);

});

router.options("/api/addWithCredentials", function(req, res) {

  res.set(cors);

  res.end();

});
此处切记一定要配置两个路由接口,除了post还有加一个options,这是因为cors跨域对于非简单请求浏览器会先发送一个options类型的请求来预检请求,具体原因请看这里!
这里需要安装一下 cookie-parser 插件,用于请求发送的 cookie。
另外,为了形式跨域请求,我们还需要把webpack.config.js文件中配置的webpack跨域代理配置注释掉,如下:
devServer: {

    noInfo: true,

    overlay: true,

    open: true

    // proxy: { // 配置跨域

    //   '/api/': {

    //     target: 'http://192.168.1.2:3000',

    //     ws: true,

    //     changOrigin: true

    //   },

    // }

  }
最后在根目录下的index.html中加上启动该demo的入口:
<li><a href="examples/addWithCredentials">addWithCredentials</a></li>
OK,我们在命令行中执行:
# 同时开启客户端和服务端

npm run server | npm start
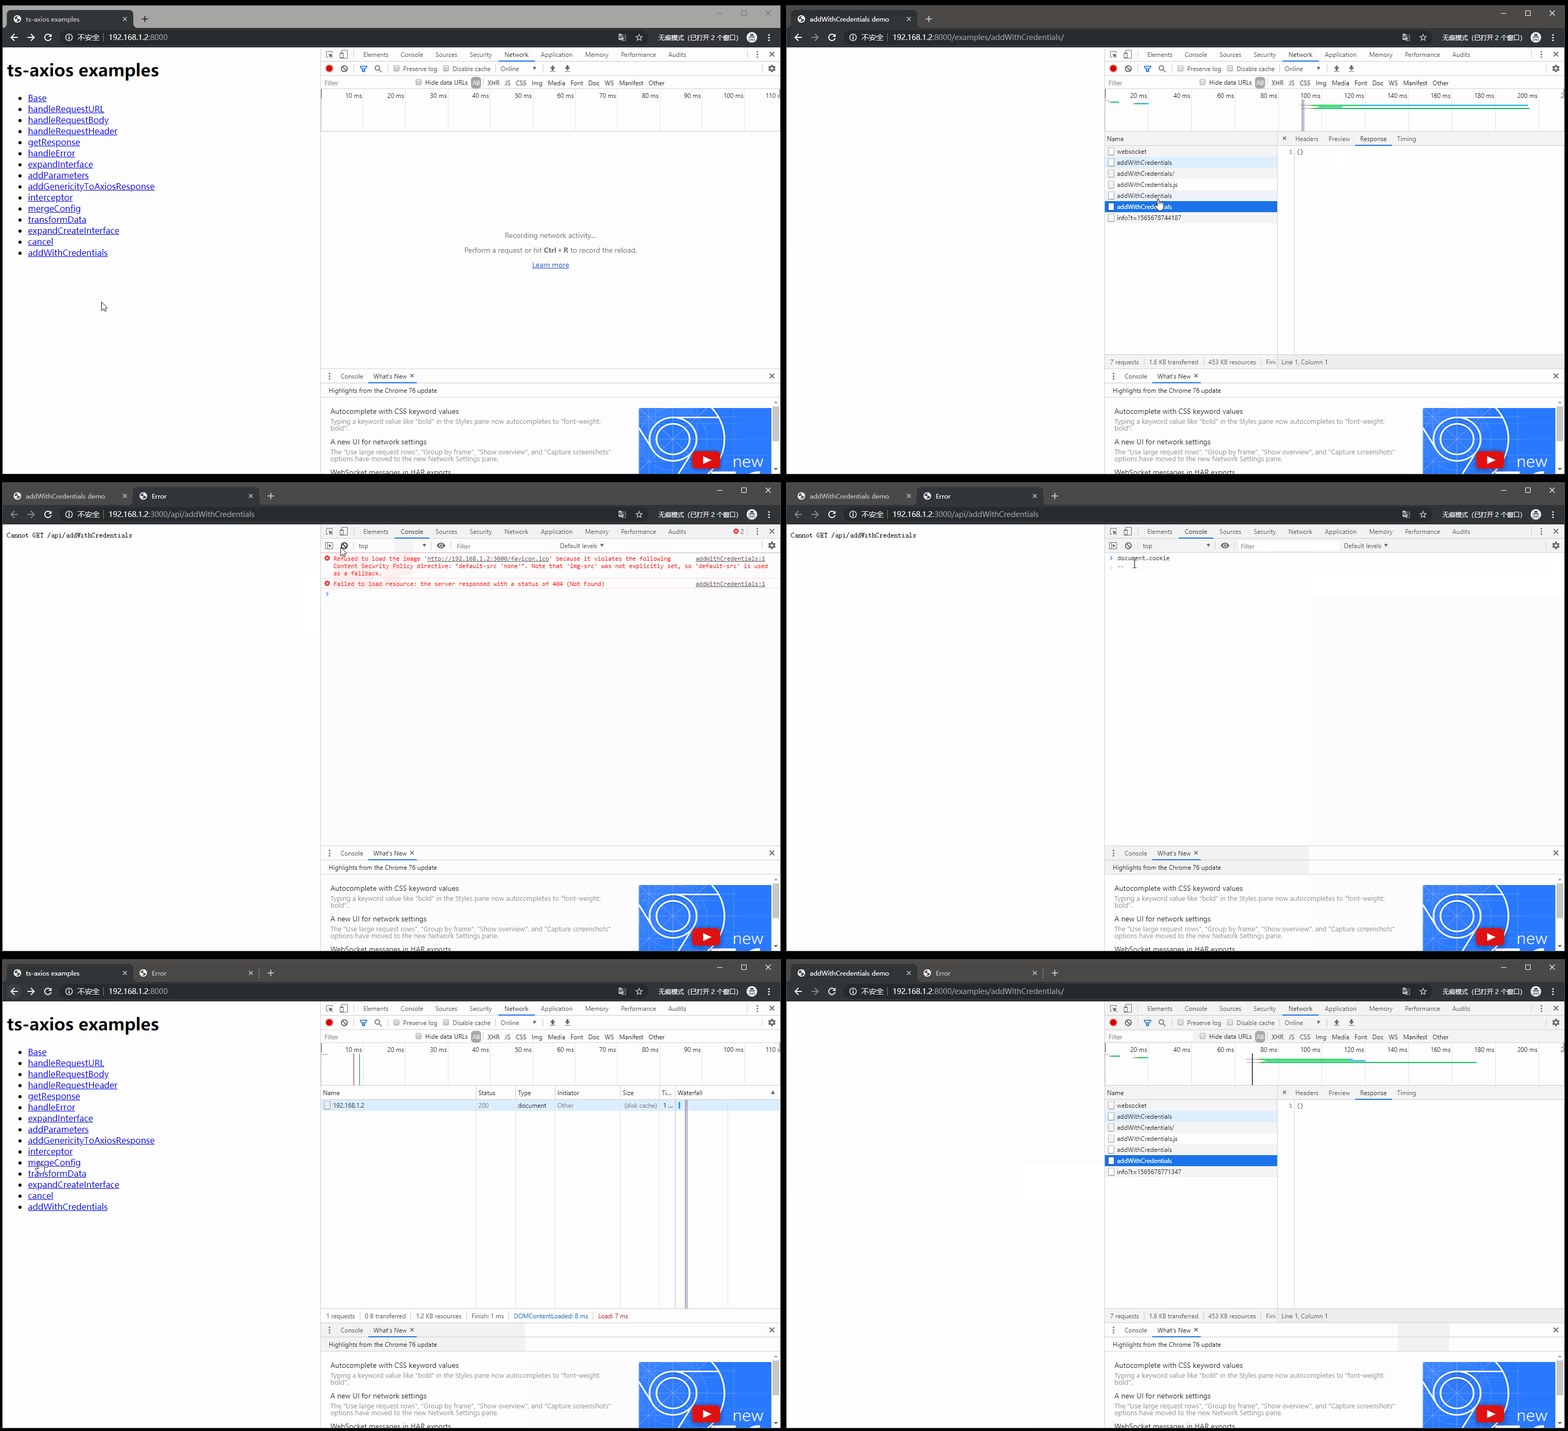
接着我们打开 chrome 浏览器,访问 http://localhost:8000/ 即可访问我们的 demo 了,我们点击 addWithCredentials,通过F12的 network 部分我们可以看到:两条请求已经正常发出了,但是两个请求返回的data都为空,这是因为我们还没有写cookie内容呢,按照下图中的方式写入cookie后,在刷新页面发送请求,我们就可以看到没有配置withCredentials属性的请求返回的data仍旧为空{},而配置了withCredentials属性的请求返回的data已经有携带的cookie内容了。

OK,添加withCredentials属性的功能我们就已经实现了。
(完)
最新文章
- spider_getModelInformation
- Android布局大全
- ARMv7 ldr/str指令详解
- Lucene 索引功能
- bzoj 3196 Tyvj 1730 二逼平衡树(线段树套名次树)
- Flex开发小结(1)如何使用AdvancedDataGrid
- g++ error: expected ‘)’ before ‘*’ token
- 微信小程序开发06-一个业务页面的完成
- C语言作业06--结构体&文件
- @deprecated 的方法处理
- iPhone屏幕尺寸说明及iPhone在微信上的一些表现
- android网页打印,安卓网页打印,h5页面打印,浏览器打印,js打印工具
- Linux查找指令(阮一峰)
- 分析org.rpgpoet.Music.wizards.length
- SpringMVC中的Model和ModelAndView的区别
- 【Enterprise Architect 】
- [LeetCode系列] 变序词查找问题(Anagrams)
- 微信 msg_sec_check接口PHP 调用
- Spring是什么+控制反转和依赖注入
- Python之查询美国护照状态