MongoDB 不在开源了,使用 Homebrew 安装只能玩社区版了
使用了大半年的 mongodb ,最近在公司的新项目中应用,在 mac 上安装 mongodb 时发现始终安装不了,一直在报下面这样的错误:
brew install mongodb
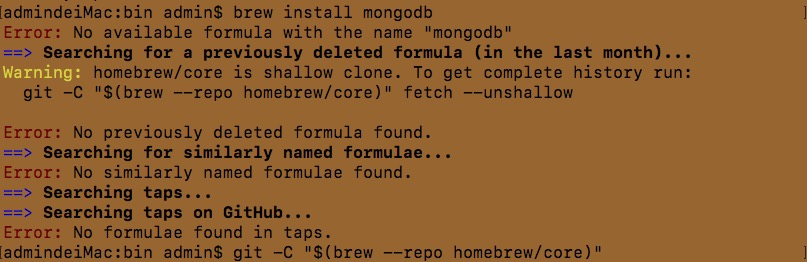
升级 brew 也不行,这个 mac 机上从未安装过 mongodb,但从错误信息中提示却是要卸载它,真是醉了。
从2019年9月2日开始 ,HomeBrew 也从核心仓库 (#43770) 当中移除了mongodb 模块
不过,幸运的是 mongodb 团队还在维护社区版的 Homebrew,最后还是从Stack Overflow 上查找到答案:
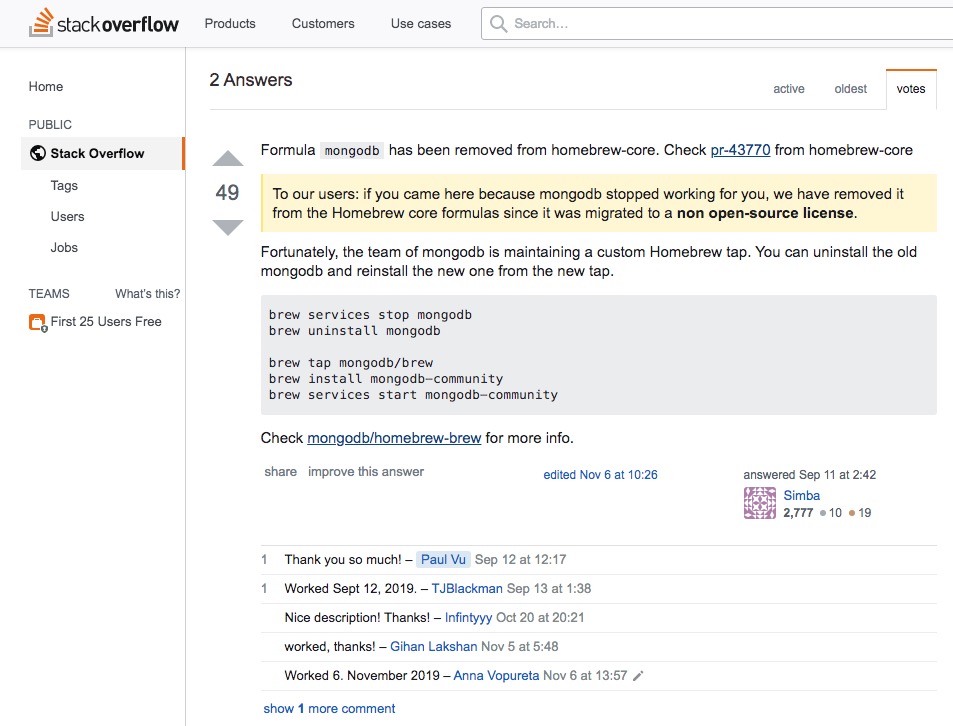
为了搞清楚这些是啥意思,查看了 homebrew-brew gitHub。
- 在安装社区版前要先执行:brew tap mongodb/brew 这个过程有点久,我装过可能需要30分钟左右。
- 安装最新社区版:brew reinstall mongodb-community
- 启动 mongodb-community 服务:
brew services start mongodb-community ,提示 “Service `mongodb-community` already started”,说明服务启动成功
mongodb-community 命令区别 mongodb
- 启动服务:brew services start mongodb-community
- 重启服务: brew services restart mongodb-community
- 停止服务:brew services stop mongodb-community
- 安装某个版本:brew install mongodb-community@x.x.x
- 手动启动服务:mongod --config /usr/local/etc/mongod.conf
文件路径:
-
配置文件:/usr/local/etc/mongod.conf 日志目录路径:/usr/local/var/log/mongodb数据目录路径:/usr/local/var/mongodb
这样 MongoDB 服务就安装和启动好了。
将 MongoDB 下载到本地,mongodb-osx-ssl-x86_64-4.0.13.tgz 我下载的是这个版本,解压后,新建目录,将解压后的文件存放在里面。
我的目录为:/Volumes/code/localhost/node/mongodb/bin
- 创建存储数据库文件
data
在任意盘符根目录下创建一个 data 目录,用来存放数据库文件。 mongoDB 会自动把自己安装位置的盘符根目录下的 data 文件夹作为自己的数据存储目录,这里也可以直接在安装位置所在盘符创建,我是在 bin 目录下创建的 data 目录。
新开一个 shell,指定 db 路径:
进入 /Volumes/code/localhost/node/mongodb/bin 目录 ,输入 mongod,会看到 :
MongoDB starting : pid=942 port=27017 dbpath=/data/db 64-bit
db version v4.2.1
git version: edf6d45851c0b9ee15548f0f847df141764a317e
。。。
说明 db 启动成功了!!
如果 data 目录在其它位置,需要指定 data 目录路径,输入 mongod --dbpath 路径
- 连接数据库 npm run start
在 server.js 中,进行配置:
const mongoose = require('mongoose');

const mongoClient = require('mongodb').MongoClient;

// db

const dburl = "mongodb://127.0.0.1:27017/local";

mongoClient.connect(dburl, (err, db) => {

    if (err) {

        console.log('数据库连接失败!');

        return;

    };

    console.log(db);

});
在 package.json 中,进行配置:
"scripts": {

        "server": "node server.js",

        "start": "nodemon server.js"

},
const dburl = "mongodb://127.0.0.1:27017/local";
默认情况下,db 启动成功后,本地会有三个表 admin / config / local
> show dbs

admin   0.000GB

config  0.000GB

local   0.000GB

>
- 查看 db 配置信息 npm run start ,成功的启动 服务并连接 db
> web@1.0.0 start /Volumes/code/localhost/node/web

> nodemon server.js

[nodemon] 1.19.4

[nodemon] to restart at any time, enter `rs`

[nodemon] watching dir(s): *.*

[nodemon] watching extensions: js,mjs,json

[nodemon] starting `node server.js`

(node:1009) DeprecationWarning: current Server Discovery and Monitoring engine is deprecated, and will be removed in a future version. To use the new Server Discover and Monitoring engine, pass option { useUnifiedTopology: true } to the MongoClient constructor.

Successful! 访问地址为 http://127.0.0.1:3000

MongoClient {

  _events: [Object: null prototype] {},

  _eventsCount: 0,

  _maxListeners: undefined,

  s: {

    url: 'mongodb://127.0.0.1:27017/local',

    options: {

      servers: [Array],

      caseTranslate: true,

      dbName: 'local',

      socketTimeoutMS: 360000,

      connectTimeoutMS: 30000,

      retryWrites: true,

      useRecoveryToken: true,

      readPreference: [ReadPreference],

      promiseLibrary: [Function: Promise]

    },

    promiseLibrary: [Function: Promise],

    dbCache: Map {},

    sessions: Set {},

    writeConcern: undefined,

    namespace: MongoDBNamespace { db: 'admin', collection: undefined }

  },

  topology: Server {

    _events: [Object: null prototype] {

      serverOpening: [Function],

      serverDescriptionChanged: [Function],

      serverHeartbeatStarted: [Function],

      serverHeartbeatSucceeded: [Function],

      serverHeartbeatFailed: [Function],

      serverClosed: [Function],

      topologyOpening: [Function],

      topologyClosed: [Function],

      topologyDescriptionChanged: [Function],

      commandStarted: [Function],

      commandSucceeded: [Function],

      commandFailed: [Function],

      joined: [Function],

      left: [Function],

      ping: [Function],

      ha: [Function],

      authenticated: [Function],

      error: [Function],

      timeout: [Function],

      close: [Function],

      parseError: [Function],

      open: [Function],

      fullsetup: [Function],

      all: [Function],

      reconnect: [Function]

    },

    _eventsCount: 25,

    _maxListeners: Infinity,

    clientInfo: {

      driver: [Object],

      os: [Object],

      platform: 'Node.js v12.11.1, LE'

    },

    s: {

      coreTopology: [Server],

      sCapabilities: null,

      clonedOptions: [Object],

      reconnect: true,

      emitError: true,

      poolSize: 5,

      storeOptions: [Object],

      store: [Store],

      host: '127.0.0.1',

      port: 27017,

      options: [Object],

      sessionPool: [ServerSessionPool],

      sessions: Set {},

      promiseLibrary: [Function: Promise]

    }

  }

}
最新文章
- 【控制iOS7兼容iOS6 状态栏的显示不完全 简单缩写】
- AutoHotkey(AHK)
- OA项目笔记-从建立接口 dao impl action jsp等框架实现crud
- SQL Server服务器名称与默认实例名不一致的修复方法
- java笔记--异常详解与处理
- [译]SQL Server 之 查询优化器
- 织梦dedecms模板调用标签大全-提高制作模板速度
- SQL SERVER 强制排序规则查询
- 双网卡bond
- Fedora 下 安装 chrome
- 查看使用的Eclipse版本
- BZOJ2818: Gcd 莫比乌斯反演
- Alamofire 4.0 迁移指南
- X509证书认证流程介绍
- Semaphore 源码分析
- Angular5 路由传参的3种方法
- 基于for循环的呼吸灯
- hibernate框架的简单入门
- 2802:小游戏利用bfs来实现
- jenkins自动发布java代码