【Django】一对多表结构
2024-09-01 07:41:48
1.创建project数据库表
INSTALLED_APPS = [

    'django.contrib.admin',

    'django.contrib.auth',

    'django.contrib.contenttypes',

    'django.contrib.sessions',

    'django.contrib.messages',

    'django.contrib.staticfiles',

    'app01',       #新增app

]
配置settings.py
from django.db import models

# Create your models here.

class Business(models.Model):

    # id    系统默认id列,自增,主键

    caption = models.CharField(max_length=32)  # 32表示字符长度

class Host(models.Model):

    nid = models.AutoField(primary_key=True)

    hostname = models.CharField(max_length=64,db_index=True)

    ip = models.GenericIPAddressField(protocol='ipv4',db_index=True)

    port = models.IntegerField()

    b = models.ForeignKey(to='Business',to_field='id')
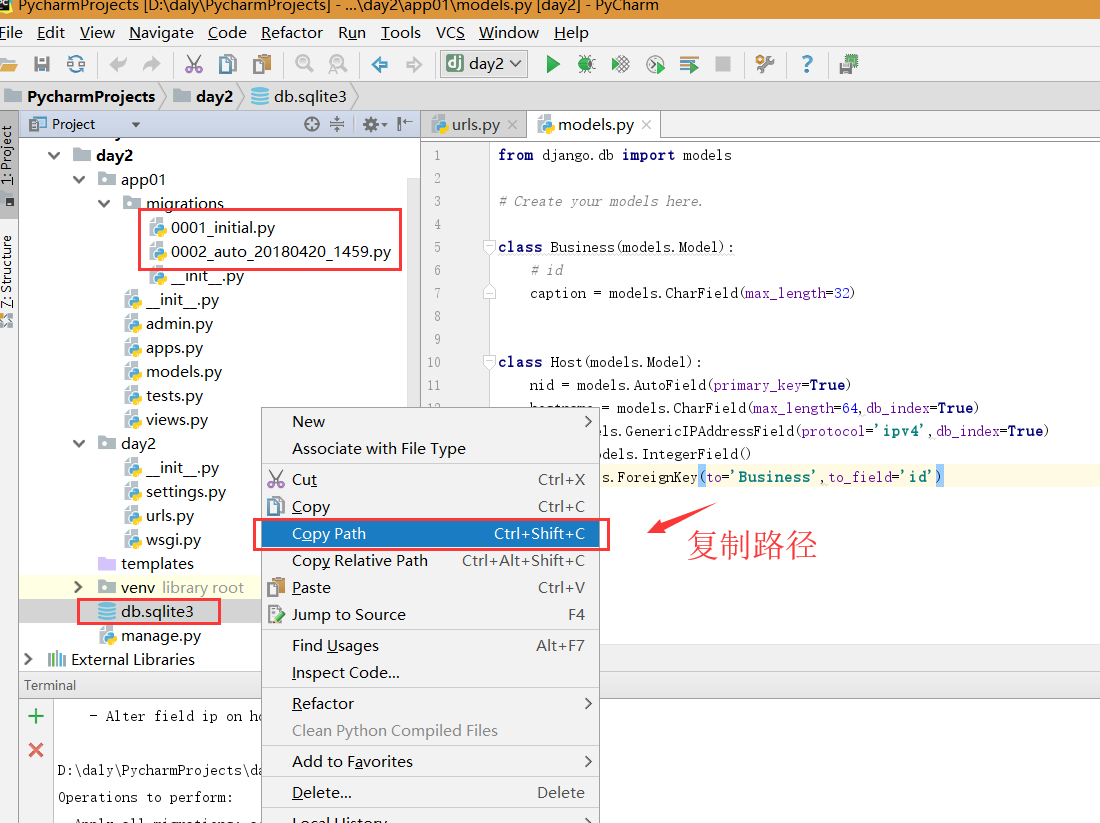
app01/models.py 创建两个简单的数据库表,通过ForeignKey外键关联
运行:

python manage.py makemigrations

python manage.py migrate
Ok后,使用Navicat Premium软件方可查看!
2.操作数据库表
运行Navicat
点击连接,使用SQLite抓取数据
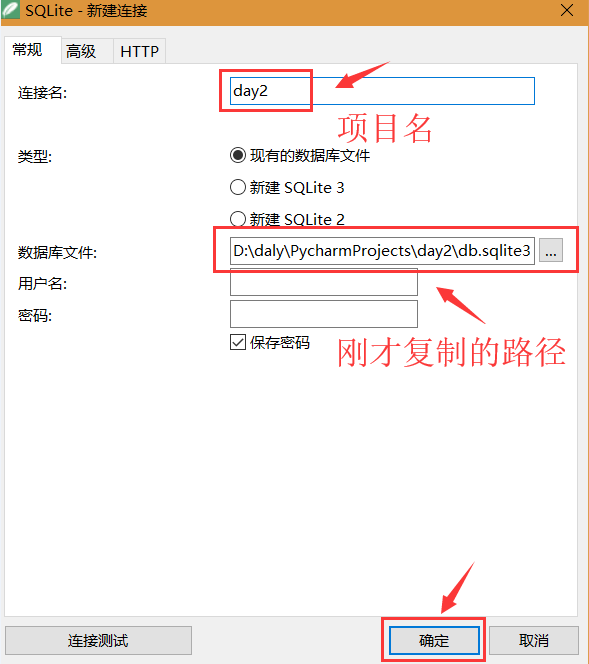
点击确认
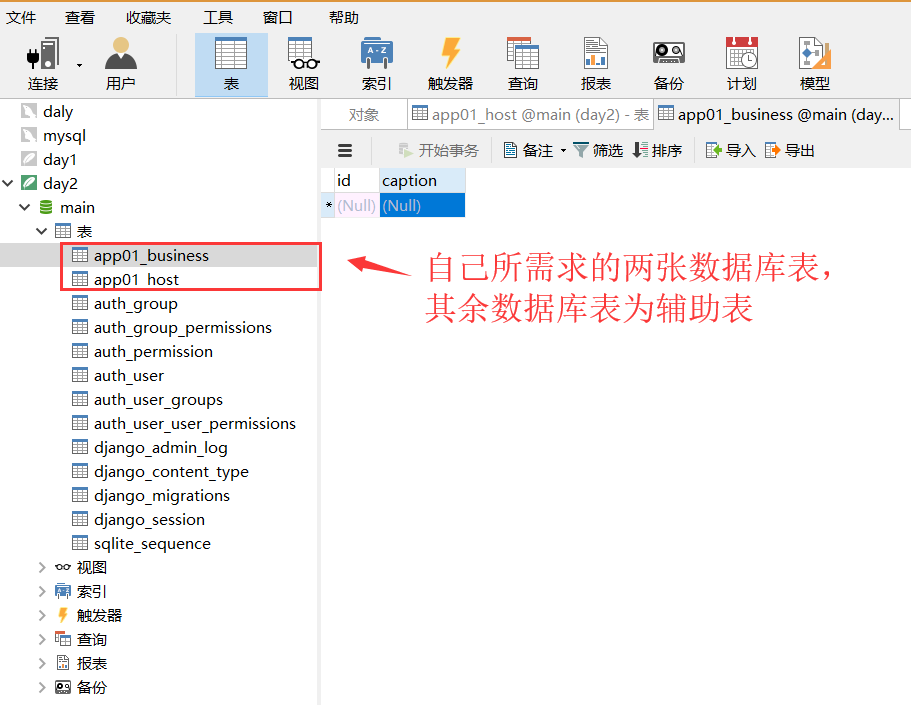
获取单表单数据的三种方式
from django.contrib import admin

from django.conf.urls import url

from app01 import views

urlpatterns = [

    url(r'^admin/', admin.site.urls),

    url(r'^business/', views.business),

]
project/urls
from django.shortcuts import render,HttpResponse,redirect

from app01 import models

# Create your views here.

def business(requset):

    v1 = models.Business.objects.all()

    #QuerySet

    #[obj(id,caption,code),obj(id,caption,code),obj(id,caption,code)]

    v2 = models.Business.objects.all().values('id','caption')

    # QuerySet

    # [{'id':1,'caption':'苹果'},{'id':2,'caption':''香蕉},{'id':3,'caption':'菠萝'},{'id':4,'caption':'梨子'}]

    v3 = models.Business.objects.all().values_list('id','caption')

    # QuerySet

    # [(0,苹果),(2,香蕉)]

    return render(requset,'business.html',{'v1':v1,'v2':v2,'v3':v3})
app01/views.py
from django.db import models

# Create your models here.

class Business(models.Model):

    # id

    caption = models.CharField(max_length=32)

    code = models.CharField(max_length=32,null=True,default='apple')
app01/models.py
<!DOCTYPE html>

<html lang="en">

<head>

    <meta charset="UTF-8">

    <title>Title</title>

</head>

<body>

    <h1>业务线列表(列表)</h1>

    <ul>

        {% for row in v1 %}

            <li>{{ row.id }}-{{ row.caption }}-{{ row.code }}</li>

        {% endfor %}

    </ul>

    <h1>业务线列表(字典)</h1>

    <ul>

        {% for row in v2 %}

            <li>{{ row.id }}-{{ row.caption }}</li>

        {% endfor %}

    </ul>

    <h1>业务线列表(元组)</h1>

    <ul>

        {% for row in v3 %}

            <li>{{ row.0 }}-{{ row.1 }}</li>

        {% endfor %}

    </ul>

</body>

</html>
templates/business.html
效果图

一对多跨表操作(第一种)
from django.contrib import admin

from django.conf.urls import url

from app01 import views

# from django.urls import path

urlpatterns = [

    url(r'^admin/', admin.site.urls),

    url(r'^business/', views.business),

    url(r'^host/', views.host),  #在business基础上

]
project/urls.py
from django.db import models

# Create your models here.

class Business(models.Model):

    # id

    caption = models.CharField(max_length=32)

    code = models.CharField(max_length=32,null=True,default='apple')

class Host(models.Model):

    nid = models.AutoField(primary_key=True)

    hostname = models.CharField(max_length=64,db_index=True)

    ip = models.GenericIPAddressField(protocol='ipv4',db_index=True)

    port = models.IntegerField()

    b = models.ForeignKey(to='Business',to_field='id')
app01/models.py
from django.shortcuts import render,HttpResponse,redirect

from app01 import models

# Create your views here.

def host(request):

    v1 = models.Host.objects.filter(nid__gt=0)

    #for row in v1:

        #print(row.nid,row.hostname,row.ip,row.port,row.b_id,row.b.id,row.b.caption,row.b.code,sep='\t')

    # return HttpResponse('戴利祥')

    return render(request,'host.html',{'v1': v1})
app01/views.py
<!DOCTYPE html>

<html lang="en">

<head>

    <meta charset="UTF-8">

    <title>Title</title>

</head>

<body>

    <h1>业务线列表(列表)</h1>

    <table border="">

        <thead>

            <tr>

                <th>主机名字</th>

                <th>IP</th>

                <th>端口</th>

                <th>业务线名称</th>

                <th>业务线编码</th>

            </tr>

        </thead>

        <tbody>

            {% for row in v1 %}

                 <tr aa="{{ row.nid }}" ab="{{ row.b.id }}">

                     <td>{{ row.hostname }}</td>

                     <td>{{ row.ip }}</td>

                     <td>{{ row.port }}</td>

                     <td>{{ row.b.caption }}</td>

                     <td>{{ row.b.code }}</td>

                 </tr>

            {% endfor %}

        </tbody>

    </table>

</body>

</html>
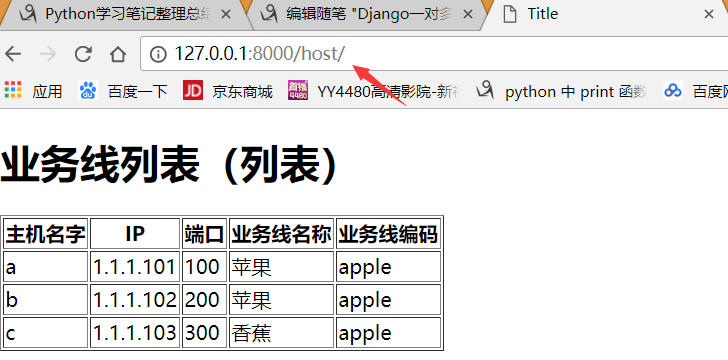
templates/host.html
效果图:
一对多跨表操作(第二种,第三种):
def host(request):

    v1 = models.Host.objects.filter(nid__gt=0)

    for row in v1:

        print(row.nid,row.hostname,row.ip,row.port,row.b_id,row.b.id,row.b.caption,row.b.code,sep='\t')

    v2 = models.Host.objects.filter(nid__gt=0).values('nid','hostname','b_id','b__caption') #获取到的值为字典

    # print(v2)

    for row in v2:

        print(row['nid'],row['hostname'],row['b_id'],row['b__caption'])

    v3 = models.Host.objects.filter(nid__gt=0).values_list('nid','hostname','b_id','b__caption') #获取到的值为元组

    # #print(v3)

    for row in v3:

         print(row)

    # return HttpResponse('你好')

    return render(request,'host.html',{'v1': v1, 'v2':v2 ,'v3':v3})
app01/views.py
print输出结果:
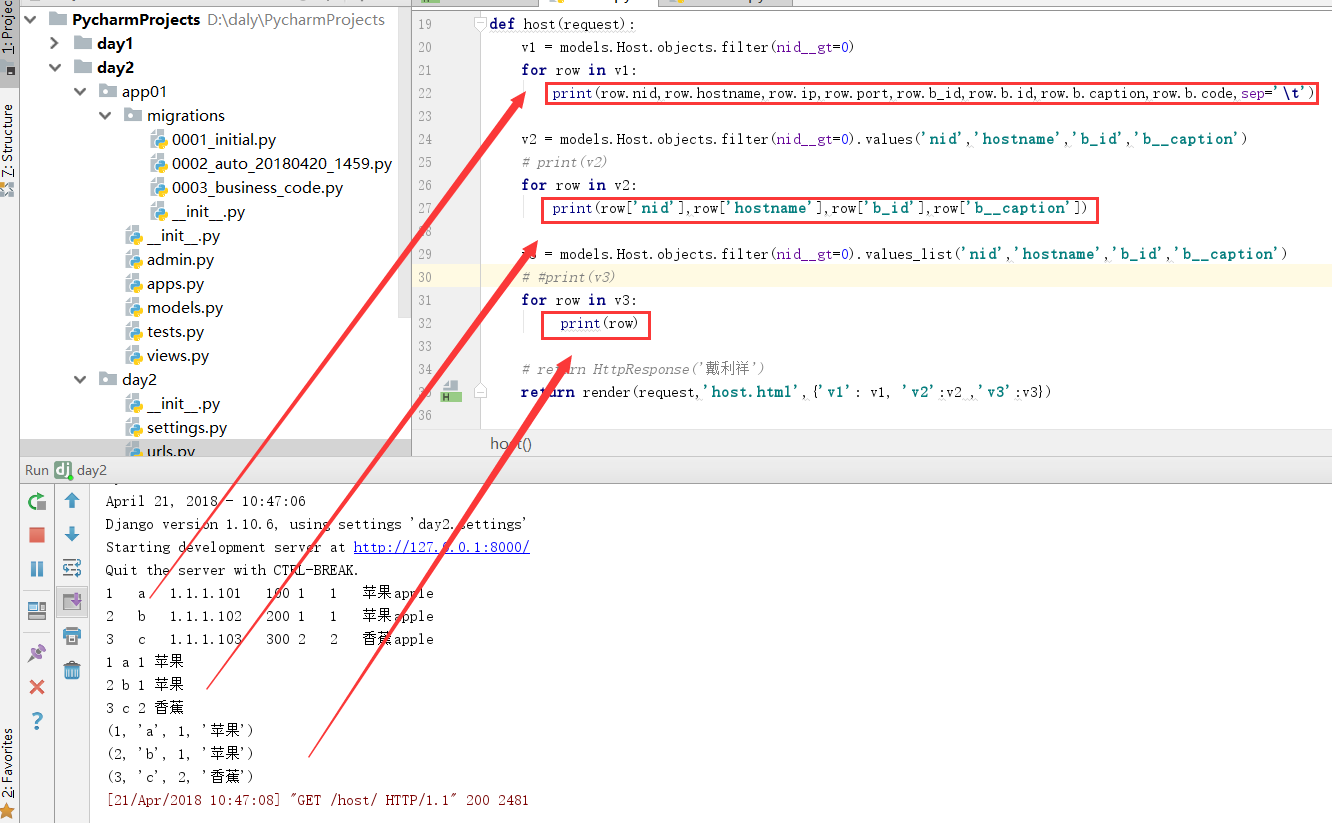
刷新:http://127.0.0.1:8000/host/

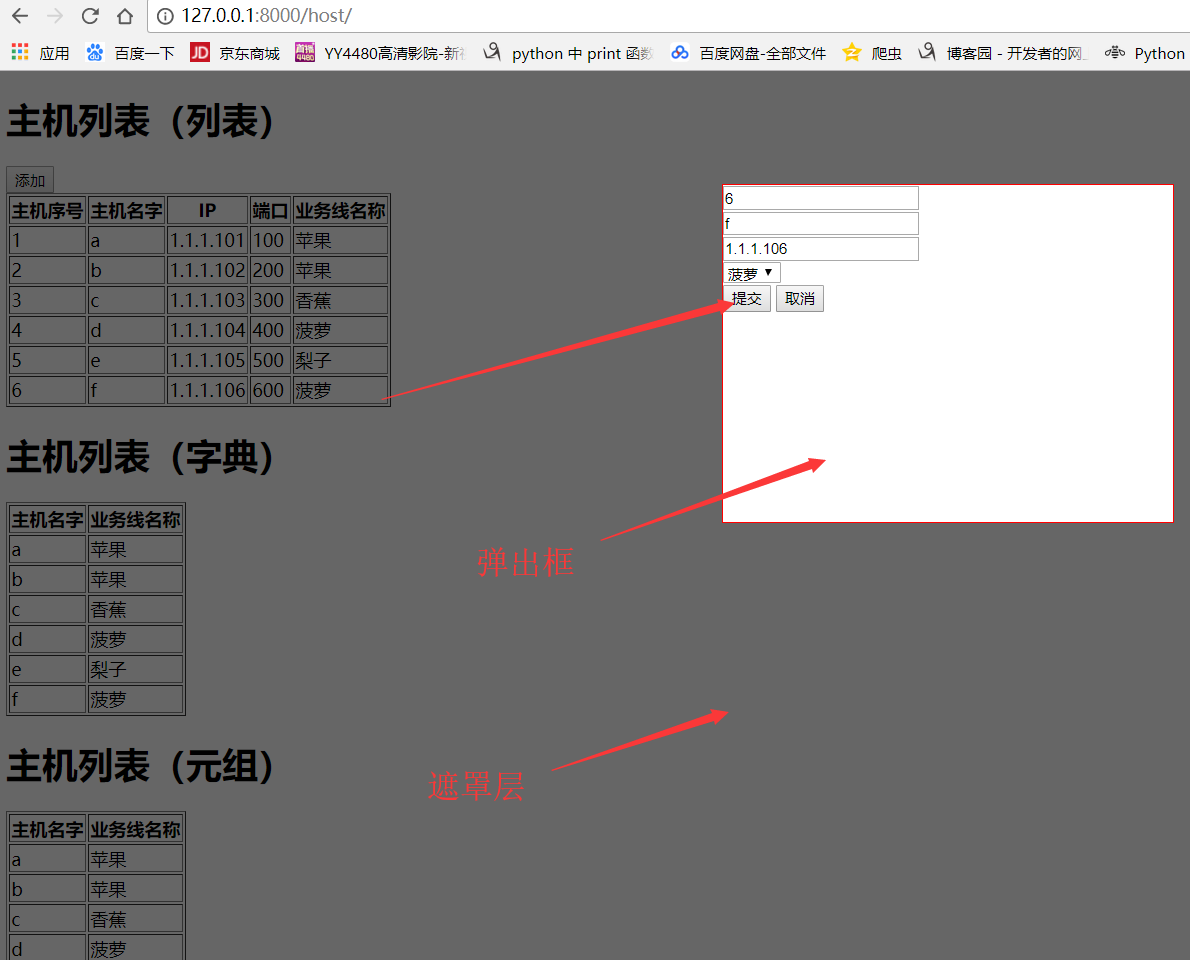
模拟对话框增加一对多数据示例
from django.shortcuts import render,HttpResponse,redirect

from app01 import models

# Create your views here.

def business(requset):

    v1 = models.Business.objects.all()

    #QuerySet

    #[obj(id,caption,code),obj(id,caption,code),obj(id,caption,code)]

    v2 = models.Business.objects.all().values('id','caption')

    # QuerySet

    # [{'id':1,'caption':'苹果'},{'id':2,'caption':''香蕉},{'id':3,'caption':'菠萝'},{'id':4,'caption':'梨子'}]

    v3 = models.Business.objects.all().values_list('id','caption')

    # QuerySet

    # [(0,苹果),(2,香蕉)]

    return render(requset,'business.html',{'v1':v1,'v2':v2,'v3':v3})

def host(request):

    if request.method == 'GET':

        v1 = models.Host.objects.filter(nid__gt=0)

        v2 = models.Host.objects.filter(nid__gt=0).values('nid','hostname','b_id','b__caption')

        v3 = models.Host.objects.filter(nid__gt=0).values_list('nid','hostname','b_id','b__caption')

        b_list= models.Business.objects.all()

        return render(request,'host.html',{'v1': v1, 'v2':v2 , 'v3':v3 ,'b_list':b_list})

    elif request.method == 'POST':

        h = request.POST.get('hostname')

        i = request.POST.get('ip')

        p = request.POST.get('port')

        b = request.POST.get('b_id')

        # models.Host.objects.create(hostname=h,

        #                            ip=i,

        #                            port=p,

        #                            b=models.Business.objects.get(id=b)

        #                            )

        models.Host.objects.create(hostname=h,

                                   ip=i,

                                   port=p,

                                   b_id=b,

                                    )

        return redirect('/host')   #以get分方式重新访问http://127.0.0.1:8000/host/
app01/views.py
<!DOCTYPE html>

<html lang="en">

<head>

    <meta charset="UTF-8">

    <title>Title</title>

    <style>

        .hide{

            display: none;

        }

        .shade{

            position: fixed;

            top: 0;

            right:0 ;

            left: 0;

            bottom: 0;

            background: black;

            opacity: 0.6;

            z-index: 100;

        }

        .add-modal{

            position: fixed;

            height: 300px;

            width: 400px;

            top: 100px;

            left: 50%;

            z-index: 101;

            border: 1px solid red;

            background: white;

            margin-left: -200px;

        }

    </style>

</head>

<body>

    <h1>主机列表(列表)</h1>

    <div>

        <input id="add_host" type="button" value="添加"/>    <!--模态对话框-->

    </div>

    <table border="">

        <thead>

            <tr>

                <th>主机序号</th>

                <th>主机名字</th>

                <th>IP</th>

                <th>端口</th>

                <th>业务线名称</th>

            </tr>

        </thead>

        <tbody>

            {% for row in v1 %}

                <tr aa="{{ row.nid }}" ab="{{ row.b.id }}" ac="{{ row.b.code }}">

                    <td>{{ forloop.counter }}</td>

                    <td>{{ row.hostname }}</td>

                    <td>{{ row.ip }}</td>

                    <td>{{ row.port }}</td>

                    <td>{{ row.b.caption }}</td>

                </tr>

            {% endfor %}

        </tbody>

    </table>

    <h1>主机列表(字典)</h1>

    <table border="">

        <thead>

        <tr>

            <th>主机名字</th>

            <th>业务线名称</th>

        </tr>

        </thead>

        <tbody>

        {% for row in v2 %}

            <tr aa="{{ row.nid }}" ab="{{ row.b__id }}">

                <td>{{ row.hostname }}</td>

                <td>{{ row.b__caption }}</td>

            </tr>

        {% endfor %}

        </tbody>

    </table>

    </table>

    <h1>主机列表(元组)</h1>

    <table border="">

        <thead>

        <tr>

            <th>主机名字</th>

            <th>业务线名称</th>

        </tr>

        </thead>

        <tbody>

        {% for row in v3 %}

            <tr aa="{{ row.0 }}" ab="{{ row.2}}">

                <td>{{ row.1 }}</td>

                <td>{{ row.3 }}</td>

            </tr>

        {% endfor %}

        </tbody>

    </table>

    <div class="shade hide"></div>               <!--遮罩层,全屏-->

    <div class="add-modal hide">                 <!--弹出框-->

        <form method="POST" action="/host/">    <!--编辑弹出框内容-->

            <div class="group">

                <input type="text" placeholder="主机名" name="hostname"/>

            </div>

            <div class="group">

                <input type="text" placeholder="IP" name="ip"/>

            </div>

            <div class="group">

                <input type="text" placeholder="端口" name="port"/>

            </div>

            <div class="group">

                <select name="b_id">

                    {% for op in b_list %}

                    <option value="{{ op.id }}">{{ op.caption }}</option>

                    {% endfor %}

                </select>

            </div>

            <input type="submit" value="提交"/>

            <input id="cancel" type="button" value="取消"/>

        </form>

    </div>

    <script src="/static/jquery-1.12.4.js"></script>    <!--JS文件-->

    <script>

        $(function () {                                     <!--页面框架加载完成-->

            $('#add_host').click(function () {              <!--绑定事件-->

                $('.shade,.add-modal').removeClass('hide'); <!--点击添加按钮,呼出遮罩层与弹出框-->

            });

            $('#cancel').click(function () {

                $('.shade,.add-modal').addClass('hide');

            });

        })

    </script>

</body>

</html>
templates/host.html
新增static/jquery-1.12.4.js 文件
https://files.cnblogs.com/files/dalyday/jquery-1.12.4.js
最新文章
- 【Python】 属性的 get 与 set 方法
- Html5-canvas
- sizeToFit()使用心得
- 【Java的JNI快速学习教程】
- android.annotation cannot be resolved
- 从零开始学习jQuery (八) 插播:jQuery实施方案
- Linux下产生随机密码10方法
- jQuery EasyUI的使用入门
- 刚由pc端做移动端的感受
- maximum shortest distance
- Hibernate异常之关键字错误
- 守护态运行Docker容器
- golang中的defer
- react-native 配置 在mac 上找不到.npmrc
- Oracle数据库ORA-01109 数据库未打开
- linux下搭建lamp环境以及安装swoole扩展
- 【WPF】ImageMagick调节图片的颜色
- iOS开发简记(3):tips提示
- Linux:磁盘配额
- Oracle安装部署之rhel 5.8下静默安装oracle11gr2
热门文章
- unity shader 纹理&透明效果
- Leetcode之二分法专题-1011. 在 D 天内送达包裹的能力(Capacity To Ship Packages Within D Days)
- MSIL实用指南-类相关生成
- Setup Factory 9 简单打包
- 使用GPU跑Tensorflow代码实录
- openSession 与 getCurrentSession的区别
- poj2186Popular Cows+tarjan缩点+建图
- Jmeter基础教程图文版(二)- 核心组件
- Loadrunner 11 的安装
- Python3-编码问题-解决为何我的python打印总是出现乱码??