qt 使用qtxlsx 读写excel
https://github.com/dbzhang800/QtXlsxWriter 下载qtxlsx地址
QtXlsx is a library that can read and write Excel files. It doesn't require Microsoft Excel and can be used in any platform that Qt5 supported. The library can be used to
- Generate a new .xlsx file from scratch
- Extract data from an existing .xlsx file
- Edit an existing .xlsx file
Getting Started
- For linux user, if your Qt is installed through package manager tools such "apt-get", make sure that you have installed the Qt5 develop package qtbase5-private-dev
Usage(1): Use Xlsx as Qt5's addon module
Building the module
Note: Perl is needed in this step.
Download the source code.
Put the source code in any directory you like
Go to top directory of the project in a terminal and run
    qmake

    make

    make install
The library, the header files, and others will be installed to your system.
make html_docscan be used to generate documentations of the library, andmake checkcan be used to run unit tests of the library.
Using the module
- Add following line to your qmake's project file:
QT += xlsx
- Then, using Qt Xlsx in your code
    #include <QtXlsx>

    int main()

    {

        QXlsx::Document xlsx;

        xlsx.write("A1", "Hello Qt!");

        xlsx.saveAs("Test.xlsx");

        return 0;

    }
Usage(2): Use source code directly
The package contains a qtxlsx.pri file that allows you to integrate the component into applications that use qmake for the build step.
Download the source code.
Put the source code in any directory you like. For example, 3rdparty:
    |-- project.pro

    |-- ....

    |-- 3rdparty\

    |     |-- qtxlsx\

    |     |
- Add following line to your qmake project file:
include(3rdparty/qtxlsx/src/xlsx/qtxlsx.pri)
Note: If you like, you can copy all files from src/xlsx to your application's source path. Then add following line to your project file:
include(qtxlsx.pri)
> **Note**: If you do not use qmake, you need to define the following macro manually

> ```

    XLSX_NO_LIB
- Then, using Qt Xlsx in your code
    #include "xlsxdocument.h"

    int main()

    {

        QXlsx::Document xlsx;

        xlsx.write("A1", "Hello Qt!");

        xlsx.saveAs("Test.xlsx");

        return 0;

    }
在构建的时候,可能会有如下的错误,
xlsxzipreader.cpp: In member function ‘void QXlsx::ZipReader::init()’:

xlsxzipreader.cpp:51:66: error: conversion from ‘QVector<QZipReader::FileInfo>’ to non-scalar type ‘QList<QZipReader::FileInfo>’ requested

     QList<QZipReader::FileInfo> allFiles = m_reader->fileInfoList();
这里只需要吧出错的文件添加 :
#include <QVector>
然后把出错的地方的"QList" 用"QVector" 替换掉重新构建就可以了。
对于Qt Xlsx ( QtXlsxWriter ) 的安装请参考:
http://blog.csdn.net/woshidahuaidan2011/article/details/52724452
这里主要介绍其基本的编程使用方法。
首先我们想到就是对xlsx文件进行读写,因此我们有如下的代码:
#include <QtCore>
#include "xlsxdocument.h"
#include "xlsxformat.h"
#include "xlsxcellrange.h"
#include "xlsxchart.h"
int main()
{
QXlsx::Document xlsx("book1.xlsx");/*打开一个book1的文件*/
QXlsx::Format format1;/*设置该单元的样式*/
format1.setFontColor(QColor(Qt::red));/*文字为红色*/
format1.setPatternBackgroundColor(QColor(152,251,152));/*北京颜色*/
format1.setFontSize(15);/*设置字体大小*/
format1.setHorizontalAlignment(QXlsx::Format::AlignHCenter);/*横向居中*/
format1.setBorderStyle(QXlsx::Format::BorderDashDotDot);/*边框样式*/
xlsx.write("A1", "Hello Qt!", format1);/*写入文字,应该刚才设置的样式*/
xlsx.write(2, 1, 12345, format1);/*写入文字,应该刚才设置的样式*/
QXlsx::Format format2;/*重新设置另一个单元的样式*/
format2.setFontBold(true);/*设置加粗*/
format2.setFontUnderline(QXlsx::Format::FontUnderlineDouble);/*下双划线*/
format2.setFillPattern(QXlsx::Format::PatternLightUp);/*填充方式*/
xlsx.write("A4", "=44+33", format2);/*写入文字,应该刚才设置的样式*/
xlsx.write("C4", true, format2);
xlsx.saveAs("book1.xlsx");/*保存*/
QXlsx::Document xlsx2("Book1.xlsx");/*复制book1到book2*/
xlsx2.saveAs("Book2.xlsx");
return 0;
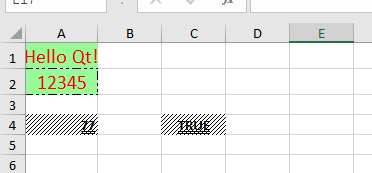
}其运行效果如下:
接下来我们处理数据的是很多时候需要插入折线图、饼状图等等来图像化的处理数据,因此我们可以可以在原有代码上添加一段代码,使之添加一个sheet而且插入饼状图及其条形图:
#include <QtCore>
#include "xlsxdocument.h"
#include "xlsxformat.h"
#include "xlsxcellrange.h"
#include "xlsxchart.h"
int main()
{
QXlsx::Document xlsx("book1.xlsx");/*打开一个book1的文件*/
QXlsx::Format format1;/*设置该单元的样式*/
format1.setFontColor(QColor(Qt::red));/*文字为红色*/
format1.setPatternBackgroundColor(QColor(152,251,152));/*北京颜色*/
format1.setFontSize(15);/*设置字体大小*/
format1.setHorizontalAlignment(QXlsx::Format::AlignHCenter);/*横向居中*/
format1.setBorderStyle(QXlsx::Format::BorderDashDotDot);/*边框样式*/
xlsx.write("A1", "Hello Qt!", format1);/*写入文字,应该刚才设置的样式*/
xlsx.write(2, 1, 12345, format1);/*写入文字,应该刚才设置的样式*/
QXlsx::Format format2;/*重新设置另一个单元的样式*/
format2.setFontBold(true);/*设置加粗*/
format2.setFontUnderline(QXlsx::Format::FontUnderlineDouble);/*下双划线*/
format2.setFillPattern(QXlsx::Format::PatternLightUp);/*填充方式*/
xlsx.write("A4", "=44+33", format2);/*写入文字,应该刚才设置的样式*/
xlsx.write("C4", true, format2);
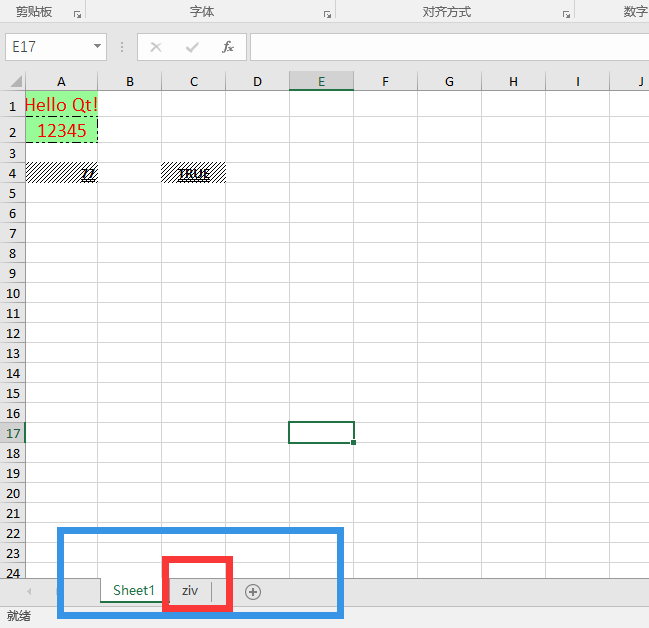
if(!xlsx.selectSheet("ziv")){/*在当前打开的xlsx文件中,找一个名字为ziv的sheet*/
xlsx.addSheet("ziv");//找不到的话就添加一个名为ziv的sheet
}
for (int i=10; i<20; ++i) {/*写入一串数字*/
xlsx.write(i, 1, i*i*i); //A10:A19
xlsx.write(i, 2, i*i); //B10:B19
xlsx.write(i, 3, i*i-1); //C10:C19
}
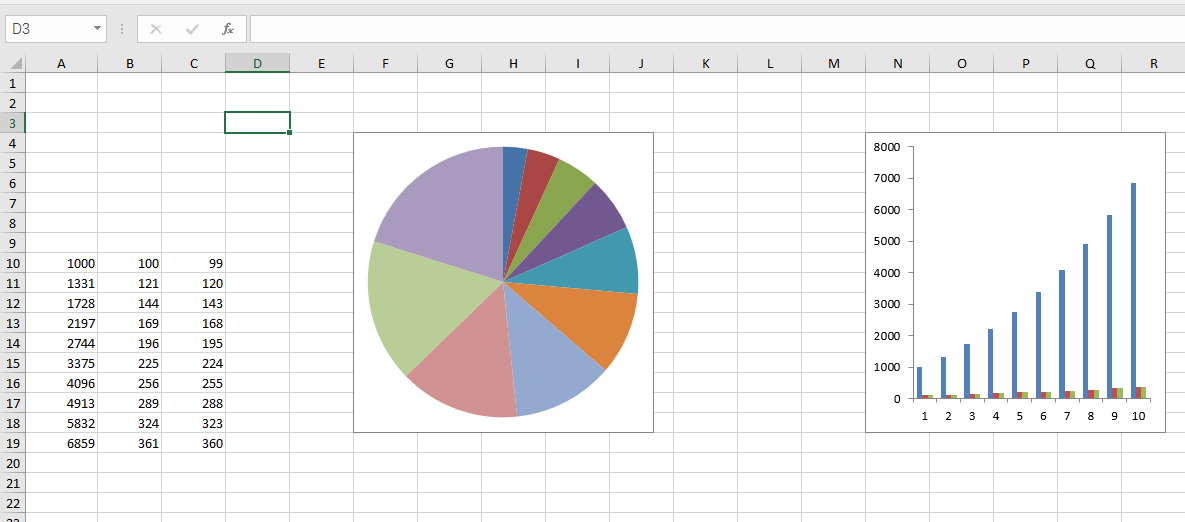
QXlsx::Chart *pieChart = xlsx.insertChart(3, 5, QSize(300, 300));/*在3行5列的位置插入一个图标*/
pieChart->setChartType(QXlsx::Chart::CT_Pie);/*插入一个饼形图*/
pieChart->addSeries(QXlsx::CellRange("A10:A19"));/*饼形图添加数据*/
pieChart->addSeries(QXlsx::CellRange("B10:B19"));
pieChart->addSeries(QXlsx::CellRange("C10:C19"));
QXlsx::Chart *barChart = xlsx.insertChart(3, 13, QSize(300, 300));/*在3行13列的位置插入一个图标*/
barChart->setChartType(QXlsx::Chart::CT_Bar);/*条形图*/
barChart->addSeries(QXlsx::CellRange("A10:C19"));/*给条形图加入数据*/
xlsx.saveAs("book1.xlsx");/*保存*/
QXlsx::Document xlsx2("Book1.xlsx");/*复制book1到book2*/
xlsx2.saveAs("Book2.xlsx");
return 0;
}
上面代码中运行效果如下:
很多时候我们还需要添加图表来美化表格,代码如下:
#include <QtCore>
#include <QtGui>
#include "xlsxdocument.h"
#include "xlsxformat.h"
#include "xlsxcellrange.h"
#include "xlsxchart.h"
int main()
{
QXlsx::Document xlsx("book1.xlsx");/*打开一个book1的文件*/
QXlsx::Format format1;/*设置该单元的样式*/
format1.setFontColor(QColor(Qt::red));/*文字为红色*/
format1.setPatternBackgroundColor(QColor(152,251,152));/*北京颜色*/
format1.setFontSize(15);/*设置字体大小*/
format1.setHorizontalAlignment(QXlsx::Format::AlignHCenter);/*横向居中*/
format1.setBorderStyle(QXlsx::Format::BorderDashDotDot);/*边框样式*/
xlsx.write("A1", "Hello Qt!", format1);/*写入文字,应该刚才设置的样式*/
xlsx.write(2, 1, 12345, format1);/*写入文字,应该刚才设置的样式*/
QXlsx::Format format2;/*重新设置另一个单元的样式*/
format2.setFontBold(true);/*设置加粗*/
format2.setFontUnderline(QXlsx::Format::FontUnderlineDouble);/*下双划线*/
format2.setFillPattern(QXlsx::Format::PatternLightUp);/*填充方式*/
xlsx.write("A4", "=44+33", format2);/*写入文字,应该刚才设置的样式*/
xlsx.write("C4", true, format2);
if(!xlsx.selectSheet("ziv")){/*在当前打开的xlsx文件中,找一个名字为ziv的sheet*/
xlsx.addSheet("ziv");//找不到的话就添加一个名为ziv的sheet
}
for (int i=10; i<20; ++i) {/*写入一串数字*/
xlsx.write(i, 1, i*i*i); //A10:A19
xlsx.write(i, 2, i*i); //B10:B19
xlsx.write(i, 3, i*i-1); //C10:C19
}
QXlsx::Chart *pieChart = xlsx.insertChart(3, 5, QSize(300, 300));/*在3行5列的位置插入一个图标*/
pieChart->setChartType(QXlsx::Chart::CT_Pie);/*插入一个饼形图*/
pieChart->addSeries(QXlsx::CellRange("A10:A19"));/*饼形图添加数据*/
pieChart->addSeries(QXlsx::CellRange("B10:B19"));
pieChart->addSeries(QXlsx::CellRange("C10:C19"));
QXlsx::Chart *barChart = xlsx.insertChart(3, 13, QSize(300, 300));/*在3行13列的位置插入一个图标*/
barChart->setChartType(QXlsx::Chart::CT_Bar);/*条形图*/
barChart->addSeries(QXlsx::CellRange("A10:C19"));/*给条形图加入数据*/
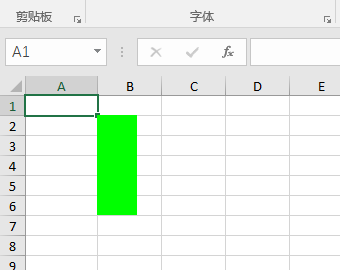
QImage image(40, 100, QImage::Format_RGB32);/*新建一个Qimage,大小40*100*/
image.fill(Qt::green);/*填充绿色*/
xlsx.insertImage(1, 1, image);/*插入图片*/
xlsx.saveAs("book1.xlsx");/*保存*/
QXlsx::Document xlsx2("Book1.xlsx");/*复制book1到book2*/
xlsx2.saveAs("Book2.xlsx");
return 0;
}
效果如下:
到此为止对于Qt Xlsx 的使用应该可以满足大部分的需求,如有疑问欢迎留言指正,原文地址:
http://blog.csdn.net/woshidahuaidan2011/article/details/53349163
最新文章
- Spring(四)注解配置Ioc
- Python Day3
- MongoDB分片之数据分割方式
- 2016HUAS_ACM暑假集训2L - Points on Cycle(圆上的点)
- MyEclipse+Struts+Hibernate+Mysql开发环境配置
- MIME类型
- error LNK2019: unresolved external symbol / error LNK2001: 无法解析的外部符号
- 修改ie版本的注册表webbroswer
- 【HDOJ】4373 Mysterious For
- Json操作
- Spark history-server 配置 !运维人员的强大工具
- 去除android ImageView “[Accessibility] Missing contentDescription attribute on image” warning
- C# 前台线程与后台线程区别
- PHP命名空间(Namespace)的使用详解
- angular.js的时间指令
- dojo页面调试出错
- 压力测试(webbench、ab、siege)
- 前端插件之Bootstrap Switch 选择框开关控制
- Mono的CustomConditionAttribute使用
- SQL Server: create table sql script