《android开发进阶从小工到专家》读书笔记--网络框架的设计与实现
第一步:
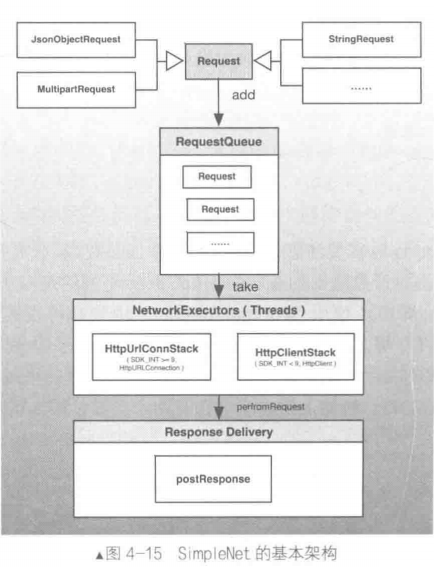
第一层:Request--请求类型,JSON,字符串,文件
第二层:消息队列--维护了提交给网络框架的请求列表,并且根据响应的规则进行排序。默认情况下按照优先级和进入队列的顺序来执行,该队列使用的是线程安全的PriorityBlockingQueue<E>,因为我们的队列会被并发访问,因此需要保证队列访问的原子性
第三层:NetworkExecutor--网络执行者,该Eexcutor继承自Thread,在run方法中循环访问请求队列,从请求队列中获取并执行HTTP请求,请求完成之后将结果投递给UI线程
第四层:Response以及Response投递类,使用ResponseDelivery来封装Response的投递,保证Response执行在UI线程。而Response会根据用户的不同需求将返回结果格式化为特定的类型。
第二步:网络请求类
public static enum HttpMethod{

    GET("GET"),

    POST("POST"),

    PUT("PUT"),

    DELETE("DELETE");

    /** http request type */

    private String mHttpMethod = "";

    privte HttpMethod(String method){

        mHttpMethod = method;

    }

    @Override

    public String toString(){

        return mHttpMethod;

    }

}

//优先级枚举

public static enum Priority{

    LOW,

    NORMAL,

    HIGH,

    IMMEDIATE

}
/**

  * 网络请求类,注意GET和DELETE不能传递请求参数,因为其请求的性质所致,用户可以将参数构建到URL后传递进来并到Request中

  * @param <T> T为请求返回的数据类型

  */

public abstract class Request<T> implements Comparable<Request<T>>{

    //默认的编码方式

    private static final String DEFAULT_PARAMS_ENCODING = "UTF-8";

    //请求序列号

    protected int mSerialNum = 0;

    //优先级默认设置为Normal

    protected Priority mPriority = Priority.NORMAL;

    //是否取消该请求

    protected boolean isCancel = false;

    /** 改请求是否应该缓存*/

    private boolean mShouldCache = true;

    //请求Listener

    protected RequestListener<T> mRequestlistener;

    //请求的URL

    private String mUrl = "";

    //请求的方法

    HttpMethod mHttpMethod = HttpMethod.GET;

    //请求的header

    private Map<String,String> mHeaders = new HashMap<String,String>();

    //请求参数

    private Map<String,String> mBodyParams = new HashMap<String,String>();

    /**

     * @param method 请求方式

     * @param url 请求的目标URL

     * @param listener 请求回调,将结果回调给用户

     */

    public Request(HttpMethod method,String url,RequestListener<T> listener){

        mHttpMethod = method;

        mUrl = url;

        mRequestlistener = listener;

    }

    //从原生的网络请求中解析结果,子类必须覆写

    public abstract T parseResponse(Response response);

    //处理Response,该方法需要运行在UI线程

    public final void deliveryResponse(Response response){

        //解析得到请求结果

        T result = parseResponse(response);

        if(mRequestlistener!=null){

            int stCode = response !=null?response.getStatusCode:-1;

            String msg = response !=null?response.getMessage():"unknown error";

            mRequestlistener.onComplete(stCode,result,msg);

        }

    }

    //代码省略

    protected String getParamsEncoding(){

        return DEFAULT_PARAMS_ENCODING;

    }

    public String getBodyContentType(){

        return "application/x-www-form-urlencoded;charset="+getParamsEncoding();

    }

    //返回POST或者PUT请求时的Body参数字节数组

    public byte[] getBody(){

        Map<String,String> params = getParams();

        if(params!=null && params.size()>0){

            return encodeParameters(params,getParamsEncoding());

        }

        return null;

    }

    //将参数转换为URL编码的参数串,格式为key1=value1&key2=value2

    private byte[] encodeParameters(Map<String,String> params,String paramsEncoding){

        StringBuilder encodedParams = new StringBuilder();

        try{

            for(Map.Entry<String,String> entry:params.entrySet()){

                encodedParams.append(URLEncoder.encode(entry.getKey(),paramsEncoding));

                encodedParams.append('=');

                encodedParams.append(URLEncoder.encode(entry.getValue(),paramsEncoding));

                encodedParams.append('&');

            }

            return encodedParams.toString().getBytes(paramsEncoding);

        }catch(UnsupportEncodingException uee){

            throw new RuntimeException("Encoding not supported:"+paramsEncoding,uee);

        }

    }

    //用于对请求的排序处理,根据优先级和加入到队列的序号进行排序

    @Override

    public int compareTo(Request<T> another){

        Priority myPriority = this.getPriority();

        Priority anotherPriority = another.getPriority();

        //如果优先级相等,那么按照添加到队列的序列号顺序来执行

        return myPriority.equals(another)?this.getSerialNumber()-another.getSerialNumber():myPriority.ordinal()-anotherPriority.ordinal();

    }

    /**

      *网络请求Listener,会被执行在UI线程

      *@param <T> 请求的response类型

      */

    public static interface RequestListener<T>{

        //请求完成的回调

        public void onComplete(int stCode,T response,String errMsg);

    }

}
HTTP实际上是基于TCP协议,而TCP协议又是基于Socket,Socket实际上操作的也就是输入、输出流,输出流是向服务器写数据,输入流是从服务器读取数据。
第三步:响应类
//请求结果类,继承自BasicHttpResponse,将结果存储在rawData中

public class Response extends BasicHttpResponse{

    //原始的Response主体数据

    public byte[] rawData = new byte[0];

    public Response(StatusLine statusLine){

        super(statusLine);

    }

    public Response(ProtocolVersion ver,int code,String reason){

        super(ver,code,reason);

    }

    @Override

    public void setEntity(HttpEntity entity){

        super.setEntity(entity);

        rawData = entityToBytes(getEntity());

    }

    public byte[] getRawData(){

        return rawData;

    }

    //代码省略

    /**Reads the contents of HttpEntity into a byte[].*/

    private byte[] entityToBytes(HttpEntity entity){

        try{

            return EntityUtils.toByteArray(entity);

        }catch(IOException e){

            e.printStackTrace();

        }

        return new byte[0];

    }

}
第四步:请求队列
网络请求队列就是在内部封装了一个优先级队列,在构建队列时会启动指定个数的NetworkExecutor(继承自Thread)来从请求队列中获取、执行请求,请求队列会根据请求的优先级、序列号对所有Request进行排序。
//请求队列,使用优先队列,使得请求可以按照优先级进行处理

public final class RequsetQueue{

    //线程安全的请求队列

    private BlockingQueue<Request<?>> mRequestQueue = new PriorityBlockingQueue<Request<?>>();

    //请求的序列化生成器

    private AtomicInteger mSerialNumGenerator = new AtomicInteger(0);

    //默认的核心数 为CPU格式加1

    private int mDispatcherNums = DEFAULT_CORE_NUMS;

    //NetworkExecutor,执行网络请求的线程

    private NetworkExecutor[] mDispatchers = null;

    //Http请求的真正执行者

    private HttpStack mHttpStack;

    protected RequestQueue(int coreNums,HttpStack httpStack){

        mDispatcherNums = coreNums;

        mHttpStack = httpStack !=null?httpStack:HttpStackFactory.createHttpStack();

    }

    //启动NetworkExecutor

    private final void startNetworkExecutors(){

        mDispatchers = new NetworkExecutor[mDispatchNums];

        for(int i=0;i<mDispatchNums;i++){

            mDispatchers[i] = new NetworkExecutor(mRequestQueue,mHttpStack);

            mDispatchers[i].start();

        }

    }

    public void start(){

        stop();

        startNetworkExecutors();

    }

    /**

      * 停止NetworkExecutor

      */

    public void stop(){

        if(mDispatchers!=null && mDispatchers.length>0){

            for(int i=0;i<mDispatchers.length;i++){

                mDispatchers[i].quit();

            }

        }

    }

    //添加请求到队列中

    public void addRequest(Request<?> request){

        if(!mRequestQueue.contains(request)){

            //为请求设置序列号

            request.setSerialNumber(this.generateSerialNumber());

            mRequestQueue.add(request);

        }else{

            Log.d("","### 请求队列中已经含有");

        }

    }

    //代码省略

    //为每个请求生成一个系列号

    private int generateSerialNumber(){

        return mSerialNumGenerator.incrementAndGet();

    }

}
第五步:NetworkExecutor网络执行器
多个NetworkExecutor共享一个消息队列,在各个NetworkExecutor的run函数中循环地取请求队列中的请求,拿到一个请求之后通过HttpStack对象来真正地执行请求,最终将请求结果通过ResponseDelivery分发给UI线程。
NetworkExecutor实质上是一个Thread,在run方法中我们会执行一个循环,不断地从请求队列中取得请求,然后交给HttpStack。
//网络请求Exector,继承自Thread,从网络请求队列中循环读取请求并且执行

final class NetworkExecutor extends Thread{

    //网络请求队列

    private BlockingQueue<Request<?>> mRequestQueue;

    //网络请求栈

    private HttpStack mHttpStack;

    //结果分发器,将结果投递到主线程

    private static ResponseDelivery mResponseDelivery = new ResponseDelivery();

    //请求缓存

    private static Cache<String,Response> mReqCache = new LruMemCache();

    //是否停止

    private boolean isStop = false;

    public NetworkExecutor(BlockingQueue<Request<?>> queue,HttpStack httpStack){

        mRequestQueue = queue;

        mHttpStack = httpStack;

    }

    @Override

    public void run(){

        try{

            while(!isStop){

                final Request<?> request = mRequestQueue.take();

                if(request.isCanceled()){

                    Log.d("###","### 取消执行了");

                    continue;

                }

                Response response = null;

                if(isUseCache(request)){

                    //从缓存中取

                    response = mReqCache.get(request.getUrl());

                }else{

                    //从网络中获取数据

                    response = mHttpCache.get(request.getUrl());

                }else{

                    //从网络上获取数据

                    response = mHttpStack.performRequest(request);

                    //如果该请求需要缓存,那么请求成功则缓存到mResponseCache中

                    if(request.shouldCache() && isSuccess(response)){

                        mReqCache.put(request.getUrl(),response);

                    }

                }

                //分发请求结果

                mResponseDelivery.deliveryResponse(request,response);

            }

        }catch(InterruptedExecption e){

            Log.i("","### 请求分发器退出");

        }

    }

    private boolean isSuccess(Response response){

        return reponse!=null && response.getStatusCode()==200;

    }

    private boolean isUseCache(Request<?> request){

        return request.shouldCache() && mReqCache.get(request.getUrl())!=null;

    }

    public void quit(){

        isStop = true;

        interrupt();

    }

}
第六步:执行网络请求的接口--HttpStack
//执行网络请求的接口

public interface HttpStack{

    /**

      * 执行HTTP请求

      * @param request 待执行的请求

      * @retrun 返回Response

      */

    public Response performRequest(Request<?> request);

}
//使用HttpURLConnection执行网络请求的HttpStack

public class HttpUrlConnStack implements HttpStack{

    @Override

    public Response performRequest(Request<?> request){

        HttpURLConnection urlConnection = null;

        try{

            //构建HttpURLConnection

            urlConnection = createUrlConnection(request.getUrl());

            //设置headers

            setRequestHeaders(urlConnection,request);

            //设置Body参数

            setRequestParams(urlConnection,request);

            return fetchResponse(urlConnection);

        }catch(Exception e){

            e.printStackTrace();

        }finally{

            if(urlConnection!=null){

                urlConnection.disconnect();

            }

        }

        return null;

    }

    private HttpURLConnection createUrlConnection(String url) throws IOException{

        URL newURL = new URL(url);

        URLConnection urlConnection = newURL.openConnection();

        urlConnection.setConnectTimeout(mConfig.connTimeOut);

        urlConnection.setReadTimeout(mConfig.soTimeOut);

        urlConnection.setDoInput(true);

        urlConnection.setUseCaches(false);

        return (HttpURLConnection)urlConnection;

    }

    private void setRequestHeaders(HttpURLConnection connection,Request<?> request){

        Set<String> headersKeys = request.getHeaders().keySet();

        for(String headerName : headersKeys){

            connection.addRequestProperty(headerName,request.getHeaders().get(headerName));

        }

    }

    protected void setRequestParams(HttpURLConnection connection,Request<?> request) throws ProtocolException,IOException{

        HttpMethod method = request.getHttpMethod();

        connection.setRequestMethod(method.toString());

        //add params

        byte[] body = request.getBody();

        if(body!=null){

            //enable output

            connection.setDoOutput(true);

            //set content type

            connection.addRequestProperty(Request.HEADER_CONTENT_TYPE,request.getBodyContentType());

            //write params data to connection

            DataOutputStream dataOutputStream = new DataOutputStream(connection.getOutputStream());

            dataOutputStream.write(body);

            dataOutputStream.close();

        }

    }

    private Response fetchResponse(HttpURLConnection connection) throws IOException{

        //Initialize HttpResponse with data from the HttpURLConnection

        ProtocolVersion protocolVersion = new ProtocolVersion("HTTP",1,1);

        int responseCode = connection.getResponseCode();

        if(responseCode == -1){

            throw new IOException("Could not retrieve response code from HttpURLConnection.");

        }

        //状态行数据

        StatusLine responseStatus = new BasicStatusLine(ptocolVersion,connection.getResponseCode(),connection.getResponseMessage());

        //构建response

        Response response = new Response(responseStatus);

        //设置response数据

        response.setEntity(entityFromURLConnection(connection));

        addHeadersToResponse(response,connection);

        return response;

    }

    /**

    * 执行HTTP请求之后获取到其数据流,即返回请求结果的流

    * @param connection

    * @return

    */

    private HttpEntity entityFromURLConnection(HttpURLConnection connection){

        BasicHttpEntity entity = new BasicHttpEntity();

        InputStream inputStream = null;

        try{

            inputStream = connection.getInputStream();

        }catch(IOException e){

            e.printStackTrace();

            inputStream = connection.getErrorStream();

        }

        //TODO:GZIP

        entity.setContent(inputStream);

        entity.setContentlength(connection.getContentLength());

        entity.setContentEncoding(connection.getContentEncoding());

        entity.setContentType(connection.getContentType());

        return entity;

    }

    private void addHeadersToResponse(BasicHttpResponse response,HttpURLConnection connection){

        for(Entry<String,List<String>> header : connection.getHeaderFields().entrySet()){

            if(header.getKey() != null){

                Header h = new BasicHeader(header.getKey(),header.getValue().get(0));

                response.addHeader(h);

            }

        }

    }

}
简单来说:构建HttpURLConnection,并通过HttpURLConnection对象设置请求Header、参数,然后发起请求,请求完成只有解析结果,并返回Response。
第七步:将请求的回调执行到UI线程--ResponseDelivery
//请求结果投递类,将请求结果投递给UI线程

class ResponseDelivery implements Executor{

    //关联主线程消息队列的hander

    Hander mResponseHandler = new Handler(Looper.getMainLooper());

    /**

      * 处理请求结果,将其执行在UI线程

      * @param request

      * @param response

      */

    public void deliveryResponse(final Request<?> request,final Response response){

        Runnable respRunnable = new Runnable(){

            @Override

            public void run(){

                request.deliveryResponse(response);

            }

        };

        execute(respRunnable);

    }

    @Override

    public void execute(Runnable command){

        mResponseHandler.post(command);

    }

}
ResponseDelivery其实就是封装了关联了UI线程消息队列的Handler。
使用:
//1.构建并启动请求队列

RequestQueue mQueue = SimpleNet.newRequestQueue();

/**

  * 发送GET请求,返回的是String类型的数据,同理还有{@see JsonRequest}、{@see MultipartRequest}

  */

private void sendStringRequest(){

    //2.构建请求

    StringRequest request = new StringRequest(HttpMethod.GET,"http://www.baidu.com",

        new RequestListener<String>(){

            @Override

            public void onComplete(int stCode,String response,String errMsg){

                //处理结果

            }

        });

    //3.将请求添加到请求队列中

    mQueue.addRequest(request);

}
最新文章
- 在android程序中加入widget(窗口小部件)并与之交互的关键代码
- 20151221001 GridView 模板
- Linux makefile教程之后序十一[转]
- Info.plist和pch文件的作用
- Chapter 4: Spring and AOP:Spring's AOP Framework -- draft
- 实现js浮点数加、减、乘、除的精确计算(网上很多文章里的方法是不能解决所有js浮点数计算误差的)
- STL string 模拟
- WeCenter 社交化问答社区程序 | WeCenter 是一款知识型的社交化问答社区程序,专注于社区内容的整理、归类、检索和再发行
- 使用MVC4,Ninject,EF,Moq,构建一个真实的应用电子商务SportsStore
- 简单svg动画实现
- Linux查询已开启文件或已运行进程开启之文件fuser,lsof,pidof
- GMT与Etc/GMT地区信息的时区转换
- window C/C++ 简单的IDE编译器
- sqlserver 中NOLOCK、HOLDLOCK、UPDLOCK、TABLOCK、TABLOCKX
- QtQuick自定义主题以及控件样式指引
- QQ音乐flac音乐转MP6格式怎样实现
- 20145304 Exp4 恶意代码分析
- day32 多进程
- js继承的实现(es5)
- J15W-J45W全铜截止阀厂家,J15W-J45W全铜截止阀价格 - 专题栏目 - 无极资讯网