Android -- onMeasure()源码分析
1,作为自定义控件最重要的三个方法之一,onMeasure()可以说是我们研究的重点,今天我们更详细的来研究一下View的onMeasure()方法和ViewGroup的onMeasure()方法
2,onMeasure()什么时候调用
我们先来自定义一个控件TestView,然后重写对应的构造函数、onFinishflate()、onSizeChange()、onDraw()、onMeasure()、onLayout()方法,下面是具体代码
package com.qianmo.activitydetail.view;

import android.content.Context;

import android.graphics.Canvas;

import android.support.annotation.Nullable;

import android.util.AttributeSet;

import android.util.Log;

import android.view.View;

/**

 * Created by Administrator on 2017/3/22 0022.

 * E-Mail:543441727@qq.com

 */

public class TestView extends View {

    private static String TAG = "TestView";

    public TestView(Context context) {

        this(context, null);

    }

    public TestView(Context context, @Nullable AttributeSet attrs) {

        this(context, attrs, 0);

    }

    public TestView(Context context, @Nullable AttributeSet attrs, int defStyleAttr) {

        super(context, attrs, defStyleAttr);

        Log.i(TAG, "TestView被创建");

    }

    /**

     * 当所有的控件中所有的子view均被映射成xml触发

     */

    @Override

    protected void onFinishInflate() {

        super.onFinishInflate();

        Log.i(TAG, "onFinishInflate()");

    }

    /**

     * 当view的大小发生变化时触发

     *

     * @param w

     * @param h

     * @param oldw

     * @param oldh

     */

    @Override

    protected void onSizeChanged(int w, int h, int oldw, int oldh) {

        super.onSizeChanged(w, h, oldw, oldh);

        Log.i(TAG, "onSizeChanged()" + ",w:" + w + ",h:" + w + ",oldw:" + oldw + ",oldh" + oldh);

    }

    /**

     * view渲染内容的细节

     *

     * @param canvas

     */

    @Override

    protected void onDraw(Canvas canvas) {

        super.onDraw(canvas);

        Log.i(TAG, "onDraw()");

    }

    /**

     * onLayout方法是ViewGroup中子View的布局方法,用于放置子View的位置。放置子View很简单,只需在重写onLayout方法,

     * 然后获取子View的实例,调用子View的layout方法实现布局。在实际开发中,一般要配合onMeasure测量方法一起使用。

     *

     * @param changed

     * @param left

     * @param top

     * @param right

     * @param bottom

     */

    @Override

    protected void onLayout(boolean changed, int left, int top, int right, int bottom) {

        super.onLayout(changed, left, top, right, bottom);

        Log.i(TAG, "onLayout()");

    }

    /**

     * 测量控件高度

     *

     * @param widthMeasureSpec

     * @param heightMeasureSpec

     */

    @Override

    protected void onMeasure(int widthMeasureSpec, int heightMeasureSpec) {

        super.onMeasure(widthMeasureSpec, heightMeasureSpec);

        Log.i(TAG, "onMeasure()");

    }

}
在布局中引用
<?xml version="1.0" encoding="utf-8"?>

<LinearLayout

    xmlns:android="http://schemas.android.com/apk/res/android"

    xmlns:app="http://schemas.android.com/apk/res-auto"

    xmlns:myview="http://schemas.android.com/apk/res-auto"

    android:layout_width="match_parent"

    android:layout_height="match_parent"

    android:background="#0a08ff"

    android:orientation="vertical"

    android:padding="10dp"

    >

    <com.qianmo.activitydetail.view.TestView

        android:layout_width="match_parent"

        android:layout_height="0dp"

        android:layout_marginTop="20dp"

        android:layout_weight="1"

        android:background="#00ff00"

        />

</LinearLayout>
来看看我们的打印结果:
打印结果

03-21 22:36:21.240 2144-2144/? I/TestView: TestView被创建

03-21 22:36:21.240 2144-2144/? I/TestView: onFinishInflate()

03-21 22:36:21.332 2144-2144/? I/TestView: onMeasure()

03-21 22:36:21.470 2144-2144/? I/TestView: onMeasure()

03-21 22:36:21.470 2144-2144/? I/TestView: onSizeChanged(),w:1080,h:1080,oldw:0,oldh0

03-21 22:36:21.470 2144-2144/? I/TestView: onLayout()

03-21 22:36:21.527 2144-2144/? I/TestView: onDraw()
可以看到当我们所有的子view被映射到xml之后在执行onMeasure()测量自身view,测量完之后保存测量后的宽高及模式,通知view大小改变,在执行view相对于父控件的放置函数及onLayout()方法,在执行绘制onDraw()方法。
3,onMeasure执行的流程
我们都知道onMeasure是由父控件ViewGroup调用的,而所有父控件都是ViewGroup的子类 ,且ViewGroup是一个抽象类,它里面有一个抽象方法onLayout,这个方法的作用就是摆放它所有的子控件(安排位置),因为是抽象类,不能直接new对象,所以我们在布局文件中可以使用View但是不能直接使用 ViewGroup。
在给子控件确定位置之前,必须要获取到子控件的大小(只有确定了子控件的大小才能正确的确定上下左右四个点的坐标),而ViewGroup并没有重写View的onMeasure方法,也就是说抽象类ViewGroup没有为子控件测量大小的能力,它只能测量自己的大小。但是既然ViewGroup是一个能容纳子控件的容器,系统当然也考虑到测量子控件的问题,所以ViewGroup提供了三个测量子控件相关的方法(measureChildren 和measureChild 和measureChildWithMargins方法)。只是在ViewGroup中没有调用它们,所以它本身不具备为子控件测量大小的能力,但是他有这个潜力哦。
为什么都有测量子控件的方法了而ViewGroup中不直接重写onMeasure方法,然后在onMeasure中调用呢?因为不同的容器摆放子控件的方式不同,比如RelativeLayout,LinearLayout这两个ViewGroup的子类,它们摆放子控件的方式不同,有的是线性摆放,而有的是叠加摆放,这就导致测量子控件的方式会有所差别,所以ViewGroup就干脆不直接测量子控件,他的子类要测量子控件就根据自己的布局特性重写onMeasure方法去测量。这么看来ViewGroup提供的三个测量子控件的方法岂不是没有作用?答案是NO,既然提供了就肯定有作用,这三个方法只是按照一种通用的方式去测量子控件,很多ViewGruop的子类测量子控件的时候就使用了ViewGroup的measureChildxxx系列方法。
测量的时候父控件的onMeasure方法会遍历他所有的子控件,挨个调用子控件的measure方法,measure方法会调用onMeasure,然后会调用setMeasureDimension方法保存测量的大小,一次遍历下来,第一个子控件以及这个子控件中的所有子控件都会完成测量工作;然后开始测量第二个子控件…;最后父控件所有的子控件都完成测量以后会调用setMeasureDimension方法保存自己的测量大小。值得注意的是,这个过程不只执行一次,也就是说有可能重复执行,因为有的时候,一轮测量下来,父控件发现某一个子控件的尺寸不符合要求,就会重新测量一遍(这也解释了我们上面onMeasure打印了两次的原因)。
举个例子,如下图所示
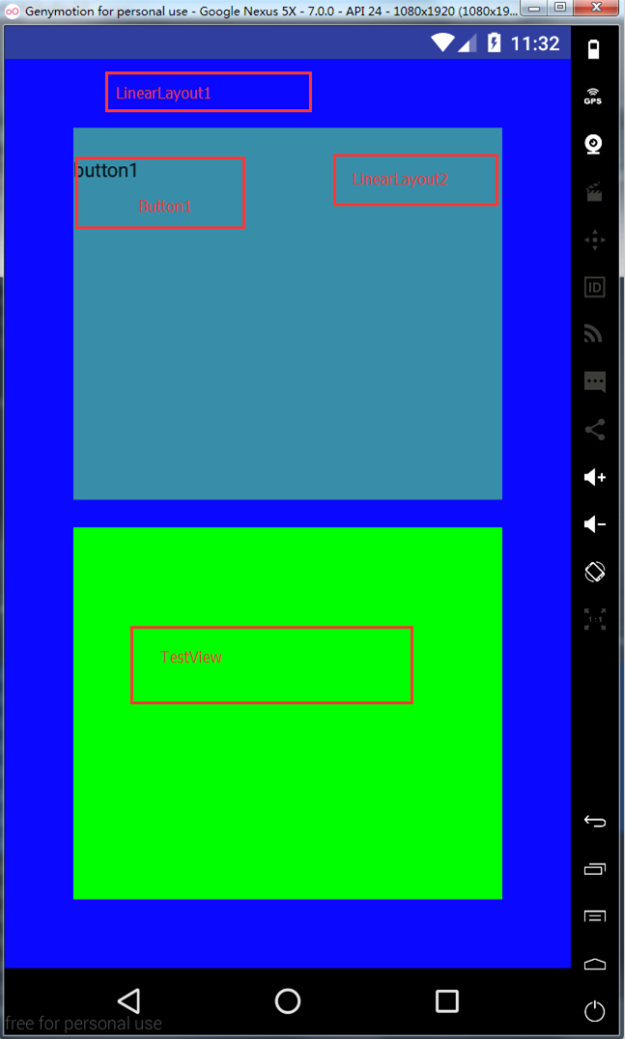

再看看用例图

4,看看ViewGroup关于测量的代码
我们知道,如果要自定义ViewGroup就必须重写onMeasure方法,在这里测量子控件的尺寸。子控件的尺寸怎么测量呢?ViewGroup中提供了三个关于测量子控件的方法,源码如下:
  /** *遍历ViewGroup中所有的子控件,调用measuireChild测量宽高 */

    protected void measureChildren(int widthMeasureSpec, int heightMeasureSpec) {

        final int size = mChildrenCount;

        final View[] children = mChildren;

        for (int i = 0; i < size; ++i) {

            final View child = children[i];

            if ((child.mViewFlags & VISIBILITY_MASK) != GONE) {

                measureChild(child, widthMeasureSpec, heightMeasureSpec);

            }

        }

    }

   /** * 测量某一个child的宽高 */

    protected void measureChild(View child, int parentWidthMeasureSpec,

            int parentHeightMeasureSpec) {

        final LayoutParams lp = child.getLayoutParams();

        final int childWidthMeasureSpec = getChildMeasureSpec(parentWidthMeasureSpec,

                mPaddingLeft + mPaddingRight, lp.width);

        final int childHeightMeasureSpec = getChildMeasureSpec(parentHeightMeasureSpec,

                mPaddingTop + mPaddingBottom, lp.height);

        child.measure(childWidthMeasureSpec, childHeightMeasureSpec);

    }

  /** * 测量某一个child的宽高,考虑margin值 */

    protected void measureChildWithMargins(View child,

            int parentWidthMeasureSpec, int widthUsed,

            int parentHeightMeasureSpec, int heightUsed) {

        final MarginLayoutParams lp = (MarginLayoutParams) child.getLayoutParams();

        final int childWidthMeasureSpec = getChildMeasureSpec(parentWidthMeasureSpec,

                mPaddingLeft + mPaddingRight + lp.leftMargin + lp.rightMargin

                        + widthUsed, lp.width);

        final int childHeightMeasureSpec = getChildMeasureSpec(parentHeightMeasureSpec,

                mPaddingTop + mPaddingBottom + lp.topMargin + lp.bottomMargin

                        + heightUsed, lp.height);

        child.measure(childWidthMeasureSpec, childHeightMeasureSpec);

    }
这三个方法分别做了那些工作大家应该比较清楚了吧?measureChildren 就是遍历所有子控件挨个测量,最终测量子控件的方法就是measureChild 和measureChildWithMargins 了,所以这里我们来了解一些其它的知识点
- measureChildWithMargins跟measureChild的区别就是父控件支不支持margin属性
支不支持margin属性对子控件的测量是有影响的,比如我们的屏幕是1080x1920的,子控件的宽度为填充父窗体,如果使用了marginLeft并设置值为100; 在测量子控件的时候,如果用measureChild,计算的宽度是1080,而如果是使用measureChildWithMargins,计算的宽度是1080-100 = 980。
- 怎样让ViewGroup支持margin属性?
ViewGroup中有两个内部类ViewGroup.LayoutParams和ViewGroup. MarginLayoutParams,MarginLayoutParams继承自LayoutParams ,这两个内部类就是VIewGroup的布局参数类,比如我们在LinearLayout等布局中使用的layout_width\layout_hight等以“layout_ ”开头的属性都是布局属性。在View中有一个mLayoutParams的变量用来保存这个View的所有布局属性。
- LayoutParams和MarginLayoutParams 的关系:
LayoutParams 中定义了两个属性(现在知道我们用的layout_width\layout_hight的来头了吧?):
declare-styleable name= "ViewGroup_Layout">

    <attr name ="layout_width" format="dimension">

        <enum name ="fill_parent" value="-1" />

        <enum name ="match_parent" value="-1" />

        <enum name ="wrap_content" value="-2" />

    </attr >

    <attr name ="layout_height" format="dimension">

        <enum name ="fill_parent" value="-1" />

        <enum name ="match_parent" value="-1" />

        <enum name ="wrap_content" value="-2" />

    </attr >

</declare-styleable >
MarginLayoutParams 是LayoutParams的子类,它当然也延续了layout_width\layout_hight 属性,但是它扩充了其他属性:
< declare-styleable name ="ViewGroup_MarginLayout">

    <attr name ="layout_width" />   <!--使用已经定义过的属性-->

    <attr name ="layout_height" />

    <attr name ="layout_margin" format="dimension"  />

    <attr name ="layout_marginLeft" format= "dimension"  />

    <attr name ="layout_marginTop" format= "dimension" />

    <attr name ="layout_marginRight" format= "dimension"  />

    <attr name ="layout_marginBottom" format= "dimension"  />

    <attr name ="layout_marginStart" format= "dimension"  />

    <attr name ="layout_marginEnd" format= "dimension"  />

</declare-styleable >
- 为什么LayoutParams 类要定义在ViewGroup中?
大家都知道ViewGroup是所有容器的基类,一个控件需要被包裹在一个容器中,这个容器必须提供一种规则控制子控件的摆放,比如你的宽高是多少,距离那个位置多远等。所以ViewGroup有义务提供一个布局属性类,用于控制子控件的布局属性。
- 为什么View中会有一个mLayoutParams 变量?
我们在之前学习自定义控件的时候学过自定义属性,我们在构造方法中,初始化布局文件中的属性值,我们姑且把属性分为两种。一种是本View的绘制属性,比如TextView的文本、文字颜色、背景等,这些属性是跟View的绘制相关的。另一种就是以“layout_”打头的叫做布局属性,这些属性是父控件对子控件的大小及位置的一些描述属性,这些属性在父控件摆放它的时候会使用到,所以先保存起来,而这些属性都是ViewGroup.LayoutParams定义的,所以用一个变量保存着。
5,关于ViewGroup中的getChildMeasureSpec方法
从上面我们贴的源码可以看到,我们的measureChild()方法和measureChildWithMargin()方法都分调用了getChildMeasureSpec()方法,其作用就是通过父控件的宽高约束规则和父控件加在子控件上的宽高布局参数生成一个子控件的约束。我们知道View的onMeasure方法需要两个参数(父控件对View的宽高约束),这个宽高约束就是通过这个方法生成的。有人会问为什么不直接拿着子控件的宽高参数去测量子控件呢?打个比方,父控件的宽高约束为wrap_content,而子控件为match_perent,是不是很有意思,父控件说我的宽高就是包裹我的子控件,我的子控件多大我就多大,而子控件说我的宽高填充父窗体,父控件多大我就多大。最后该怎么确定大小呢?所以我们需要为子控件重新生成一个新的约束规则。只要记住,子控件的宽高约束规则是父控件调用getChildMeasureSpec方法生成。
下面是getChildMeasureSpec()方法的源码
 public static int getChildMeasureSpec(int spec, int padding, int childDimension) {

        int specMode = MeasureSpec.getMode(spec);

        int specSize = MeasureSpec.getSize(spec);

        int size = Math.max(0, specSize - padding);

        int resultSize = 0;

        int resultMode = 0;

        switch (specMode) {

        // Parent has imposed an exact size on us

        case MeasureSpec.EXACTLY:

            if (childDimension >= 0) {

                resultSize = childDimension;

                resultMode = MeasureSpec.EXACTLY;

            } else if (childDimension == LayoutParams.MATCH_PARENT) {

                // Child wants to be our size. So be it.

                resultSize = size;

                resultMode = MeasureSpec.EXACTLY;

            } else if (childDimension == LayoutParams.WRAP_CONTENT) {

                // Child wants to determine its own size. It can't be

                // bigger than us.

                resultSize = size;

                resultMode = MeasureSpec.AT_MOST;

            }

            break;

        // Parent has imposed a maximum size on us

        case MeasureSpec.AT_MOST:

            if (childDimension >= 0) {

                // Child wants a specific size... so be it

                resultSize = childDimension;

                resultMode = MeasureSpec.EXACTLY;

            } else if (childDimension == LayoutParams.MATCH_PARENT) {

                // Child wants to be our size, but our size is not fixed.

                // Constrain child to not be bigger than us.

                resultSize = size;

                resultMode = MeasureSpec.AT_MOST;

            } else if (childDimension == LayoutParams.WRAP_CONTENT) {

                // Child wants to determine its own size. It can't be

                // bigger than us.

                resultSize = size;

                resultMode = MeasureSpec.AT_MOST;

            }

            break;

        // Parent asked to see how big we want to be

        case MeasureSpec.UNSPECIFIED:

            if (childDimension >= 0) {

                // Child wants a specific size... let him have it

                resultSize = childDimension;

                resultMode = MeasureSpec.EXACTLY;

            } else if (childDimension == LayoutParams.MATCH_PARENT) {

                // Child wants to be our size... find out how big it should

                // be

                resultSize = View.sUseZeroUnspecifiedMeasureSpec ? 0 : size;

                resultMode = MeasureSpec.UNSPECIFIED;

            } else if (childDimension == LayoutParams.WRAP_CONTENT) {

                // Child wants to determine its own size.... find out how

                // big it should be

                resultSize = View.sUseZeroUnspecifiedMeasureSpec ? 0 : size;

                resultMode = MeasureSpec.UNSPECIFIED;

            }

            break;

        }

        return MeasureSpec.makeMeasureSpec(resultSize, resultMode);

    }
而对应的我们方法中的参数分别对应如下图所示:
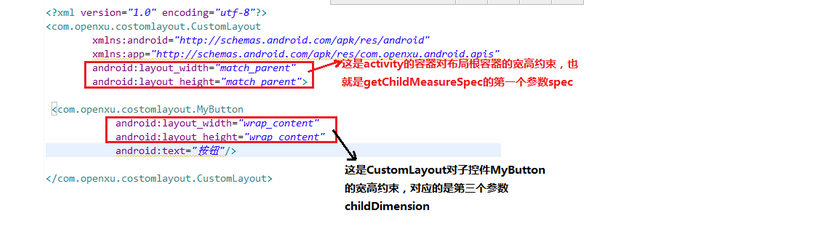
getChildMeasureSpec()的代码并不是很多,就是父布局约束和子布局的约束控制,所以我们可以得出下面结论

6,View控件中的onMeasure方法()
从上面的measureChild的源码可以看到,最后我们方法是调用的child.measure()方法,所以这里我们要回到View中看一下measure()方法,通过下面的源码发现我们的measure()方法调用的是onMeasure()方法
public final void measure(int widthMeasureSpec, int heightMeasureSpec) {

       ......省略代码

        // Suppress sign extension for the low bytes

        long key = (long) widthMeasureSpec << 32 | (long) heightMeasureSpec & 0xffffffffL;

        if (mMeasureCache == null) mMeasureCache = new LongSparseLongArray(2);

        if ((mPrivateFlags & PFLAG_FORCE_LAYOUT) == PFLAG_FORCE_LAYOUT ||

                widthMeasureSpec != mOldWidthMeasureSpec ||

                heightMeasureSpec != mOldHeightMeasureSpec) {

            // first clears the measured dimension flag

            mPrivateFlags &= ~PFLAG_MEASURED_DIMENSION_SET;

            resolveRtlPropertiesIfNeeded();

            int cacheIndex = (mPrivateFlags & PFLAG_FORCE_LAYOUT) == PFLAG_FORCE_LAYOUT ? -1 :

                    mMeasureCache.indexOfKey(key);

            if (cacheIndex < 0 || sIgnoreMeasureCache) {

                // measure ourselves, this should set the measured dimension flag back

                //在这里调用的

                onMeasure(widthMeasureSpec, heightMeasureSpec);

                mPrivateFlags3 &= ~PFLAG3_MEASURE_NEEDED_BEFORE_LAYOUT;

            } else {

                long value = mMeasureCache.valueAt(cacheIndex);

                // Casting a long to int drops the high 32 bits, no mask needed

                setMeasuredDimensionRaw((int) (value >> 32), (int) value);

                mPrivateFlags3 |= PFLAG3_MEASURE_NEEDED_BEFORE_LAYOUT;

            }

            // flag not set, setMeasuredDimension() was not invoked, we raise

            // an exception to warn the developer

            if ((mPrivateFlags & PFLAG_MEASURED_DIMENSION_SET) != PFLAG_MEASURED_DIMENSION_SET) {

                throw new IllegalStateException("View with id " + getId() + ": "

                        + getClass().getName() + "#onMeasure() did not set the"

                        + " measured dimension by calling"

                        + " setMeasuredDimension()");

            }

            mPrivateFlags |= PFLAG_LAYOUT_REQUIRED;

        }

        mOldWidthMeasureSpec = widthMeasureSpec;

        mOldHeightMeasureSpec = heightMeasureSpec;

        mMeasureCache.put(key, ((long) mMeasuredWidth) << 32 |

                (long) mMeasuredHeight & 0xffffffffL); // suppress sign extension

    }
ok我们来看一下我们的onMeasure()方法的代码,看看它具体干了些什么
protected void onMeasure(int widthMeasureSpec, int heightMeasureSpec) {

        setMeasuredDimension(getDefaultSize(getSuggestedMinimumWidth(), widthMeasureSpec),

                getDefaultSize(getSuggestedMinimumHeight(), heightMeasureSpec));

    }

public static int getDefaultSize(int size, int measureSpec) {

        int result = size;

        int specMode = MeasureSpec.getMode(measureSpec);

        int specSize = MeasureSpec.getSize(measureSpec);

        switch (specMode) {

        case MeasureSpec.UNSPECIFIED:

            result = size;

            break;

        case MeasureSpec.AT_MOST:

        case MeasureSpec.EXACTLY:

            result = specSize;

            break;

        }

        return result;

    }
从源码我们了解到:
- 如果View的宽高模式为未指定,他的宽高将设置为android:minWidth/Height =”“值与背景宽高值中较大的一个;
- 如果View的宽高 模式为 EXACTLY (具体的size ),最终宽高就是这个size值;
- 如果View的宽高模式为EXACTLY (填充父控件 ),最终宽高将为填充父控件;
- 如果View的宽高模式为AT_MOST (包裹内容),最终宽高也是填充父控件。
也就是说如果我们的自定义控件在布局文件中,只需要设置指定的具体宽高,或者MATCH_PARENT 的情况,我们可以不用重写onMeasure方法。
但如果自定义控件需要设置包裹内容WRAP_CONTENT ,我们需要重写onMeasure方法,为控件设置需要的尺寸;默认情况下WRAP_CONTENT 的处理也将填充整个父控件。
onMeasure方法最后需要调用setMeasuredDimension方法来保存测量的宽高值。
这样的话我们就基本分析完了 ,有没有恍然大悟的感觉!!! See You Next Time ....
最新文章
- JS核心系列:浅谈 call apply 与 bind
- Fedora 22中的Locale and Keyboard Configuration
- Linux软件安装
- listview嵌套gridview,并实现grid元素部分显示以及点击展开与折叠
- JS高程3.基本概念(2)
- PL/SQL 如何查看当前连接信息以及SQL PLUS如何指定IP地址
- lightoj 1370 欧拉函数
- JavaScript 单线程相关
- php 执行的目录到新的 directory 目录中
- JSP页面中<%! %>和<% %>的区别
- hadoop(五): shell命令
- android 列表开发 ListView
- EditText 监听回车事件 避免2次触发
- Window8 进不了PE如何设置BIOS
- zTree的getChangeCheckedNodes()使用
- UNITY3D 破碎 shatter
- Spring ——简介及环境搭建跑通Hello
- wtforms快速使用和源码分析(基于flask)
- JavaScript(jquery)实现二级菜单联动
- Java_web学习(一) jdk配置