Unity shader学习之屏幕后期处理效果之高度雾,重建world pos方法2
2024-10-19 08:56:35
这里使用一种更高效地从深度纹理中重建世界坐标的方法。
首先计算摄像机的视锥体的四条射线向量进行线性插值,插值后的值便是该像素在世界空间坐标下到摄像机的方向。
然后通过与深度值相乘即可得到摄像机位置到该像素的向量,加上摄像机的位置则是该像素在世界空间中的位置。
转载请注明出处:https://www.cnblogs.com/jietian331/p/9443343.html
c#代码:
 using UnityEngine;

 public class HighFog2 : PostEffectRenderer

 {

     [SerializeField]

     Color m_fogColor = Color.white;

     [Range(0f, 1f)]

     [SerializeField]

     float m_fogDensity = 0.9f;

     [SerializeField]

     float m_fogPosY = 0.1f;

     [SerializeField]

     float m_fogDisappearHeight = ;

     protected override string ShaderName

     {

         get { return "Custom/Study/HighFog2"; }

     }

     protected override void OnRenderImage(RenderTexture src, RenderTexture dest)

     {

         float fov = base.SelfCamera.fieldOfView;

         float near = base.SelfCamera.nearClipPlane;

         Transform camT = base.SelfCamera.transform;

         float halfFOV = fov * Mathf.PI / 360f;

         float toTopDis = near * Mathf.Tan(halfFOV);

         float toRightDis = toTopDis * (Screen.width / Screen.height);

         Vector3 toTop = camT.up * toTopDis;

         Vector3 toRight = camT.right * toRightDis;

         Vector3 toCenter = camT.forward * near;

         Vector3 topLeft = (toCenter + toTop - toRight) / near;

         Vector3 topRight = (toCenter + toTop + toRight) / near;

         Vector3 bottomLeft = (toCenter - toTop - toRight) / near;

         Vector3 bottomRight = (toCenter - toTop - toRight) / near;

         Matrix4x4 matrix = Matrix4x4.identity;

         matrix.SetRow(, bottomLeft);

         matrix.SetRow(, bottomRight);

         matrix.SetRow(, topLeft);

         matrix.SetRow(, topRight);

         base.Mat.SetMatrix("_CameraRays", matrix);

         base.Mat.SetColor("_FogColor", m_fogColor);

         base.Mat.SetFloat("_FogDensity", m_fogDensity);

         base.Mat.SetFloat("_FogPosY", m_fogPosY);

         base.Mat.SetFloat("_FogDisappearHeight", m_fogDisappearHeight);

         base.OnRenderImage(src, dest);

     }

 }
shader:
 Shader "Custom/Study/HighFog2"

 {

     Properties

     {

         _MainTex ("Texture", 2D) = "white" {}

     }

     SubShader

     {

         Pass

         {

             ZTest Always

             ZWrite Off

             Cull Off

             CGPROGRAM

             #pragma vertex vert

             #pragma fragment frag

             #include "UnityCG.cginc"

             struct appdata

             {

                 float4 vertex : POSITION;

                 float2 uv : TEXCOORD0;

             };

             struct v2f

             {

                 float2 uv : TEXCOORD0;

                 float4 vertex : SV_POSITION;

                 float3 ray : TEXCOORD1;

             };

             sampler2D _MainTex;

             sampler2D _CameraDepthTexture;

             uniform float4x4 _CameraRays;

             uniform float4 _FogColor;

             uniform float _FogDensity;

             uniform float _FogPosY;

             uniform float _FogDisappearHeight;

             v2f vert (appdata v)

             {

                 v2f o;

                 o.vertex = UnityObjectToClipPos(v.vertex);

                 o.uv = v.uv;

                 int index;

                 if(v.vertex.x < 0.5 && v.vertex.y < 0.5)

                 {

                     index = ;

                 }

                 else if(v.vertex.x > 0.5 && v.vertex.y < 0.5)

                 {

                     index = ;

                 }

                 else if(v.vertex.x > 0.5 && v.vertex.y > 0.5)

                 {

                     index = ;

                 }

                 else

                 {

                     index = ;

                 }

                 o.ray = _CameraRays[index].xyz;

                 return o;

             }

             fixed4 frag (v2f i) : SV_Target

             {

                 fixed4 col = tex2D(_MainTex, i.uv);

                 float d = LinearEyeDepth(SAMPLE_DEPTH_TEXTURE(_CameraDepthTexture, i.uv));

                 float3 worldPos = _WorldSpaceCameraPos + i.ray * d;

                 float fogWeight;

                 if(worldPos.y < _FogPosY)

                 {

                     fogWeight = ;

                 }

                 else if(worldPos.y > _FogPosY + _FogDisappearHeight)

                 {

                     fogWeight = ;

                 }

                 else

                 {

                     fogWeight =  - (worldPos.y - _FogPosY) / _FogDisappearHeight;

                 }

                 return lerp(col, _FogColor, fogWeight * _FogDensity);

             }

             ENDCG

         }

     }

     Fallback Off

 }
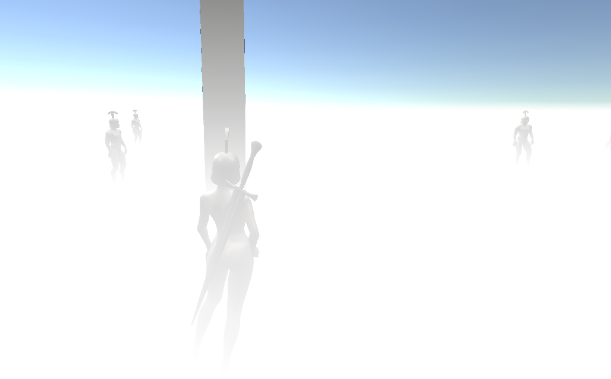
效果图如下:
最新文章
- Java 条形码 二维码 的生成与解析
- matlab(数组、矩阵)
- java中的匿名内部类总结(转)
- ssh超时断开的解决方法
- ubuntu下安装xlrd模块,Mysqldb模块
- thbgm拆包【in progress】
- [免费活动通知]RAD Studio XE8 技术研讨会(上海、成都)
- 使用 WPF 实现所见即所得HTML编辑器
- JS函数-我调用自己试试看
- Unity入门一,什么是GameObject,MonoBehaviour
- Day28--Python--网络通信协议 tcp与udp下的socket
- 开发.Net Script 模板-MyGeneration (翻译)
- sql 通过分数字段倒排获取名次的方法
- HTML表单的应用
- Android内存管理-OnTrimMemory
- 百度地图之自动提示--autoComplete
- java 接口 继承 接口 抽象类 继承 实体类
- Android开发之动态创建多个按钮
- 使用shell脚本依据分区信息分批次的下载hive表格数据
- HashMap的实现原理和底层数据结构