消息队列: rabbitMQ
什么是rabbitMQ?
rabbitMQ是一款基于AMQP协议的消息中间件,它能够在应用之间提供可靠的消息传输。在易用性,扩展性,高可用性上表现优秀。而且使用消息中间件利于应用之间的解耦,生产者(客户端)无需知道消费者(服务端)的存在。而且两端可以使用不同的语言编写,大大提供了灵活性。
centos7 上安装 rabbitmq 参考链接: https://www.cnblogs.com/liaojie970/p/6138278.html
rabbitmq 安装好后,远程连接rabbitmq server的话,需要配置权限
1. 首先在rabbitmq server上创建一个用户

[root@rabbitmq ~]# rabbitmqctl add_user admin 123456

2. 同时还要配置权限,允许从外面访问:

[root@rabbitmq ~]# rabbitmqctl set_permissions -p / admin ".*" ".*" ".*"

3. 给用户分配管理员权限(optional)

[root@rabbitmq ~]# rabbitmqctl set_user_tags admin administrator

4. 列出所有用户命令:

[root@rabbitmq ~]# rabbitmqctl list_users
客户端连接的时候需要配置认证参数,如下:
credentials = pika.PlainCredentials('admin','')    # 用户名和密码

connection = pika.BlockingConnection(

        pika.ConnectionParameters("10.0.0.124",5672,"/",credentials)

    )

channel = connection.channel()
rabbitMQ基本概念
- exchange:producer只能将消息发送给exchange。而exchange负责将消息发送到queues。Exchange必须准确的知道怎么处理它接受到的消息,是被发送到一个特定的queue还是许多quenes,还是被抛弃,这些规则则是通过exchange type来定义。主要的type有direct,topic,headers,fanout。具体针对不同的场景使用不同的type。
- queue: 消息队列,消息的载体。接收来自exchange的消息,然后再由consumer取出。exchange和queue是可以一对多的,它们通过routingKey来绑定。
- Producer : 生产者,消息的来源,消息必须发送给exchange。而不是直接给queue
- Consumer : 消费者,直接从queue中获取消息进行消费,而不是从exchange。
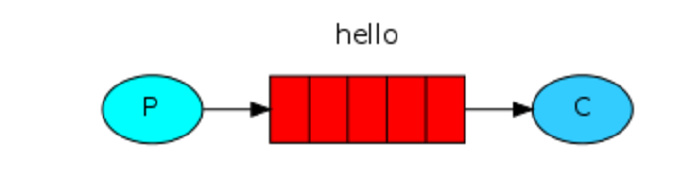
从以上可以看出Rabbitmq工作原理大致就是producer把一条消息发送给exchange。rabbitMQ根据routingKey负责将消息从exchange发送到对应绑定的queue中去,这是由rabbitMQ负责做的。而consumer只需从queue获取消息即可。基本效果图如下:

持久化问题
1. 消息确认机制
这里就会有一个问题,如果consumer在执行任务时需要花费一些时间,这个时候如果突然挂了,消息还没有被完成,消息岂不是丢失了,为了不让消息丢失,rabbitmq提供了消息确认机制,consumer在接收到,执行完消息后会发送一个ack给rabbitmq告诉它可以从queue中移除消息了。如果没收到ack。Rabbitmq会重新发送此条消息,如果有其他的consumer在线,将会接收并消费这条消息。消息确认机制是默认打开的。如果想关闭它只需要设置no_ack=true。
2. 队列持久化
- 除了consumer之外我们还得确保rabbitMQ挂了之后消息不被丢失。这里我们就需要确保队列queue和消息messages都得是持久化的。
- 队列的持久话需要设置durable属性。
channel.queue_declare(queue= task_queue, durable=True) # durable=True 队列持久化
3. 消息持久化
消息的持久话则是通过delivery_mode属性,设置值为2即可。
channel.basic_publish(exchange='',

                      routing_key="task_queue",

                      body=message,

                      properties=pika.BasicProperties(    # 消息头

                         delivery_mode = 2,     # make message persistent (消息持久化)

                      ))
一、简单发送模型
在rabbit MQ里消息永远不能被直接发送到queue。这里我们通过提供一个 空字符串 来使用 默认的exchange。这个exchange是特殊的,它可以根据routingKey把消息发送给指定的queue。所以我们的设计看起来如下所示:
发送端代码: send.py
import pika

credentials = pika.PlainCredentials('admin','')

connection = pika.BlockingConnection(

        pika.ConnectionParameters("10.0.0.124",5672,"/",credentials)

    )

channel = connection.channel()

# 声明 queue

channel.queue_declare(queue="hello")

# n RabbitMQ a message can never be sent directly to the queue, it always needs to go through an exchange.

channel.basic_publish(

        exchange='',        # 空字符串表示使用默认的exchange。这个exchange是特殊的,它可以根据routingKey把消息发送给指定的queue。

        routing_key='hello',

        body='Hello World'

    )

print("[x] sent 'Hello World!'")

connection.close()
接收端代码: receive.py
import pika

credentials = pika.PlainCredentials('admin','')

connection = pika.BlockingConnection(

        pika.ConnectionParameters("10.0.0.124",5672,"/",credentials)

    )

channel = connection.channel()

#You may ask why we declare the queue again ‒ we have already declared it in our previous code.

# We could avoid that if we were sure that the queue already exists. For example if send.py program

#was run before. But we're not yet sure which program to run first. In such cases it's a good

# practice to repeat declaring the queue in both programs.

channel.queue_declare(queue='hello')

def callback(ch,method,properties,body):

    print("[x] Received %r" % body)

channel.basic_consume(

        callback,      # 第一个参数是收到消息后的回调函数

        queue='hello',

        no_ack=True        # 默认为 False

    )

print("[*] Waiting for messages.To exit press CTRL+C")

channel.start_consuming()    # 阻塞在这一步开始收结果
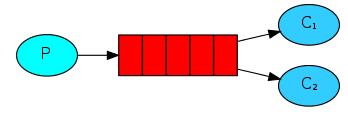
二、工作队列模式
一个生产者发送消息到队列中,有多个消费者共享一个队列,每个消费者获取的消息是唯一的。在这种模式下,RabbitMQ会默认把p发的消息依次分发给各个消费者(c),跟负载均衡差不多,如下图所示:
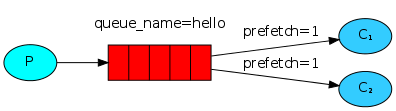
消息公平分发原则(类似负载均衡)
如果Rabbit只管按顺序把消息发到各个消费者身上,不考虑消费者负载的话,很可能出现,一个机器配置不高的消费者那里堆积了很多消息处理不完,同时配置高的消费者却一直很轻松。为解决此问题,可以在各个消费者端,配置perfetch=1,意思就是告诉RabbitMQ在我这个消费者当前消息还没处理完的时候就不要再给我发新消息了。,如下图所示:
发送端代码: send.py
import pika

import sys

credentials = pika.PlainCredentials("admin","")

connection = pika.BlockingConnection(

        pika.ConnectionParameters("10.0.0.124",5672,"/",credentials)

    )

channel = connection.channel()

channel.queue_declare(queue="task_queue",durable=True)

msg = " ".join(sys.argv[1:]) or "Hello World!"

channel.basic_publish(

        exchange="",

        routing_key="task_queue",

        body=msg,

        properties=pika.BasicProperties(    # 消息头

            delivery_mode=2,    # make message persistent (使消息持久化)

        )

    )

print("[x] Send %r" % msg)

connection.close()
接收端代码: receive.py
import pika

import time

import random

credentials = pika.PlainCredentials("admin","")

connection = pika.BlockingConnection(

        pika.ConnectionParameters("10.0.0.124",5672,"/",credentials)

    )

channel = connection.channel()

channel.queue_declare(queue="task_queue",durable=True)

def callback(ch,method,properties,body):

    print("[x] Received %r"%body)

    time.sleep(random.randint(1,50))

    print("[x] Done")

    ch.basic_ack(delivery_tag=method.delivery_tag)        # 主动发送ack

channel.basic_qos(prefetch_count=1)        # 在各个消费者端,配置perfetch=1,意思就是告诉RabbitMQ在我这个消费者当前消息还没处理完的时候就不要再给我发新消息了。

channel.basic_consume(

        callback,

        queue="task_queue"

    )        # no_ack 默认为 False

print("[x] Waiting for messages.To exit press CTRL+C")

channel.start_consuming()
Publish\Subscribe(消息发布\订阅)
之前的例子都基本都是1对1的消息发送和接收,即消息只能发送到指定的queue里,但有些时候你想让你的消息被所有的Queue收到,类似广播的效果,这时候就要用到exchange了。
Exchange在定义的时候是有类型的,以决定到底是哪些Queue符合条件可以接收消息
fanout: 所有bind到此exchange的queue都可以接收消息

direct: 通过routingKey和exchange决定的那个唯一的queue可以接收消息

topic:  所有符合routingKey(此时可以是一个表达式)的routingKey所bind的queue可以接收消息

    表达式符号说明:

        #代表一个或多个字符,*代表任何字符

        例:#.a会匹配a.a,aa.a,aaa.a等

            *.a会匹配a.a,b.a,c.a等

        注:使用RoutingKey为#,Exchange Type为topic的时候相当于使用fanout

headers: 通过headers 来决定把消息发给哪些queue
Publish\Subscribe(消息发布\订阅)之 广播模式
消息publisher 代码:send.py
import pika

import sys

credentials = pika.PlainCredentials("admin","")

connection = pika.BlockingConnection(

        pika.ConnectionParameters("10.0.0.124",5672,"/",credentials)

    )

channel = connection.channel()

channel.exchange_declare(        # 声明 exchange

        exchange="logs",

        exchange_type="fanout"

    )

msg = " ".join(sys.argv[1:]) or "Hello World!"

channel.basic_publish(

        exchange="logs",

        routing_key="",

        body=msg

    )

print("[x] Sent %r"%msg)

connection.close()
消息subscriber 代码: receive.py
import pika

credentials = pika.PlainCredentials("admin","")

connection = pika.BlockingConnection(

        pika.ConnectionParameters("10.0.0.124",5672,"/",credentials)

    )

channel = connection.channel()

channel.exchange_declare(

        exchange="logs",

        exchange_type="fanout"        # exchange 的类型

    )

#不指定queue名字,rabbit会随机分配一个名字,exclusive=True会在使用此queue的消费者断开后,自动将queue删除

result = channel.queue_declare(exclusive=True)

queue_name = result.method.queue

channel.queue_bind(                # 绑定 exchange 和 queue

        exchange="logs",

        queue=queue_name

    )

def callback(ch,method,properties,body):

    print("[x] Received %r" % body)

channel.basic_consume(

        callback,

        queue=queue_name,

        no_ack=True

    )

print("[*] Waiting for logs.To exit press CTRL+C")

channel.start_consuming()
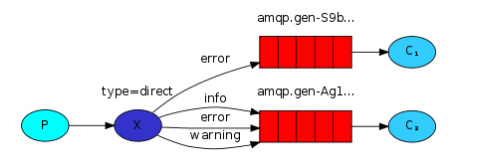
有选择的接收消息(exchange type=direct):direct 模式
RabbitMQ还支持根据关键字发送,即:队列绑定关键字,发送者将数据根据关键字发送到消息exchange,exchange根据 关键字 判定应该将数据发送至指定队列。
publisher 代码:
import pika

import sys

credentials = pika.PlainCredentials("admin","")

connection = pika.BlockingConnection(

        pika.ConnectionParameters("10.0.0.124",5672,"/",credentials)

    )

channel = connection.channel()

channel.exchange_declare(

        exchange="direct_logs",

        exchange_type="direct"        # 声明 exchange 并定义 exchange 的类型为 direct (组播)

    )

key_word = sys.argv[1] if len(sys.argv) > 1 else "info"        # 从脚本的参数中获取 关键字 作为 routing_key

msg = " ".join(sys.argv[2:]) or "Hello World!"        # 从脚本参数中获取 消息内容

channel.basic_publish(

        exchange="direct_logs",

        routing_key=key_word,        # 哪些队列绑定了这个关键字,哪些队列就能收到这个消息

        body=msg

    )

print("[x] Sent %r:%r"%(key_word,msg))

connection.close()
subscriber 代码:
import pika

import sys

credentials = pika.PlainCredentials("admin","")

connection = pika.BlockingConnection(

        pika.ConnectionParameters("10.0.0.124",5672,"/",credentials)

    )

channel = connection.channel()

channel.exchange_declare(

        exchange="direct_logs",

        exchange_type="direct"        # 声明 exchange 并定义 exchange 的类型为 direct

    )

# 生成随机 queue

result = channel.queue_declare(exclusive=True)

queue_name = result.method.queue

key_words = sys.argv[1:]        # 从脚本参数中获取 关键字

if not key_words:        # 脚本没有传参数,则退出程序

    sys.stderr.write("Usage:%s [info] [warning] [error]\n" % sys.argv[0])

    sys.exit(1)

for key_word in key_words:        # 循环绑定 关键字 routing_key

    channel.queue_bind(

            exchange="direct_logs",

            queue=queue_name,

            routing_key=key_word        # 绑定关键字 key_word,绑定了这个关键字的队列能收到消息

        )

def callback(ch,method,properties,body):

    print("[x] %r:%r" % (method.routing_key,body))        # 通过 method 参数获取 routing_key : method.routing_key

channel.basic_consume(

        callback,

        queue=queue_name,

        no_ack=True

    )

print("[x] Waiting for direct_logs. To exit press CTRL+C")

channel.start_consuming()
运行结果:
发送消息

只收到warning的消息

只收到error的消息

error和waring的都能收到

Publish\Subscribe(消息发布\订阅)之 Topic 模式
这种模型是最灵活的,相比较于direct的完全匹配和fanout的广播。Topic可以用类似正则的手法更好的匹配来满足我们的应用。下面我们首先了解一下topic类型的exchange。
topic类型的routing_key不可以是随意的单词,它必须是一系列的单词组合,中间以点号隔开,譬如“quick.orange.rabbit”这个样子。发送消息的routing_key必须匹配上绑定到队列的routing_key,消息才会被发送。
此外还有个重要的地方要说明,在如下代码处绑定的routing_key种可以有 * 和 # 2种字符。它们代表的意义如下:
- * : 可以匹配任意一个单词
- # : 可以匹配0到多个单词
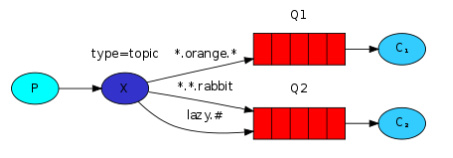
由图可知,Q1匹配3个单词中间为 orange 的routing_key ,而Q2可以匹配3个单词且最后一个单词为rabbit 和 第一个单词为lazy后面可以有多个单词的 routing_key。
publisher 端代码:
 import pika

 import sys

 credentials = pika.PlainCredentials("admin","")

 connection = pika.BlockingConnection(

         pika.ConnectionParameters("10.0.0.124",5672,"/",credentials)

     )

 channel = connection.channel()

 channel.exchange_declare(

         exchange="topic_logs",

         exchange_type="topic"

     )

 bind_key = sys.argv[1] if len(sys.argv) > 1 else "anonynous.info"        # 从脚本参数中读取 routing_key,routing_key 的格式以 . 分隔

 msg = " ".join(sys.argv[2:]) or "Hello World!"        # 脚本参数中读取 消息内容

 channel.basic_publish(

         exchange="topic_logs",

         routing_key=bind_key,        # topic 类型的 exchange 的 routing_key 的单词以 . 分隔

         body=msg

     )

 print("[x] Sent %r:%r"%(bind_key,msg))

 connection.close()
subscriber 端代码:
 import pika

 import sys

 credentials = pika.PlainCredentials("admin","")

 connection = pika.BlockingConnection(

         pika.ConnectionParameters("10.0.0.124",5672,"/",credentials)

     )

 channel = connection.channel()

 channel.exchange_declare(

         exchange="topic_logs",

         exchange_type="topic"

     )

 # 生成随机队列

 result = channel.queue_declare(exclusive=True)

 queue_name = result.method.queue

 bind_keys = sys.argv[1:]

 if not bind_keys:

     sys.stderr.write("Usage:%s [bind_key] ...\n" % sys.argv[0])

 for bind_key in bind_keys:

     channel.queue_bind(

             exchange="topic_logs",

             queue=queue_name,

             routing_key=bind_key        # 动态绑定 routing_key

         )

 def callback(ch,method,properties,body):

     print("[x] Received %r:%r" % (method.routing_key,body))

 channel.basic_consume(

         callback,

         queue=queue_name,

         no_ack=True

     )

 print("[*] Waiting for topic_logs. To exit press CTRL+C")

 channel.start_consuming()
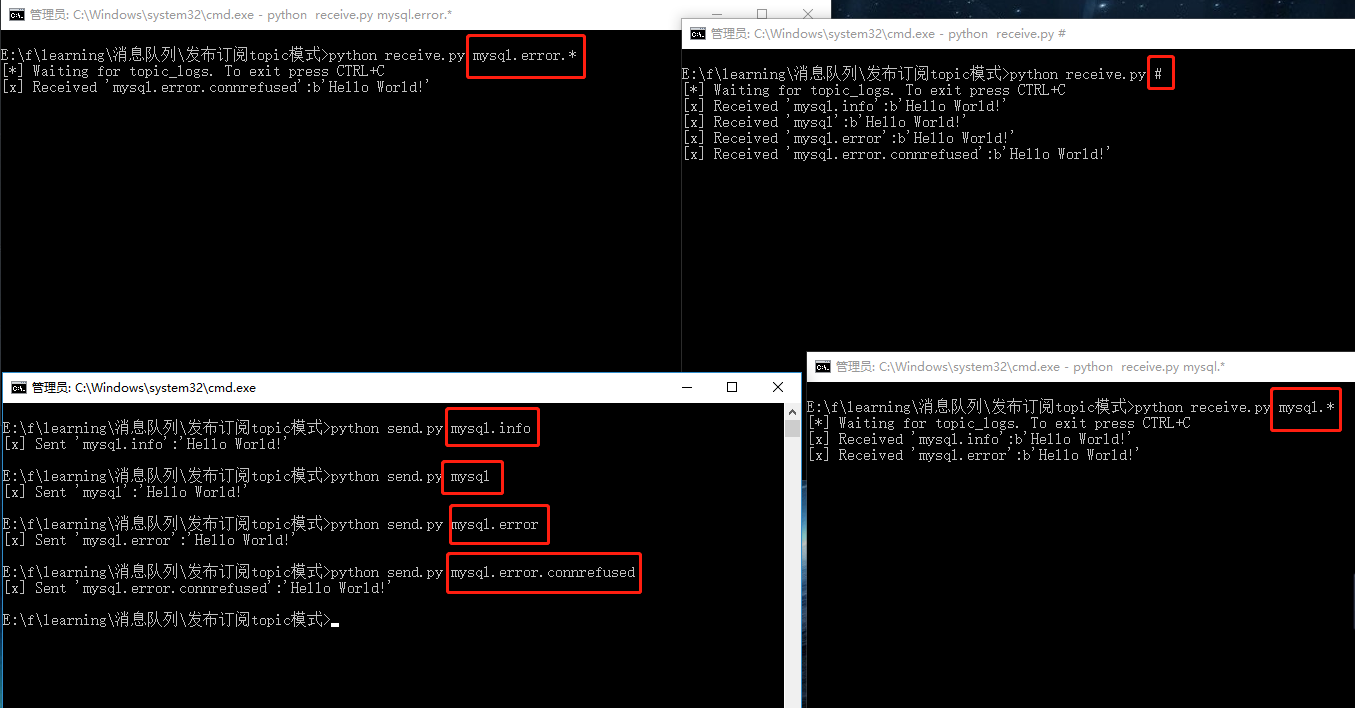
运行结果:
Remote procedure call (RPC)
前面的例子都有个共同点,就是发送端发送消息出去后没有结果返回。如果只是单纯发送消息,当然没有问题了,但是在实际中,常常会需要接收端将收到的消息进行处理之后,返回给发送端。
当我们需要在远程服务器上执行一个方法并等待它的结果的时候,我们将这种模式称为RPC。
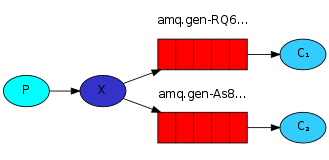
在rabbit MQ中为了能让client收到server端的response message。需要定义一个callback queue,不过现在有一个问题,就是每次请求都会创建一个callback queue .这样的效率是极其低下的。幸运的是我们可以通过correlation_id为每一个client创建一个单独的callback queue。通过指定correlation_id我们可以知道callback queue中的消息属于哪个client。要做到这样只需client每次发送请求时带上这唯一的correlation_id。然后当我们从callback queue中收到消息时,我们能基于 correlation_id 匹配上我们的消息。匹配不上的消息将被丢弃,看上去就像下图这样:
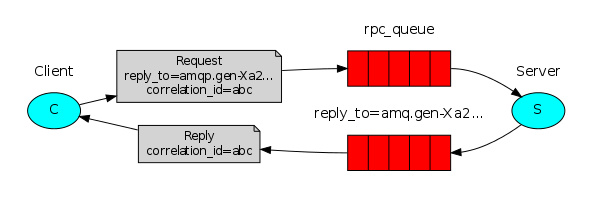
处理方法描述:发送端在发送信息前,产生一个接收消息的临时队列,该队列用来接收返回的结果。
总结一下流程如下:
- client发起请求,请求中带有2个参数reply_to和correlation_id
- 请求发往rpc_queue
- server获取到rpc_queue中的消息,处理完毕后,将结果发往reply_to指定的callback queue
- client 获取到callback queue中的消息,匹配correlation_id,如果匹配就获取,不匹配就丢弃.
RPC server 代码:
import pika

credentials = pika.PlainCredentials("admin","")

connect = pika.BlockingConnection(

        pika.ConnectionParameters("10.0.0.124",5672,"/",credentials)

    )

channel = connect.channel()

channel.queue_declare(queue="rpc_queue")        # 在 server 端声明 rpc_queue 队列;由于只在 server 端声明了这个队列,所以要先启动 server 端

def fib(n):

    if n == 1:

        return 1

    elif n == 2:

        return 1

    else:

        return fib(n-1) + fib(n-2)

def on_response(ch,method,properties,body):

    """

    收到消息后的回调函数

    """

    n = int(body)

    response = fib(n)

    ch.basic_publish(        # 消息处理完后就把处理结果发布给 client 端

            exchange="",

            routing_key=properties.reply_to,        # 回复消息的时候用  properties.reply_to

            properties = pika.BasicProperties(correlation_id=properties.correlation_id),

            body=str(response)

        )

    ch.basic_ack(delivery_tag=method.delivery_tag)        # 告诉 client 端消息已经处理完

channel.basic_consume(

        on_response,

        queue="rpc_queue"

    )

print("[*] Awaiting RPC requests.")

channel.start_consuming()

"""

在接收端使用channel.basic_consume()无限循环监听,如果设置no-ack参数为真,每次Consumer接到数据后,而不管是否处理完成,RabbitMQ Server会立即把这个Message标记为完成,然后从queue中删除了。为了保证数据不被丢失,RabbitMQ支持消息确认机制,即acknowledgments。为了保证数据能被正确处理而不仅仅是被Consumer收到,那么我们不能采用no-ack。而应该是在处理完数据后发送ack。

在处理数据后发送的ack(ch.basic_ack()方法),就是告诉RabbitMQ数据已经被接收,处理完成,RabbitMQ可以去安全的删除它了。如果Consumer退出了但是没有发送ack,那么RabbitMQ就会把这个Message发送到下一个Consumer。这样就保证了在Consumer异常退出的情况下数据也不会丢失。

这里并没有用到超时机制。RabbitMQ仅仅通过Consumer的连接中断来确认该Message并没有被正确处理。也就是说,RabbitMQ给了Consumer足够长的时间来做数据处理。

Demo的callback方法中ch.basic_ack(delivery_tag = method.delivery_tag)告诉rabbitmq消息已经正确处理。如果没有这条代码,Consumer退出时,Message会重新分发。然后RabbitMQ会占用越来越多的内存,由于RabbitMQ会长时间运行,因此这个“内存泄漏”是致命的。

"""
RPC client 代码:
import pika

import uuid

class FibRpcClient(object):

    def __init__(self):

        credentials = pika.PlainCredentials("admin","")

        self.connect = pika.BlockingConnection(

                pika.ConnectionParameters("10.0.0.124",5672,"/",credentials)

            )

        self.channel = self.connect.channel()

        # 生成随机队列,用于接收 server 端返回的消息

        result = self.channel.queue_declare(exclusive=True)

        self.queue_name = result.method.queue

        self.channel.basic_consume(        # 准备接收server端返回的消息

                self.on_response,

                queue=self.queue_name,

                no_ack=True

            )

    def on_response(self,ch,method,properties,body):

        """

        接收到 server 端消息后的回调函数

        """

        if self.corr_id == properties.correlation_id:

            self.response = body

    def call(self,n):

        """

        调用该函数发布请求(消息)

        """

        self.response = None    # 从 server 端收到的响应

        self.corr_id = str(uuid.uuid4())        # 生成该条请求(消息)的唯一标识

        self.channel.basic_publish(

                exchange="",

                routing_key="rpc_queue",        # basic_publish 发布时的 routing_key 和 basic_consume 消费时的 queue 相对应

                properties = pika.BasicProperties(

                        reply_to=self.queue_name,

                        correlation_id=self.corr_id

                    ),

                body=str(n)

            )

        while self.response is None:

            self.connect.process_data_events()        # 【非阻塞式】的检查队列里面有没有新消息 (如果有新消息,则会开始消费消息,可理解为 basic_consume 的 start_consuming())

        return int(self.response)

fib_rpc = FibRpcClient()

print("[x] Requesting fib(10)")

response = fib_rpc.call(10)

print("[.] Got %r" % response)
参考链接:
https://www.cnblogs.com/alex3714/articles/5248247.html
https://www.cnblogs.com/cjaaron/p/9184594.html#3999010
https://www.jb51.net/article/75647.htm
最新文章
- 三周,用长轮询实现Chat并迁移到Azure测试
- iOS开发之网络编程--1、AFNetwork 3.x 的所有开发中常用基础介绍
- 贪心(模拟费用流):NOIP2011 观光公交
- eclipse同时开两个tomcat
- 最小生成树Prim
- 模仿J2EE的session机制的App后端会话信息管理
- S-CMS企建v3二次SQL注入
- android打电话方法(直接拨通)
- V4L2 API详解 <二> Camera详细设置【转】
- 给 Advice 传递参数
- 创建日志表记录DML操作和DDL操作
- RFQ 、IFB、RFP 、RFI的区别是什么
- Maven(一)如何用Eclipse创建一个Maven项目
- R语言以及RStdio的安装
- vue-cli 3 is not a modual err
- Hystrix使用
- C#获取显示器屏幕数量 控制winform显示到哪一个屏幕
- 从一段字符串中去除数字的shell方法
- Oracle 学习----游标(使用无参光标cursor)
- 数据字典的设计--3.首页添加删除表格(JS实现)