mysql读写分离[高可用]
顾名思义, 在mysql负载均衡中有多种方式, 本人愚钝,只了解驱动中间件和mysql_proxy两种方式, 对于驱动,利用的是ReplicationDriver,具体请看远哥的这篇文章: MySQL读写分离又一好办法 使用 com.mysql.jdbc.ReplicationDriver
本次我要实现利用的方式是:mysql_proxy
下面进入主题
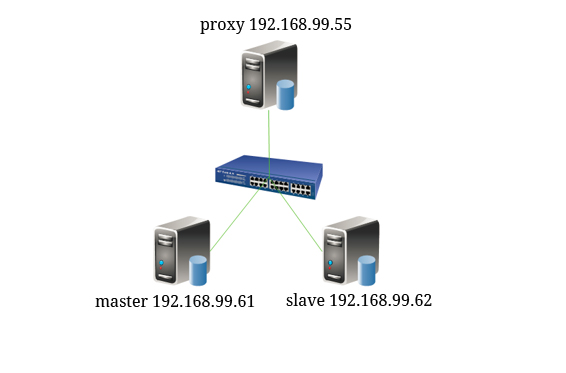
mysql_proxy:192.168.99.55
master:192.168.99.61
slave:192.168.99.62
1.安装mysql_proxy
tar -zxvf mysql-proxy-0.8.4-linux-rhel5-x86-64bit.tar.gz -C /usr/local

cd /usr/local

mv mysql-proxy-0.8.4-linux-rhel5-x86-64bit mysql-proxy
下面是需要的依赖
gcc* gcc-c++* autoconf* automake* zlib* libxml* ncurses-devel* libmcrypt* libtool* flex* pkgconfig*

libevent* glib* readline-devel
2.添加代理用户
useradd -r mysql-proxy
3.sysv服务脚本mysql_proxy
这个脚本放置的位置是:/etc/init.d
记得授权,chmod +x /etc/init.d/mysql_proxy
这个脚本是用来做快捷启动的。
#!/bin/bash

#

# mysql-proxy This script starts and stops the mysql-proxy daemon

#

# chkconfig: - 78 30

# processname: mysql-proxy

# description: mysql-proxy is a proxy daemon for mysql

# Source function library.

. /etc/rc.d/init.d/functions

prog="/usr/local/mysql-proxy/bin/mysql-proxy"

# Source networking configuration.

if [ -f /etc/sysconfig/network ]; then

    . /etc/sysconfig/network

fi

# Check that networking is up.

[ ${NETWORKING} = "no" ] && exit 0

# Set default mysql-proxy configuration.

ADMIN_USER="admin"

ADMIN_PASSWD="admin"

ADMIN_LUA_SCRIPT="/usr/local/mysql-proxy/share/doc/mysql-proxy/admin.lua"

PROXY_OPTIONS="--daemon"

PROXY_PID=/var/run/mysql-proxy.pid

PROXY_USER="mysql-proxy"

# Source mysql-proxy configuration.

if [ -f /etc/sysconfig/mysql-proxy ]; then

    . /etc/sysconfig/mysql-proxy

fi

RETVAL=0

start() {

    echo -n $"Starting $prog: "

    daemon $prog $PROXY_OPTIONS --pid-file=$PROXY_PID --proxy-address="$PROXY_ADDRESS" --user=$PROXY_USER --admin-username="$ADMIN_USER" --admin-lua-script="$ADMIN_LUA_SCRIPT" --admin-password="$ADMIN_PASSWORD"

    RETVAL=$?

    echo

    if [ $RETVAL -eq 0 ]; then

        touch /var/lock/subsys/mysql-proxy

    fi

}

stop() {

    echo -n $"Stopping $prog: "

    killproc -p $PROXY_PID -d 3 $prog

    RETVAL=$?

    echo

    if [ $RETVAL -eq 0 ]; then

        rm -f /var/lock/subsys/mysql-proxy

        rm -f $PROXY_PID

    fi

}

# See how we were called.

case "$1" in

    start)

        start

        ;;

    stop)

        stop

        ;;

    restart)

        stop

        start

        ;;

    condrestart|try-restart)

        if status -p $PROXY_PIDFILE $prog >&/dev/null; then

            stop

            start

        fi

        ;;

    status)

        status -p $PROXY_PID $prog

        ;;

    *)

        echo "Usage: $0 {start|stop|restart|reload|status|condrestart|try-restart}"

        RETVAL=1

        ;;

esac

exit $RETVAL
4.为服务脚本提供配置文件mysql_proxy
这个脚本放在的位置是:/etc/sysconfig(我是根据上面服务脚本的位置放的, 喜欢放在别处的地方可以自行修改)。
# Options for mysql-proxy

ADMIN_USER="admin"

ADMIN_PASSWORD="admin"

ADMIN_ADDRESS=""

ADMIN_LUA_SCRIPT="/usr/local/mysql-proxy/share/doc/mysql-proxy/admin.lua"

PROXY_ADDRESS=""

PROXY_USER="mysql-proxy"

PROXY_OPTIONS="--daemon --log-level=info --log-use-syslog --plugins=proxy --plugins=admin --proxy-backend-addresses=192.168.99.61:3306
--proxy-read-only-backend-addresses=192.168.99.62:3306 --proxy-lua-script=/usr/local/mysql-proxy/share/doc/mysql-proxy/rw-splitting.lua"
5.创建admin.lua
这个脚本放置的位置是:/usr/local/mysql-proxy/share/doc/mysql-proxy
--[[ $%BEGINLICENSE%$

 Copyright (c) 2007, 2012, Oracle and/or its affiliates. All rights reserved.

 This program is free software; you can redistribute it and/or

 modify it under the terms of the GNU General Public License as

 published by the Free Software Foundation; version 2 of the

 License.

 This program is distributed in the hope that it will be useful,

 but WITHOUT ANY WARRANTY; without even the implied warranty of

 MERCHANTABILITY or FITNESS FOR A PARTICULAR PURPOSE. See the

 GNU General Public License for more details.

 You should have received a copy of the GNU General Public License

 along with this program; if not, write to the Free Software

 Foundation, Inc., 51 Franklin St, Fifth Floor, Boston, MA

 02110-1301  USA

 $%ENDLICENSE%$ --]]

function set_error(errmsg)

proxy.response = {

type = proxy.MYSQLD_PACKET_ERR,

errmsg = errmsg or "error"

}

end

function read_query(packet)

if packet:byte() ~= proxy.COM_QUERY then

set_error("[admin] we only handle text-based queries (COM_QUERY)")

return proxy.PROXY_SEND_RESULT

end

local query = packet:sub(2)

local rows = { }

local fields = { }

if query:lower() == "select * from backends" then

fields = {

{ name = "backend_ndx",

 type = proxy.MYSQL_TYPE_LONG },

{ name = "address",

 type = proxy.MYSQL_TYPE_STRING },

{ name = "state",

 type = proxy.MYSQL_TYPE_STRING },

{ name = "type",

 type = proxy.MYSQL_TYPE_STRING },

{ name = "uuid",

 type = proxy.MYSQL_TYPE_STRING },

{ name = "connected_clients",

 type = proxy.MYSQL_TYPE_LONG },

}

for i = 1, #proxy.global.backends do

local states = {

"unknown",

"up",

"down"

}

local types = {

"unknown",

"rw",

"ro"

}

local b = proxy.global.backends[i]

rows[#rows + 1] = {

i,

b.dst.name,          -- configured backend address

states[b.state + 1], -- the C-id is pushed down starting at 0

types[b.type + 1],   -- the C-id is pushed down starting at 0

b.uuid,              -- the MySQL Server's UUID if it is managed

b.connected_clients  -- currently connected clients

}

end

elseif query:lower() == "select * from help" then

fields = {

{ name = "command",

 type = proxy.MYSQL_TYPE_STRING },

{ name = "description",

 type = proxy.MYSQL_TYPE_STRING },

}

rows[#rows + 1] = { "SELECT * FROM help", "shows this help" }

rows[#rows + 1] = { "SELECT * FROM backends", "lists the backends and their state" }

else

set_error("use 'SELECT * FROM help' to see the supported commands")

return proxy.PROXY_SEND_RESULT

end

proxy.response = {

type = proxy.MYSQLD_PACKET_OK,

resultset = {

fields = fields,

rows = rows

}

}

return proxy.PROXY_SEND_RESULT

end
6.修改rw-splitting.lua
修改的是min_idle_connections和max_idle_connections的值,都等于1
local commands    = require("proxy.commands")

local tokenizer   = require("proxy.tokenizer")

local lb          = require("proxy.balance")

local auto_config = require("proxy.auto-config")

--- config

--

-- connection pool

if not proxy.global.config.rwsplit then

	proxy.global.config.rwsplit = {

		min_idle_connections = 1,

		max_idle_connections = 1,

		is_debug = false

	}

end
7.测试mysql_proxy
7.1启动mysql_proxy
service mysql_proxy start
7.2端口进程状态
进程
ps aux | grep mysql-proxy

root     14230  0.0  0.0 103244   836 pts/0    S+   11:25   0:00 grep mysql-proxy

496      28239  0.0  0.0  45772  2104 ?        S    Dec04   0:03 /usr/local/mysql-proxy/libexec/mysql-proxy --daemon --log-level=info --log-use-syslog --plugins=proxy --plugins=admin --proxy-backend-addresses=192.168.75.61:3306 --proxy-read-only-backend-addresses=192.168.75.62:3306 --proxy-lua-script=/usr/local/mysql-proxy/share/doc/mysql-proxy/rw-splitting.lua --pid-file=/var/run/mysql-proxy.pid --proxy-address= --user=mysql-proxy --admin-username=admin --admin-lua-script=/usr/local/mysql-proxy/share/doc/mysql-proxy/admin.lua --admin-password=admin
端口
netstat -tlnp | grep mysql-proxy

tcp        0      0 0.0.0.0:4041                0.0.0.0:*                   LISTEN      28239/mysql-proxy

tcp        0      0 0.0.0.0:3306                0.0.0.0:*                   LISTEN      28239/mysql-proxy
看到上面, 端口有4041与3306, 这两个端口都是关键所在,下面将进行解题。
7.3登录mysql_proxy
随便找一台有mysql客户端的机器登录到mysql_proxy192.168.99.55(也可以在99.55上面安装mysql客户端, 我是在别的机器连得), 这个登录使用的账号密码还记得把?它就是脚本中指定的账号密码,admin:admin
mysql -u admin -p -h 192.168.99.55 --port=4041
必须指定端口, 不然跑的是3306
7.4查询状态
7.4.1 select * from help
+------------------------+------------------------------------+

| command                | description                        |

+------------------------+------------------------------------+

| SELECT * FROM help     | shows this help                    |

| SELECT * FROM backends | lists the backends and their state |

+------------------------+------------------------------------+

2 rows in set (0.00 sec)
7.4.2 SELECT * FROM backends
+-------------+--------------------+-------+------+------+-------------------+

| backend_ndx | address            | state | type | uuid | connected_clients |

+-------------+--------------------+-------+------+------+-------------------+

|           1 | 192.168.99.61:3306 | down    | rw   | NULL |                 0 |

|           2 | 192.168.99.62:3306 | down    | ro   | NULL |                 0 |

+-------------+--------------------+-------+------+------+-------------------+

2 rows in set (0.00 sec)
看到上面的信息, master99.61的type是rw(支持读写),slave99.62的type是ro(只读)
7.5抓包分析
在master上:
tcpdump -i eth0 -nn -XX ip dst 192.168.99.61 and tcp dst port 3306
在slave上:
tcpdump -i eth0 -nn -XX ip dst 192.168.99.62 and tcp dst port 3306
7.5.1主从分析
为了更明显操作结果, 停止主从
登录mysql_proxy
mysql -u admin -p -h 192.168.75.55 --port=3306
这次登录的是3306, 上面登录的是4041,请大家不要混淆。
至于3306与4041有什么不一样, 下面我解析一下, 4041就是查询读写分离的状态的, 3306无疑就是提供给外部的接口。
现在往test表插入一条数据
insert into test.testtest values(80,'80');
下面查询, 是查询不到的, 因为主从已经断开, 查的是往62跑, 写是写进61了, 只要把主从配置回来一切正常。
上面的抓包就是没操作一下都会有记录, 这次很明显看出来读写分析所跑的机器。
进行写时, master抓到的包是:
14:25:28.835455 IP 192.168.99.55.45648 > 192.168.99.61.3306: Flags [P.], seq 2082548409:2082548453, ack 3795613073, win 173, options [nop,nop,TS val 2915927263 ecr 2948974813], length 44

        0x0000:  0050 5689 cba6 0050 5689 9616 0800 4508  .PV....PV.....E.

        0x0010:  0060 994f 4000 4006 897b c0a8 4b37 c0a8  .`.O@.@..{..K7..

        0x0020:  4b3d b250 0cea 7c21 2ab9 e23c 7591 8018  K=.P..|!*..<u...

        0x0030:  00ad eed3 0000 0101 080a adcd 84df afc5  ................

        0x0040:  c8dd 2800 0000 0369 6e73 6572 7420 696e  ..(....insert.in

        0x0050:  746f 2074 6573 742e 7465 7374 7465 7374  to.test.testtest

        0x0060:  2076 616c 7565 7328 322c 2732 2729       .values(2,'2')

14:25:28.836543 IP 192.168.99.55.45648 > 192.168.99.61.3306: Flags [.], ack 12, win 173, options [nop,nop,TS val 2915927264 ecr 2949040785], length 0

        0x0000:  0050 5689 cba6 0050 5689 9616 0800 4508  .PV....PV.....E.

        0x0010:  0034 9950 4000 4006 89a6 c0a8 4b37 c0a8  .4.P@.@.....K7..

        0x0020:  4b3d b250 0cea 7c21 2ae5 e23c 759c 8010  K=.P..|!*..<u...

        0x0030:  00ad f329 0000 0101 080a adcd 84e0 afc6  ...)............
slave此时的状态是:
tcpdump: verbose output suppressed, use -v or -vv for full protocol decode

listening on eth0, link-type EN10MB (Ethernet), capture size 65535 bytes
进行读时, slave的状态是:
15:00:36.252068 IP 192.168.99.55.40191 > 192.168.99.62.3306: Flags [P.], seq 853416170:853416202, ack 2118301929, win 184, options [nop,nop,TS val 2915944710 ecr 2911691799], length 32

        0x0000:  0050 5689 a328 0050 5689 9616 0800 4508  .PV..(.PV.....E.

        0x0010:  0054 7caa 4000 4006 a62b c0a8 4b37 c0a8  .T|.@.@..+..K7..

        0x0020:  4b3e 9cff 0cea 32de 18ea 7e42 b8e9 8018  K>....2...~B....

        0x0030:  00b8 0093 0000 0101 080a adcd c906 ad8c  ................

        0x0040:  e417 1c00 0000 0373 656c 6563 7420 2a20  .......select.*.

        0x0050:  6672 6f6d 2074 6573 742e 7465 7374 7465  from.test.testte

        0x0060:  7374                                     st

15:00:36.253339 IP 192.168.99.55.40191 > 192.168.99.62.3306: Flags [.], ack 144, win 223, options [nop,nop,TS val 2915944712 ecr 2912255989], length 0

        0x0000:  0050 5689 a328 0050 5689 9616 0800 4508  .PV..(.PV.....E.

        0x0010:  0034 7cab 4000 4006 a64a c0a8 4b37 c0a8  .4|.@.@..J..K7..

        0x0020:  4b3e 9cff 0cea 32de 190a 7e42 b978 8010  K>....2...~B.x..

        0x0030:  00df 8c29 0000 0101 080a adcd c908 ad95  ...)............

        0x0040:  7ff5                                     ..
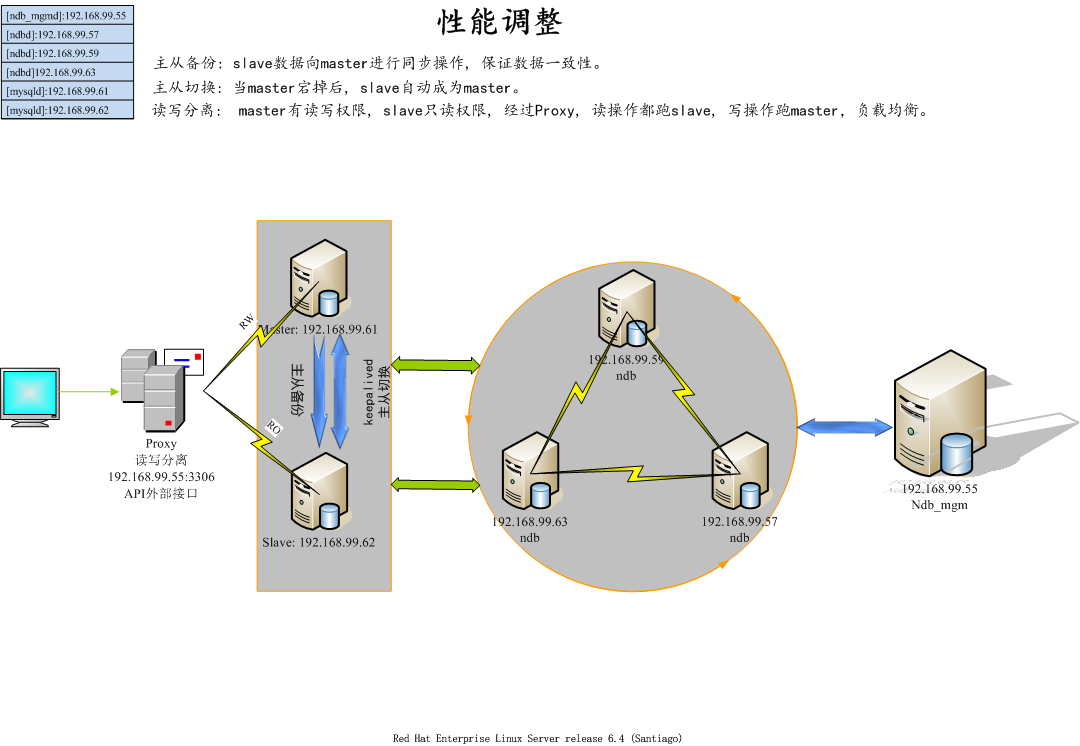
最终拓扑
最新文章
- java servlet
- <<< Tomcat运行提示The server does not support version 3.0
- Oracle RMAN 恢复控制文件到指定的路径
- mesos+marathon+zookeeper的docker管理集群亲手搭建实例(环境Centos6.8)
- 协同滤波 Collaborative filtering 《推荐系统实践》 第二章
- hadoop安装与WordCount例子
- 开始慢慢学习这本书了。。Python编程实战:运用设计模式、并发和程序库创建高质量程序
- stack 集合栈计算机 (摘)
- hdu 4912 Paths on the tree(树链拆分+贪婪)
- chrome浏览器解决ajax跨域问题
- Studio 5000编程:如何判断AB PLC系统中的硬件设备是否在正常工作
- Donald Knuth
- spring注解之@profile
- SP四种作用范围pageContext、request、session、application 一看就懂
- Nginx+Tomcat集群配置
- 一份最中肯的Java学习路线+资源分享(拒绝傻逼式分享)
- Ubuntu中基于QT的系统网线连接状态的实时监视
- go时间和日期
- mybatis interceptor 处理查询参数及查询结果
- 20145219 《Java程序设计》第02周学习总结
热门文章
- 安装Cuda9.0+cudnn7.3.1+tensorflow-gpu1.13.1
- 学习笔记 python 面向对象学习
- linux 下查看c 函数帮助
- python开源数据库gadfly安装排除错误
- WebActivatorEx—动态注册httpmodle
- 部署一个不依赖tomcat容器的应用
- asp.net拦截器
- 32.js 判断当前页面是否被浏览
- caffe-ssd运行create_data.sh的时候报错:SSD from caffe.proto import caffe_pb2 ImportError: No module named caffe.proto
- MindMaster学习笔记