ActiveQq的代码实现
2024-10-21 10:12:27
]从java代码开始再过渡到springboot
Java代码的实现
1.activemq这个消息中间件有两种形式
1. p2p(生产者,消费者)
特点:

生产者:
package com.lqh;

import org.apache.activemq.ActiveMQConnectionFactory;

import org.apache.activemq.command.ActiveMQQueue;

import javax.jms.*;

public class p2ppub {

public static void main(String[] args) throws Exception {

//   创建连接工厂

    ActiveMQConnectionFactory factory = new ActiveMQConnectionFactory("tcp://192.168.91.111:61616");

//    创建连接

    Connection connection = factory.createConnection();

//    创建会话 第一个参数就是指是否开启session事务如果开启了,需要手动提交session.commit
//    Session.AUTO_ACKNOWLEDGE  这个代表自动回执就是接收到消息后向对列应答成功
    Session session = connection.createSession(false, Session.AUTO_ACKNOWLEDGE);

//     创建生产者(指明消息队列的名字)

    Destination destination = new ActiveMQQueue("152-queue1");

    MessageProducer producer = session.createProducer(destination);

//    创建消息 使用会话创建

    TextMessage textMessage = session.createTextMessage("hello-152");

//    生产者发布消息

    producer.send(textMessage);

//    提交

//    session.commit();

//    关闭资源

    connection.close();

    session.close();

    producer.close();

}

}
消费者:
package com.lqh;

import org.apache.activemq.ActiveMQConnectionFactory;

import org.apache.activemq.command.ActiveMQQueue;

import javax.jms.*;

public class p2psub {

//    消费者

public static void main(String[] args) throws JMSException {

// 创建连接工厂

    ActiveMQConnectionFactory factory = new ActiveMQConnectionFactory("tcp://192.168.91.111:61616");

//    创建连接

    Connection connection = factory.createConnection();

    //    启动连接

    connection.start();

//    创建会话  是否开启事务 开启自动回执

    Session session = connection.createSession(false, Session.AUTO_ACKNOWLEDGE);

//    创建消费者 指定消费者的队列名字

    Destination destination = new ActiveMQQueue("152-queue1");

    MessageConsumer consumer = session.createConsumer(destination);

//    消费者获取到消息

    TextMessage receive = (TextMessage) consumer.receive();

    System.out.println(receive);

//    事务提交

//    session.commit();

//   资源释放

    connection.close();

    consumer.close();

    session.close();

}

}
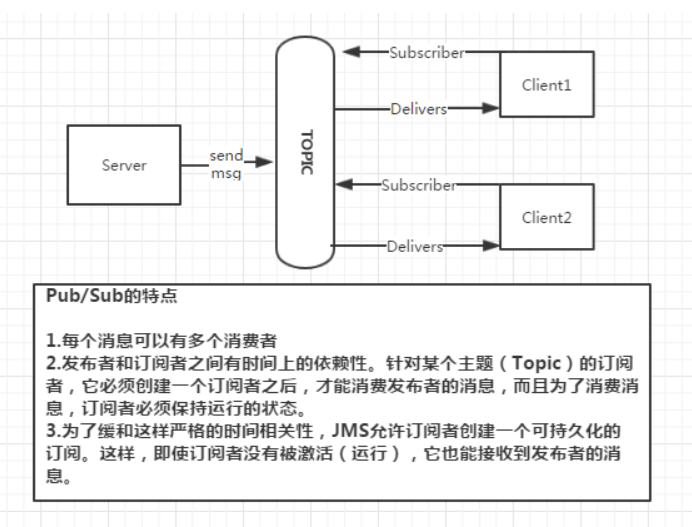
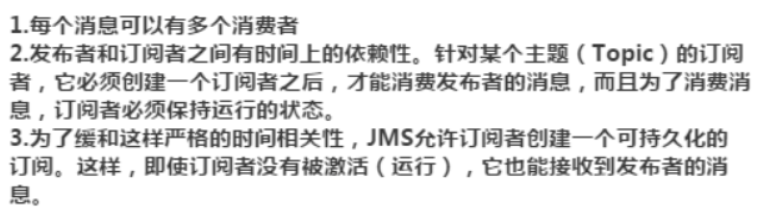
2. 发布与订阅

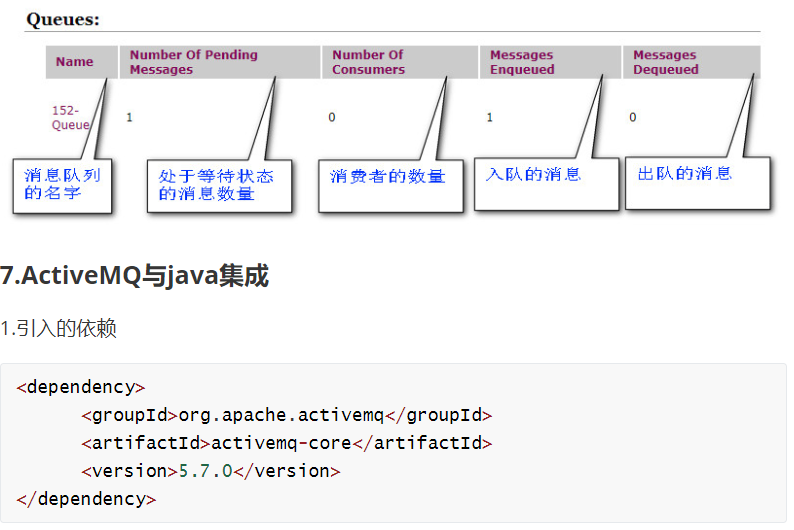
<dependency>
<groupId>org.apache.activemq</groupId>
<artifactId>activemq-core</artifactId>
<version>5.7.0</version>
</dependency>
pub 发布
package com.lqh;

import org.apache.activemq.ActiveMQConnectionFactory;

import org.apache.activemq.command.ActiveMQQueue;

import javax.jms.*;

public class p2ppub {

public static void main(String[] args) throws Exception {

//   创建连接工厂

    ActiveMQConnectionFactory factory = new ActiveMQConnectionFactory("tcp://192.168.91.111:61616");

//    创建连接

    Connection connection = factory.createConnection();

//    创建会话

    Session session = connection.createSession(false, Session.AUTO_ACKNOWLEDGE);

//     创建生产者(指明消息队列的名字)

    Destination destination = new ActiveMQQueue("152-queue1");

    MessageProducer producer = session.createProducer(destination);

//    创建消息 使用会话创建

    TextMessage textMessage = session.createTextMessage("hello-152");

//    生产者发布消息

    producer.send(textMessage);

//    提交

//    session.commit();

//    关闭资源

    connection.close();

    session.close();

    producer.close();

}

}
sub 订阅
package com.lqh;

import org.apache.activemq.ActiveMQConnectionFactory;

import org.apache.activemq.command.ActiveMQQueue;

import javax.jms.*;

public class p2psub {

//    消费者

public static void main(String[] args) throws JMSException {

// 创建连接工厂

    ActiveMQConnectionFactory factory = new ActiveMQConnectionFactory("tcp://192.168.91.111:61616");

//    创建连接

    Connection connection = factory.createConnection();

    //    启动连接

    connection.start();

//    创建会话  是否开启事务 开启自动回执

    Session session = connection.createSession(false, Session.AUTO_ACKNOWLEDGE);

//    创建消费者 指定消费者的队列名字

    Destination destination = new ActiveMQQueue("152-queue1");

    MessageConsumer consumer = session.createConsumer(destination);

//    消费者获取到消息

    TextMessage receive = (TextMessage) consumer.receive();

    System.out.println(receive);

//    事务提交

//    session.commit();

//   资源释放

    connection.close();

    consumer.close();

    session.close();

}

}
这个订阅与发布是需要先启动订阅者,再启动发布者这样消息才会发布出来然后程序才会截止。也就是pub/sub的特点
为了解决这个问题就采用了持久化 订阅者的持久化
package com.lqh;

import org.apache.activemq.ActiveMQConnectionFactory;

import org.apache.activemq.command.ActiveMQTopic;

import javax.jms.*;

public class DureableSub {

    public static void main(String[] args) throws JMSException {

//        创建一个连接工厂

        ActiveMQConnectionFactory factory = new ActiveMQConnectionFactory("tcp://192.168.91.111:61616");

//        2从工厂获取一个连接

        Connection connection = factory.createConnection();

        connection.setClientID("clinet111"); //给连接起一个名字随便起 (为一个标识id)

        connection.start();

//        3根据连接创建一个会话

        Session session = connection.createSession(false, Session.AUTO_ACKNOWLEDGE);

//        4.根据会话去创建一个可持久化订阅

        ActiveMQTopic destination=new ActiveMQTopic("151-Topic");

//        可持久化订阅  给当前消费者起一个id 这个id可以随便起

        TopicSubscriber consumer = session.createDurableSubscriber((Topic) destination, "anyname");

//        5.接收消息。

        TextMessage message = (TextMessage) consumer.receive();

        String text = message.getText();

        System.out.println(text);

        connection.close();

        session.close();

        consumer.close();

    }

}
为了使持久化生效需要先启动一次订阅者,和发布者做一个连接告诉activemq我当前是一个可持久化的订阅者 ,以后将这个信息保存起来为持久化之前topic的信息是不保存的,有订阅者将这个信息推出去没有就将这个信息删除了
例如:没有持久化前 只是启动分布者信息发布后没有订阅者,就会将信息删除
持久化后,即使没有订阅者消息发布后会将消息保存起来当消费者一启动就会将信息发布回来。
p2p中消费者需要访问才能消费
解决方法---监听器
使用springboot集成
       <dependency>

            <groupId>org.springframework.boot</groupId>

            <artifactId>spring-boot-starter-activemq</artifactId>

            <version>2.1.5.RELEASE</version>

        </dependency>
server.port=8989

spring.activemq.broker-url=tcp://192.168.91.111:61616
p2p 代码
package com.example.controller;

import org.apache.activemq.command.ActiveMQQueue;

import org.springframework.beans.factory.annotation.Autowired;

import org.springframework.jms.annotation.JmsListener;

import org.springframework.jms.core.JmsTemplate;

import org.springframework.web.bind.annotation.RequestMapping;

import org.springframework.web.bind.annotation.RestController;

import javax.jms.JMSException;

import javax.jms.Message;

import javax.jms.TextMessage;

@RestController

public class TestSubController {

   @Autowired

   JmsTemplate jmsTemplate;

    @RequestMapping("send")

   public void sendMsg(){

//        指定消息队列的名字

       ActiveMQQueue destination = new ActiveMQQueue("151-Topic");

       jmsTemplate.convertAndSend(destination,"hello");

   }

//   监听器当151-Topic消息队列发生了改变就会调用当前方法

    @JmsListener(destination = "151-Topic")

    public void receive(Message message) throws JMSException {

        TextMessage textMessage= (TextMessage) message;

        System.out.println(textMessage.getText());

    }

}
发布和订阅
package com.example.controller;

import org.apache.activemq.command.ActiveMQTopic;

import org.springframework.beans.factory.annotation.Autowired;

import org.springframework.jms.annotation.JmsListener;

import org.springframework.jms.core.JmsTemplate;

import org.springframework.web.bind.annotation.RequestMapping;

import org.springframework.web.bind.annotation.RestController;

import javax.jms.JMSException;

import javax.jms.Message;

import javax.jms.TextMessage;

@RestController

public class TestPubSubController {

    @Autowired

    private JmsTemplate jmsTemplate;

    @RequestMapping("pub")

    public String pub(String msg){

        ActiveMQTopic destination = new ActiveMQTopic("boot-topic");

        jmsTemplate.convertAndSend(destination,msg);

        return "publish success";

    }

    @RequestMapping("sub")

    public String sub(){

        ActiveMQTopic destination = new ActiveMQTopic("boot-topic");

        Object o = jmsTemplate.receiveAndConvert(destination);

        String s = o.toString();

        return s;

    }

    @JmsListener(destination = "boot-topic",containerFactory = "defaultJmsListenerContainerFactory")

    public void receive(Message message) throws JMSException {

        TextMessage textMessage= (TextMessage) message;

        System.out.println(textMessage.getText());

    }

}
因为springboot集成了activemq但是并没有实现持久化所以需要自定义持久化
package com.example.conf;

import org.apache.activemq.ActiveMQConnectionFactory;

import org.springframework.context.annotation.Bean;

import org.springframework.context.annotation.Configuration;

import org.springframework.jms.config.DefaultJmsListenerContainerFactory;

@Configuration

public class KeepSubConf {

    @Bean

    public DefaultJmsListenerContainerFactory defaultJmsListenerContainerFactory(){

        DefaultJmsListenerContainerFactory factory = new DefaultJmsListenerContainerFactory();

        factory.setConnectionFactory(activeMQConnectionFactory());

        factory.setClientId("client01");

        factory.setSubscriptionDurable(true);

        return  factory;

    }

    public ActiveMQConnectionFactory activeMQConnectionFactory(){

        ActiveMQConnectionFactory factory = new ActiveMQConnectionFactory("tcp://192.168.121.126:61616");

        return factory;

    }

}
///
最新文章
- Spring框架概述
- fork()创建子进程
- 第一节(配置springmvc环境)学习尚硅谷-springmvc视频教程
- GRUB密码设置
- java 12 - 5 带有缓冲区的字符流
- python学习之最简单的用户注册及登录验证小程序
- java解析密钥格式
- jsLint配置参数解释
- s3c6410_uboot中的代码重定位(nand->sdram)
- Effective C++条款01: 视C++为一个语言联邦
- WPF后台更换背景图-Background
- Config
- 有关UITableViewCell的侧滑删除以及使用相关大神框架MGSwipeTableCell遇到的小问题
- nodejs 中es5 模块的几种写法
- luogu【P3377】 【模板】左偏树
- iphone连接电脑itunes之后 C盘突然小很多被占了很多空间
- namespace------------https://www.cnblogs.com/linhaifeng/p/6657119.html
- [Go] golang缓冲通道实现资源池
- 无法确定条件表达式的类型,因为“<null>”和“System.DateTime”之间没有隐式转换----解决办法
- Mysql数据库的二进制安装和基础入门操作