Java并发:AbstractQueuedSynchronizer(AQS)
队列同步器 AbstractQueuedSynchronizer 是一个公共抽象类。提供一个同步器框架,用于实现依赖于先进先出(FIFO)等待队列的阻塞锁和相关同步器(信号量,事件等)。使用一个 int 成员变量表示同步状态,通过内置的 FIFO 队列来完成资源获取线程的排队工作。
同步器的使用主要是通过集成这个抽象类并实现它的抽象方法来管理同步状态,这个抽象提供了三个方法来对同步状态进行更改操作,分别是 getState(),setState(int) 和 compareAndSetState(int, int),这三个方法能保证状态的改变是安全的。抽象类的子类最好定义为同步器的静态内部类。
AQS 的设计是基于模板方法模式的,使用者需要继承并重写指定这些方法。随后在实现自定义的同步器的实现中调用这些模板方法,这些模板方法将会调用使用者重写的方法。
public final void acquire(int arg) |
独占式获取同步状态,如果当前线程获取同步状态成功,则由该方法返回,否则,将会进入同步队列等待,该方法会调用重写的 tryAcquire(int)。 |
public final void acquireInterruptibly |
与 acquire(int) 相同,但是该方法相应中断,当前线程未获取到同步状态而进入同步队列中,如果当前线程被中断,则会抛出中断异常并返回。 |
public final boolean tryAcquireNanos |
在 acquireInterruptibly(int) 基础上加了超时限制,如果当前线程在规定时间内没有获取到同步状态,则将返回 false,反之,返回 true。 |
public final void acquireShared(int arg) |
共享式的获取同步状态,如果当前线程未获取到同步状态,将会进入同步队列等待,与独占式获取的主要区别是在同一时刻可以有多个线程获取到同步状态。 |
public final void acquireSharedInterruptibly |
与 acquireShared(int) 相同,该方法响应中断。 |
public final boolean tryAcquireSharedNanos |
在 acquireSharedInterruptibly(int) 基础上增加了超时限制。 |
public final boolean releaseShared(int arg) |
独占式的释放同步状态,该方法会在释放同步状态之后,将同步队列的定义一个线程唤醒。 |
public final boolean releaseShared(int arg) |
共享式的释放同步状态 |
public final Collection<Thread> |
获取等待在同步队列上的线程集合 |
这些模板方法基本上分为3类:独占式获取与释放同步状态、共享式获取与释放同步状态和查询等待队列中的等待线程情况。这些模板方法在实现自定义同步组件时被调用。
protected boolean tryAcquire(int arg) |
独占式获取同步状态,实现该方法需要查询当前状态并判断同步状态是否符合预期,然后在进行CAS设置同步状态。 |
protected boolean tryRelease(int arg) |
独占式释放同步状态,等待获取同步状态的线程将会有机会获取同步状态。 |
protected int tryAcquireShared(int arg) |
共享式获取同步状态,返回大于等于0的值,表示获取成功,反之,获取失败。 |
protected boolean tryReleaseShared |
共享式释放同步状态。 |
protected boolean isHeldExclusively() |
当前同步器是否在独占模式下被线程占用,一般方法表示是否被当前线程所独占。 |
下面是一个自定义同步组件的例子:独占锁 Mutex,同一时刻只有一个线程占有锁,里面定义了一个静态内部类,该内部类继承了同步器并实现了独占式获取和释放同步状态。
 1 public class Mutex implements Lock {

 2

 3     /**

 4      * 静态内部类,继承了同步器并实现了独占式获取和释放同步状态。

 5      */

 6     private static class Sync extends AbstractQueuedSynchronizer {

 7         // 是否处于占用状态

 8         @Override

 9         protected boolean isHeldExclusively() {

10             return getState() == 1;

11         }

12         // 当状态为0的时候获取锁

13         public boolean tryAcquire(int acquires) {

14             if (compareAndSetState(0, 1)) {

15                 setExclusiveOwnerThread(Thread.currentThread());

16                 return true;

17             }

18             return false;

19         }

20         // 释放锁,将状态设置为0

21         @Override

22         protected boolean tryRelease(int releases) {

23             if (getState() == 0)

24                 throw new IllegalMonitorStateException();

25             setExclusiveOwnerThread(null);

26             setState(0);

27             return true;

28         }

29         // 返回一个Condition,每个condition都包含了一个condition队列

30         Condition newCondition() {

31             return new ConditionObject();

32         }

33     }

34

35     // 只需要将操作代理到Sync上即可

36     private final Sync sync = new Sync();

37

38     @Override

39     public void lock() {

40         sync.acquire(1);

41     }

42

43     @Override

44     public void lockInterruptibly() throws InterruptedException {

45         sync.acquireInterruptibly(1);

46     }

47

48     @Override

49     public boolean tryLock() {

50         return sync.tryAcquire(1);

51     }

52

53     @Override

54     public boolean tryLock(long time, TimeUnit unit) throws InterruptedException {

55         return sync.tryAcquireNanos(1, unit.toNanos(time));

56     }

57

58     @Override

59     public void unlock() {

60         sync.release(1);

61     }

62

63     @Override

64     public Condition newCondition() {

65         return sync.newCondition();

66     }

67

68     public boolean isLocked() {

69         return sync.isHeldExclusively();

70     }

71

72     public boolean hasQueuedThreads() {

73         return sync.hasQueuedThreads();

74     }

75 }
AQS的类图:
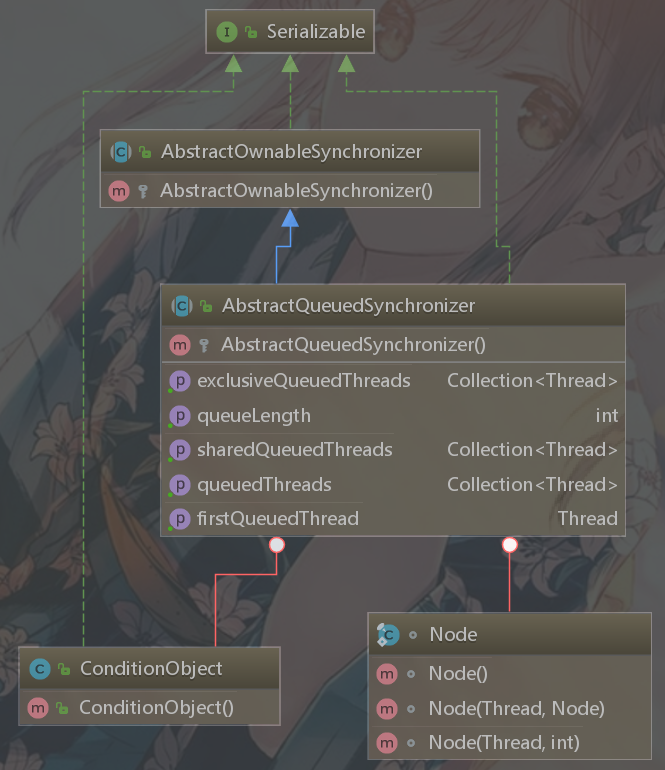
同步器依赖内部的同步队列(一个FIFO的双向队列)来完成同步状态管理,当前线程获取同步状态失败时,同步器会将当前线程以及等待状态等信息构造成为一个节点 Node 并加入同步队列,同时会阻塞当前线程,当同步状态释放时,会把首节点中的线程唤醒,时期再次尝试获取同步状态。
在 Node 类中有以下几种等待状态:
① SIGNAL,值为-1,后继结点的线程处于等待状态,若当前节点的线程释放了同步状态或者说被取消了,则会唤醒后继节点。
② CANCELLED,值为1,由于在同步队列中等待的线程由于超时或中断,需要从同步队列中取消等待。处于取消状态的节点不会再去竞争锁,也就是说不会再被阻塞。节点会一直保持取消状态,而不会转换为其他状态。
③ CONDITION,值为-2,节点在等待队列中,节点线程在等待在 Condition 上,当其他的线程对 Condition 调用了signal() 方法后,该节点将会从等待队列中转移到同步队列中,加入到对同步状态的获取中。
④ PROPAGATE,值为-3,当前线程被唤醒之后,可能还有剩余的资源可以唤醒其他线程,该状态用来表明后续节点会传播唤醒的操作。需要注意的是只有头节点才可以设置为该状态。
⑤ 初始状态,值为 0。
独占式同步状态的核心形式如下:
Acquire:

     while (!tryAcquire(arg)) {

        enqueue thread if it is not already queued;

        possibly block current thread;

     }

Release:

     if (tryRelease(arg))

        unblock the first queued thread;
在JDK 8 中 AQS 中的源代码为:
1   public final void acquire(int arg) {

2         if (!tryAcquire(arg) &&

3             acquireQueued(addWaiter(Node.EXCLUSIVE), arg))

4             selfInterrupt();

5   }
同步状态获取失败时,addWaiter 方法可以把构造的同步节点加入到队列尾部。
 1   private Node addWaiter(Node mode) {

 2         Node node = new Node(Thread.currentThread(), mode);

 3         // 尝试在尾部快速添加,后面还有enq方法完善整个添加过程

 4         Node pred = tail;

 5         if (pred != null) {

 6             node.prev = pred;

 7             if (compareAndSetTail(pred, node)) {

 8                 pred.next = node;

 9                 return node;

10             }

11         }

12         enq(node);

13         return node;

14   }

15

16   private Node enq(final Node node) {

17         for (;;) {

18             Node t = tail;

19             if (t == null) { // 必须初始化

20                 if (compareAndSetHead(new Node()))

21                     tail = head;

22             } else {

23                 node.prev = t;

24                 if (compareAndSetTail(t, node)) { // 通过CAS将节点设置为尾节点

25                     t.next = node;

26                     return t;

27                 }

28             }

29         }

30     }
最后调用 acquireQueued方法使得该节点以“死循环”的方式获取同步状态。acquireQueueud(final Node node, int arg) 源码如下,节点自旋获取同步状态。
 1   final boolean acquireQueued(final Node node, int arg) {

 2         boolean failed = true;

 3         try {

 4             boolean interrupted = false;

 5             for (;;) {

 6                 final Node p = node.predecessor(); // 获取前驱节点

 7                 if (p == head && tryAcquire(arg)) {

 8                     setHead(node);

 9                     p.next = null; // GC帮助回收

10                     failed = false;

11                     return interrupted;

12                 }

13                 if (shouldParkAfterFailedAcquire(p, node) &&

14                     parkAndCheckInterrupt())    // 检查并跟新无法获取状态的节点,如果线程应该阻塞,则返回true;第二个函数停下来并检查是否应该中断

15                     interrupted = true;

16             }

17         } finally {

18             if (failed)

19                 cancelAcquire(node);

20         }

21   }
同步器的 release方法,当前线程获取同步状态并执行了相应逻辑之后,就需要释放同步状态,使得后续节点能够继续获取同步状态。
1     public final boolean release(int arg) {

2         if (tryRelease(arg)) {

3             Node h = head;

4             if (h != null && h.waitStatus != 0)

5                 unparkSuccessor(h);

6             return true;

7         }

8         return false;

9     }
独占式超时获取同步状态 doAcquireNanos方法
 1     private boolean doAcquireNanos(int arg, long nanosTimeout)

 2             throws InterruptedException {

 3         if (nanosTimeout <= 0L)

 4             return false;

 5         final long deadline = System.nanoTime() + nanosTimeout; // 计算截止时间

 6         final Node node = addWaiter(Node.EXCLUSIVE);

 7         boolean failed = true;

 8         try {

 9             for (;;) {

10                 final Node p = node.predecessor();

11                 if (p == head && tryAcquire(arg)) {

12                     setHead(node);

13                     p.next = null; // help GC

14                     failed = false;

15                     return true;

16                 }

17                 nanosTimeout = deadline - System.nanoTime(); // 时间差 = 截止时间-当前时间

18                 if (nanosTimeout <= 0L)

19                     return false;

20                 if (shouldParkAfterFailedAcquire(p, node) &&

21                     nanosTimeout > spinForTimeoutThreshold)

22                     LockSupport.parkNanos(this, nanosTimeout);

23                 if (Thread.interrupted())

24                     throw new InterruptedException();

25             }

26         } finally {

27             if (failed)

28                 cancelAcquire(node);

29         }

30     }
样例代码,其中 withoutMutex() 和 withMutex() 分别是使用和不使用自定义同步器的样例,执行之后会明显发现带自定义同步器 Mutex 的线程不会交替执行。
  1 package concurrent.lock;

  2

  3 import java.util.concurrent.TimeUnit;

  4 import java.util.concurrent.locks.AbstractQueuedSynchronizer;

  5 import java.util.concurrent.locks.Condition;

  6 import java.util.concurrent.locks.Lock;

  7

  8 /**

  9  * @program: MyPractice

 10  * @description: 自定义同步组件Mutex,他只允许同一时刻只允许一个线程占有锁

 11  * @author: Mr.Wu

 12  * @create: 2019-09-18 20:43

 13  **/

 14 public class Mutex implements Lock {

 15

 16     /**

 17      * 静态内部类,继承了同步器并实现了独占式获取和释放同步状态。

 18      */

 19     private static class Sync extends AbstractQueuedSynchronizer {

 20         // 是否处于占用状态

 21         @Override

 22         protected boolean isHeldExclusively() {

 23             return getState() == 1;

 24         }

 25         // 当状态为0的时候获取锁

 26         public boolean tryAcquire(int acquires) {

 27             if (compareAndSetState(0, 1)) {

 28                 setExclusiveOwnerThread(Thread.currentThread());

 29                 return true;

 30             }

 31             return false;

 32         }

 33         // 释放锁,将状态设置为0

 34         @Override

 35         protected boolean tryRelease(int releases) {

 36             if (getState() == 0)

 37                 throw new IllegalMonitorStateException();

 38             setExclusiveOwnerThread(null);

 39             setState(0);

 40             return true;

 41         }

 42         // 返回一个Condition,每个condition都包含了一个condition队列

 43         Condition newCondition() {

 44             return new ConditionObject();

 45         }

 46     }

 47

 48     // 只需要将操作代理到Sync上即可

 49     private final Sync sync = new Sync();

 50

 51     @Override

 52     public void lock() {

 53         sync.acquire(1);

 54     }

 55

 56     @Override

 57     public void lockInterruptibly() throws InterruptedException {

 58         sync.acquireInterruptibly(1);

 59     }

 60

 61     @Override

 62     public boolean tryLock() {

 63         return sync.tryAcquire(1);

 64     }

 65

 66     @Override

 67     public boolean tryLock(long time, TimeUnit unit) throws InterruptedException {

 68         return sync.tryAcquireNanos(1, unit.toNanos(time));

 69     }

 70

 71     @Override

 72     public void unlock() {

 73         sync.release(1);

 74     }

 75

 76     @Override

 77     public Condition newCondition() {

 78         return sync.newCondition();

 79     }

 80

 81     public boolean isLocked() {

 82         return sync.isHeldExclusively();

 83     }

 84

 85     public boolean hasQueuedThreads() {

 86         return sync.hasQueuedThreads();

 87     }

 88

 89     public static void withoutMutex() throws InterruptedException {

 90         System.out.println("Without mutex: ");

 91         int threadCount = 2;

 92         final Thread threads[] = new Thread[threadCount];

 93         for (int i = 0; i < threads.length; i++) {

 94             final int index = i;

 95             threads[i] = new Thread(() -> {

 96                 for (int j = 0; j < 100000; j++) {

 97                     if (j % 20000 == 0) {

 98                         System.out.println("Thread-" + index + ": j =" + j);

 99                     }

100                 }

101             });

102         }

103

104         for (int i = 0; i < threads.length; i++) {

105             threads[i].start();

106         }

107         for (int i = 0; i < threads.length; i++) {

108             threads[i].join();

109         }

110     }

111

112     public static void withMutex() {

113         System.out.println("With mutex: ");

114         final Mutex mutex = new Mutex();

115         int threadCount = 2;

116         final Thread threads[] = new Thread[threadCount];

117         for (int i = 0; i < threads.length; i++) {

118             final int index = i;

119             threads[i] = new Thread(() -> {

120

121                 mutex.lock();

122                 try {

123                     for (int j = 0; j < 100000; j++) {

124                         if (j % 20000 == 0) {

125                             System.out.println("Thread-" + index + ": j =" + j);

126                         }

127                     }

128                 } finally {

129                     mutex.unlock();

130                 }

131             });

132         }

133

134         for (int i = 0; i < threads.length; i++) {

135             threads[i].start();

136         }

137     }

138

139

140     public static void main(String[] args) throws InterruptedException {

141         withoutMutex();

142         System.out.println();

143         withMutex();

144     }

145 }
以上说的是独占式获取同步状态,下面是共享式获取同步状态。
共享式与独占式的区别最主要在于同一时刻能否有多个线程同是获取到同步状态。写操作要求对资源的独占式访问,而读操作是共享式访问。共享式访问资源是,其他共享式的访问均被允许,而独占式访问将会被阻塞;独占式访问资源时,同一时刻其他访问资源均被阻塞。
通过调用同步器的 acquireShared(int) 方法可以共享式获取同步状态。在 acquireShared 方法中,tryAcquireShared 方法返回的是 int 型,大于等于 0 时,表示能够获取到同步状态。
 1     public final void acquireShared(int arg) {

 2         if (tryAcquireShared(arg) < 0)

 3             doAcquireShared(arg);

 4     }

 5

 6     private void doAcquireShared(int arg) {

 7         final Node node = addWaiter(Node.SHARED);

 8         boolean failed = true;

 9         try {

10             boolean interrupted = false;

11             for (;;) {

12                 final Node p = node.predecessor();

13                 if (p == head) {  // 如果当前节点的前驱是头结点,则尝试获取同步状态

14                     int r = tryAcquireShared(arg);

15                     if (r >= 0) { // 如果返回值获取的值大于等于0,表示获取同步状态成功并从自旋过程中返回

16                         setHeadAndPropagate(node, r);

17                         p.next = null; // help GC

18                         if (interrupted)

19                             selfInterrupt();

20                         failed = false;

21                         return;

22                     }

23                 }

24                 if (shouldParkAfterFailedAcquire(p, node) &&

25                     parkAndCheckInterrupt())

26                     interrupted = true;

27             }

28         } finally {

29             if (failed)

30                 cancelAcquire(node);

31         }

32     }
在共享式获取的自旋过程中,成功获取到同步状态并退出自旋的条件就是 tryAcquireShared 的返回值大于等于 0。
和独占式一样,共享式也要释放同步状态,通过调用 releaseShared(int) 方法释放同步状态,将会唤醒后续处于等待状态的节点。
1     public final boolean releaseShared(int arg) {

2         if (tryReleaseShared(arg)) {

3             doReleaseShared();

4             return true;

5         }

6         return false;

7     }
下面是一个自定义同步组件 TwinsLock,程序运行时每次都会同时打印两条语句,说同时有两个线程在执行。
  1 package concurrent.lock;

  2

  3 import java.util.concurrent.TimeUnit;

  4 import java.util.concurrent.locks.AbstractQueuedSynchronizer;

  5 import java.util.concurrent.locks.Condition;

  6 import java.util.concurrent.locks.Lock;

  7

  8 /**

  9  * @program: MyPractice

 10  * @description: 自定义共享锁

 11  * @author: Mr.Wu

 12  * @create: 2019-09-19 20:45

 13  **/

 14 public class TwinsLock implements Lock {

 15

 16     private static class Sync extends AbstractQueuedSynchronizer {

 17

 18         public Sync(int resourceCount) {

 19             if (resourceCount <= 0) {

 20                 throw new IllegalArgumentException("resourceCount must be larger than zero.");

 21             }

 22             // 设置可以共享的资源总数

 23             setState(resourceCount);

 24         }

 25

 26

 27         @Override

 28         protected int tryAcquireShared(int reduceCount) {

 29             // 使用尝试获得资源,如果成功修改了状态变量(获得了资源)

 30             // 或者资源的总量小于 0(没有资源了),则返回。

 31             for (; ; ) {

 32                 int lastCount = getState();

 33                 int newCount = lastCount - reduceCount;

 34                 if (newCount < 0 || compareAndSetState(lastCount, newCount)) {

 35                     return newCount;

 36                 }

 37             }

 38         }

 39

 40         @Override

 41         protected boolean tryReleaseShared(int returnCount) {

 42             // 释放共享资源,因为可能有多个线程同时执行,所以需要使用 CAS 操作来修改资源总数。

 43             for (; ; ) {

 44                 int lastCount = getState();

 45                 int newCount = lastCount + returnCount;

 46                 if (compareAndSetState(lastCount, newCount)) {

 47                     return true;

 48                 }

 49             }

 50         }

 51     }

 52

 53     // 定义两个共享资源,说明同一时间内可以有两个线程同时运行

 54     private final Sync sync = new Sync(2);

 55

 56     @Override

 57     public void lock() {

 58         sync.acquireShared(1);

 59     }

 60

 61     @Override

 62     public void lockInterruptibly() throws InterruptedException {

 63         sync.acquireInterruptibly(1);

 64     }

 65

 66     @Override

 67     public boolean tryLock() {

 68         return sync.tryAcquireShared(1) >= 0;

 69     }

 70

 71     @Override

 72     public boolean tryLock(long time, TimeUnit unit) throws InterruptedException {

 73         return sync.tryAcquireNanos(1, unit.toNanos(time));

 74     }

 75

 76     @Override

 77     public void unlock() {

 78         sync.releaseShared(1);

 79     }

 80

 81     @Override

 82     public Condition newCondition() {

 83         throw new UnsupportedOperationException();

 84     }

 85

 86     public static void main(String[] args) {

 87         final Lock lock = new TwinsLock();

 88         int threadCounts = 10;

 89         Thread threads[] = new Thread[threadCounts];

 90         for (int i = 0; i < threadCounts; i++) {

 91             final int index = i;

 92             threads[i] = new Thread(() -> {

 93                 for (int i1 = 0; i1 < 5; i1++) {

 94                     lock.lock();

 95                     try {

 96                         TimeUnit.SECONDS.sleep(1);

 97                         System.out.println(Thread.currentThread().getName());

 98                     } catch (InterruptedException e) {

 99                         e.printStackTrace();

100                     } finally {

101                         lock.unlock();

102                     }

103

104                     try {

105                         TimeUnit.SECONDS.sleep(1);

106                     } catch (InterruptedException e) {

107                         e.printStackTrace();

108                     }

109                 }

110             });

111         }

112

113         for (int i = 0; i < threadCounts; i++) {

114             threads[i].start();

115         }

116     }

117 }
最新文章
- iOS开发--JS调用原生OC篇
- git的基础介绍和使用
- linux skill
- Qt不同类之间信号槽连接
- POI Word 模板 文字 图片 替换
- 使用awk排除第一行和第二行的数据
- Selenium2Library系列 keywords 之 _SelectElementKeywords 之 select_from_list_by_label(self, locator, *labels)
- SmoothProgressBar
- linux驱动程序之电源管理之linux的电源管理架构(3)
- UCOS 中的中断处理
- xp sp3安装 iis5.1
- CF #April Fools Day Contest 2016 E Out of Controls
- TechSmith Camtasia Studio屏幕录像编辑工具
- MVC 统一异常处理
- JDBC连接数据库时候出错
- python模拟---注册登陆查看个人信息
- ftp 两台服务器传输文件 apache
- 【原创】运维基础之OpenResty(Nginx+Lua)+Kafka
- 遇到npm报错read ECONNRESET怎么办
- CF401D Roman and Numbers