巧用 CSS 把图片马赛克化
一、image-rendering 介绍
CSS 中有一个有趣的特性叫 image-rendering,它可以通过算法来更好地显示被缩放的图片。
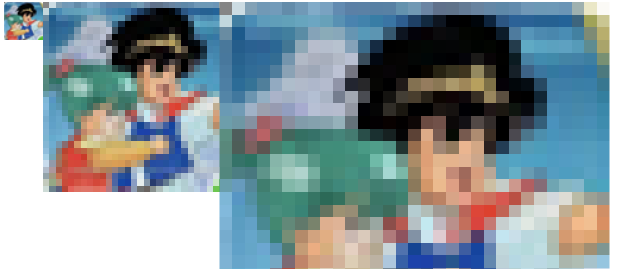
假设我们有一张尺寸较小的二维码截图(下方左),将其放大 10 倍后图像会被虚化(下方右):

这时给放大的图片加上 image-rendering: pixelated 的特性,CSS 会通过算法将其像素化展示,使其图像轮廓具有更锐利的边缘:

该特性非常适合应用在色彩单一、轮廓分明、需要被放大的图片上,可以营造出一种伪矢量的既视感(减少放大后的失真)。
对于色彩丰富、细节较多的照片,image-rendering: pixelated 使用后会营造出一种马赛克的外观:
这离本文标题所希望实现的马赛克效果还有段距离 —— 目前图片需要被放大后才能显示出效果,而我们希望能在保有原图尺寸的基础上,给图片覆盖等尺寸马赛克。
然而 image-rendering 特性对尺寸未发生缩放的元素是不会生效的。
二、踩坑等尺寸马赛克的实现
等尺寸马赛克的原理相当于先把一张照片模糊化,然后再经过锐化算法处理得到各种小方格。
image-rendering: pixelated 帮我们实现了“锐化”的步骤,我们得想想怎么实现“模糊”。
首先使用滤镜的模糊方案是行不通的,因为 image-rendering 和图像缩放系数强相关,所以应当思考可以怎样利用图片的缩放能力。
这里得说一句,WEB 上的图片像极了 Photoshop 里的智能对象 —— 你可以任意修改它的尺寸(例如放大很多倍让其变模糊),但最后再把图片改回原本的大小时,图片会变回原来的样子(没有任何失真)。
如何保留图片放大后的“模糊”信息,是优先需要解决的问题。
聪明的小伙伴已经想到了可以尝试使用 canvas 来处理,毕竟 canvas 可以轻松获取、绘制图像,且绘制出来的图像信息是纯数据的,而非图形对象(Image),故经其放大绘制的图片数据再进行缩小绘制(到原尺寸)会失真(这正好是我们所希望发生的)。
但这里也存在一些坑:
- 外部图像通过
image-rendering: pixelated算法处理后显示的信息,canvas是无法拿到的,因为那是显示层的东西。canvas拿到的依旧是未经锐化的、模糊的原生图像内容; canvas本身如果没有缩放的话,给canvas添加image-rendering: pixelated没有任何意义。
这意味着你无法把图片在 canvas 外面放大锐化,然后再写入 canvas 去缩小绘制(并不断迭代处理)来得到锐化后的原尺寸图片。
三、有趣的 canvas 拉伸
在解决上述问题时,我们先来看看 canvas 一个有趣的特性。
如果我们在 canvas 标签里定义了宽高:
<canvas width="100" height="50" ></canvas>
同时又给 canvas 在样式中定义了另一个宽高:
canvas {

  width: 200px;

  height: 200px;

}
那么 canvas 会以哪个尺寸来显示呢?
答案是以 CSS 的尺寸来显示,但画布的内容尺寸会以画布标签内定义的宽高为准。这意味着虽然我们看到的是 200px * 200px 的画布,但它的内容实际被拉伸了(宽被拉伸了 2 倍,高被拉伸了 4 倍)。
注:左边为画布,右边为原图
这也是 canvas 作为可替换元素的一个特性 —— CSS 无法修改其内容。试想一下,如果 CSS 可以动态地修改 canvas 内容的尺寸,意味着 canvas 的内容会被裁剪掉一部分,或者多出来一部分空白区域,这显然是不可取的。所以 canvas 在保留内容完整的前提下,整体伸缩到样式规定尺寸,是合理的浏览器行为。
利用 canvas 的这个特性,我们可以这样来实现等尺寸马赛克:
- 创建一个画布,通过样式规定好其宽高,并设置
image-rendering: pixelated特性; - 计算图片最佳展示尺寸(以类似
background-size: contain的形式展示); - 将画布的宽高(非样式)设置为样式宽高的
1/N; - 绘制图像,绘制的图像宽高为最佳展示尺寸的
1/N。
如此一来,我们实际绘制了一个尺寸仅为最佳尺寸 1/N 的图像,再通过 canvas 的 N 倍放大又变回了视觉上的最佳尺寸。图像因为走的 canvas 绘制,所以放大回最佳尺寸后会保持模糊,从而满足了 image-rendering 的匹配需求。
注:这里提到的“最佳尺寸”,指的是步骤 2 里“确保完整展示图像”所对应的最佳尺寸,而非图片原生尺寸。
四、代码实现
我们按照上方步骤来书写对应代码,当然我们希望灵活一些,例如上述的 N 可以由用户自定义。另外本章的代码可以在 Github 上获取。
HTML 部分
主要为选择图片的 <input> 控件、画布、方便画布获取图像的 <img>、供用户自定义缩放倍数的文本框、执行按钮:
  <input id="file" type="file" accept="image/*" />

  <canvas id="canvas"></canvas>

  <img id="img-raw" />

  <label for="compress-times">压缩倍数:</label>

  <input id="compress-times" type="number" value="12">

  <button>马赛克化</button>
CSS 部分
我们需要通过样式规定好画布的外观尺寸,并配置 image-rendering: pixelated 特性。另外 <img> 标签只是一个传递用户所选图片到画布的中介,可以直接隐藏:
    canvas {

      display: block;

      border: gray solid 1px;

      width: 600px;

      height: 600px;

      image-rendering: pixelated;

    }

    img {

      display: none;

    }
JS 部分
    let imgBlobUrl;

    const file = document.getElementById('file');

    const img = document.getElementById('img-raw');

    const compressTimes = document.getElementById('compress-times');

    const defaultCompressTimes = compressTimes.value | 0;

    const canvas = document.getElementById('canvas');

    const button = document.querySelector('button');

    const boundingRect = canvas.getBoundingClientRect();

    const ctx = canvas.getContext('2d');

    const canvas_w = boundingRect.width;

    const canvas_h = boundingRect.height;

    // 以 background-size: contain 形式设置图片尺寸

    function matchImgSizeToCanvas(imgElem = img) {

      let w = imgElem.width;

      let h = imgElem.height;

      if (w > canvas_w || h > canvas_h) {

        let radio = Math.max(h / canvas_h, w / canvas_w);

        radio = Number(radio.toFixed(2));

        imgElem.width = parseInt(w / radio);

        imgElem.height = parseInt(h / radio);

      }

    }

    // 绘制 1/N 大小的图像,画布宽高属性设为样式宽高的 1/N,从而实现画布内容的 N 倍放大

    function run() {

      let ct = parseInt(compressTimes.value) || defaultCompressTimes;

      canvas.width = parseInt(canvas_w / ct);

      canvas.height = parseInt(canvas_h / ct);

      ctx.drawImage(img, 0, 0, parseInt(img.width / ct), parseInt(img.height / ct));

    }

    function cleanCanvas() {

      ctx.clearRect(0, 0, canvas_w, canvas_h);

    }

    function reset() {

      img.removeAttribute('width');

      img.removeAttribute('height');

      cleanCanvas();

      matchImgSizeToCanvas(img);

      run();

    }

    file.addEventListener('change', function (e) {

      window.URL.revokeObjectURL(imgBlobUrl);

      const picFile = this.files[0];

      imgBlobUrl = window.URL.createObjectURL(picFile);

      img.onload = function init() {

        reset();

      }

      img.src = imgBlobUrl;

    }, false);

    button.addEventListener('click', reset, false);
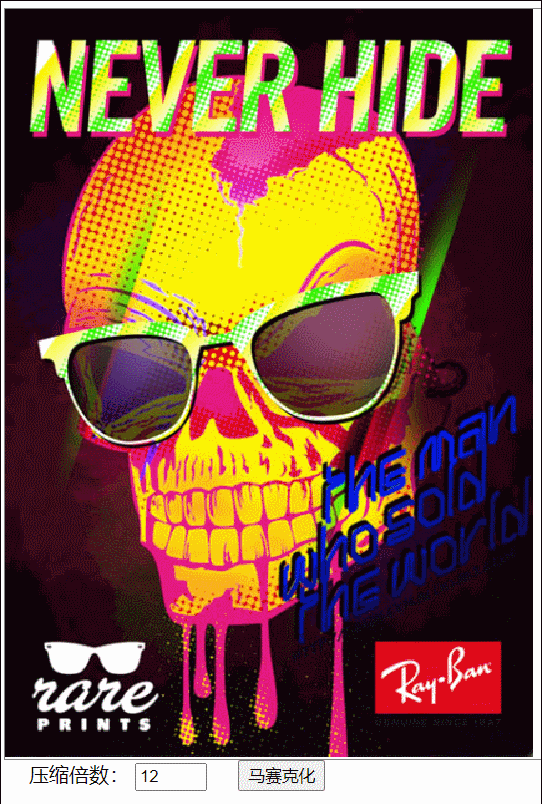
执行效果:
五、马赛克插件封装
通过上方示例我们学习了如何利用 canvas 特性来设计等尺寸的马赛克效果,现在我们尝试把该功能封装为一个简易插件,可以让页面上的图片列表一键马赛克化。
插件的实现方案也很简单 —— 用户点击按钮时,往图片容器上插入一个和容器等尺寸的画布(尺寸通过样式设置),再绘制覆盖画布的图像,并缩小画布的宽高属性来放大画布内容:
插件脚本
/** @file mosaic.js **/

class Mosaic {

    constructor(url, container, options = {}) {

        if (typeof container === 'string') {

            container = document.querySelector(container);

        }

        if (!url || !container?.style) {

            console.error('参数不正确');

        }

        this.url = url;

        this.options = options;

        this.container = container;

        this.init();

    }

    init() {

        const img = new Image();

        const canvas = document.createElement('canvas');

        canvas.style.position = 'absolute';

        canvas.style.zIndex = 999;

        canvas.style.imageRendering = 'pixelated';

        this.img = img;

        this.canvas = canvas;

        this.ctx = canvas.getContext('2d');

        const containerBoundingRect = this.container.getBoundingClientRect();

        const container_w = containerBoundingRect.width;

        const container_h = containerBoundingRect.height;

        // 通过样式初始化画布尺寸为容器尺寸

        canvas.style.width = container_w + 'px';

        canvas.style.height = container_h + 'px';

        img.onload = () => {

            this.run(container_w, container_h);

        }

        img.src = this.url;

    }

    run(w, h) {

        // 缩小倍数,可以由参数传入,默认为 12

        const compressTimes = parseInt(this.options.compressTimes) || 12;

        let compress_w = parseInt(w / compressTimes);

        let compress_h = parseInt(h / compressTimes);

        // 修改画布尺寸属性为 1/缩小倍数

        this.canvas.width = compress_w;

        this.canvas.height = compress_h;

        // 绘制图片覆盖缩小后的画布

        this.ctx.drawImage(this.img, 0, 0, compress_w, compress_h);

        this.container.prepend(this.canvas);

        this.img = null;

    }

    remove() {

        this.container.removeChild(this.canvas);

        this.canvas = null;

    }

}

export default Mosaic;
插件使用页
/** @file plugin-demo.html **/

<head>

  <style>

    ul {

      list-style: none;

      margin: 0;

      padding: 0;

    }

    li {

      float: left;

      line-height: 0;

      margin: 0 20px 20px 0;

    }

    li>img {

      max-height: 180px;

    }

    div {

      display: block;

      clear: both;

    }

  </style>

</head>

<body>

  <ul>

    <li><img src="./assert/0.png" /></li>

    <li><img src="./assert/1.png" /></li>

    <li><img src="./assert/2.png" /></li>

    <li><img src="./assert/3.png" /></li>

  </ul>

  <div>

    <button id="generate">铺上马赛克</button>

    <button id="remove">移除马赛克</button>

  </div>

  <script type="module">

    import Mosaic from './mosaic.js';

    let liElems = document.querySelectorAll('li');

    let mosaicList = [];

    document.querySelector('#generate').onclick = () => {

      remove();

      for (let i = 0; i < liElems.length; i++) {

        let liElem = liElems[i];

        let url = liElem.querySelector('img').src;

        let mosaic = new Mosaic(url, liElem);

        mosaicList.push(mosaic);

      }

    }

    function remove() {

      mosaicList.forEach((mosaic) => {

        mosaic.remove();

      });

      mosaicList.length = 0;

    }

    document.querySelector('#remove').onclick = remove;

  </script>

</body>
执行效果:


以上便是本文全部内容,相关代码可以在 Github 上获取。
希望能令你有所收获,共勉~
最新文章
- struts-标签
- Roslyn 学习笔记(一)
- MYCAT 安装(转)
- ASIHTTPRequest 记录过去5秒的平均流量字节/秒
- wordpress(一)wordpress环境的搭建
- oracle:jdbcTest
- 白盒测试之初识gtest工具
- Java-Iterator的用法
- location传值
- 转载--MYSQL5.7:Access denied for user 'root'@'localhost' (using password:YES)解决方法
- 基数排序模板(基数排序,C++模板)
- Python全栈-网络编程基础
- git other-误删恢复等
- 测试redis集群的两种方式:分片和哨兵
- 20145302张薇 《网络对抗》MSF应用基础
- 我的UI启蒙之路
- 怎么在.net里面解析JSON文件?
- Date Json格式转换Date格式
- Java多线程—阻塞队列和生产者-消费者模式
- Oracle基础学习2--Oracle登录与三种验证机制