p5.js基本[一] T型高斯分布的小星星
样例
  <script src="./p5/p5.js"></script>

<script>

  function setup() {

      // 只写一次你想做的事

    createCanvas(400, 400);

  }

  function draw() {

      // 写下你要重复的内容

      //  每秒约60次速度重复

    background(220);

    ellipse(50,50,80,80);

  }

</script>
createCanvas(width,height)创建canvasellipse(x,y,cx的直径,cy的直径)椭圆background()- 一个参数: 0-255 0表示纯黑色 255白色
- 三个参数 rgb
circle(x,y,直径)圆
通过查看源码可知

x,y,w,[h],[tl],[tr],[br],[bl]

[] 是可选参数分别是 高,左上圆角,右上,右下,下左

三个参数是圆

react(20,20,width,height)四个参数是长方形或者正方形

react(20,20,width,height,border-radius)五个参数是有圆角的长方形或者正方形

两个圆角就是对角(50,10)  就是上左,下右 50, 上右,下左 10

三个圆角就是(50,30,5)  上左50,上右30, 下右,下左5
line(起点x,起点y,终点x,终点y)直线square(x,y,边长)正方形triangle(x1,y1,x2,y2,x3,y3 )三角形quad( x1, y1, x2,y2,x3,y3,x4,y4 )四边形fill()一个参数是亮点(0-255)
一个参数 SVG/CSS
fill('red')

fill('#fae')

fill('#222222')

fill('rgb(0,255,0)')

fill('rgba(0,255,0, 0.25)')

fill('rgb(100%,0%,10%)')

fill('rgba(100%,0%,100%,0.5)')

// p5 color

fill(color(0, 0, 255));
三个参数
RGB三个参数
HSB* colorMode(HSB);
* fill(255, 204, 100);
stroke()- 一个参数亮点(0-255),三个RGB
strokeWeight(number)noStroke()noFill()
demo
 function setup() {

      createCanvas(600, 200);

    }

    function draw() {

        background(220);

        fill(230, 128, 255);    // 青色

        circle(100, 100, 80);

        stroke(255, 128, 0);

        circle(200, 100, 80);

        fill(200)

        strokeWeight(10);

        circle(300, 100, 80);

        noFill();

        strokeWeight(5);

        stroke(123);

        circle(400, 100, 80);

    }
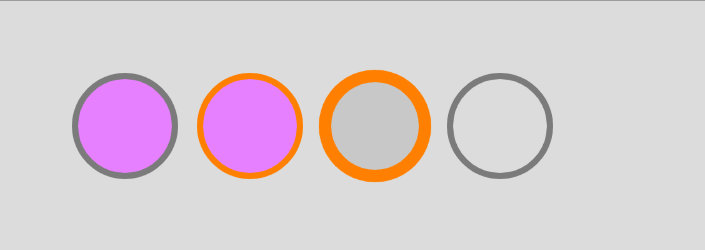
结论: 设置填充后,如果没有再次设置这个属性,将一直保持这个设置
noLoop() 功能
setup设置了一个noLoop() ,只执行一次
如果我们把draw() 函数,里面执行一个noLoop() 就只执行一次
变量的书写
 let dia = 60;

    function setup() {

      createCanvas(400, 200);

      background(220);

      noLoop();

    }

    function draw() {

      fill(128, 128, 0);

      noStroke();

      circle(100, 100, dia);

      circle(200, 100, dia);

      circle(300, 100, dia);

    }
应该写在函数的外面
打印函数
print()或者console.log()
编写一个动画
    let dia = 0;

    function setup() {

      createCanvas(400, 200);

      strokeWeight(2);

    }

    function draw() {

      if(dia>400){

        noLoop()

      }

      background(220);

      circle(dia,100,50)

      dia+=0.5;

    }
鼠标事件
按下的按钮mouseIsPressed 返回boolean
按下按钮类型mouseButton 返回鼠标左键,鼠标右键,鼠标中间滚轮'left','right','center'
大写表示直接可以拿到的全局变量LEFT,RIGHT,CENTER
当前指针坐标(mouseX,mouseY)
demo
   function setup() {

      createCanvas(500, 500);

      background(220);

      stroke(220);  // 设置边框颜色

    }

    function draw() {

      if (mouseIsPressed) {  // 鼠标按下

        if (mouseButton == LEFT) {  // 按下鼠标左键

          fill(256, 128, 0);

          circle(mouseX, mouseY, 20);  // 拿到坐标画圆

        } else if (mouseButton == RIGHT) {  // 拿到鼠标右键,画正方形

          fill(0, 128, 256);

          square(mouseX - 10, mouseY - 10, 20);

        }

      }

    }
左键画圆,右键画框
按键输入
先鼠标按下,在使用键key 拿到对应的字符串
if (mouseIsPressed) {  // 鼠标按下

        console.log(key);

}
随机数
random(min,max)
就是min,max返回随机
传入一个参数
random([1, 2, 3])

//1,2,3随机

random(10) // 0-10
不过你使用Math.random也是可以只是他封装啦
point(x,y)
其实可以设置z,用于 webGL
在空间设置一个点
设置stroke() 改变颜色
设置strokeWeight() 改变大小
constranin
将一个值限制一定范围
- 参数一 要约束的数
- 参数二 最低限度
- 参数三 最大值
- 参数四 受限的数量
abs
就是Math.abs()限制绝对值
abs(-3) // 3
randomGaussian
均值,标准差,作为参数的高斯或正态分布[高斯分布的随机数]
randomGaussian(Mean,StandardDeviation)

没有参数就是均值 0, 标准差为 1

一个参数就是均值, 标准差1
高斯模糊的随机实验
我们设置一个
(width 400,height 500)的矩形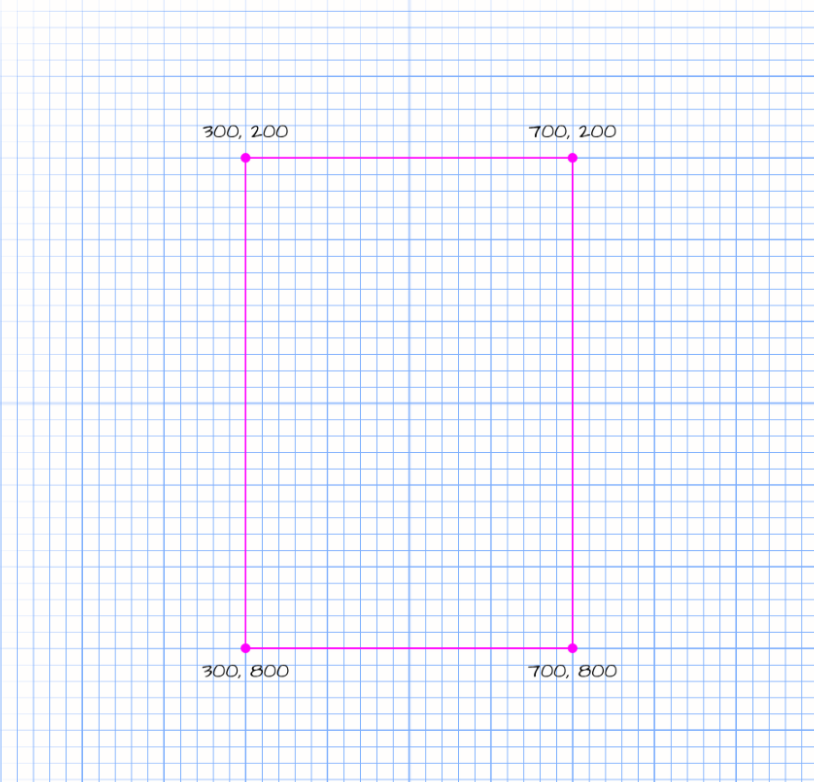
随机放置的点需要在X轴上放置在300px和700px之间,在Y轴上放置在200px和800px之间
function setup() {

  createCanvas(1000, 1000);

  background(10);

}

function draw() {

  stroke(245);

  var xloc = random(300, 700);

  var yloc = random(200, 800);

  point(xloc, yloc);

}
步骤二,我想怎么在梯形做出这个效果
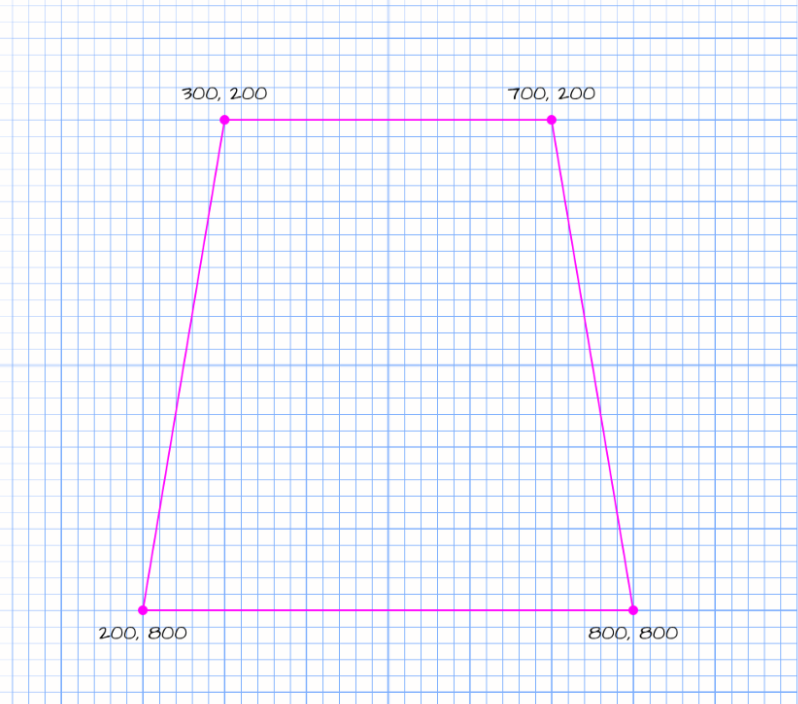
对于Y轴,我们可以设置跟之前相同200,800之间
对于x轴,就有点棘手,拿出小学学的斜率的公式y=kx+b 我们可以知道b=200,那么我们可以先算左边两个点,去掉b的距离就是(0,600),(100,0)那么公式可知

左边的斜率可以算出-6 右边的则为6
带入方程里可以得到x0=(y-200)/6
所以直接带入里面 x的左边的范围坐标就是x1=300-x0 右边就是x2=700+x0
  function setup() {

    createCanvas(1000, 1000);

    background(10);

  }

  function draw() {

    stroke(245);

    var yloc = random(200, 800);

    var shift = (yloc - 200) /6;

    var xloc = random(300 - shift, 700 + shift);

    point(xloc, yloc);

  }
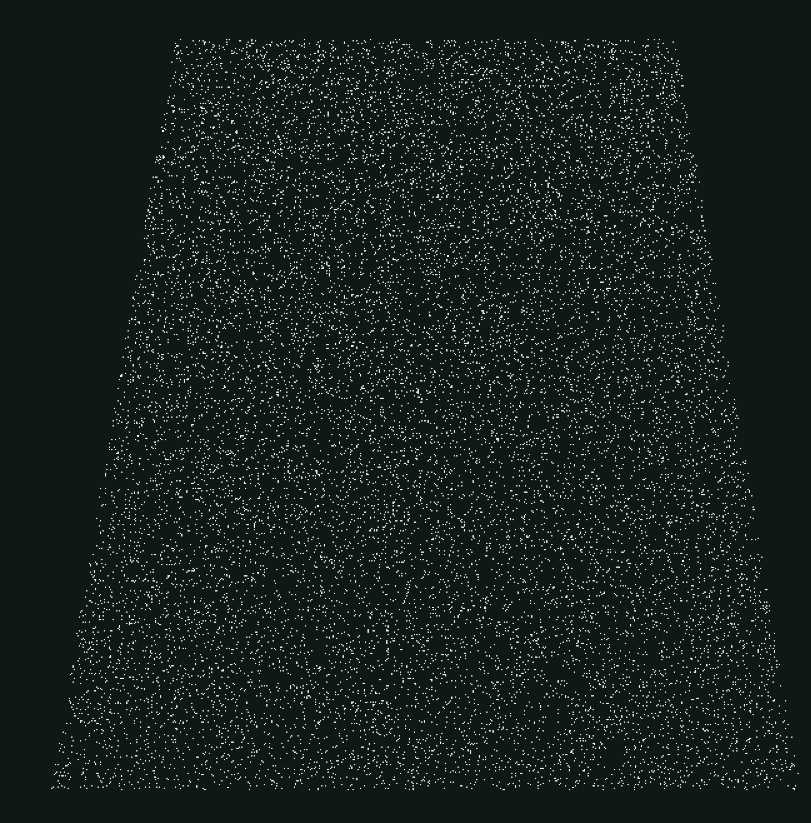
我们发现上面的不好看,那么如果编写出特定的均值和方差的高斯正态分布随机数
设置 基于均值200,方差180包含的随机数是
a = 180;

b = 200;

y = a*randomGaussian() + b;
记得要限制这个随机数的范围,由于y轴的限制范围为200-800
constrain(yloc, 200, 800);
完整代码为
 //方差,平均数, 尽量让粒子发布在顶部

    let sd = 180;

    let mean = 200;

    function setup() {

      createCanvas(1000, 1000);

      background(16,23,33);

    }

    function draw() {

      let yloc = randomGaussian();

      //  对于方差尽量使用正数,这样它的分布会尽量在顶部,所以使用绝对值

      yloc = abs(yloc * sd) + mean;

      // 限制范围

      yloc = constrain(yloc, 200, 800);

      let shift = (yloc - 200) /6;

      let xloc = random(300 - shift, 700 + shift);

      stroke(220)

      point(xloc, yloc);

      // 让它看上去更加梦幻点

      fill(107,202,226,15)

      noStroke();

     let d=random(6,11);

      ellipse(xloc,yloc,d,d)

    }

最新文章
- dubbo连接zookeeper注册中心因为断网导致线程无限等待问题【转】
- 在angular中实现下拉框的两种方式 ng-repeat和 ng-option
- 【原】相煎何太急——input的blur事件与button的click事件
- Wix 安装部署教程(七) 获取管理员权限
- 常见linux命令释义(第六天)——shell环境变量
- Android关联源码support-v4,v7,v13源码(转)
- 《深入理解Nginx》阅读与实践(一):Nginx安装配置与HelloWorld
- Java for LeetCode 063 Unique Paths II
- nosql(1)---radis
- Objective C中nil/Nil/NULL的区别
- net异步编程之await
- c++ split模板实现
- CQRS架构
- 波涛1202wm8833 lihomme/历织造 2013秋装全新男装夹克 整身年龄外套潮流立领男士休闲外套薄_9才号
- js规范
- vue报错 Do not use built-in or reserved HTML elements as component id:header
- 【漫画】程序员永远修不好的Bug——情人节
- Jade教程
- Centos7之Systemd风格
- JAVA的debug入门和多断电调试