LevelDB学习笔记 (3): 长文解析memtable、跳表和内存池Arena
LevelDB学习笔记 (3): 长文解析memtable、跳表和内存池Arena
1. MemTable的基本信息
我们前面说过leveldb的所有数据都会先写入memtable中,在leveldb中每个 LevelDB 实例最多会维护两个 MemTable: mem_ 和 imm_。mem_ 可以读写,imm_ 只读。分别对应了memtable和immutable table。
1.1 首先去看一下db/memtable.h
下面是基本的构造信息
class MemTable {

 public:

  // 必须显示调用

  explicit MemTable(const InternalKeyComparator& comparator);

  // 禁止拷贝构造和拷贝赋值

  MemTable(const MemTable&) = delete;

  MemTable& operator=(const MemTable&) = delete;

  // 增加引用计数

  void Ref() { ++refs_; }

  //引用计数减一,当引用计数为0时,销毁当前对象。

  void Unref() {

    --refs_;

    assert(refs_ >= 0);

    if (refs_ <= 0) {

      delete this;

    }

  }
下面是memtable的一些基本操作和需要的基本数据结构
有对于memtable的数据写入和读取。分别为add和get
以及定义需要存储数据的跳表结构和对应的key的比较器
这里可以发现对应key的add操作是需要对应的seqnumber这个就相当于对于每次更新的config number、version number的意思。这样我们可以一直获取的是最新的数据。。
 // add 和 get操作

  void Add(SequenceNumber seq, ValueType type, const Slice& key,

           const Slice& value);

  bool Get(const LookupKey& key, std::string* value, Status* s);

 private:

  friend class MemTableIterator;

  friend class MemTableBackwardIterator;

  // 针对于key的比较操作

  struct KeyComparator {

    const InternalKeyComparator comparator;

    explicit KeyComparator(const InternalKeyComparator& c) : comparator(c) {}

    int operator()(const char* a, const char* b) const;

  };

  // 跳表用于存储数据

  typedef SkipList<const char*, KeyComparator> Table;

  ~MemTable();  // Private since only Unref() should be used to delete it

  KeyComparator comparator_;

  int refs_;

  //  内存分配器

  Arena arena_;

  Table table_;

};

}  // namespace leveldb
1.2 跳表SkipList
由于memtable中的数据都是放到跳表中的。所以在深入理解memtable之前我们必须要先来看一下跳表这个数据结构,看过redis源码解析的同学应该对跳表这个数据结构很熟悉了。而且在算法导论中也有学到过这个数据结构。跳表于1990 年,由William Pugh 发表其论文:Skip Lists: A Probabilistic Alternative to Balanced Trees。
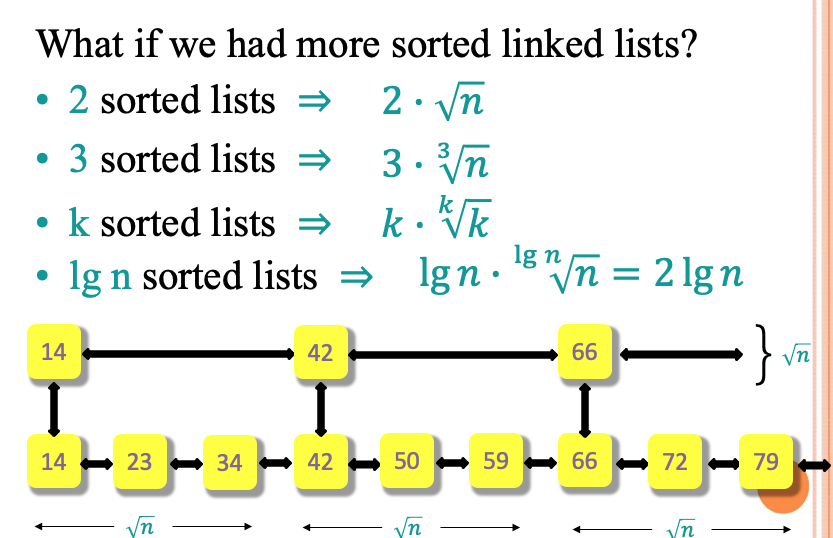
说是跳表其实就是多个单链表连接起来,对于一个单链表我们的search操作的时间复杂度是\(0(n)\) 。但是如果有一些辅助链表的帮助就可以帮我们减少这一时间复杂度
经过下面无聊的证明,跳表对于查找的时间复杂度可以变成\(O(logn)\)
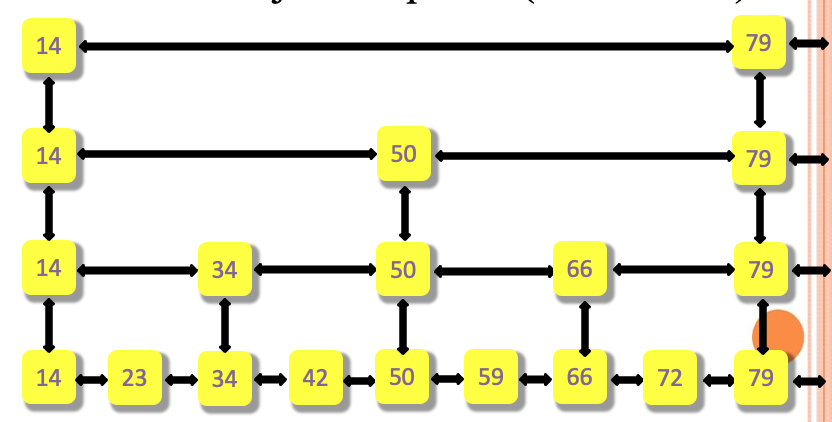
SkipList查找流程
对于查找72的流程如下
- 首先在第一层遍历14、79发现72大于14小于79因此进入第二层从14继续搜索
- 第二层发现50 < 72 < 79所以进入第三层从50开始继续搜索
- 第三层发现66 < 72 < 79所以进入第四层从66开始继续搜索
- 在第四层就会找到72.这就是整个的搜索过程
1.3 LevelDB的SkipList
内存顺序学习
首先leveldb中是通过了原子操作和内存顺序做到了无锁并发。这里先学习一下内存顺序(Memory Order)
学习博客c++11多线程初探
知乎讨论如何理解 C++11 的六种 memory order?
https://github.com/apache/incubator-brpc/blob/master/docs/cn/atomic_instructions.md#memory-fence
在 C11/C++11 中,引入了六种不同的 memory order,可以让程序员在并发编程中根据自己需求尽可能降低同步的粒度,以获得更好的程序性能。这六种 order 分别是:
relaxed, acquire, release, consume, acq_rel, seq_cst
其中memory_order_relaxed编译器仅保证load和stroe是原子操作,除此之外并不提供任何跨线程的同步。 如果某个操作只要求是原子操作,除此之外,不需要其它同步的保障,就可以使用 Relaxed ordering。程序计数器是一种典型的应用场景:
#include <cassert>

#include <vector>

#include <iostream>

#include <thread>

#include <atomic>

std::atomic<int> cnt = {0};

void f()

{

    for (int n = 0; n < 1000; ++n) {

        cnt.fetch_add(1, std::memory_order_relaxed);

    }

}

int main()

{

    std::vector<std::thread> v;

    for (int n = 0; n < 10; ++n) {

        v.emplace_back(f);

    }

    for (auto& t : v) {

        t.join();

    }

    assert(cnt == 10000);    // never failed

    return 0;

}
而对于Release-Acquire ordering这种模型store()使用memory_order_release,而load()使用memory_order_acquire。这种模型有两种效果,第一种是可以限制 CPU 指令的重排:
- 在
store()之前的所有读写操作,不允许被移动到这个store()的后面。 - 在
load()之后的所有读写操作,不允许被移动到这个load()的前面。
除此之外,还有另一种效果:假设 Thread-1 store()的那个值,成功被 Thread-2 load()到了,那么 Thread-1 在store()之前对内存的所有写入操作,此时对 Thread-2 来说,都是可见的。
比如下面的例子
std::atomic<bool> ready{ false };

int data = 0;

//thread 1

void producer()

{

    data = 100;                                       // A

    ready.store(true, std::memory_order_release);     // B

}

//thread 2

void consumer()

{

    while (!ready.load(std::memory_order_acquire))    // C

        ;

    assert(data == 100); // never failed              // D

}

std::thread t1(producer);

std::thread t2(consumer);

t1.join();

t2.join();
这个执行流程是对于进程1他会保证A不被移到B的后面
对于进程2而言C也不会移到D的后面
而当进程2读到ready为true的时候,就表示进程1中对于data的写入对于进程2是可见的因此对于D的执行则永远不会failed
1. 跳表的定义
- 有指定的最大层数
- 为节点分配空间的
arena - 指向表头的指针
head max_height_表示目前跳表最高多少层rnd_用来生成每个节点层数的随机数
 private:

  enum { kMaxHeight = 12 };

  inline int GetMaxHeight() const {

    return max_height_.load(std::memory_order_relaxed);

  }

  Node* NewNode(const Key& key, int height);

  // Immutable after construction

  Comparator const compare_;

  Arena* const arena_;  // Arena used for allocations of nodes

  Node* const head_;

  std::atomic<int> max_height_;  // Height of the entire list

  // Read/written only by Insert().

  Random rnd_;

};
跳表的构造函数
这里通过传入的比较器和对应的分配器进行构造
但是这里有一些需要注意的点。
template <typename Key, class Comparator>

SkipList<Key, Comparator>::SkipList(Comparator cmp, Arena* arena)

    : compare_(cmp),

      arena_(arena),

      head_(NewNode(0 /* any key will do */, kMaxHeight)),

      max_height_(1),

      rnd_(0xdeadbeef) {

  for (int i = 0; i < kMaxHeight; i++) {

    head_->SetNext(i, nullptr);

  }

}
1. NewNode函数
另外就是给将head_初始化,分配一个空节点,初始化跳表高度为1,初始化随机函数(分配一个种子)。
最后for循环里,将头结点的每一层都初始化。
这里注意NewNode利用了一个叫做placement New的操作。来实现对于Node的构造
实际上每个Node都所拥有的大小是会很高度挂钩,因为这涉及到了next数组的大小。
typename SkipList<Key, Comparator>::Node* SkipList<Key, Comparator>::NewNode(

    const Key& key, int height) {

  char* const node_memory = arena_->AllocateAligned(

      sizeof(Node) + sizeof(std::atomic<Node*>) * (height - 1));

  return new (node_memory) Node(key);

}
2. Node函数
Node函数中有节点需要用到的一些帮助函数
比如Next和SetNext。这里就用到了上面所说的Release-Acquire ordering在无所锁的情况下实现原子性的读写操作
并且保证当线程1写入next[n]的时候线程2会在线程1写完才会读到这个值
template <typename Key, class Comparator>

struct SkipList<Key, Comparator>::Node {

  explicit Node(const Key& k) : key(k) {}

  Key const key;

  // Accessors/mutators for links.  Wrapped in methods so we can

  // add the appropriate barriers as necessary.

  Node* Next(int n) {

    assert(n >= 0);

    // Use an 'acquire load' so that we observe a fully initialized

    // version of the returned Node.

    return next_[n].load(std::memory_order_acquire);

  }

  void SetNext(int n, Node* x) {

    assert(n >= 0);

    // Use a 'release store' so that anybody who reads through this

    // pointer observes a fully initialized version of the inserted node.

    next_[n].store(x, std::memory_order_release);

  }

  // No-barrier variants that can be safely used in a few locations.

  Node* NoBarrier_Next(int n) {

    assert(n >= 0);

    return next_[n].load(std::memory_order_relaxed);

  }

  void NoBarrier_SetNext(int n, Node* x) {

    assert(n >= 0);

    next_[n].store(x, std::memory_order_relaxed);

  }

 private:

  // 记录了该节点在每一层的next节点

  // Array of length equal to the node height.  next_[0] is lowest level link.

  std::atomic<Node*> next_[1];

};
2. 跳表实现之-初始化
在db_impl找到了对于mem的初始化。也就是会有对于skiplist的初始化
当我们执行
leveldb::DB *db; leveldb::Options opts; opts.create_if_missing = true; leveldb::Status status = leveldb::DB::Open(opts, "../tmp/testdb1", &db);
这里的DB:open会执行下面这一行来初始化MemTable
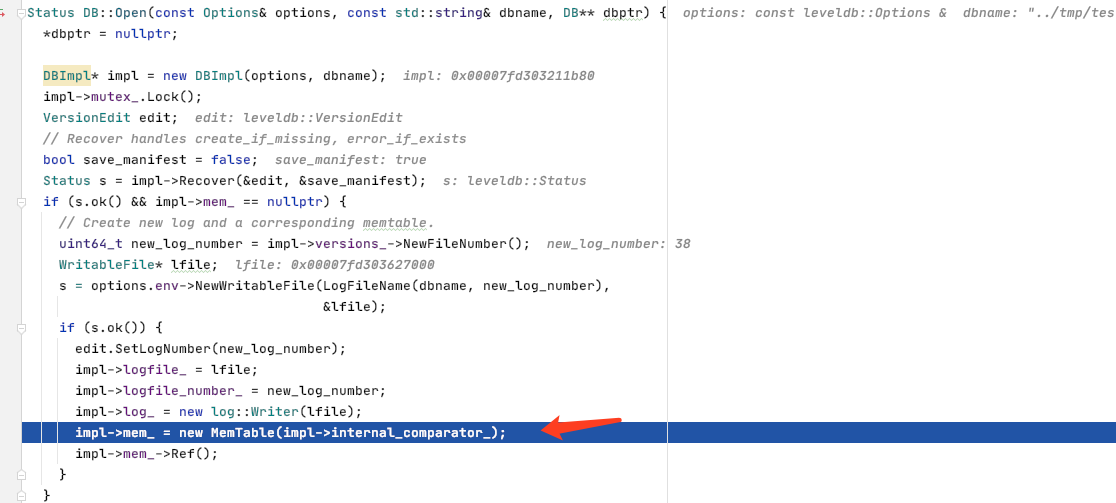
而在memtable.cc中的MemTable的构造函数中通过initial list实现了对于skipList的构造

3. 跳表实现之-插入操作
插入整体的思路还是比较简单的,但是有一些小细节需要注意
1. next_[1]的使用
这里用next_[1]这样的char数组来替代了char*,但本质还是一个单链表。
如下面这样的结构就是
b->c->d->g

2. 插入之前要先找到当前key对应于每一层的所有前驱节点
- 首先从最高层开始寻找,并且让x等于头节点。同时获取头节点在最高层的next节点
- 如果这个节点比要插入的节点小。则要插入的节点要放到这个节点后面,同时继续在当前层搜索
- 如果遇到不符合判断的节点即要插入节点要放在这个节点的前面,那么我们就找了要插入节点的前驱节点
- 同时让层数--去上一层继续寻找
template <typename Key, class Comparator>

typename SkipList<Key, Comparator>::Node*

SkipList<Key, Comparator>::FindGreaterOrEqual(const Key& key,

                                              Node** prev) const {

  Node* x = head_;

  int level = GetMaxHeight() - 1;

  while (true) {

    Node* next = x->Next(level);

    if (KeyIsAfterNode(key, next)) {

      // Keep searching in this list

      x = next;

    } else {

      if (prev != nullptr) prev[level] = x;

      if (level == 0) {

        return next;

      } else {

        // Switch to next list

        level--;

      }

    }

  }

}
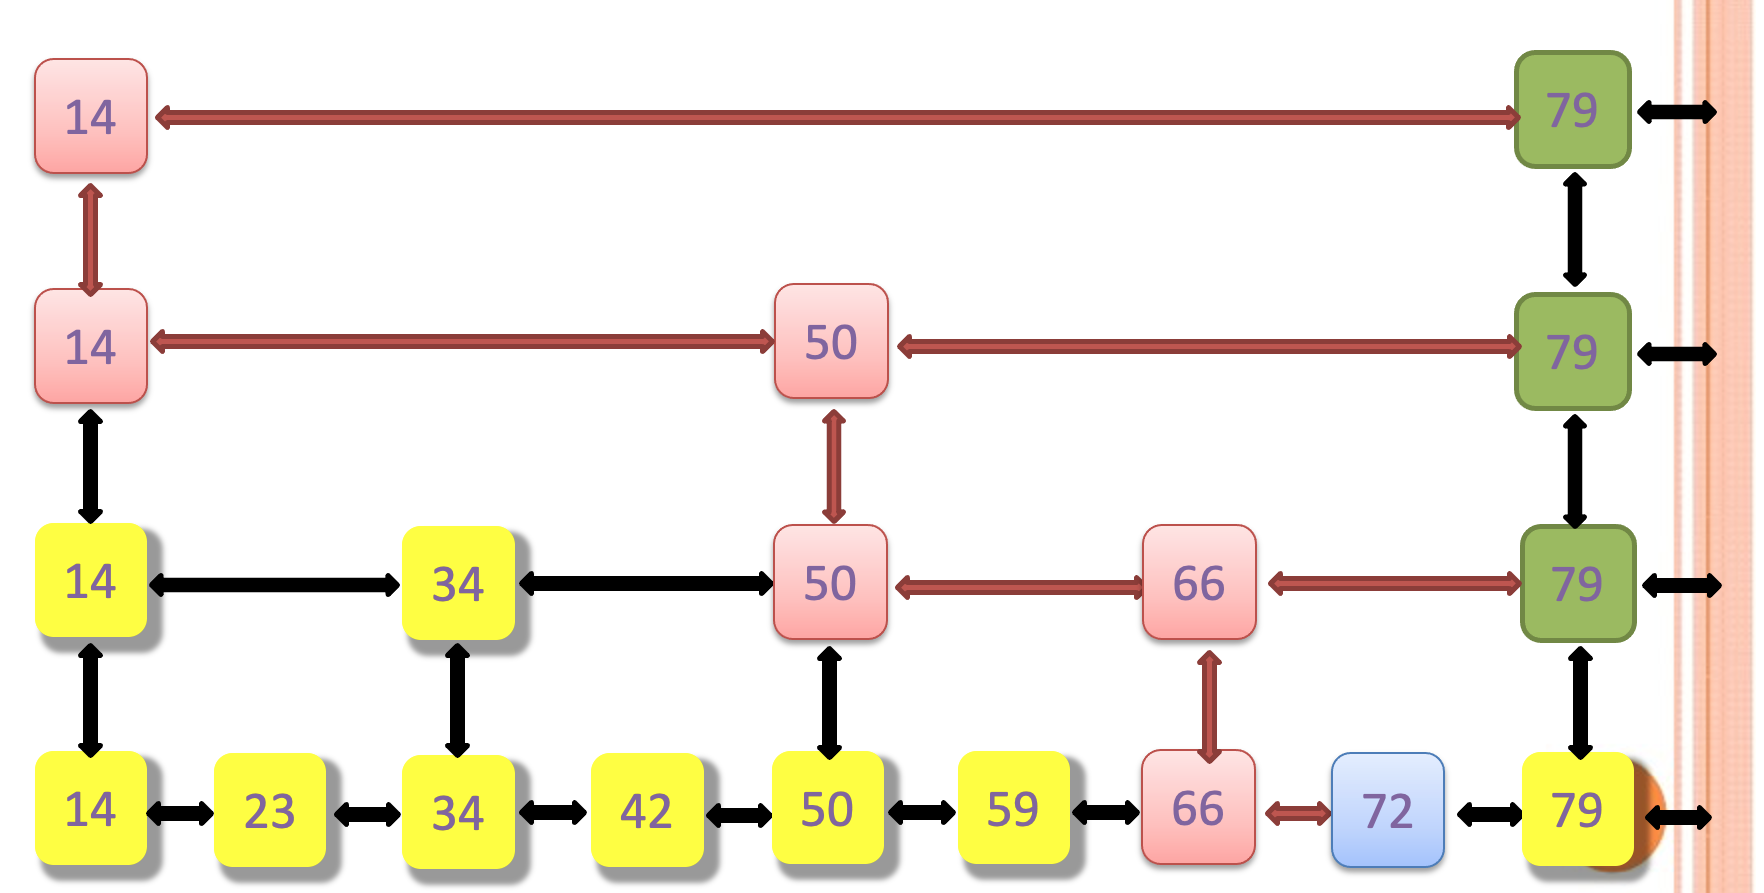
3. 逻辑上存储和物理上存储的区别
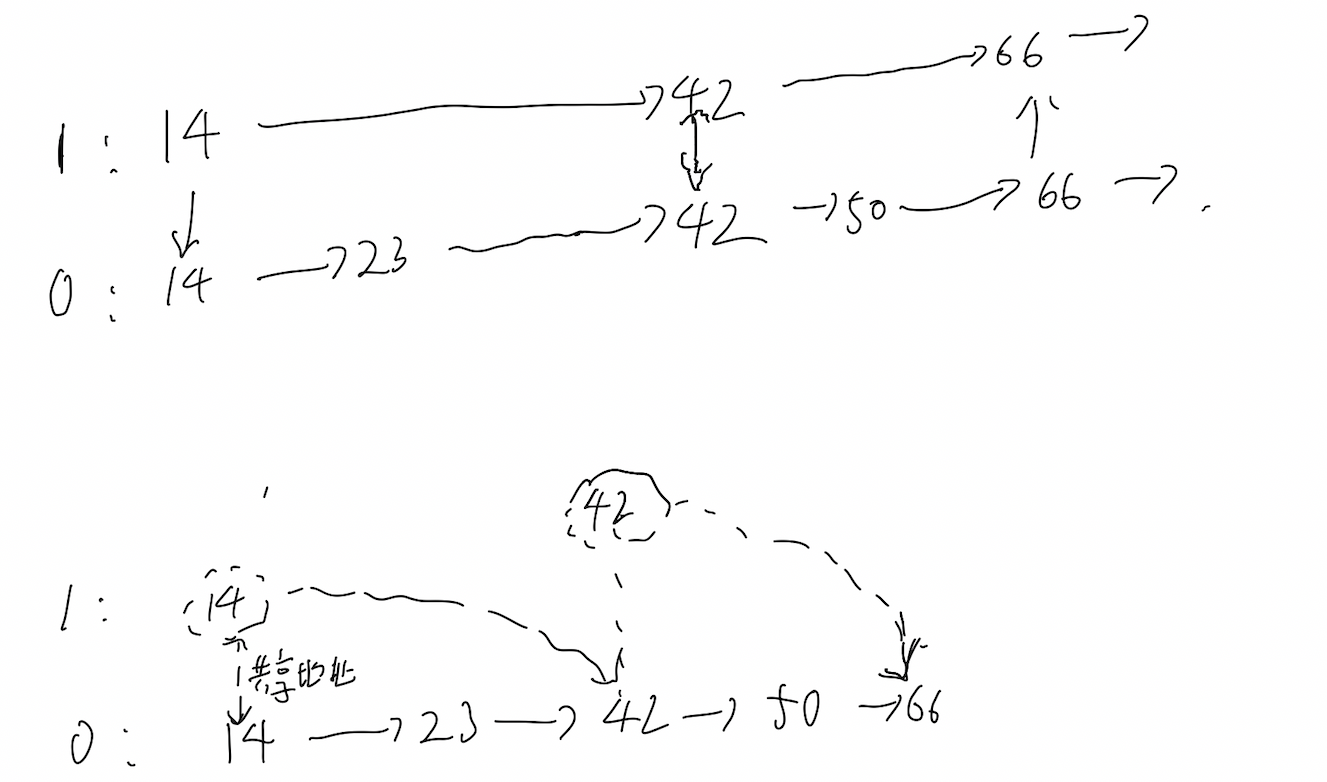
整体区别如上图。leveldb基本上是完全引用的形式实现了多层的skiplist,这样是非常节省内存的。他这样的实现得益于在newNode时候的一些小技巧
 char* const node_memory = arena_->AllocateAligned(

      sizeof(Node) + sizeof(std::atomic<Node*>) * (height - 1));

  return new (node_memory) Node(key);
这里以上图为例子对于14这个节点他会被分别一个Node + 多一个next_的地址
因为他需要14->next_[1]这个来存储42这个节点所在的地址。
4. 整个的insert函数
这个时候再来看insert就比较简单了,配合注释应该可以看懂的
template <typename Key, class Comparator>

void SkipList<Key, Comparator>::Insert(const Key& key) {

  // TODO(opt): We can use a barrier-free variant of FindGreaterOrEqual()

  // here since Insert() is externally synchronized.

  Node* prev[kMaxHeight];

  //这个函数的作用有(2)

  // 1. 找到第一个大于等于key的节点

  // 2. 就是初始化prev数组,让它分别保存要插入的key在不同level中的前驱

  Node* x = FindGreaterOrEqual(key, prev);

  // Our data structure does not allow duplicate insertion

	// 要么x为空 要么x >key

  assert(x == nullptr || !Equal(key, x->key));

  int height = RandomHeight();

  // 如果想要插入的随机高度  > 当前的最大高度

  // 则更新最大高度

  if (height > GetMaxHeight()) {

    for (int i = GetMaxHeight(); i < height; i++) {

      prev[i] = head_;

    }

    // It is ok to mutate max_height_ without any synchronization

    // with concurrent readers.  A concurrent reader that observes

    // the new value of max_height_ will see either the old value of

    // new level pointers from head_ (nullptr), or a new value set in

    // the loop below.  In the former case the reader will

    // immediately drop to the next level since nullptr sorts after all

    // keys.  In the latter case the reader will use the new node.

    max_height_.store(height, std::memory_order_relaxed);

  }

  x = NewNode(key, height);

  for (int i = 0; i < height; i++) {

    // NoBarrier_SetNext() suffices since we will add a barrier when

    // we publish a pointer to "x" in prev[i].

    x->NoBarrier_SetNext(i, prev[i]->NoBarrier_Next(i));

    prev[i]->SetNext(i, x);

  }
这个函数最后还是有一些小技巧
这里就是单链表的插入但是有两个要注意的地方
- 这里对于设置x的next指针并没有用barrier操作,也就是说它的顺序是任意的。
- 但是第二个对于prev[i]->next = x 这一操作这里用了
memory_order_release也就是说对于上一个操作必须在这个操作之前,这也是为什么上一个操作可以不用barrier的原因
  x = NewNode(key, height);

  for (int i = 0; i < height; i++) {

    // NoBarrier_SetNext() suffices since we will add a barrier when

    // we publish a pointer to "x" in prev[i].

    x->NoBarrier_SetNext(i, prev[i]->NoBarrier_Next(i));

    prev[i]->SetNext(i, x);

  }
4. 跳表实现之-迭代器与查找
对于跳表的遍历leveldb专门定义了迭代器
SkipList<key,Comparator>::Iterator iter(&list)
下面是SkipList迭代器对应的一些函数
  class Iterator {

   public:

    // Initialize an iterator over the specified list.

    // The returned iterator is not valid.

    explicit Iterator(const SkipList* list);

    // 确保当前node不为空

    bool Valid() const;

    // 返回当前位置的key

    const Key& key() const;

   	// node_ = node_.Next(0)

    void Next();

    // node _ = node的前驱

    void Prev();

    // 查找第一个 key >= target的node

    void Seek(const Key& target);

    // Position at the first entry in list.

    // Final state of iterator is Valid() iff list is not empty.

    void SeekToFirst();

    // Position at the last entry in list.

    // Final state of iterator is Valid() iff list is not empty.

    void SeekToLast();

   private:

    const SkipList* list_;

    Node* node_;

    // Intentionally copyable

  };
1. Prev和FindLessThan
Prev函数是让node = node->prev也就是把node置为它的前驱。由于我们是单链表,所以这里要找前驱实际上需要一个遍历。
这里我们用到了FindLessThan这个函数
- 还是从最高层出发
- 找到第一个next节点大于等于key的节点
- 返回这个节点即为所求
template <typename Key, class Comparator>

typename SkipList<Key, Comparator>::Node*

SkipList<Key, Comparator>::FindLessThan(const Key& key) const {

  Node* x = head_;

  int level = GetMaxHeight() - 1;

  while (true) {

    assert(x == head_ || compare_(x->key, key) < 0);

    Node* next = x->Next(level);

    if (next == nullptr || compare_(next->key, key) >= 0) {

      if (level == 0) {

        return x;

      } else {

        // Switch to next list

        level--;

      }

    } else {

      x = next;

    }

  }

}
所以Prev就非常容易的实现了
inline void SkipList<Key, Comparator>::Iterator::Prev() {

  // Instead of using explicit "prev" links, we just search for the

  // last node that falls before key.

  assert(Valid());

  node_ = list_->FindLessThan(node_->key);

  if (node_ == list_->head_) {

    node_ = nullptr;

  }

}
2. 利用FindGreaterOrEqual实现Seek函数
template <typename Key, class Comparator>

inline void SkipList<Key, Comparator>::Iterator::Seek(const Key& target) {

  node_ = list_->FindGreaterOrEqual(target, nullptr);

}
因为FindGreaterOrEqual函数就是返回大于等于target的第一个节点。这就是seek函数所需要的
5. 跳表实现之-杂七杂八
1. 随机高度函数
rnd_.Next()随机生成一个数- 然后对4取余,也就是有1/4的概率高都增长
template <typename Key, class Comparator>

int SkipList<Key, Comparator>::RandomHeight() {

  // Increase height with probability 1 in kBranching

  static const unsigned int kBranching = 4;

  int height = 1;

  while (height < kMaxHeight && ((rnd_.Next() % kBranching) == 0)) {

    height++;

  }

  assert(height > 0);

  assert(height <= kMaxHeight);

  return height;

}
2. Contains函数
contains函数的功能是判断当前的skiplist中是否有key值存在
- 利用了之前说过的
FindGreaterOrEqual可以说是封装的非常好了
template <typename Key, class Comparator>

bool SkipList<Key, Comparator>::Contains(const Key& key) const {

  Node* x = FindGreaterOrEqual(key, nullptr);

  if (x != nullptr && Equal(key, x->key)) {

    return true;

  } else {

    return false;

  }

}
2. MemTable的Add操作
在看Add之前要先看一下,对于每一条数据是以什么样的格式放入table中的
1. MemTable的内部编码引用自
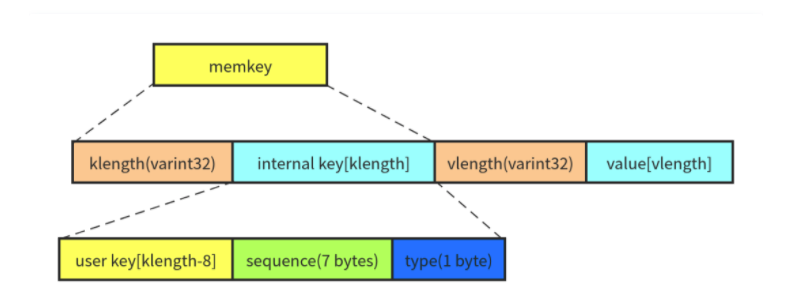
MemTable 中保存的数据是 key 和 value 编码成的一个字符串,由四个部分组成:
- klength: 变长的 32 位整数(varint 的编码),表示 internal key 的长度。
- internal key: 长度为 klength 的字符串。
- vlength: 变长的 32 位整数(varint 的编码),表示 value 的长度。
- value: 长度为 vlength 的字符串。
对应在代码里就是
这里的编码主要有两种
- 第一种是对klength和vlength的
EncodeVarint32编码 - 第二种是对sequcenceNumber + type的
EncodeFixed64编码 - 对于key和value的data部分则直接存储
size_t key_size = key.size();

size_t val_size = value.size();

size_t internal_key_size = key_size + 8; // +8 = (sequence 7 bytes + 1 bytes type)

const size_t encoded_len = VarintLength(internal_key_size) +

                           internal_key_size + VarintLength(val_size) +

                           val_size;

char* buf = arena_.Allocate(encoded_len); // 分配内存 大小为encoded_len

char* p = EncodeVarint32(buf, internal_key_size); //

std::memcpy(p, key.data(), key_size);

p += key_size;

EncodeFixed64(p, (s << 8) | type);

p += 8;

p = EncodeVarint32(p, val_size);

std::memcpy(p, value.data(), val_size);
EncoderVarint32函数
- 首先把字符数组转为uint8_t类型的数组,这样我们接下来才能表示数字。可以看到,在判断语句中对数字所需要的位数进行了判断,如果可以用7个位来表示,那就直接赋值,如果可以用14个位来表示(剩下两位要用来表示数字是否结束),那就把数字的前7位放到dst[0]中,在把剩余的7位右移,放到dst[1]中去。如果可以用21个位来表示,那么前七个位放到dst[0],中间七位放到dst[1],最后七位放到dst[2]。
- 举例说来,假设我们的dst是一个长度位5的字符数组,value等于129。那么dst在内存空间中是这样表示的dst[4] dst[3] dst[2] dst[1] dst[0],每个占据8位,value的二进制表示为0000 0000 1000 0001。ptr首先指向dst[0],现在我们通过(ptr++) = 128 | value把最后七位0000 0001放到dst[0]中去,此处发生了截断,因为ptr是uint8_t类型,而value是uint32_t,所以只会把value的最后七位放到dst[0]中去,放完之后dst[0]等于1000 0001,注意此处最高位的1并不是数字,而是代表数字没有结束,要继续操作。接下来我们把中间七位00 0000 1放到dst[1]中去,首先右移七位得到0000 0001,然后直接赋值即可。
版权声明:本文为CSDN博主「馒头2870」的原创文章,遵循CC 4.0 BY-SA版权协议,转载请附上原文出处链接及本声明。
原文链接:https://blog.csdn.net/sjc2870/article/details/112342573
char* EncodeVarint32(char* dst, uint32_t v) {

  // Operate on characters as unsigneds

  uint8_t* ptr = reinterpret_cast<uint8_t*>(dst);

  static const int B = 128;

  if (v < (1 << 7)) {

    *(ptr++) = v;

  } else if (v < (1 << 14)) {

    *(ptr++) = v | B;

    *(ptr++) = v >> 7;

  } else if (v < (1 << 21)) {

    *(ptr++) = v | B;

    *(ptr++) = (v >> 7) | B;

    *(ptr++) = v >> 14;

  } else if (v < (1 << 28)) {

    *(ptr++) = v | B;

    *(ptr++) = (v >> 7) | B;

    *(ptr++) = (v >> 14) | B;

    *(ptr++) = v >> 21;

  } else {

    *(ptr++) = v | B;

    *(ptr++) = (v >> 7) | B;

    *(ptr++) = (v >> 14) | B;

    *(ptr++) = (v >> 21) | B;

    *(ptr++) = v >> 28;

  }

  return reinterpret_cast<char*>(ptr);

}
EncodeFixed64函数
这个对于64位的固定编码就比较通俗易懂了。
依次取低8位放到buffer[i]中
inline void EncodeFixed64(char* dst, uint64_t value) {

  uint8_t* const buffer = reinterpret_cast<uint8_t*>(dst);

  // Recent clang and gcc optimize this to a single mov / str instruction.

  buffer[0] = static_cast<uint8_t>(value);

  buffer[1] = static_cast<uint8_t>(value >> 8);

  buffer[2] = static_cast<uint8_t>(value >> 16);

  buffer[3] = static_cast<uint8_t>(value >> 24);

  buffer[4] = static_cast<uint8_t>(value >> 32);

  buffer[5] = static_cast<uint8_t>(value >> 40);

  buffer[6] = static_cast<uint8_t>(value >> 48);

  buffer[7] = static_cast<uint8_t>(value >> 56);

}
EncodeVarint64
emmm这个代码等价于上面的EncoderVarint32函数只不过比上面的更简洁更大佬
char* EncodeVarint64(char* dst, uint64_t v) {

  static const int B = 128;

  uint8_t* ptr = reinterpret_cast<uint8_t*>(dst);

  while (v >= B) {

    *(ptr++) = v | B;

    v >>= 7;

  }

  *(ptr++) = static_cast<uint8_t>(v);

  return reinterpret_cast<char*>(ptr);

}
2. Add
随后的add就是把我们编码之后的数据insert到skiplist中就可以了
void MemTable::Add(SequenceNumber s, ValueType type, const Slice& key,

                   const Slice& value) {

  // Format of an entry is concatenation of:

  //  key_size     : varint32 of internal_key.size()

  //  key bytes    : char[internal_key.size()]

  //  value_size   : varint32 of value.size()

  //  value bytes  : char[value.size()]

  size_t key_size = key.size();

  size_t val_size = value.size();

  size_t internal_key_size = key_size + 8;

  const size_t encoded_len = VarintLength(internal_key_size) +

                             internal_key_size + VarintLength(val_size) +

                             val_size;

  char* buf = arena_.Allocate(encoded_len);

  char* p = EncodeVarint32(buf, internal_key_size);

  std::memcpy(p, key.data(), key_size);

  p += key_size;

  EncodeFixed64(p, (s << 8) | type);

  p += 8;

  p = EncodeVarint32(p, val_size);

  std::memcpy(p, value.data(), val_size);

  assert(p + val_size == buf + encoded_len);

  table_.Insert(buf);

}
这里有要注意的就是SequenceNumber了
快照就是根据SequenceNumber的值来实现的,有了这个数字,就可以保证,读到的值就是一定的。
 key       value   sequencenumber

 a            1        3

 a            2        4

 a            3        5
如果指定了sequencenumber=4,那么读到a的值就是2,而不是3;
3. MemTable的Get操作
1. db_impl.cc中的Get操作
MemTable的get操作是在整个leveldb读操作中的一种,因为会先去看MemTable中是否有数据,这里先从整个leveldb的get操作入手。来分析整体的调用过程
- 先忽略掉这里的快照操作,如果在options没有指定快照的话,那么就回去获取最新的sequence number
- 获取互斥锁
- 获取本次读操作的 Sequence Number:如果 ReadOptions 参数的 snapshot 不为空,则使用这个 snapshot 的 sequence number;否则,默认使用 LastSequence(LastSequence 会在每次写操作后更新)。
- 对于MemTable, Immutable Memtable 和 Current Version(SSTable) 增加引用计数,避免在读取过程中被后台线程进行 compaction 时“垃圾回收”了。
- 释放互斥锁,不同线程的请求可以并发执行读取操作,上面加锁是因为要修改引用次数,是一个写操作。
- 构造 LookupKey
- 从 MemTable 查找
Status DBImpl::Get(const ReadOptions& options, const Slice& key,

                   std::string* value) {

  Status s;

  MutexLock l(&mutex_);

  SequenceNumber snapshot;

  if (options.snapshot != nullptr) {

    snapshot =

        static_cast<const SnapshotImpl*>(options.snapshot)->sequence_number();

  } else {

    snapshot = versions_->LastSequence();

  }

  MemTable* mem = mem_;

  MemTable* imm = imm_;

  Version* current = versions_->current();

  mem->Ref();

  if (imm != nullptr) imm->Ref();

  current->Ref();

  bool have_stat_update = false;

  Version::GetStats stats;

  // Unlock while reading from files and memtables

  {

    mutex_.Unlock();

    // First look in the memtable, then in the immutable memtable (if any).

    LookupKey lkey(key, snapshot);

    if (mem->Get(lkey, value, &s)) {

      // Done

    }

    mutex_.Lock();

  }

  if (have_stat_update && current->UpdateStats(stats)) {

    MaybeScheduleCompaction();

  }

  mem->Unref();

  if (imm != nullptr) imm->Unref();

  current->Unref();

  return s;

}
2.LookupKey的实现
通过user_key和sequence构造
leveldb:LookupKey用于LevelDB内部查找的接口
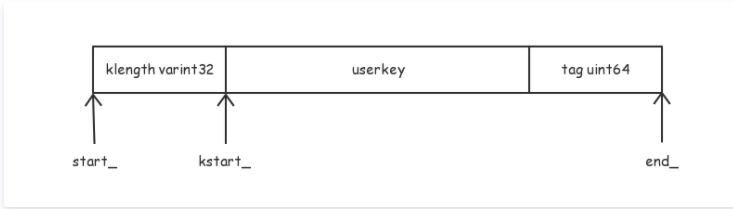
- klength 的类型是 varint32,存储的是
user_key + tag的长度 - userkey 就是 Get 接口传入的 key 参数。
- tag 是 7 字节 sequence number 和 1 字节 value type。
- 一个 varint32 最多需要 5 个字节,tag 需要 8 字节。所以一个 LookupKey 最多需要分配
[ usize + 13 字节]内存(usize 是 userkey 的 size)。
LookupKey::LookupKey(const Slice& user_key, SequenceNumber s) {

  size_t usize = user_key.size();

  size_t needed = usize + 13;  // A conservative estimate

  char* dst;

  if (needed <= sizeof(space_)) {

    dst = space_;

  } else {

    dst = new char[needed];

  }

  start_ = dst;

  dst = EncodeVarint32(dst, usize + 8);

  kstart_ = dst;

  std::memcpy(dst, user_key.data(), usize);

  dst += usize;

  EncodeFixed64(dst, PackSequenceAndType(s, kValueTypeForSeek));

  dst += 8;

  end_ = dst;

}
这里除了上面提到过的两种编码方式还多了一个PackSequenceAndType
其实就是对sequenceNumber << 8 | Type 的一个封装
static uint64_t PackSequenceAndType(uint64_t seq, ValueType t) {

  assert(seq <= kMaxSequenceNumber);

  assert(t <= kValueTypeForSeek);

  return (seq << 8) | t;

}
3.对Memtable的get操作
最后再来看memtable中的get操作
- 这里其实就是利用迭代器在skipList中找到对应的key
- 然后就是对编码信息的解码过程
bool MemTable::Get(const LookupKey& key, std::string* value, Status* s) {

  Slice memkey = key.memtable_key();

  Table::Iterator iter(&table_);

  iter.Seek(memkey.data());

  if (iter.Valid()) {

    const char* entry = iter.key();

    uint32_t key_length;

    const char* key_ptr = GetVarint32Ptr(entry, entry + 5, &key_length);

    if (comparator_.comparator.user_comparator()->Compare(

            Slice(key_ptr, key_length - 8), key.user_key()) == 0) {

      // Correct user key

      const uint64_t tag = DecodeFixed64(key_ptr + key_length - 8);

      switch (static_cast<ValueType>(tag & 0xff)) {

        case kTypeValue: {

          Slice v = GetLengthPrefixedSlice(key_ptr + key_length);

          value->assign(v.data(), v.size());

          return true;

        }

        case kTypeDeletion:

          *s = Status::NotFound(Slice());

          return true;

      }

    }

  }

  return false;

}
代码过程分析
key.memtable_key()实际上就是把刚才创建的lookupkey返回
  // Return a key suitable for lookup in a MemTable.

  Slice memtable_key() const { return Slice(start_, end_ - start_); }
GetVarint32Ptr这里的解码就像编码一样有两种情况。
- 对应了要解码的数字小于等于127 也就是
(result & 128) == 0)的时候直接返回
inline const char* GetVarint32Ptr(const char* p, const char* limit,

                                  uint32_t* value) {

  if (p < limit) {

    uint32_t result = *(reinterpret_cast<const uint8_t*>(p));

    if ((result & 128) == 0) {

      *value = result;

      return p + 1;

    }

  }

  return GetVarint32PtrFallback(p, limit, value);

}- 否则的话调用
GetVarint32PtrFallback
以129为例子
129会这样来存储 |0000 0001| 1000 0001|
刚开始 *p = 10000001
所以 *p & 128 == 1随后就会执行result |= ((byte & 127) << shift); result = 1
p++之后 *p = 0000 0100
随后byte无法进入if中而进入esle中
result |= (byte << shift) = 129
随后返回即可
const char* GetVarint32PtrFallback(const char* p, const char* limit,

                                   uint32_t* value) {

  uint32_t result = 0;

  for (uint32_t shift = 0; shift <= 28 && p < limit; shift += 7) {

    uint32_t byte = *(reinterpret_cast<const uint8_t*>(p));

    p++;

    if (byte & 128) {

      // More bytes are present

      result |= ((byte & 127) << shift);

    } else {

      result |= (byte << shift);

      *value = result;

      return reinterpret_cast<const char*>(p);

    }

  }

  return nullptr;
- 对应了要解码的数字小于等于127 也就是
value type
如果对应的类型是
kTypeDeletion,表示该 key/value 已经从 Memtable 中删除,这时候将NotFound保存在状态码中,并且返回。
3. MemTable的删除操作
追踪一次删除操作的发生。
DB:delete -> writeBatch::Delete()
这里的删除并不是真的删除元素,而是添加一条删除记录来实现的。真正的删除操作会在后台进程中完成,也是为了减少io增大效率。
void WriteBatch::Delete(const Slice& key) {

  WriteBatchInternal::SetCount(this, WriteBatchInternal::Count(this) + 1);

  rep_.push_back(static_cast<char>(kTypeDeletion));

  PutLengthPrefixedSlice(&rep_, key);

}
1. 首先这里会添加一个kTypeDeletion + key的前缀
然后在WriteBatch::Iterate中
Slice input(rep_);

if (input.size() < kHeader) {

  return Status::Corruption("malformed WriteBatch (too small)");

}

input.remove_prefix(kHeader);

Slice key, value;

int found = 0;

while (!input.empty()) {

  found++;

  char tag = input[0];

  input.remove_prefix(1);

  switch (tag) {

		//.......

    //检测到了key的前缀有kTypeDeletion随后调用

    // handler->Delete去skipList中标记key为删除

    case kTypeDeletion:

      if (GetLengthPrefixedSlice(&input, &key)) {

        handler->Delete(key);
2. 在 handler->Delete中
实际上这个函数调用了mem_->Add函数.指定其中的keyType = KTypeDeletion
void Delete(const Slice& key) override {

    mem_->Add(sequence_, kTypeDeletion, key, Slice());

    sequence_++;

  }
这样当下一次获取当前key的数据的时候,最新的sequenceNumber已经标记它为删除
4. MemTable-->ImmuTable的转变
找了半天发现是在这里实现的MemTable -> ImmuTable的转变。具体的逻辑会在后面进行分析,这里的内容已经足够多了。
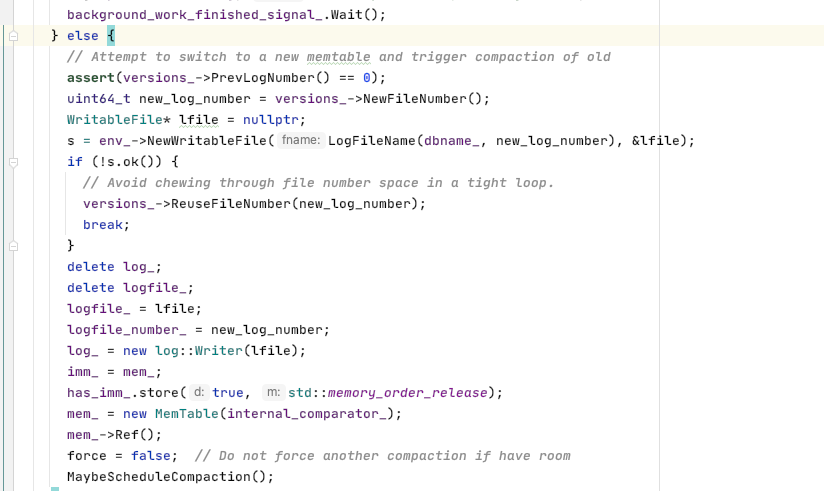
但还是配图,是在这里实现了转变
imm_ = mem_ ; // 把原来的memtable -> immutable

mem_ = new MemTable() // 创建一个新的memTable
5. 内存池Arena
最后花点时间在MemTable用到的内存池上。
首先看Arena类的四个私有变量
// Allocation state

  char* alloc_ptr_;

  size_t alloc_bytes_remaining_;

  // Array of new[] allocated memory blocks

  std::vector<char*> blocks_;

  // Total memory usage of the arena.

  //

  // TODO(costan): This member is accessed via atomics, but the others are

  //               accessed without any locking. Is this OK?

  std::atomic<size_t> memory_usage_;
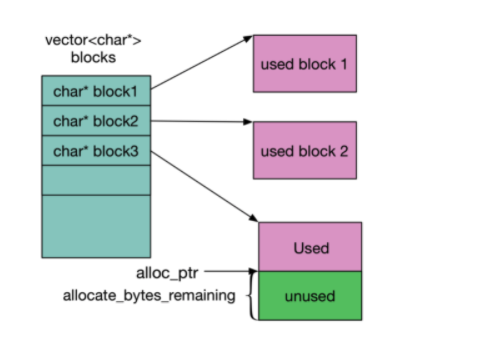
其中如上图所示,blocks_是一个包含指向各个块的char *数组,而alloc_ptr_则表示了当前块的未使用内存区域的起始地址。同时用alloc_bytes_remaining_来表示当前块还剩多少内存是没有被使用的
而我们整个的分配过程是从Allocate(size_t bytes)函数开始的
- 如果要分配的内存大小 < 当前块剩余内存大小的话则直接分配
- 否则要调用
AllocateFallback
inline char* Arena::Allocate(size_t bytes) {

  // The semantics of what to return are a bit messy if we allow

  // 0-byte allocations, so we disallow them here (we don't need

  // them for our internal use).

  assert(bytes > 0);

  if (bytes <= alloc_bytes_remaining_) {

    char* result = alloc_ptr_;

    alloc_ptr_ += bytes;

    alloc_bytes_remaining_ -= bytes;

    return result;

  }

  return AllocateFallback(bytes);

}
AllocateFallback(bytes)
如果当前块的剩余内存区域不足以进行分配的话则需要调用这个函数
static const int kBlockSize = 4096;
- 如果需要分配的大小 > 1KB的话则单独申请一个
bytes的快分配给它 - 否则就是申请一个正常大小的块
4kb然后在新的块分配他
char* Arena::AllocateFallback(size_t bytes) {

  if (bytes > kBlockSize / 4) {

    // Object is more than a quarter of our block size.  Allocate it separately

    // to avoid wasting too much space in leftover bytes.

    char* result = AllocateNewBlock(bytes);

    return result;

  }

  // We waste the remaining space in the current block.

  alloc_ptr_ = AllocateNewBlock(kBlockSize);

  alloc_bytes_remaining_ = kBlockSize;

  char* result = alloc_ptr_;

  alloc_ptr_ += bytes;

  alloc_bytes_remaining_ -= bytes;

  return result;

}
AllocateNewBlock(block_bytes)函数
- 分配一个制定大小的新块,给它加入
blocks_数组中 - 在总的使用内存变量中加入新分配的内存
char* Arena::AllocateNewBlock(size_t block_bytes) {

  char* result = new char[block_bytes];

  blocks_.push_back(result);

  memory_usage_.fetch_add(block_bytes + sizeof(char*),

                          std::memory_order_relaxed);

  return result;
最后看AllocateAligned(size_t bytes) 函数
这个是类allocate函数只不过制定了对奇要求。
- 第一行是获取当前系统的对其规格。一般来讲x86-64机器的(void*)大小就是8bytes;
- 唯一的区别就是
needed = bytes + slopslop是为了对奇所需要多加的bytes
char* Arena::AllocateAligned(size_t bytes) {

  const int align = (sizeof(void*) > 8) ? sizeof(void*) : 8;

  static_assert((align & (align - 1)) == 0,

                "Pointer size should be a power of 2");

  size_t current_mod = reinterpret_cast<uintptr_t>(alloc_ptr_) & (align - 1);

  size_t slop = (current_mod == 0 ? 0 : align - current_mod);

  size_t needed = bytes + slop;

  char* result;

  if (needed <= alloc_bytes_remaining_) {

    result = alloc_ptr_ + slop;

    alloc_ptr_ += needed;

    alloc_bytes_remaining_ -= needed;

  } else {

    // AllocateFallback always returned aligned memory

    result = AllocateFallback(bytes);

  }

  assert((reinterpret_cast<uintptr_t>(result) & (align - 1)) == 0);

  return result;

}
关于Arena的内存释放
可以发现整个Arena中没有类free释放,它的整个释放都在整个对象的析构函数完成
Arena::~Arena() {

  for (size_t i = 0; i < blocks_.size(); i++) {

    delete[] blocks_[i];

  }
而整个Arena的析构函数会在memTable对象被释放的时候进行释放。
最新文章
- 测试LVS+Keepalived高可用负载均衡集群
- linux下rpm包安装、配置和卸载mysql
- ASP.NET MVC学习系列(二)-WebAPI请求
- 【转】Xcode添加静态库以及编译选项配置常见问题
- Java中实现十进制数转换为二进制的三种思路
- java之servlet入门操作教程一续
- socks5代理转http代理
- 安装kylin的艰难历程
- Linux配置防火墙,开启80端口、3306端口
- git从远程分支clone项目到本地,切换分支命令,其他常用命令
- block详解
- python模块: hashlib模块, configparse模块, logging模块,collections模块
- Docker - Docker与Vagrant的区别
- MySQL开发索引创建规范
- libevent简述
- Common Gateway Interface Python CGI编程
- Java之File与递归
- Qbot回归,已感染5.4万台计算机
- 调整设置 Win7休眠文件“Hiberfil.sys”
- ifconfig无输出的原因及解决办法
热门文章
- TensorFlow+TVM优化NMT神经机器翻译
- GPU上的基本线性代数
- 10分钟内基于gpu的目标检测
- 用TensorRT针对AArch64用户的交叉编译示例
- 使用nGraph的Intel&#174;Xeon&#174;上的高性能TensorFlow
- application/octet-stream二进制流, springboot项目, postman 测试参数设置
- 太神奇了!GIF的合成与提取这么好玩
- Qt中的布局浅析与弹簧的使用,以及Qt居中的两种方法
- Java面试指北!13个认证授权常见面试题/知识点总结!| JavaGuide
- SpringBoot和Spring到底有没有本质的不同?