MQTT研究之EMQ:【wireshark抓包分析】
基于上篇博文【SSL双向验证】的环境基础,进行消息的具体梳理.
环境基础信息:
. 单台Linux CentOS7.2系统,安装一个EMQTTD的实例broker。

. emq的版本2.3.11。

. 客户端分为mosquitto_pub,以及MQTT.fx 1.7.1的subscriber。

. 证书是通过openssl(version:1.0.2k-fips)生成的,rootCA是自签名的,subscriber和publisher的证书是通过rootCA签署的。

. 抓包工具wireshark(version: 2.6.,下载地址https://www.wireshark.org/download/win64/),分析SSL/TLS通信的消息流.
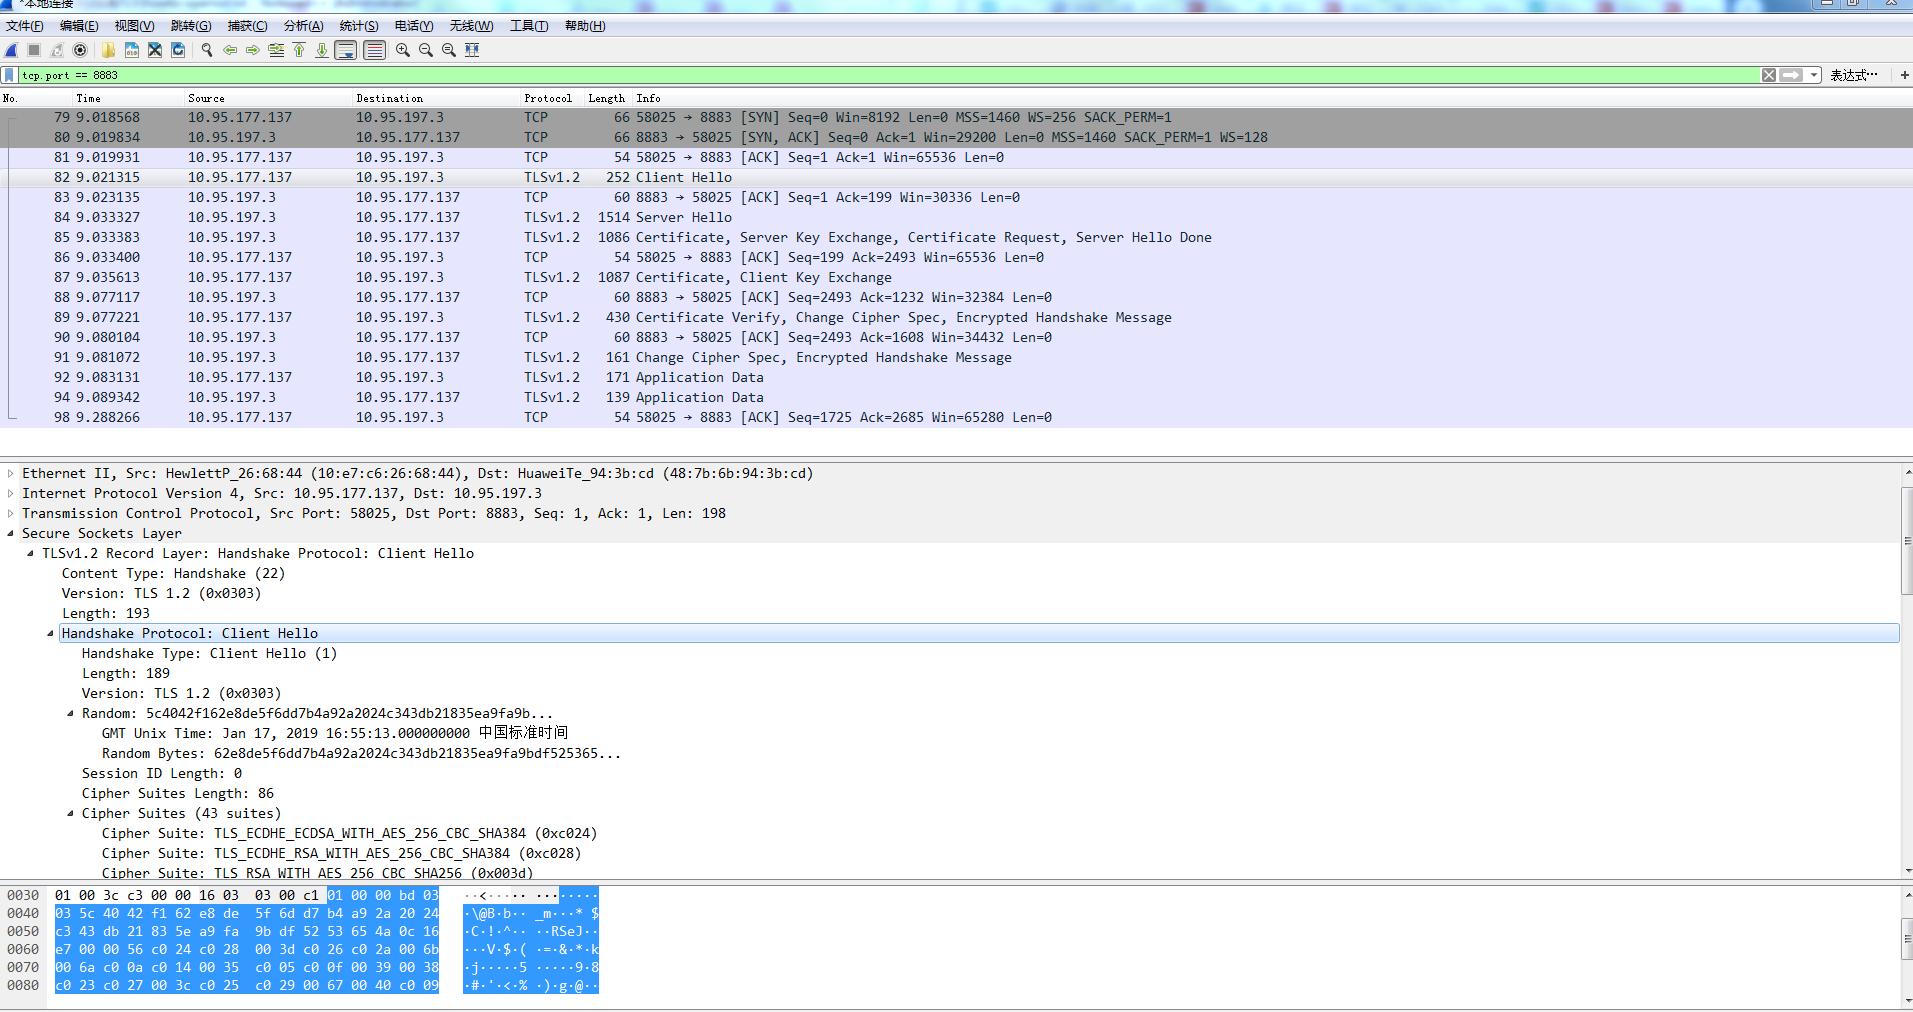
第一步:通过wireshark抓取SSL双向验证的消息
下面是我测试过程中,得到的消息流程,我的测试环境,在TLS的两层消息结构(record layer,handshake layer)中的握手协议环节,得到的cipher suite的值是:TLS_ECDHE_RSA_WITH_AES_256_CBC_SHA384。
先简单介绍下,这个cipher suite的含义,这个应该是SSL/TLS协议中比较难以理解的一个概念。这个说简单点,就是秘钥协商(Key agreement)的顶层设计,后续的消息流程都是密切的基于这个cipher suite的值而有较大的不同,准确的说,秘钥交换(Key exchange)和上诉红色部分关系最为密切.
1、秘钥协商和秘钥交换这两个概念,看到很多地方的讨论和描述中,似乎没有区分的很明确,依据我的理解,秘钥协商和秘钥交换,确实有很大的关联性,不可能完全割裂或者分离关系,只是两个概念描述的侧重点不同,秘钥协商更多表述怎么做这个逻辑,而秘钥交换,更多侧重怎么做的实际动作或者流程。
2、cipher suite的简单介绍
就拿我这个测试的cipher suite值说明吧。
TLS_ECDHE_RSA_WITH_AES_256_CBC_SHA384
键值交换签名协议 数据加密算法 信息认证码算法
更详细的介绍,可以对照下面这个图:

秘钥协商/交换,是为了在握手的过程中,基于给定的cipher suite完成shared secret的生成过程,这个秘钥就是用来为后续数据传输的时候对称加密用的密码。信息验证码协议,是为了保证数据传输的时候的数据一致性或者完整性的。
在我们这个测试中,基于上述cipher suite得到的消息流如下:
C->S: Client Hello
S->C: Server Hello
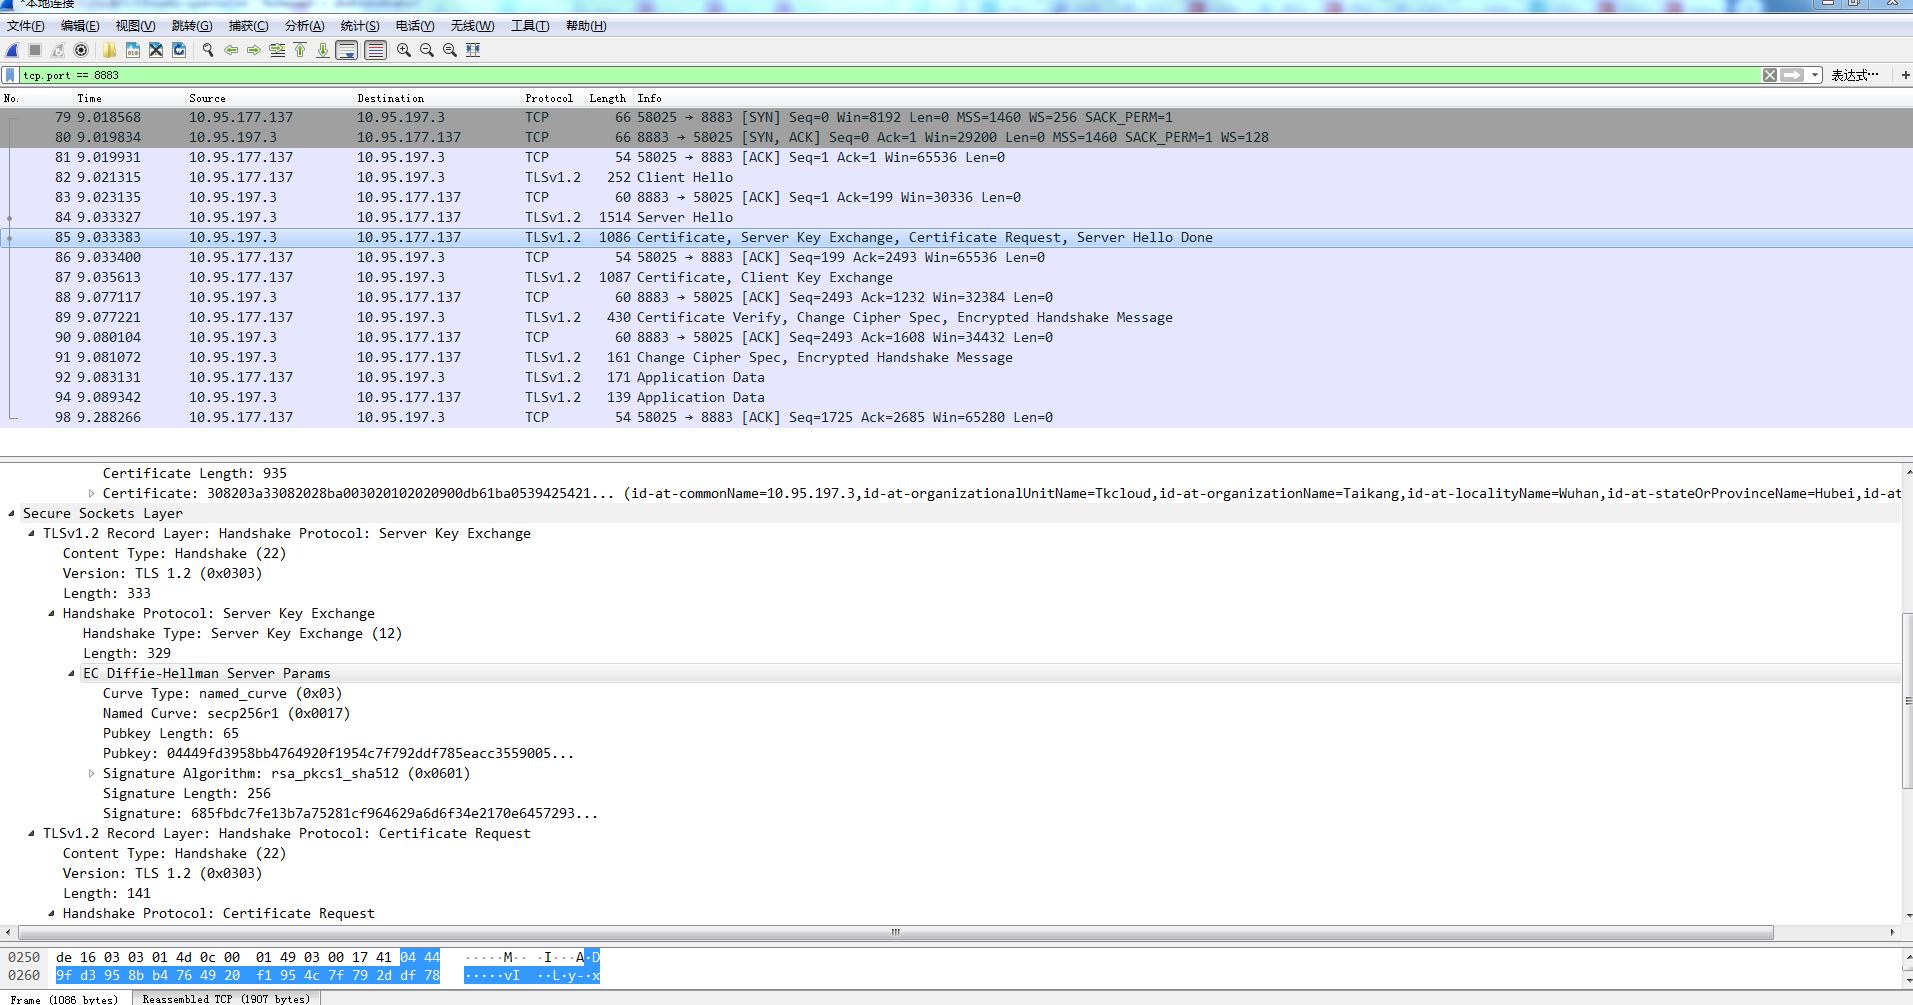
S->C: Certificate,Server Key Exchange, Certificate Request, Server Hello Done
C->S: Certificate, Client Key Exchange
C->S: Certificate Verify,Change Cipher Spec,Encrypted Handshake Message
S->C: Change Cipher Spec,Encrypted Handshake Message
C->S: Application Data
S->C: Application Data
a. C->S: Client Hello
b. S->C: Server Hello

c. S->C: Certificate,Server Key Exchange, Certificate Request, Server Hello Done (这里的Certificate Request,就是服务端要求客户端上报证书)
d. C->S: Certificate, Client Key Exchange (这个环节很重要,体现了双向SSL验证的特征了,服务端要求的身份验证,即希望校验客户端的证书的过程)

e. C->S: Certificate Verify,Change Cipher Spec,Encrypted Handshake Message
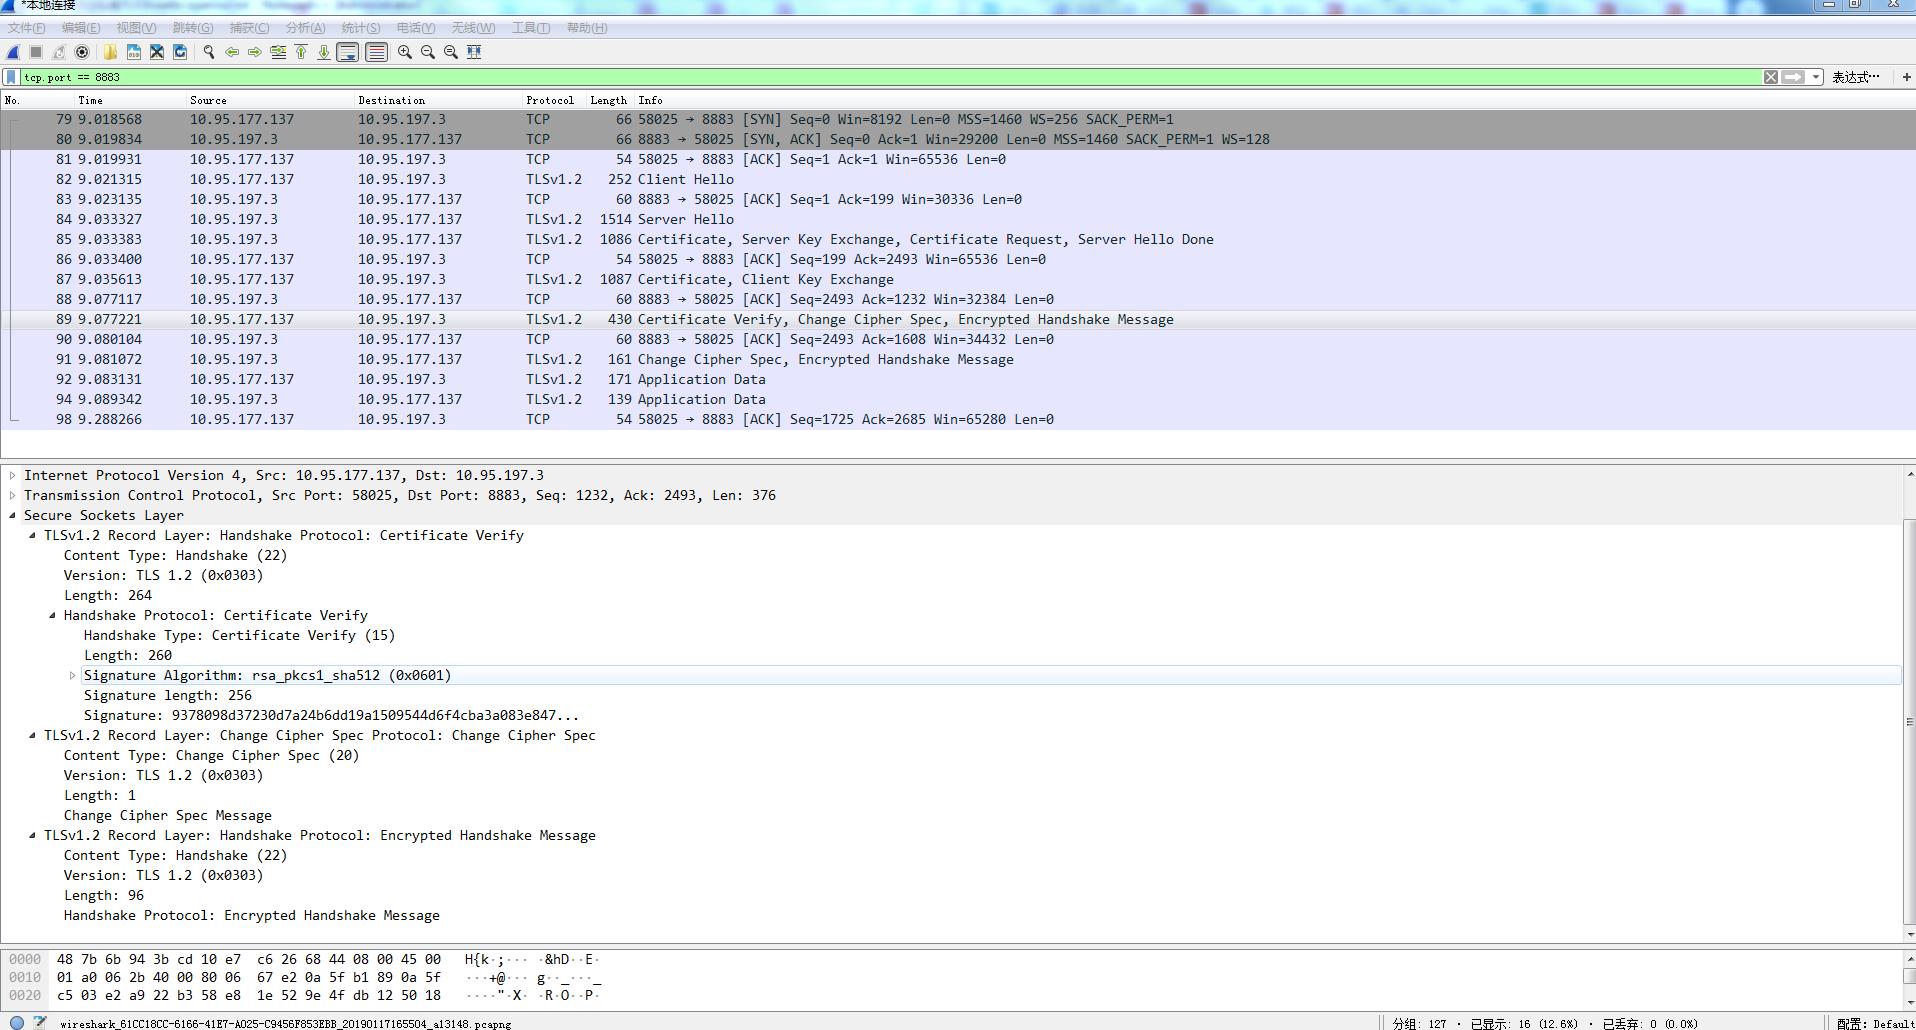
这个消息,其实理解起来似乎有点不好理解。为何客户端要上报Certificate Verify呢?
). certificate Verify消息必须在client key exchange后面由客户端发出去给服务器端。

). 这个消息,是客户端构建的,内容是客户端收发的所有的handshake消息(不含当前这个Verify的消息)拼接后的内容进行hash,然后用证书对应的私钥进行签名后所得的内容S1。

). 这个消息,服务端会进行验证。验证的逻辑,通过对服务端缓存的客户端消息,以及服务端发送的所有handshake消息,同样进行拼接然后计算hash值h2,用客户端的证书中的公钥解析Verify中的签名S1得到对应的hash值h1,对比h1和和

,若相同,则验证通过,否则失败。
可以参考这个链接中的内容,其实,他的解释或者介绍,也是基于RFC文档中的内容进行的,只是比较白话了,相对好懂些。
f. S->C: Change Cipher Spec,Encrypted Handshake Message

g.C->S: Application Data

第二步:单向SSL验证(客户端验证服务端的合法性)
1. 配合broker
## Path to the file containing the user's private PEM-encoded key.

##

## See: http://erlang.org/doc/man/ssl.html

##

## Value: File

#listener.ssl.external.keyfile = /etc/emqttd/certs/key.pem

listener.ssl.external.keyfile = /opt/certs/server.key

## Path to a file containing the user certificate.

##

## See: http://erlang.org/doc/man/ssl.html

##

## Value: File

#listener.ssl.external.certfile = /etc/emqttd/certs/cert.pem

listener.ssl.external.certfile = /opt/certs/server.crt

## Path to the file containing PEM-encoded CA certificates. The CA certificates

## are used during server authentication and when building the client certificate chain.

##

## Value: File

## listener.ssl.external.cacertfile = /etc/emqttd/certs/cacert.pem

listener.ssl.external.cacertfile = /opt/certs/rootCA.crt

## The Ephemeral Diffie-Helman key exchange is a very effective way of

## ensuring Forward Secrecy by exchanging a set of keys that never hit

## the wire. Since the DH key is effectively signed by the private key,

## it needs to be at least as strong as the private key. In addition,

## the default DH groups that most of the OpenSSL installations have

## are only a handful (since they are distributed with the OpenSSL

## package that has been built for the operating system it’s running on)

## and hence predictable (not to mention,  bits only).

## In order to escape this situation, first we need to generate a fresh,

## strong DH group, store it in a file and then use the option above,

## to force our SSL application to use the new DH group. Fortunately,

## OpenSSL provides us with a tool to do that. Simply run:

## openssl dhparam -out dh-params.pem

##

## Value: File

## listener.ssl.external.dhfile = /etc/emqttd/certs/dh-params.pem

## A server only does x509-path validation in mode verify_peer,

## as it then sends a certificate request to the client (this

## message is not sent if the verify option is verify_none).

## You can then also want to specify option fail_if_no_peer_cert.

## More information at: http://erlang.org/doc/man/ssl.html

##

## Value: verify_peer | verify_none

listener.ssl.external.verify = verify_none    #主要是在双向验证的基础上将此配置改为verify_none

## Used together with {verify, verify_peer} by an SSL server. If set to true,

## the server fails if the client does not have a certificate to send, that is,

## sends an empty certificate.

##

## Value: true | false

## listener.ssl.external.fail_if_no_peer_cert = true
2. 通过wireshark抓取SSL消息流
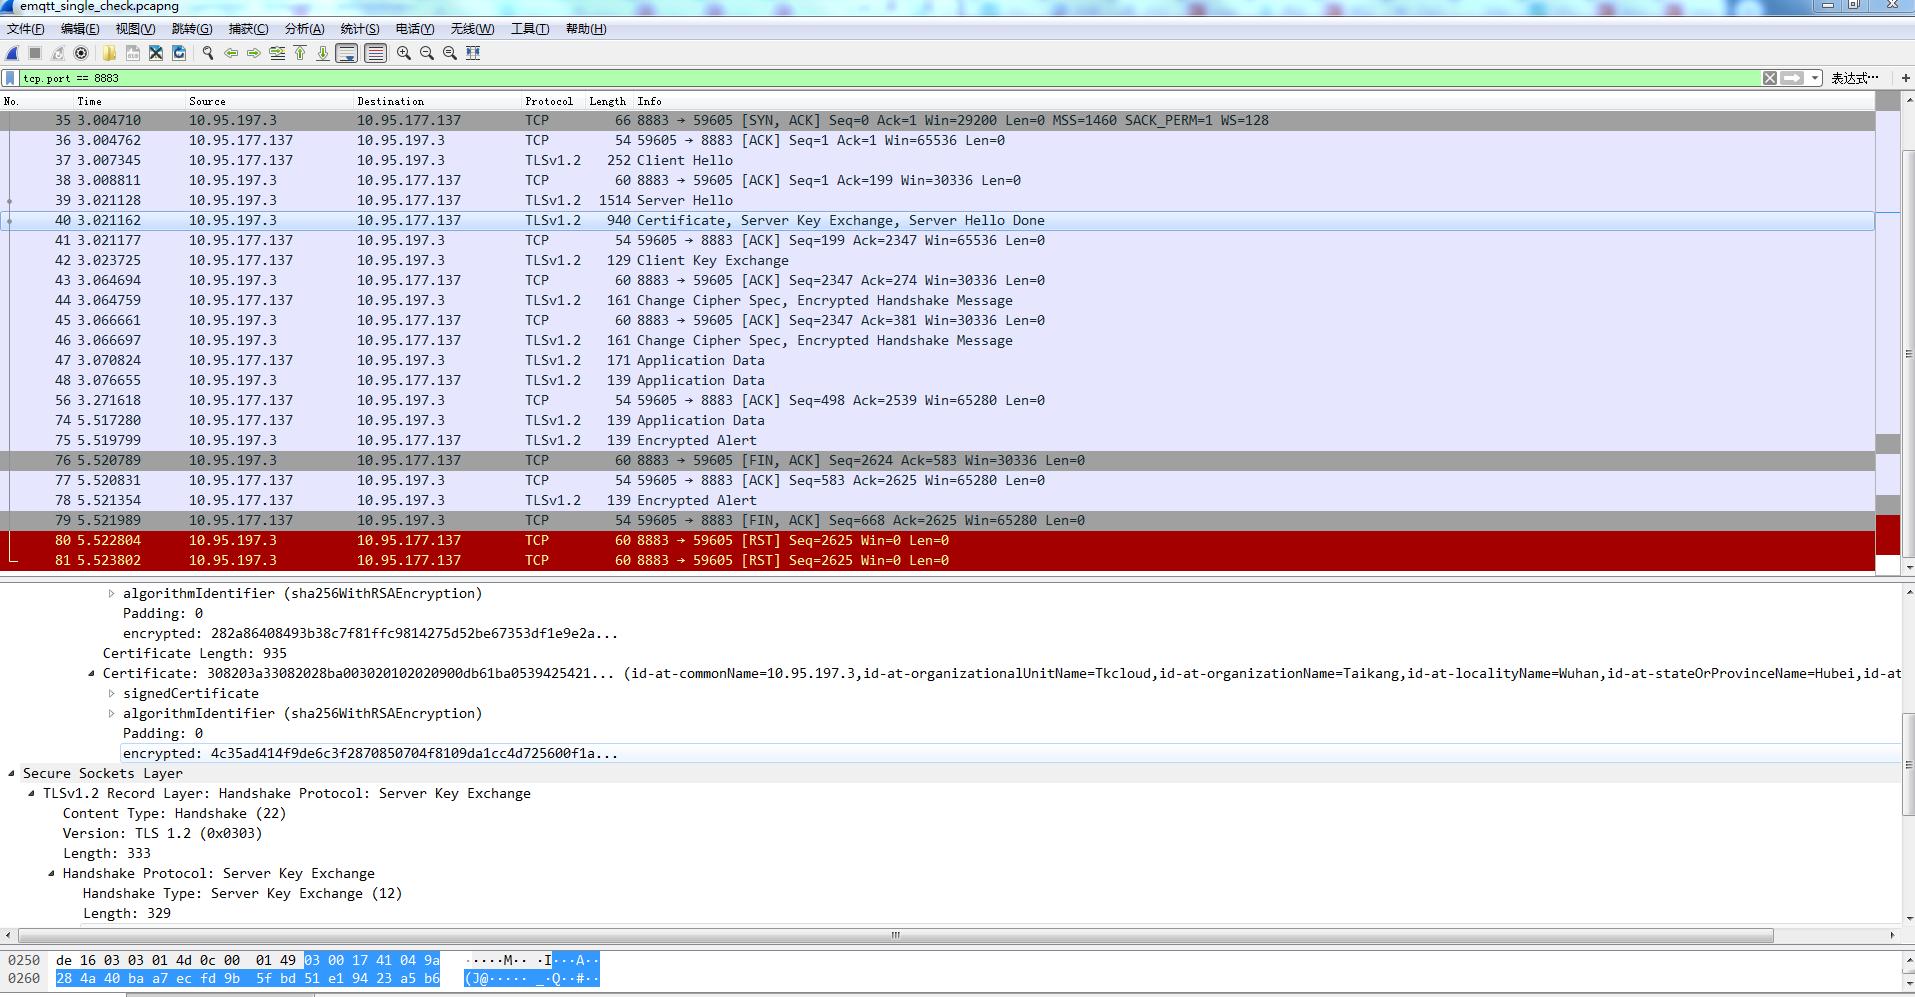
具体的通过wireshark抓取SSL消息流
C->S: Client Hello

S->C: Server Hello

S->C: Certificate, Server Key Exchange, Server Hello Done

C->S: Client Key Exchange

C->S: Change Cipher Spec, Encrypted Handshake Message

S->C: Change Cipher Spec, Encrypted Handshake Message

C->S: Application Data

S->C: Application Data

......

S->C: Encrypted Alert

C->S: Encrypted Alert
最后,补充一下,关于DH秘钥交换的流程图,ECDH交换和DH交换流程逻辑相同,只是算法中交换的参数计算逻辑不同而已,从DH升级到ECDH是可以平滑做到的。
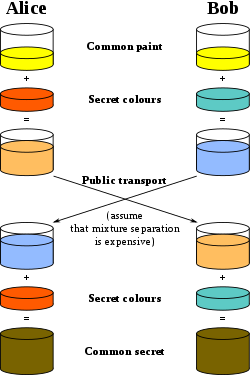
ECDH秘钥交换说明:
假设密钥交换双方为Alice、Bob,其有共享曲线参数(椭圆曲线E、阶N、基点G),对于于上图中的common paint黄色信息,是大家共有的,只是每次协商时,值不同,但是双方都是知道的。
1.Alice生成随机整数a (对应上图中的orange),计算A=a*G(这个A,对应上图中orange-tan)。Bob生成随机整数b(对应上图中的blue-green),计算B=b*G(这个B,对应上图中的light-blue)。
2.Alice将A传递给Bob。A的传递可以公开,即攻击者可以获取A。由于椭圆曲线的离散对数问题是难题,所以攻击者不可以通过A、G计算出a。Bob将B传递给Alice。同理,B的传递可以公开。
3.Bob收到Alice传递的A,计算Q=b*A (这里的Q,对应上图中yellow-brown)
4.Alice收到Bob传递的B,计算Q‘=a*B(这里的Q‘,对应上图中yellow-brown)
Alice、Bob双方即得Q=b*A=b*(a*G)=(b*a)*G=(a*b)*G=a*(b*G)=a*B=Q' (交换律和结合律),即双方得到一致的密钥Q。
到此,整个秘钥交换为核心的SSL消息流,大体就算是弄清楚了。
最新文章
- laravel框架中容器类简化代码-摘自某书
- JS-offsetParent定位父节点
- JavaScript 高性能笔记
- OC类方法和实例方法中的self区别
- java常用面板
- .net+mssql制作抽奖程序思路及源码
- 获取资源ID
- Java学习小结(1)-数组的创建与传参
- server宕机监控、检測、报警程序(139绑定手机短信报警)monitor_down.sh
- 【charger battery 充電 充電器 電池】停充的種類
- 一致性Hash漫画图解
- 2019 年起如何开始学习 ABP 框架系列文章-开篇有益
- Mac 软件专题之:OS X Yosemite 精彩应用软件推荐
- zabbix安装部署(server部分)
- Cracking The Coding Interview 1.5
- C++中关于配置文件的问题
- 一步一步学习IdentityServer4 (1) 概要配置说明
- asp.net要验证的用户名和密码
- 查找mysql的my.cnf位置
- yum基本用法与修改源