Heartbeat+HAProxy+MySQL半复制高可用架构
2024-09-27 21:01:15
目录
- 一 基础环境
- 二 架构设计
- 三 安装MySQL
- 3.1 安装MySQL
- 3.2 初始化MySQL
- 四 配置MySQL半同步
- 4.1 加载插件
- 4.2 配置半同步复制
- 4.3 master创建账号并授权
- 4.4 slave创建账号并授权
- 4.4 启动同步
- 五 安装HAProxy
- 5.1 下载及安装
- 5.2 创建HAProxy相关配置文件
- 六 配置HAProxy
- 6.1 配置master的HAProxy
- 6.2 配置slave的HAProxy
- 七 安装Heartbeat
- 八 配置Heartbeat
- 8.1 配置authkeys
- 8.2 配置Heartbeat
- 8.3 配置主备切换
- 8.4 添加MySQL健康检查
- 8.5 配置haresources
- 九 启动服务
- 9.1 启动Heartbeat
- 十 验证服务
- 10.1 验证VIP
- 10.2 验证进程
- 十一 功能测试
- 11.1 验证3307端口的读负载均衡转发策略
- 11.2 验证3308端口的读负载均衡转发策略
- 11.3 模拟从库crash
- 11.4 模拟主库crash
- 附录一:半同步复制概念
一 基础环境
|
节点
|
系统版本
|
MySQL版本
|
业务IP
|
心跳IP
|
|
Master
|
CentOS 7.5
|
MySQL 5.6
|
192.168.88.100
|
192.168.77.100
|
|
Slave
|
CentOS 7.5
|
MySQL 5.6
|
192.168.88.101
|
192.168.77.101
|
|
VIP
|
192.168.88.88
|
|||
关闭防火墙及SELinux;
配置NTP时钟同步;
主机名及hosts:
#public ip
192.168.88.100 master.yewu.com master
192.168.88.101 slave.yewu.com slave
#private ip
192.168.77.100 master-private.ha.com master-private
192.168.77.101 slave-private.ha.com slave-private
二 架构设计
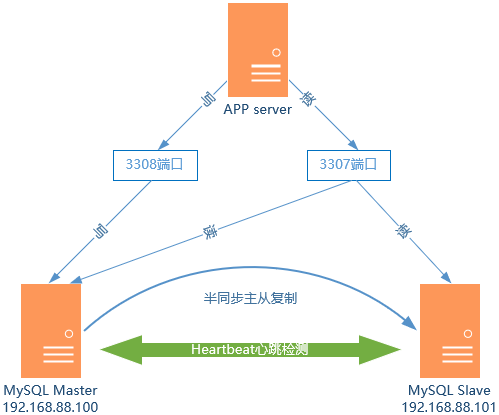
如图所示,两台MySQL主机采用MySQL半同步数据复制机制实现主从复制,采用不同端口实现读写分离,用于提高查询性能。Heartbeat通过心跳检测,避免单点故障,主要用于主机健康状态检查以及实现haproxy两台主机之间的自动失败切换。从而在任何一台主机宕机时,都不会影响对外提供服务(VIP可以漂移),保持MySQL数据库服务的高可用性。
整体架构原理:
主机Master和Slave,分别配置为MySQL半同步复制,且都启动Heartbeat服务,但只有Master启动haproxy服务;
通过Heartbeat启用一个虚IP,实现Master和Slave的自动切换;
在haproxy中配置两对frontend/backend,使用不同的端口,一个端口用于响应读请求,另一个端口用于响应读请求,实现读写分离。
注意:当frontend与backend是同一物理主机时,frontend不能绑定与backend相同的端口。
初始正常状态下,Master上的haproxy通过写端口将写请求转发至主机Master,通过读端口将读请求转发给Master和Slave,实现读负载均衡;
当主机Master异常时,Slave接管服务,此时需要:
- (1)VIP漂移到主机Slave上;
- (2)重置Slave的MySQL Slave角色,使之切换为Master;
- (3)启动Slave上的haproxy,继续接收应用的请求。
当主机Slave异常时,Master上的haproxy会将Slave踢出,其它动作类似如上。
三 安装MySQL
3.1 安装MySQL
  1 [root@master ~]# yum list installed | grep mysql	#查看是否存在其他MySQL组件

  2 [root@master ~]# yum -y remove mysql*			#为避免冲突引,卸载已存在的组件

  3 [root@master ~]# yum -y install mariadb mariadb-server

  4 [root@master ~]# systemctl start mariadb.service
注意:以上操作在Slave主机上也需要执行。
3.2 初始化MySQL
  1 [root@master ~]# mysql_secure_installation		#设置root密码

  2 [root@master ~]# systemctl restart mariadb.service
注意:以上操作在Slave主机上也需要执行。
四 配置MySQL半同步
4.1 加载插件

  1 [root@master ~]# ll /usr/lib64/mysql/plugin/		#查看插件

  2 [root@master ~]# mysql -uroot -p

  3 Enter password:

  4 MariaDB [(none)]> install plugin rpl_semi_sync_master soname 'semisync_master.so';

  5 MariaDB [(none)]> install plugin rpl_semi_sync_slave soname 'semisync_slave.so';
提示:为考虑可能出现的主从切换,需要在主从节点均添加master和slave插件。
1 MariaDB [(none)]> select * from information_schema.plugins where plugin_name like '%semi%'\G #查看加载情况

提示:主备节点都需要加载。
4.2 配置半同步复制
4.2.1 master my.cf配置
  1 [root@master ~]# vi /etc/my.cnf

  2 [mysqld]

  3 ……

  4 server-id=1				#设置主服务器master的id

  5 log-bin=mysql-bin			#配置二进制变更日志命名格式

  6 plugin-load=rpl_semi_sync_master=semisync_master.so

  7 rpl_semi_sync_master_enabled=1

  8 rpl_semi_sync_master_timeout=1000
4.2.2 slave my.cf配置
  1 [root@slave ~]# vi /etc/my.cnf

  2 [mysqld]

  3 ……

  4 server-id=2				#设置本服务器slave的id

  5 log-bin=mysql-bin			#配置二进制变更日志命名格式

  6 plugin-load=rpl_semi_sync_master=semisync_master.so

  7 rpl_semi_sync_master_enabled=1

  8

  9 read-only				#设为只读模式,只能从master同步,不能直接写入
4.3 master创建账号并授权
1 [root@master ~] mysql -uroot -p
2 Enter password:
3 MariaDB [(none)]> grant replication slave on *.* to 'repl_user'@'192.168.88.101' identified by 'x12345678';
4 MariaDB [(none)]> grant replication slave on *.* to 'repl_user'@'slave.yewu.com' identified by 'x12345678';
5 MariaDB [(none)]> grant all privileges on *.* to 'root'@'192.168.88.%' identified by 'x120952576' with grant option;
6 MariaDB [(none)]> grant all privileges on *.* to 'root'@'slave.yewu.com' identified by 'x120952576';
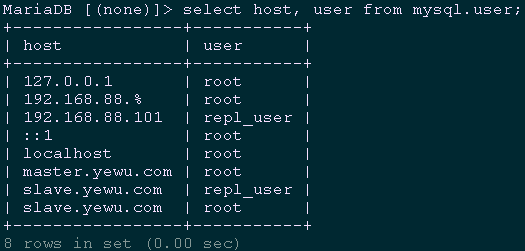
7 MariaDB [(none)]> flush privileges;
8 MariaDB [(none)]> select host, user from mysql.user; #查看权限
  1 [root@master ~]# systemctl restart mariadb.service

  2 [root@master ~]# mysql -uroot -p

  3 Enter password:

  4 MariaDB [(none)]> show master status;
master:
file:mysql-bin.000001
position:245
提示:主备模式中,仅需要主库授权从库复制即可。
4.4 slave创建账号并授权
1 [root@slave ~] mysql -uroot -p
2 Enter password:
3 MariaDB [(none)]> grant replication slave on *.* to 'repl_user'@'192.168.88.100' identified by 'x12345678';
4 MariaDB [(none)]> grant replication slave on *.* to 'repl_user'@'master.yewu.com' identified by 'x12345678';
5 MariaDB [(none)]> grant all privileges on *.* to 'root'@'192.168.88.%' identified by 'x120952576' with grant option;
6 MariaDB [(none)]> grant all privileges on *.* to 'root'@'master.yewu.com' identified by 'x120952576' with grant option;
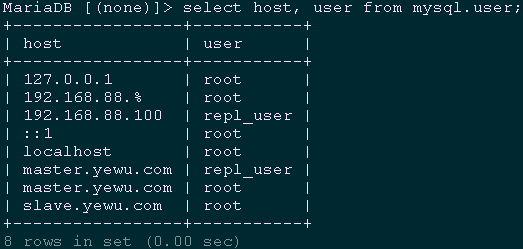
7 MariaDB [(none)]> select host, user from mysql.user; #查看权限
  1 [root@master ~]# systemctl restart mariadb.service

  2 [root@master ~]# mysql -uroot -p

  3 Enter password:

  4 MariaDB [(none)]> show master status;
master:
file:mysql-bin.000001
position:245
提示:主备模式中,仅需要主库授权从库复制即可。
4.4 启动同步
  1 [root@slave ~]# systemctl restart mariadb.service

  2 [root@slave ~]# mysql -uroot -p

  3 Enter password:

  4 MariaDB [(none)]> change master to master_host='192.168.88.100',

  5 master_user='repl_user',

  6 master_password='x12345678',

  7 master_log_file='mysql-bin.000001',

  8 master_port=3306,

  9 master_log_pos=245;

 10 MariaDB [(none)]> start slave;

 11 MariaDB [(none)]> show slave status\G			#查看slave状态
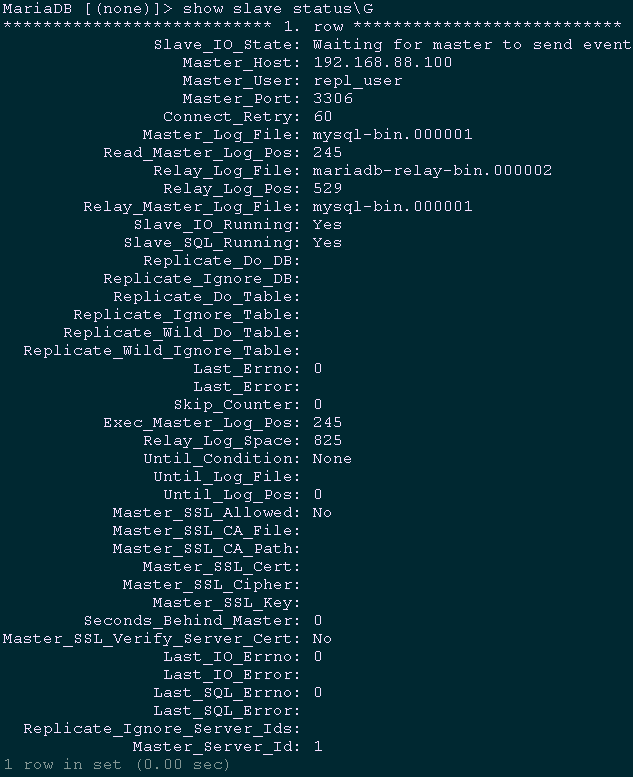
提示:
slave的I/O和SQL线程都已经开始运行,而且Seconds_Behind_Master不再是NULL。日志的位置增加了,意味着一些事件被获取并执行了。如果你在master上进行修改,你可以在slave上看到各种日志文件的位置的变化,同样,你也可以看到数据库中数据的变化;
半同步相关概念见附录一。
五 安装HAProxy
5.1 下载及安装
  1 [root@master ~]# wget http://www.haproxy.org/download/1.9/src/haproxy-1.9.0.tar.gz

  2 [root@master ~]# tar -zxvf haproxy-1.9.0.tar.gz

  3 [root@master ~]# cd haproxy-1.9.0/

  4 [root@master haproxy-1.9.0]# make TARGET=linux3100 CPU=x86_64 PREFIX=/usr/local/haprpxy

  5 #编译uname -r #查看系统内核版本号

  6 [root@master haproxy-1.9.0]# make install PREFIX=/usr/local/haproxy
参数解释:
TARGET=linux3100:内核版本,使用uname -r可查看内核。
5.2 创建HAProxy相关配置文件
  1 [root@master ~]# mkdir /usr/local/haproxy/conf				#创建配置文件目录

  2 [root@master ~]# mkdir -p /etc/haproxy					#创建配置文件目录

  3 [root@master ~]# touch /usr/local/haproxy/haproxy.cfg			#创建配置文件

  4 [root@master ~]# ln -s /usr/local/haproxy/conf/haproxy.cfg /etc/haproxy/haproxy.cfg		 #添加配置文件软连接

  5 [root@master ~]# cp -r /root/haproxy-1.9.0/examples/errorfiles /usr/local/haproxy/errorfiles #拷贝错误页面

  6 [root@master ~]# ln -s /usr/local/haproxy/errorfiles /etc/haproxy/errorfiles

  7 #添加软连接

  8 [root@master ~]# mkdir -p  /usr/local/haproxy/log			#创建日志文件目录

  9 [root@master ~]# touch /usr/local/haproxy/log/haproxy.log		#创建日志文件目录

 10 [root@master ~]# ln -s /usr/local/haproxy/log/haproxy.log /var/log/haproxy.log

 11 #添加软连接

 12 [root@master ~]# cp /usr/local/haproxy/sbin/haproxy /usr/sbin/	#拷贝HAProxy命令

 13 [root@master ~]# cp /root/haproxy-1.7.9/examples/haproxy.init /etc/rc.d/init.d/haproxy

 14 #拷贝开机启动文件

 15 [root@master ~]# chmod u+x /etc/rc.d/init.d/haproxy			#添加脚本执行权限

 16 [root@master ~]# chkconfig haproxy on				#设置开机启动
六 配置HAProxy
6.1 配置master的HAProxy
  1 [root@master ~]# vi /etc/haproxy/haproxy.cfg

  2 global

  3     log         127.0.0.1 local2        # 日志定义级别

  4     chroot      /usr/local/haproxy      # 当前工作目录

  5     pidfile     /var/run/haproxy.pid    # 进程id

  6     maxconn     4000                    # 最大连接数

  7     user        haproxy                 # 运行改程序的用户

  8     group       haproxy

  9     daemon                              # 后台形式运行

 10     stats socket /usr/local/haproxy/stats

 11

 12 defaults

 13     mode                    tcp         # haproxy运行模式(http | tcp | health)

 14     log                     global      # 采用全局定义的日志

 15     option                  dontlognull # 不记录健康检查的日志信息

 16     option                  redispatch  # serverId对应的服务器挂掉后,强制定向到其他健康的服务器

 17     retries                 3           # 三次连接失败则服务器不用

 18     timeout http-request    10s

 19     timeout queue           1m

 20     timeout client          1m          # 客户端超时

 21     timeout server          1m          # 服务器超时

 22     timeout http-keep-alive 10s

 23     timeout check           10s         # 心跳检测

 24     maxconn                 600         # 最大连接数

 25

 26 listen stats                            # 配置haproxy状态页(用来查看的页面)

 27     mode http

 28     bind 0.0.0.0:8888

 29     stats enable

 30     stats refresh 30s                   #设置统计页面自动刷新的时间

 31     stats uri /stats                    #设置统计页面url

 32     stats realm Haproxy Manager         #设置登录HAProxy统计页面密码框上提示文本

 33     stats auth admin:admin              #设置登录HAProxy统计页面用户名和密码设置

 34     #stats hide-version                 #隐藏统计页面上HAProxy的版本信息

 35 frontend  read

 36     bind *:3307                         # 监听前端3307端口(表示任何ip访问3307端口都会将数据轮番转发到mysql服务器群组中)

 37     default_backend        mysql_read   # 后端服务器组名

 38

 39 backend mysql_read

 40     balance     roundrobin              # 使用轮询方式调度

 41     server mysql1 192.168.88.100:3306 check port 3306 maxconn 300

 42     server mysql2 192.168.88.101:3306 check port 3306 maxconn 300

 43

 44 frontend  write

 45     bind *:3308                         # 监听前端3308端口(表示任何ip访问3308端口都会将数据轮番转发到mysql服务器群组中)

 46     default_backend        mysql_write  # 后端服务器组名

 47

 48 backend mysql_write

 49     server mysql1 192.168.88.100:3306 check port 3306 maxconn 300
解释:
更多的HAProxy配置可参考《002.HAProxy安装及常见配置》;
以上配置了两对frontend\backend:
read绑定3307端口接收读请求,其对应的backend为mysql_read,其中定义两个台MySQL服务器,使用轮询策略实现读负载均衡。
write绑定3308端口接收写请求,其对应的backend为mysql_write,其中只定义MySQL Master,即只有它接收写请求。
6.2 配置slave的HAProxy
  1 [root@slave ~]# vi /etc/haproxy/haproxy.cfg

  2 global

  3     log         127.0.0.1 local2        # 日志定义级别

  4     chroot      /usr/local/haproxy      # 当前工作目录

  5     pidfile     /var/run/haproxy.pid    # 进程id

  6     maxconn     4000                    # 最大连接数

  7     user        haproxy                 # 运行改程序的用户

  8     group       haproxy

  9     daemon                              # 后台形式运行

 10     stats socket /usr/local/haproxy/stats

 11

 12 defaults

 13     mode                    tcp         # haproxy运行模式(http | tcp | health)

 14     log                     global      # 采用全局定义的日志

 15     option                  dontlognull # 不记录健康检查的日志信息

 16     option                  redispatch  # serverId对应的服务器挂掉后,强制定向到其他健康的服务器

 17     retries                 3           # 三次连接失败则服务器不用

 18     timeout http-request    10s

 19     timeout queue           1m

 20     timeout client          1m          # 客户端超时

 21     timeout server          1m          # 服务器超时

 22     timeout http-keep-alive 10s

 23     timeout check           10s         # 心跳检测

 24     maxconn                 600         # 最大连接数

 25

 26 listen stats                            # 配置haproxy状态页(用来查看的页面)

 27     mode http

 28     bind 0.0.0.0:8888

 29     stats enable

 30     stats refresh 30s                   #设置统计页面自动刷新的时间

 31     stats uri /stats                    #设置统计页面url

 32     stats realm Haproxy Manager         #设置登录HAProxy统计页面密码框上提示文本

 33     stats auth admin:admin              #设置登录HAProxy统计页面用户名和密码设置

 34     #stats hide-version                 #隐藏统计页面上HAProxy的版本信息

 35 frontend  read

 36     bind *:3307                         # 监听前端3307端口(表示任何ip访问3307端口都会将数据轮番转发到mysql服务器群组中)

 37     default_backend        mysql_read   # 后端服务器组名

 38

 39 backend mysql_read

 40     balance     roundrobin              # 使用轮询方式调度

 41     server mysql1 192.168.88.100:3306 check port 3306 maxconn 300

 42     server mysql2 192.168.88.101:3306 check port 3306 maxconn 300

 43

 44 frontend  write

 45     bind *:3308                         # 监听前端3308端口(表示任何ip访问3308端口都会将数据轮番转发到mysql服务器群组中)

 46     default_backend        mysql_write  # 后端服务器组名

 47

 48 backend mysql_write

 49     server mysql1 192.168.88.101:3306 check port 3306 maxconn 300
解释:
更多的HAProxy配置可参考《002.HAProxy安装及常见配置》;
以上配置了两对frontend\backend:
read绑定3307端口接收读请求,其对应的backend为mysql_read,其中定义两个台MySQL服务器,使用轮询策略实现读负载均衡。
write绑定3308端口接收写请求,其对应的backend为mysql_write,其中定义当服务切换到Slave上时,接收读写请求的只有192.168.88.101这台主机。
七 安装Heartbeat
略,见《002.Heartbeat部署及httpd高可用》中的Heartbeat安装部分。
提示:相关安装及主机名等准备步骤参考《002.Heartbeat部署及httpd高可用》即可。
八 配置Heartbeat
8.1 配置authkeys
  1 [root@master ~]# vi /usr/local/heartbeat/etc/ha.d/authkeys

  2 auth 3

  3 3 md5 Yes!
8.2 配置Heartbeat
  1 [root@master ~]# vi /usr/local/heartbeat/etc/ha.d/ha.cf

  2 logfile /var/log/ha-log			#记录Heartbeat其他相关日志信息

  3 logfacility     local0			#设置heartbeat的日志,这里用的是系统日志

  4 keepalive 2				#设定心跳(监测)时间间隔为2秒

  5 deadtime 15				#宣告死亡时间

  6 warntime 10				#心跳延时时间

  7 initdead 60				#初始化时间

  8 udpport 694				#用于通信的UDP端口

  9 bcast   eth1				#接受广播心跳的网卡接口

 10 ucast eth1 192.168.77.101		#置对方机器心跳检测的IP

 11 auto_failback off			#关闭自动切回恢复正常的主节点

 12 node master.yewu.com			#集群节点的名称,必须匹配uname -n的结果。

 13 node slave.yewu.com

 14 ping 192.168.88.1

 15 respawn hacluster /usr/local/heartbeat/libexec/heartbeat/ipfail
注意: 主机和备机之间进行心跳检测,当备机无法检测到主机的心跳,则开启vip;
如果主机和备机都没有挂掉,由于通信问题导致相互无法连接,则会出现裂脑,即主备都对外声明了vip,导致数据出现故障 ,因此建议主机和备机间应该采用专门只是用于检测心跳的网卡(网络),其他数据(业务)网络应该独立于此心跳网络。
8.3 配置主备切换
  1 [root@master ~]# vi /root/remove_slave.sh

  2 #!/bin/sh

  3 #****************************************************************#

  4 # ScriptName: remove_slave.sh

  5 # Author: xhy

  6 # Create Date: 2018-12-22 09:58

  7 # Modify Author: xhy

  8 # Modify Date: 2018-12-22 09:58

  9 # Version:

 10 #***************************************************************#

 11 user=root

 12 password=x120952576

 13 log=/var/log/mariadb/remove_slave.log

 14 echo "`date`" >> $log

 15 rm -rf /tmp/kill.sql

 16 mysql -u$user -p$password -e "select * into outfile '/tmp/kill.sql' from (select concat('kill ',id,';') from information_schema.processlist where command='sleep' union all select 'set global read_o

 17 nly=OFF;' union all select 'stop slave;' union all select 'reset slave all;') t;"

 18 mysql -u$user -p$password < /tmp/kill.sql >> $log

 19  /bin/sed -i 's#read-only#\#read-only#' /etc/my.cnf
提示:对于CentOS7.X系统。MariaDB出于安全性考虑,不允许直接使用into outfile将sql语句输出至文件目录,而是采用文件目录的子目录,如/tmp/kill.sql会输出至/tmp/systemd-private-1……/tmp/kill.sql。可参考如下方式关闭安全保护:
  1 # vi /usr/lib/systemd/system/mariadb.service

  2 #PrivateTmp=true

  3 PrivateTmp=false

  4 # systemctl daemon-reload

  5 # systemctl restart mariadb.service
  1 [root@master ~]# chmod 755 /root/remove_slave.sh

  2 [root@master ~]# scp /root/remove_slave.sh root@192.168.88.101:/root/
8.4 添加MySQL健康检查
  1 [root@master ~]# vi mysql_check.sh

  2 #!/bin/sh

  3 #****************************************************************#

  4 # ScriptName: mysql_check.sh

  5 # Author: xhy

  6 # Create Date: 2018-12-20 16:40

  7 # Modify Author: xhy

  8 # Modify Date: 2018-12-20 16:40

  9 # Version:

 10 #***************************************************************#

 11 MYSQL=/usr/bin/mysql

 12 MYSQL_HOST=localhost

 13 MYSQL_USER=root

 14 MYSQL_PASSWORD=x120952576

 15 date=`date +%y%m%d-%H:%M:`

 16 echo $date

 17 $MYSQL -h $MYSQL_HOST -u $MYSQL_USER -p$MYSQL_PASSWORD -e "show status;" >/dev/null 2>&1

 18 #$mysqlclient --host=$host --port=$port--user=$user --password=$password  -e"show databases;" > /dev/null 2>&1

 19 if [ $? == 0 ]

 20 then

 21    echo " $host mysql login successfully "

 22    exit 0

 23 else

 24    echo " $host mysql login faild"

 25    /etc/init.d/heartbeat stop

 26    exit 2

 27 fi

 28 [root@master ~]# chmod 755 /root/mysql_check.sh

 29 [root@master ~]# scp /root/mysql_check.sh root@192.168.88.101:/root/

 30 [root@master ~]# crontab -e			#定时任务

 31 */1 * * * * /root/mysql_check.sh >>/var/log/mariadb/check_mysql.log

 32 [root@slave ~]# crontab -e			#定时任务

 33 */1 * * * * /root/mysql_check.sh >>/var/log/mariadb/check_mysql.log
提示:heartbeat只检测心跳,即可检测设备是否宕机,然后宕机后进行切换,而不会检测上层应用,如MySQL。可手动写入一个脚本检测服务状态,如MySQL。若mysql服务宕掉,则kill掉heartbeat进程从而实现故障转移(类似keepalived)。
8.5 配置haresources
  1 root@master ~]# vi /usr/local/heartbeat/etc/ha.d/resource.d/changemysql

  2 /root/remove_slave.sh

  3 /etc/init.d/haproxy restart

  4 [root@master ~]# chmod 755 /usr/local/heartbeat/etc/ha.d/resource.d/changemysql

  5 [root@master ~]# ll /usr/local/heartbeat/etc/ha.d/resource.d/	#查看现有资源类型

  6 [root@master ~]# vi /usr/local/heartbeat/etc/ha.d/haresources

  7 master.yewu.com IPaddr::192.168.88.88/24/eth0 mariadb changemysql

  8 [root@master ~]# scp /usr/local/heartbeat/etc/ha.d/{ha.cf,haresources,authkeys} 192.168.88.101:/usr/local/heartbeat/etc/ha.d/		#将所有配置复制至slave节点

  9 [root@master ~]# scp /usr/local/heartbeat/etc/ha.d/resource.d/changemysql root@192.168.88.101:/usr/local/heartbeat/etc/ha.d/resource.d/

 10 [root@slave ~]# vi /usr/local/heartbeat/etc/ha.d/ha.cf

 11 ucast eth1 192.168.77.100		#置对方机器心跳检测的IP
解释:haresources中配置mariadb和changemysql,默认Heartbeat会从优先从/usr/local/heartbeat/etc/ha.d/resource.d/查找同名脚本运行,若有相应资源需要启动可复制至此目录,然后会从/etc/init.d/目录下找同名(即MariaDB)运行,由于本架构采用CentOS7.X系统,需要将已编辑完成的mariadb启动脚本(见附件)上传至/etc/init.d/目录;
changemysql脚本用于Heartbeat实现HAProxy的切换及MySQL的主备切换。
九 启动服务
9.1 启动Heartbeat
在此场景中,两个主机的heartbeat服务的启动必须符合顺序,要先启动192.168.88.101,再启动,192.168.88.100。
若顺序相反,则当192.168.88.100获得VIP资源,会执行本地的mysql脚本,这时将会调用/root/remove_slave.sh,重置192.168.88.100在MySQL主从中master角色,导致192.168.88.100转换为slave节点,而VIP却依旧存在于192.168.88.100。此时若外界访问VIP(即访问RS:192.168.88.100),若采用的是写,会导致写入从角色。
必须先后在192.168.88.101好192.168.88.100上执行以下命令:
  1 [root@slave ~]# systemctl start heartbeat.service

  2 [root@slave ~]# systemctl enable heartbeat.service

  3 [root@master ~]# service haproxy start

  4 [root@master ~]# systemctl start heartbeat.service

  5 [root@master ~]# systemctl enable heartbeat.service
十 验证服务
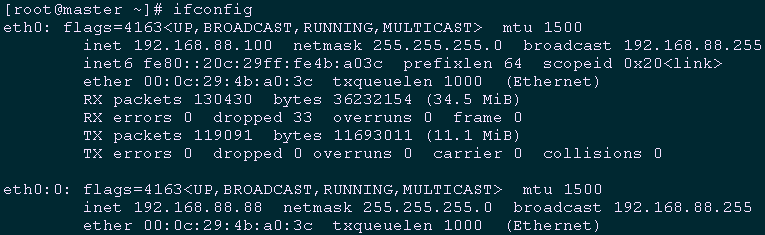
10.1 验证VIP
1 [root@master ~]# ifconfig
10.2 验证进程
1 [root@master ~]# ps -ef | grep -E 'heartbeat|haproxy' | grep -v grep

提示:192.168.88.100上有heartbeat、haproxy相关进程,以及mysql_check定时任务。
1 [root@slave ~]# ps -ef | grep -E 'heartbeat|haproxy' | grep -v grep

提示:192.168.88.100上有heartbeat相关进程,以及mysql_check定时任务。
十一 功能测试
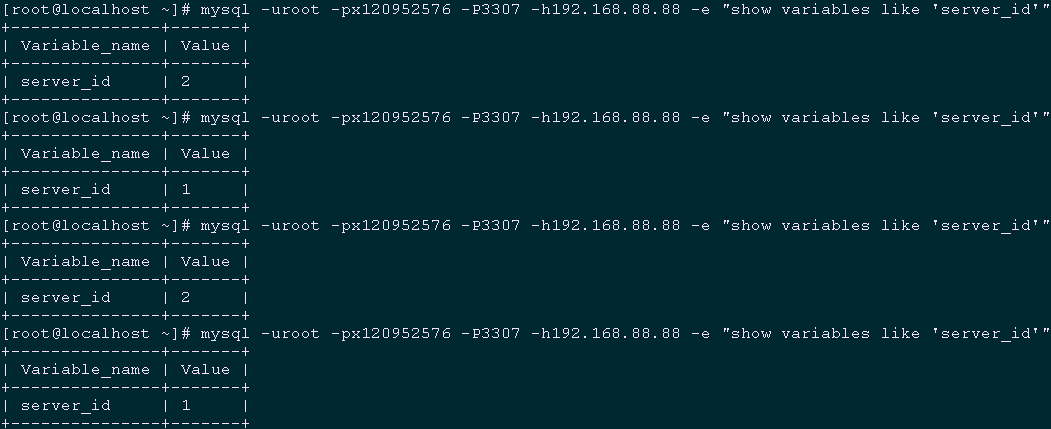
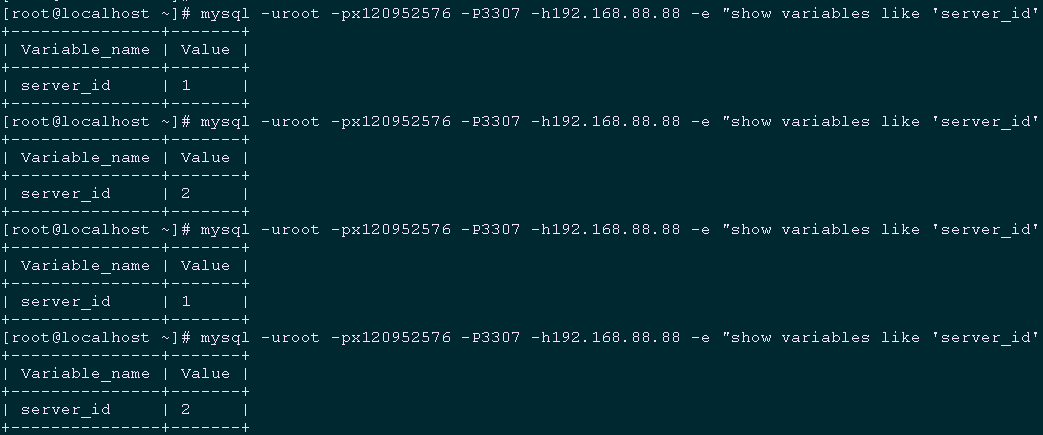
11.1 验证3307端口的读负载均衡转发策略
1 [root@localhost ~]# mysql -uroot -px120952576 -P3307 -h192.168.88.88 -e "show variables like 'server_id'"
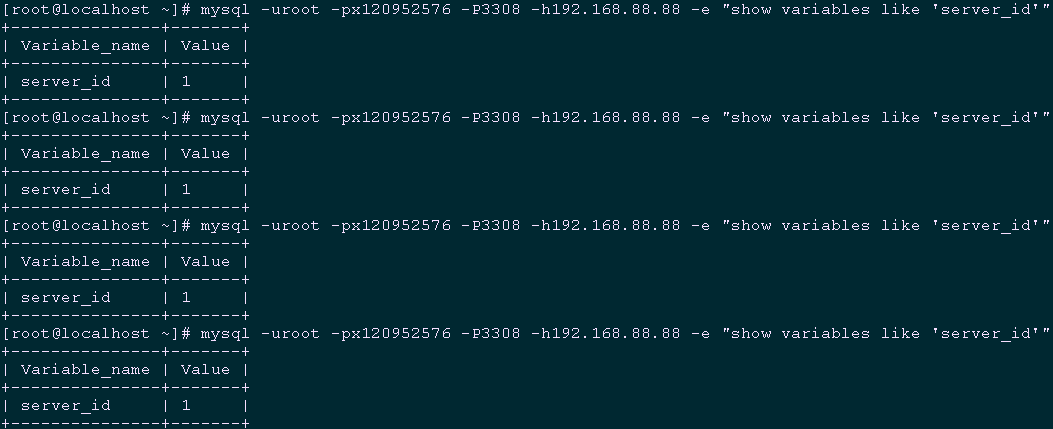
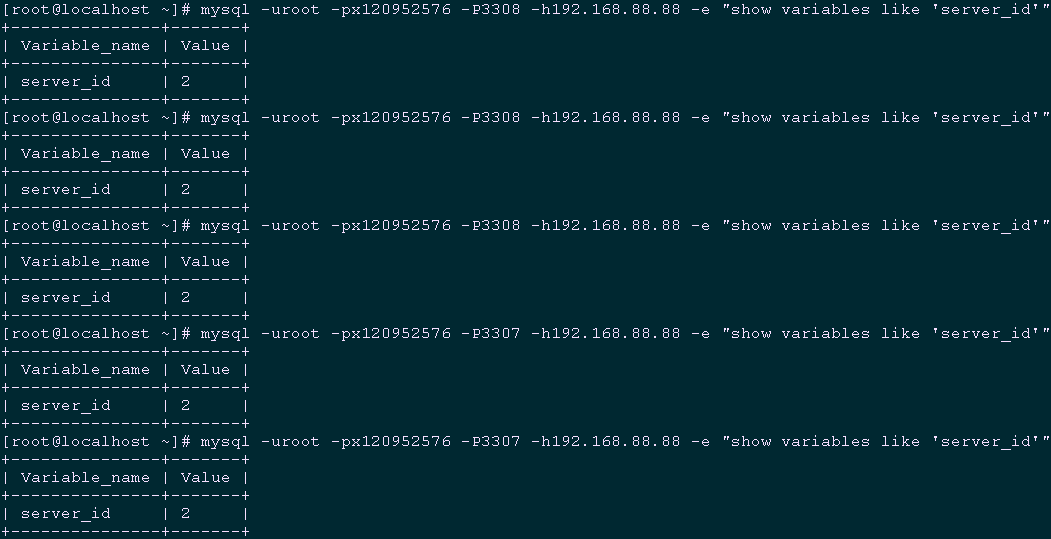
11.2 验证3308端口的读负载均衡转发策略
1 [root@localhost ~]# mysql -uroot -px120952576 -P3308 -h192.168.88.88 -e "show variables like 'server_id'"
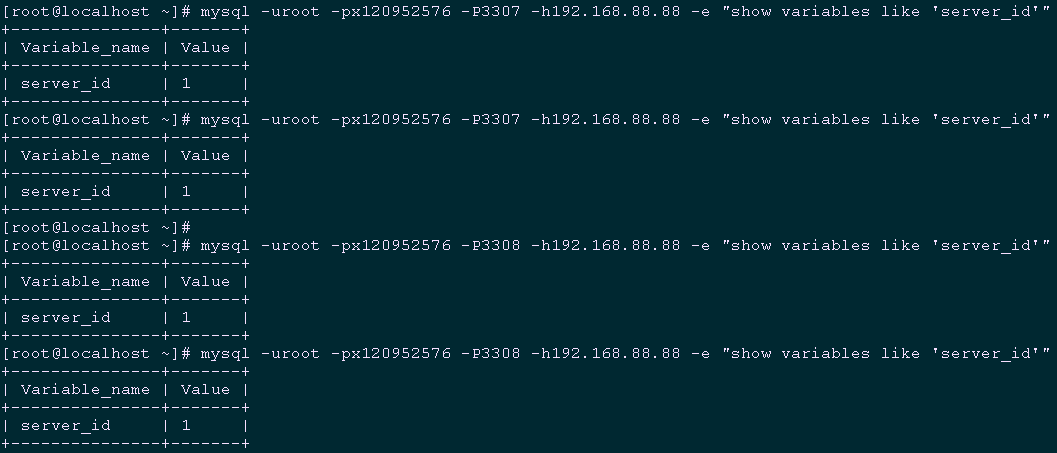
11.3 模拟从库crash
  1 [root@slave ~]# pkill -9 mysqld

  2 [root@localhost ~]# mysql -uroot -px120952576 -P3307 -h192.168.88.88 -e "show variables like 'server_id'"

  3 [root@localhost ~]# mysql -uroot -px120952576 -P3308 -h192.168.88.88 -e "show variables like 'server_id'"
  1 [root@slave ~]# systemctl start mariadb.service		#重启从库

  2 [root@localhost ~]# mysql -uroot -px120952576 -P3307 -h192.168.88.88 -e "show variables like 'server_id'"    #再次验证3307端口的读负载均衡转发策略
11.4 模拟主库crash
  1 [root@master ~]# pkill -9 mysqld

  2 [root@localhost ~]# mysql -uroot -px120952576 -P3308 -h192.168.88.88 -e "show variables like 'server_id'"

  3 [root@localhost ~]# mysql -uroot -px120952576 -P3307 -h192.168.88.88 -e "show variables like 'server_id'"
高可用原理梳理:
正常情况下,对VIP读(即3307)会被均衡分布到后端192.168.88.100和192.168.88.101,对VIP写(3308)只会转发给192.168.88.100,此功能为HAProxy设置的后端侧露实现;
当192.168.88.101的MySQL crash时(即从库),VIP位于192.168.88.100,对VIP的读(3307)和写(3308),只会分发至192.168.88.100(即主库);
当192.168.88.100的MySQL crash时(即主库),由于定时任务check_mysql脚本会自动检测到MySQL异常,从而出发Heartbeat停止,于是VIP随之偏移至192.168.88.101(即从库)。此时对VIP的读(3307)和写(3308),只会分发至192.168.88.101(即新的主库)。
附录一:半同步复制概念
异步复制(Asynchronous replication):MySQL默认的复制机制,指主库在执行完客户端提交的事务后会立即将结果返给给客户端,并不确保从库是否已经接收并处理。此机制存在一个可能的问题,若主库crash掉了,此时主库上已经提交的事务可能并没有复制到从库中,如果此时,强行将从提升为主,可能导致新主上的数据不完整。
全同步复制(Fully synchronous replication):指当主库执行完一个事务,所有的从库都执行了该事务才返回给客户端。此机制因为需要等待所有从库执行完该事务才能返回,所以全同步复制的性能必然会收到一定影响。
半同步复制(Semisynchronous replication):介于异步复制和全同步复制之间,主库在执行完客户端提交的事务后不是立刻返回给客户端,而是等待至少一个从库接收到并写到relay log中才返回给客户端。相对于异步复制,半同步复制提高了数据的安全性,但它也造成了一定程度的延迟,这个延迟最少是一个TCP/IP往返的时间,建议半同步复制最好在低延时的网络中使用。
原文转自:https://www.cnblogs.com/itzgr/p/10233932.html
作者:木二
最新文章
- canvas快速绘制圆形、三角形、矩形、多边形
- HashMap,Hashtable,TreeMapMap
- JZ2440开发板学习 1. 刚接触开发板, 安装驱动
- overflow 清除浮动
- protected(C# 参考)
- 深入理解jQuery插件开发(转)
- Bzoj 1046: [HAOI2007]上升序列 二分,递推
- Java工作队列和线程池
- js设计模式--策略模式
- 获取Promise的值
- WebForm从客户端中检测到有潜在危险的Request.Form 值的处理办法
- \\Device\\PhysicalMemory
- http和https的加密方式
- 理解 Memory barrier(内存屏障)【转】
- BadgeValueView
- 行尸走肉第一季/全集The Walking Dead迅雷下载
- 绝对定位常见误区:position:absolute相对于谁定位、及当溢出时怎么隐藏
- 《图解Http》 10,11章:构建Web的技术, Web的攻击技术
- Linux的find命令实例详解和mtime ctime atime
- Kafka查看偏移量报错:WARN WARNING: ConsumerOffsetChecker is deprecated and will be dropped in releases following 0.9.0. Use ConsumerGroupCommand instead.