Kibana,Logstash 和 Cerebro 的安装运行
公号:码农充电站pro
主页:https://codeshellme.github.io
1,安装 Kibana
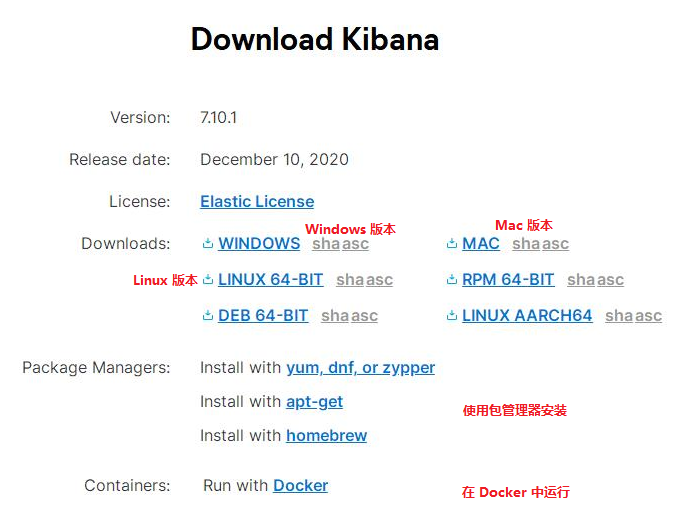
Kibana 用于数据可视化,我们可以进入到 Kibana 下载页面下载 Kibana,如下所示:
接下来根据自己的系统,下载相应的版本,然后进行解压,得到如下文件夹:
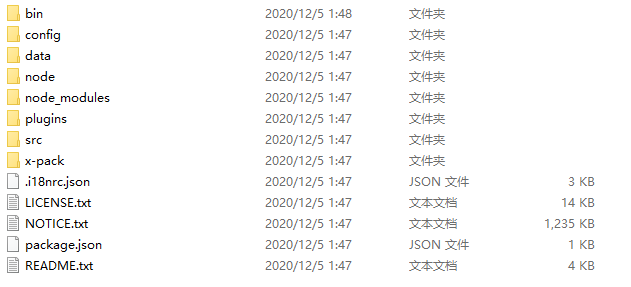
其中 bin 目录是一些工具命令,config 目录中是配置文件。
bin 目录中的 kibana.bat 是 Kibana 的启动程序,先来使用 --help 参数查看其用法:
> bin\kibana --help

  Usage: bin/kibana [command=serve] [options]

  Kibana is an open source (Apache Licensed), browser based analytics and search dashboard for Elasticsearch.

  Commands:

    serve  [options]  Run the kibana server

    help  <command>   Get the help for a specific command

  "serve" Options:

    -e, --elasticsearch <uri1,uri2>  Elasticsearch instances

    -c, --config <path>              Path to the config file, use multiple --config args to include multiple config files

    -p, --port <port>                The port to bind to

    -q, --quiet                      Prevent all logging except errors

    -Q, --silent                     Prevent all logging

    --verbose                        Turns on verbose logging

    -H, --host <host>                The host to bind to

    -l, --log-file <path>            The file to log to

    --plugin-dir <path>              A path to scan for plugins, this can be specified multiple times to specify multiple directories

    --plugin-path <path>             A path to a plugin which should be included by the server, this can be specified multiple times to specify multiple paths

    --plugins <path>                 an alias for --plugin-dir

    --optimize                       Deprecated, running the optimizer is no longer required

    -h, --help                       output usage information
配置文件无须做任何修改就可以运行,使用 bin\kibana 命令启动一个 Kibana 实例,如果运行成功,Kibana 将在 5601 端口监听服务。
在运行 Kibana 之前要使 ES 处于运行状态。
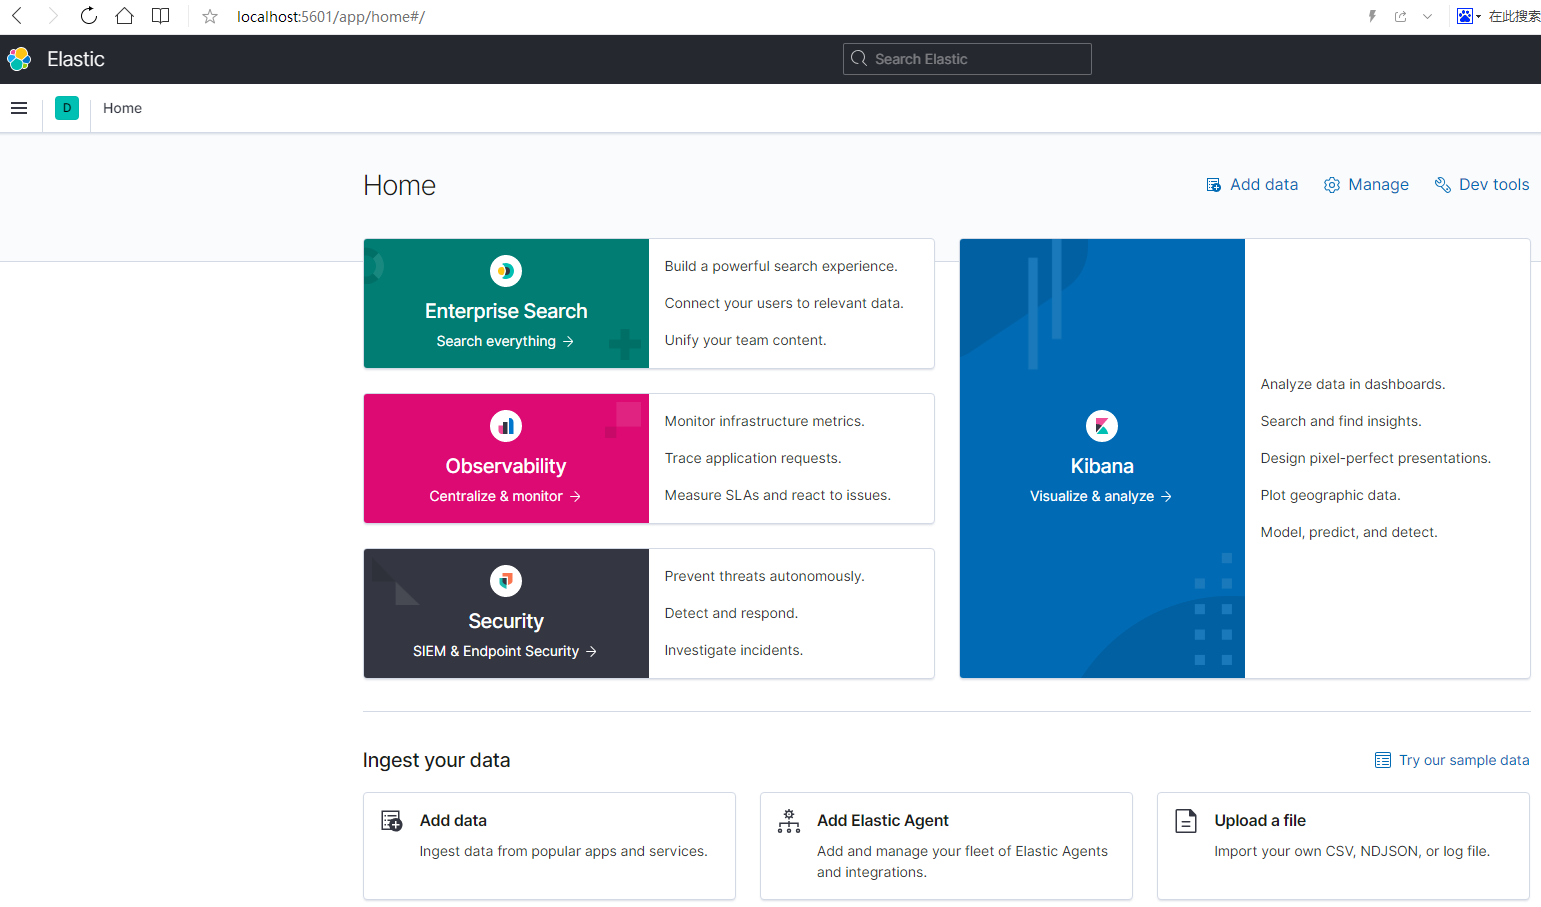
使用浏览器访问本地的 5601 端口,查看 Kibana 是否启动成功,如果像下面这样,说明启动成功:
2,简单使用 Kibana
点击下面的框框,可以添加数据:

这里有一些测试数据:

点击 Add data 可以将数据添加到系统中(这些数据其实是添加到了 ES 中)。
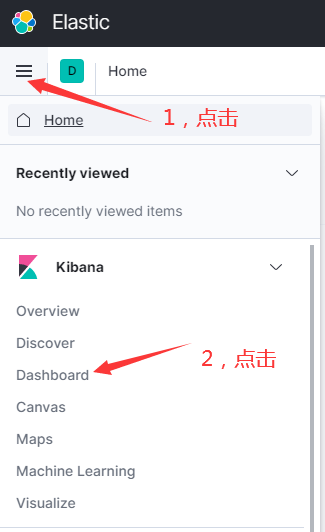
添加数据成功后,可以到 Dashboard 页面查看数据。
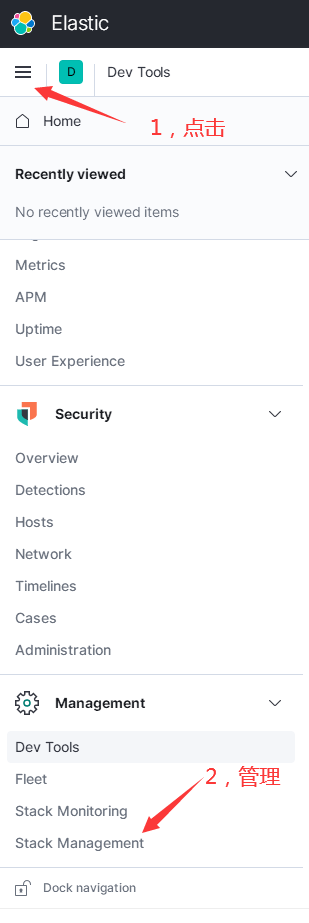
3,Deve Tools
Kibana 中的 Dev Tools 是个有用的工具:
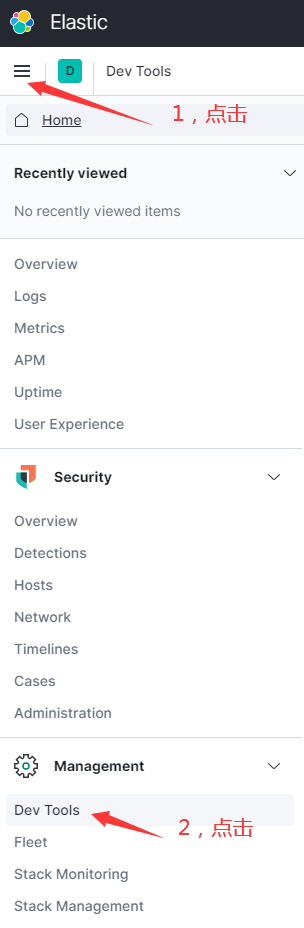
在 Dev tools 中可以执行 ES 命令:

4,Kibana 插件
使用 bin\kibana-plugin 命令可以安装 Kibana 插件:
> bin\kibana-plugin --help

  Usage: bin/kibana-plugin [command] [options]

  The Kibana plugin manager enables you to install and remove plugins that provide additional functionality to Kibana

  Commands:

    list                            list installed plugins

    install  [options] <plugin/url> install a plugin

    remove  [options] <plugin>      remove a plugin

    help  <command>                 get the help for a specific command
5,安装 Logstash
Logstash 用于向 ES 中导入数据。首先进入到 Logstash 下载页面下载 logstash:
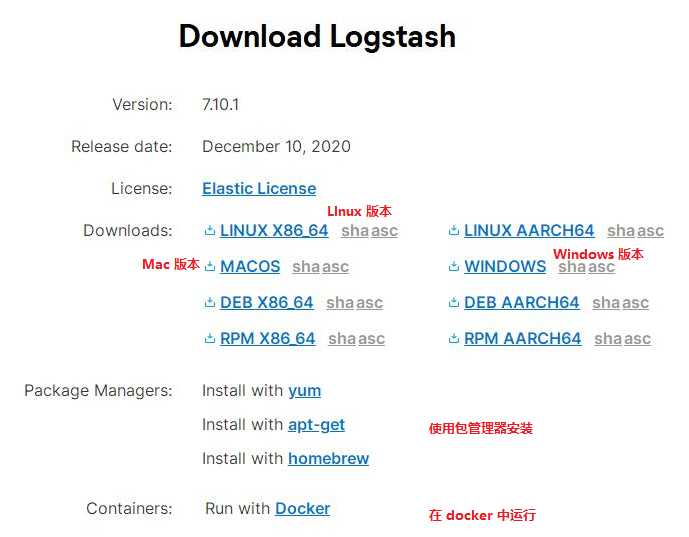
接下来是根据自己的系统下载相应的版本,下载完成后,解压后可得到如下目录:
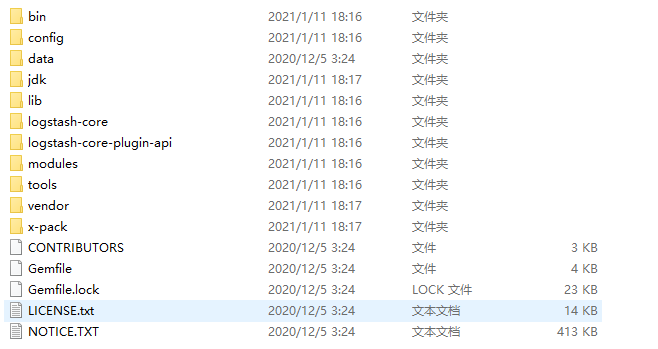
其中 bin 目录中是一些工具命令,config 目录中是配置文件,config\logstash-sample.conf 文件是 logstash 的配置文件示例。
6,使用 Logstash
这里是一份 MovieLens 数据集,我们将其下载下来,并用 logstash 将其导入 ES。
使用 logstash 导入文件时,要为其指定配置文件,我们将下面内容命名为 logstash.conf,并将其放在 config 目录中。
input {

  file {

    path => "C:/logstash-7.10.1/ml-latest-small/movies.csv"

    start_position => "beginning"

  }

}

filter {

  csv {

    separator => ","

    columns => ["id","content","genre"]

  }

  mutate {

    split => { "genre" => "|" }

    remove_field => ["path", "host","@timestamp","message"]

  }

  mutate {

    split => ["content", "("]

    add_field => { "title" => "%{[content][0]}"}

    add_field => { "year" => "%{[content][1]}"}

  }

  mutate {

    convert => {

      "year" => "integer"

    }

    strip => ["title"]

    remove_field => ["path", "host","@timestamp","message","content"]

  }

}

output {

   elasticsearch {

     hosts => "http://localhost:9200"

     index => "movies"

     document_id => "%{id}"

   }

  stdout {}

}
这个配置文件中的内容,你不必全部看懂,只需要知道下面两点:
input.file.path表示要导入的文件路径。output.elasticsearch.hosts表示 ES 的地址。
下面使用 bin\logstash 命令将 movies.csv 文件中的数据导入 ES,使用 -f 指定配置文件:
> bin\logstash -f config\logstash.conf
7,使用 Kibana 查看导入的数据
当导入完成后,可以使用 Kibana 查看导入的数据:
然后点击索引管理:

然后可以看到下面的页面:
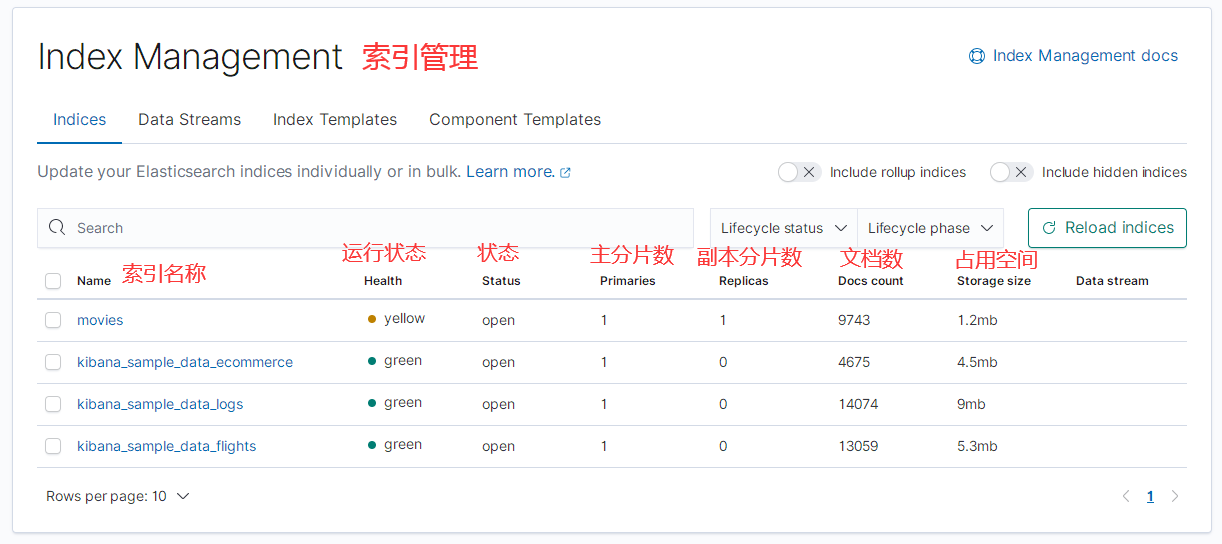
点击 movies 索引,可以看到它的详细数据:

还可以查看 Setting,Mapping 等数据。
8,安装及运行 Cerebro
Cerebro 是一个开源的 ElasticSearch 管理工具。
在 Windows 系统中可以使用 choco 来安装:
choco install cerebro-es
也可以在下载页下载安装包。
下载 / 安装好之后,使用 bin/cerebro 运行程序,启动成功后,它会在 9000 端口监听服务。
使用浏览器访问 9000 端口:
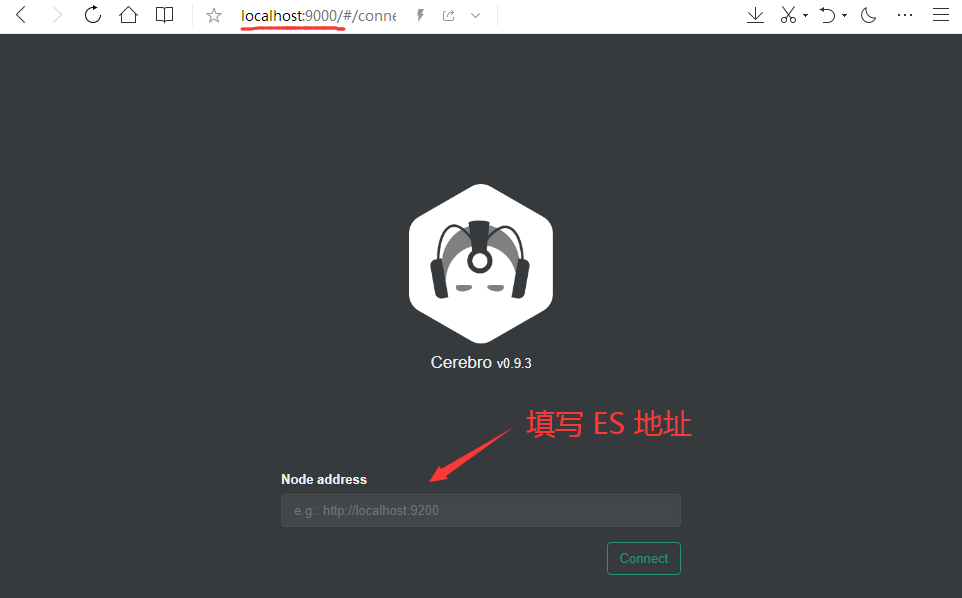
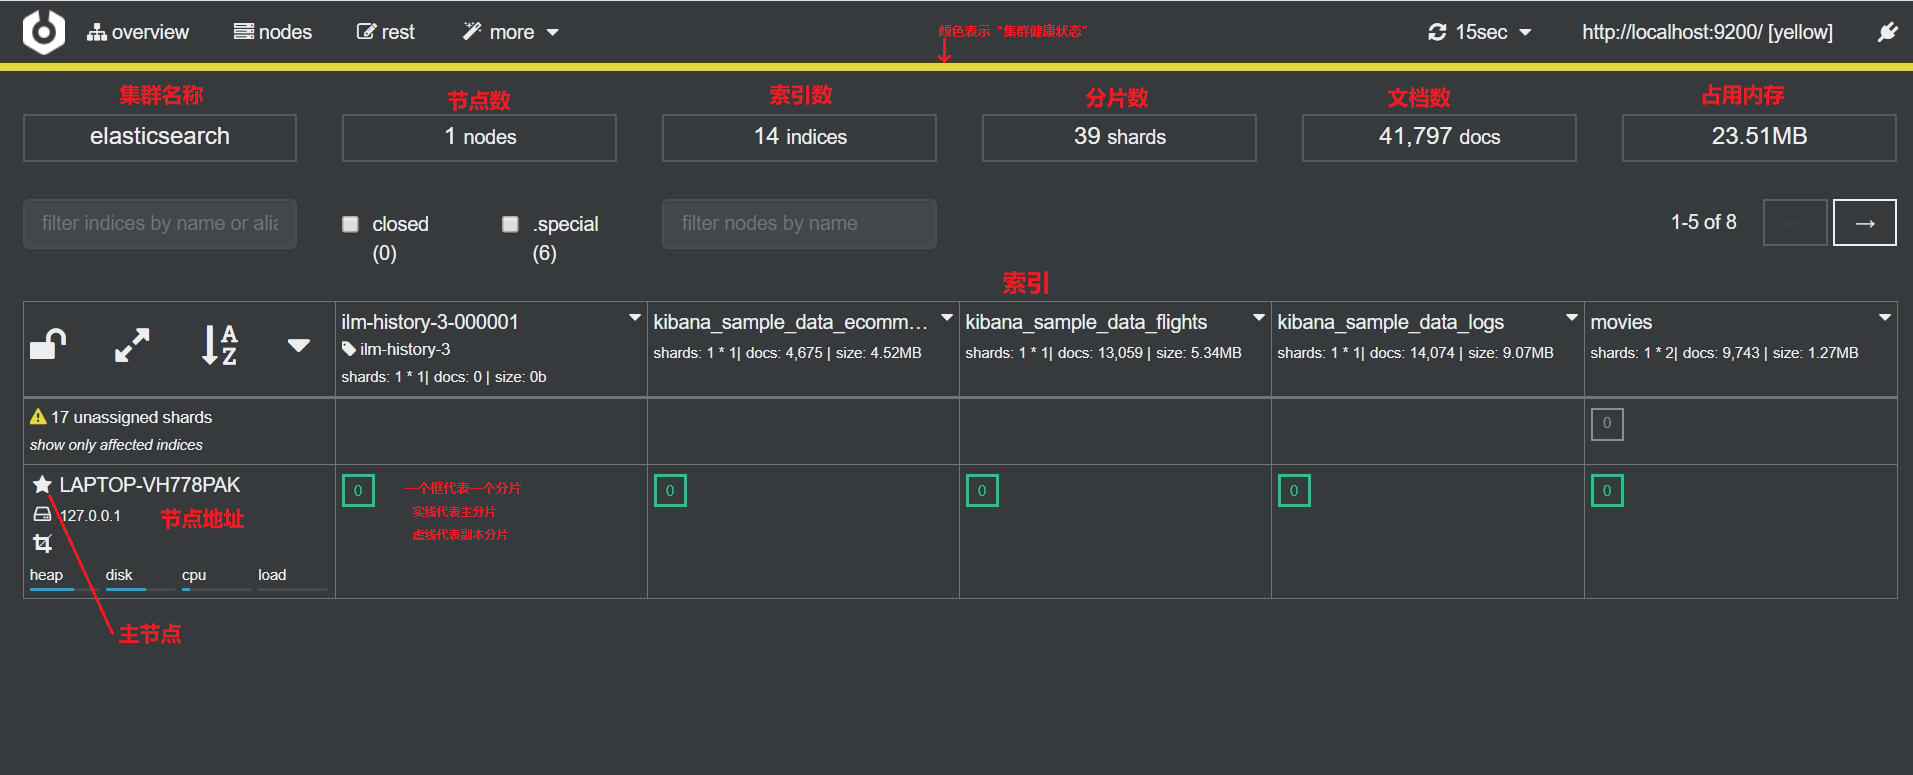
然后填入 ES 地址,点击 Connect,可以看到 ES 的管理界面:
(本节完。)
推荐阅读:
欢迎关注作者公众号,获取更多技术干货。

最新文章
- 银行卡BIN: Bank Identification Number
- Codeforces 722C. Destroying Array
- 怎么写jq插件?
- jQuery里ajax的用法
- 使用vim 查看二进制文件
- 【原】Linux Raid 实验
- 局域网无法访问vmware虚拟机WEB服务器解决办法
- linux 常用命令;
- Java 中 String 类和StringBuilder 类的常用方法
- Solrcloud,tomcat,外部zookeeper配置
- JavaScript(1)——变量、函数声明及作用域
- Android Gradle 指定 Module 打包
- macaca测试web小例子
- pip 警告!The default format will switch to columns in the future
- Hive窗口函数
- 防火墙/IDS测试工具Ftester
- tft屏图像显示也成功完成
- face_recognition 基础接口
- oracle-rman-2
- RocketMQ 消息存储
热门文章
- 用C#实现模拟双色球中奖程序 控制台应用程序
- Head First 设计模式 —— 07. 适配器模式
- JVM 源码分析(二):搭建 JDK 8 源码调试环境(Windows 上使用 CLion)
- 剑指offer 面试题3:数组中重复的数字
- update 表名 set 某列名=now() where user in('user1','user2','user3');
- 【Linux】删除软连接被坑
- DG主备切换遇到not allwod或者RESOLVABLE GAP解决办法
- CMU数据库(15-445)Lab1-BufferPoolManager
- centos7+宝塔+ssrpanel v3 魔改版 前后端配置教程
- InnoDB事务篇