.net core使用 ELK
一 Linux 下安装部署
第一种方法:docker-compose 安装方式
1.1 创建 docker-compose.yml 文件
version: '3.1'

services:

  elasticsearch:

   container_name: elasticsearch

   image: docker.elastic.co/elasticsearch/elasticsearch:7.9.2

   ports:

    - 9200:9200

   volumes:

    - elasticsearch-data:/usr/share/elasticsearch/data

   environment:

    - xpack.monitoring.enabled=true

    - xpack.watcher.enabled=false

    - "ES_JAVA_OPTS=-Xms512m -Xmx512m"

    - discovery.type=single-node

   networks:

    - elastic

  kibana:

   container_name: kibana

   image: docker.elastic.co/kibana/kibana:7.9.2

   ports:

    - 5601:5601

   depends_on:

    - elasticsearch

   environment:

    - ELASTICSEARCH_URL=http://localhost:9200

   networks:

    - elastic

networks:

  elastic:

    driver: bridge

volumes:

  elasticsearch-data:
1.2 在放有docker-compose.yml的目录下运行命令以启动容器。
docker-compose up -d
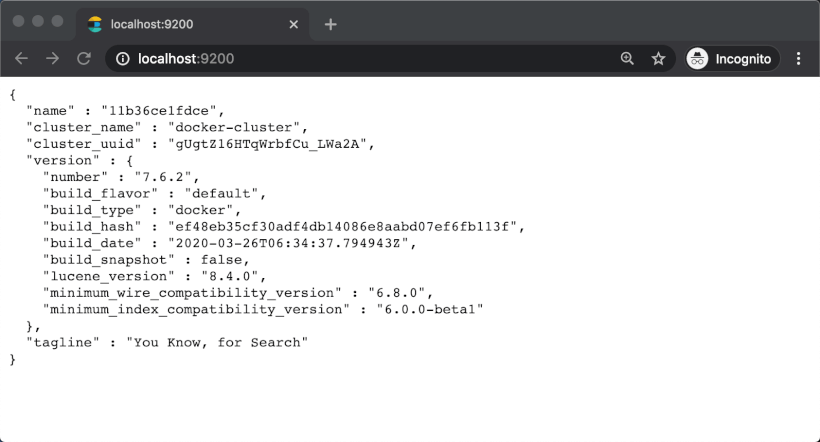
1.3 安装成功后打开 http://localhost:9200 表示已经安装成功
第二种方法:下载安装包安装 并且开启登录验证功能
Note:这边下载的是版本7.10,elk比较吃性能。我这边服务器是一核2G 也撑不起,加了一些虚拟内存才解决问题
我把下载的安装包放在我的OSS空间里面,访问比较快。
2.1下载地址:这边下载的是
elasticsearch 下载地址: https://www.elastic.co/cn/downloads/elasticsearch
kibana下载地址: https://www.elastic.co/cn/downloads/kibana
2.2 elasticsearch安装
下载解压安装包
 wget  https://xuquan.oss-cn-shenzhen.aliyuncs.com/Software/elasticsearch-7.10.0-linux-x86_64.tar.gz

 tar -zxvf elasticsearch-7.10.0-linux-x86_64.tar.gz -C /usr/local/
不能使用root 启用应用,需要创建一个新用户elk,把elasticsearch-7.10.0文件夹的拥有者改为elk
1    adduser elk

2

3   passwd elk  然后 输入密码

4

5   chown -R elk /usr/local/elasticsearch-7.10.0/

6

7   cd /usr/local/elasticsearch-7.10.0/

8

9   su elk
更改配置文件,开启密码密码登录验证
1
2 vim /usr/local/elasticsearch-7.10.0/config/elasticsearch.yml

3

4 http.cors.enabled: true

5 http.cors.allow-origin: "*"

6 http.cors.allow-headers: Authorization

7 xpack.security.enabled: true

8 xpack.license.self_generated.type: basic

9 xpack.security.transport.ssl.enabled: true
启动应用(后台运行需要加-d)
./bin/elasticsearch -d
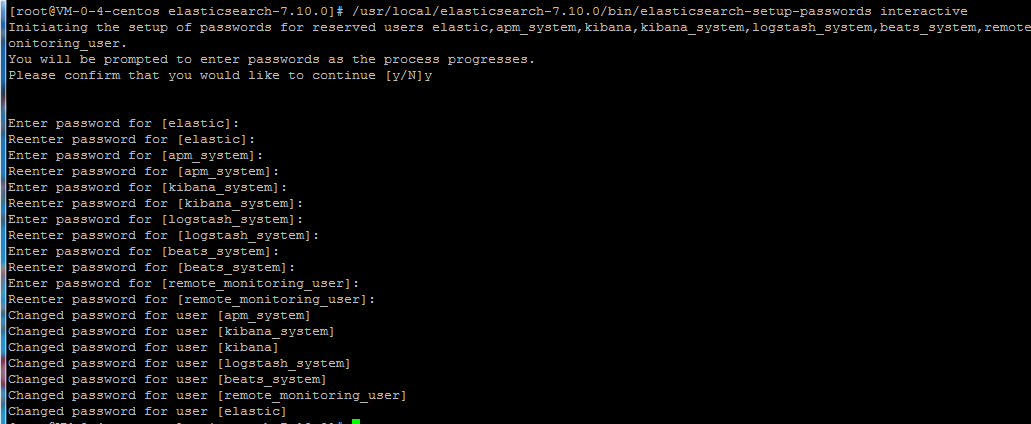
因为设置密码需要应用启动才能所以密码的设置初始化要放在启动后面。切换回root账号做密码设置。
1 su root

2

3 /usr/local/elasticsearch-7.10.0/bin/elasticsearch-setup-passwords interactive
出现下面界面就开始做密码设置,设置完切换回elk 重启 elasticsearch即可。
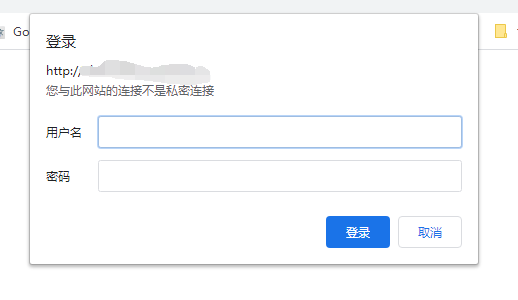
打开网址后出现输入密码的弹窗,这样就完成elasticsearch的安装
2.3 kibana安装
下载解压安装包
wget   https://xuquan.oss-cn-shenzhen.aliyuncs.com/Software/kibana-7.10.0-linux-x86_64.tar.gz

tar -zxvf kibana-7.10.0-linux-x86_64.tar.gz -C /usr/local/
修改配置文件
 1   vim /usr/local/kibana-7.10.0-linux-x86_64/config/kibana.yml

 2

 3   # Kibana的端口号

 4   server.port: 9201

 5

 6   # Kibana绑定的主机地址:

 7   elasticsearch.hosts: "0.0.0.0"

 8

 9   # Kibana所连接的ES:

10    elasticsearch.hosts: "http://127.0.0.1:9200"

11

12   # 配置pid文件存储运行Kibana时的进程号,便于用kill -9 `cat /var/run/kibana.pid`来杀进程。

13   pid_file: /var/run/kibana.pid
设置密码: 把usernane设置为 kibans 密码设置为自己的密码,这边的账号就可以在 kibana, elasticsearch,和net core 使用了

cd 到kibana安装目录下的bin文件夹 运行命令启动
1  cd /usr/local/kibana-7.10.0-linux-x86_64/bin

2

3  ./kibana
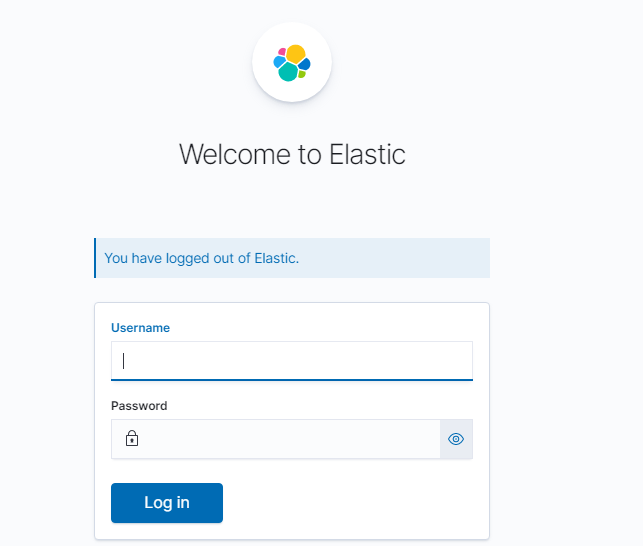
输入的账号密码登录即可进入后台
备注: 如需更改密码 可执行
curl -H "Content-Type:application/json" -XPOST -u elastic 'http://127.0.0.1:9200/_xpack/security/user/elastic/_password' -d '{ "password" : "123456" }'
二 在.net core3.1 中使用Serilog 集成ELK ,这边就直接贴代码了
安装的包为:
1  //< PackageReference Include = "Serilog.AspNetCore" Version = "3.4.0" />

2 //< PackageReference Include = "Serilog.Enrichers.Environment" Version = "2.1.3" />

3 //< PackageReference Include = "Serilog.Exceptions" Version = "5.6.0" />

4 //< PackageReference Include = "Serilog.Sinks.Debug" Version = "1.0.1" />

5 //< PackageReference Include = "Serilog.Sinks.Elasticsearch" Version = "8.4.1" />
Program.cs
 1   public static IHostBuilder CreateHostBuilder(string[] args, string urls) =>

 2             Host.CreateDefaultBuilder(args)

 3                 .ConfigureWebHostDefaults(webBuilder =>

 4                 {

 5                     webBuilder

 6                     .UseStartup<Startup>()

 7                     .UseUrls(urls);

 8                 }).ConfigureLogging((context, logging) =>

 9                 {

10

15                     logging.AddSerilog(new LoggerConfiguration()

16                     .Enrich.FromLogContext()

17                     .Enrich.WithExceptionDetails()

18                     .Enrich.WithMachineName()

19                     .WriteTo.Elasticsearch(new ElasticsearchSinkOptions(new Uri(context.Configuration["ElasticConfiguration:Uri"]))

20                     {

21                         AutoRegisterTemplate = true,

22                         IndexFormat = $"{Assembly.GetExecutingAssembly().GetName().Name.ToLower().Replace(".", "-")}-{context.HostingEnvironment.EnvironmentName?.ToLower().Replace(".", "-")}-{DateTime.UtcNow:yyyy-MM}",

23                         ModifyConnectionSettings = setting => setting.BasicAuthentication(context.Configuration["ElasticConfiguration:UserName"], context.Configuration["ElasticConfiguration:PassWord"])

24                     })

25                     .Enrich.WithProperty("Environment", context.HostingEnvironment.EnvironmentName)

26                     .ReadFrom.Configuration(context.Configuration)

27                     .CreateLogger());

28

29                 });

appsettings.json
1 "Serilog": {

2     "MinimumLevel": {

3       "Default": "Warning",

4       "Override": {

5         "Microsoft": "Error",

6         "System": "Warning"

7       }

8     }

9   }
这样就完成了,只需要在kibana创建索引查看了
最新文章
- 非root用户安装软件
- 颜色渐变的JS代码
- Laravel Container分析
- Linux Shell 命令
- 【Window】Tor(洋葱头路由)+Privoxy 网络实践(附带Java实例代码)
- script的defer和async
- p39
- scrolView
- codevs 1001 舒适的路线 (并查集)
- sp<> 强指针类的用法
- java学习笔记09-类与对象
- Python cv2库(人脸检测)
- Elastic Stack之ElasticSearch分布式集群二进制方式部署
- MySQL中case then用法
- [转载]详解主流浏览器多进程架构:Chrome、IE
- linux 除了某个文件或某个文件夹以外全部删除
- EF + MySql 错误:配置错误 无法识别的元素“providers”
- CC2530学习路线-基础实验-定时器控制LED灯亮灭(3)
- Android——数据存储:手机外部存储 SD卡存储
- 获取BinaryReader中读取的文件名