Android简易记事本
此次做的Android简易记事本的存储方式使用了SQLite数据库,然后界面的实现比较简单,但是,具有增删改查的基本功能,这里可以看一下效果图,如下:
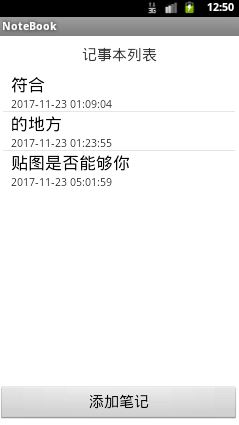
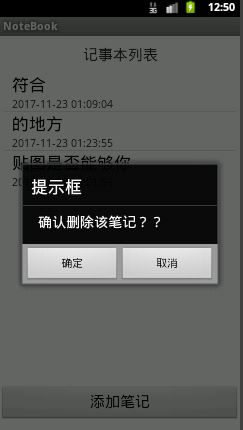
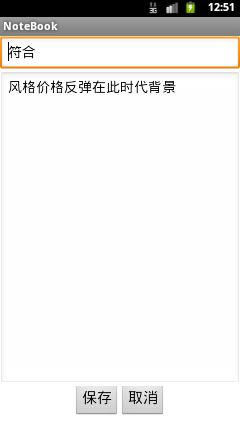
具体操作就是长按可以删除操作,点击可以进行修改,点击添加笔记按钮可以添加一个笔记。
首先我们需要三个界面样式一个是我们的进入程序时的第一个界面,然后第一个界面里面有一个ListView,这个ListView需要一个xml来描述里面的各个元素,这也是第二个。还有一个就是我们的编辑页面的界面。
三个xml描述文件如下:
activity_main.xml:进入程序的第一个界面
<LinearLayout xmlns:android="http://schemas.android.com/apk/res/android"

    xmlns:tools="http://schemas.android.com/tools"

    android:layout_width="match_parent"

    android:layout_height="match_parent"

    android:orientation="vertical"

    tools:context=".MainActivity" >

    <TextView

        android:layout_height="wrap_content"

        android:layout_width="fill_parent"

        android:text="记事本列表"

        android:textSize="20sp"

        android:paddingTop="10dp"

        android:paddingBottom="5dp"

        android:gravity="center"/>

    <LinearLayout

        android:layout_width="fill_parent"

        android:layout_height="fill_parent"

        android:layout_weight="1" >

        <ListView

            android:id="@+id/listNote"

            android:layout_margin="5dp"

            android:layout_width="match_parent"

            android:layout_height="wrap_content" >

        </ListView>

    </LinearLayout>

    <Button

        android:id="@+id/addNote"

        android:layout_width="fill_parent"

        android:layout_height="wrap_content"

        android:layout_gravity="center"

        android:layout_marginBottom="10dp"

        android:text="添加笔记"

        android:textSize="20sp" />

</LinearLayout>
note_item.xml:描述记事本列表中每个元素的各个控件
<?xml version="1.0" encoding="utf-8"?>

<LinearLayout xmlns:android="http://schemas.android.com/apk/res/android"

    android:layout_width="match_parent"

    android:layout_height="match_parent"

    android:orientation="vertical" >

    <TextView

        android:id="@+id/noteTitle"

        android:layout_width="match_parent"

        android:layout_height="wrap_content"

        android:layout_marginLeft="10dp"

        android:singleLine="true"

        android:text=""

        android:textAppearance="?android:attr/textAppearanceLarge" />

    <TextView

        android:id="@+id/noteCreateTime"

        android:layout_width="fill_parent"

        android:layout_height="wrap_content"

        android:layout_marginLeft="10dp"

        android:text="" />

</LinearLayout>
note_editor.xml:编辑界面
<?xml version="1.0" encoding="utf-8"?>

<LinearLayout xmlns:android="http://schemas.android.com/apk/res/android"

    android:layout_width="match_parent"

    android:layout_height="match_parent"

    android:orientation="vertical" >

    <TextView

        android:id="@+id/noteId"

        android:visibility="gone"

        android:layout_width="wrap_content"

        android:layout_height="wrap_content"

        android:text=""/>

    <EditText

        android:id="@+id/title"

        android:layout_width="match_parent"

        android:layout_height="wrap_content"

        android:ems="10"

        android:hint="输入标题">

        <requestFocus />

    </EditText>

    <EditText

        android:id="@+id/content"

        android:layout_width="match_parent"

        android:layout_height="match_parent"

        android:layout_weight="1"

        android:hint="输入内容"

        android:gravity="left">

    </EditText>

    <LinearLayout

        android:layout_width="match_parent"

        android:layout_height="wrap_content"

        android:orientation="horizontal"

        android:layout_gravity="center"

        android:gravity="center">

        <Button

        android:id="@+id/save"

        android:layout_width="wrap_content"

        android:layout_height="wrap_content"

        android:layout_gravity="center"

        android:layout_marginBottom="10dp"

        android:text="保存"

        android:textSize="20sp" />

        <Button

        android:id="@+id/cancel"

        android:layout_width="wrap_content"

        android:layout_height="wrap_content"

        android:layout_gravity="center"

        android:layout_marginBottom="10dp"

        android:text="取消"

        android:textSize="20sp" />

    </LinearLayout>

</LinearLayout>
现在我们可以考虑我们底层的数据库的操作了,这里有一个类专门用于与数据库打交道,如下:
DBService.java
public class DBService {

	private static SQLiteDatabase db = null;

	static {

		//新建或者打开db

		db = SQLiteDatabase.openOrCreateDatabase("data/data/cn.lger.notebook/NoteBook.db", null);

		String sql = "create table NoteBook(_id integer primary key autoincrement,title varchar(255),content TEXT, createTime varchar(25))";

		//判断是否存在表NoteBook,如果不存在会抛出异常,捕捉异常后创建表

		try{

			db.rawQuery("select count(1) from NoteBook ",null);

		}catch(Exception e){

			db.execSQL(sql);

		}

	}

	public static SQLiteDatabase getSQLiteDatabase(){

		return db;

	}

	public static Cursor queryAll(){

		return db.rawQuery("select * from NoteBook ",null);

	}

	public static Cursor queryNoteById(Integer id){

		return db.rawQuery("select * from NoteBook where _id =?",new String[]{id.toString()});

	}

	public static void deleteNoteById(Integer id){

		if(id == null)

			return ;

		db.delete("NoteBook", "_id=?", new String[]{id.toString()});

	}

	public static void updateNoteById(Integer id, ContentValues values){

		db.update("NoteBook", values, "_id=?", new String[]{id.toString()});

	}

	/**

	 * 添加一个笔记,并且记录当前添加的时间

	 * @param values 表中的各个字段值

	 */

	public static void addNote(ContentValues values){

		values.put("createTime", DateFormat.format("yyyy-MM-dd kk:mm:ss", System.currentTimeMillis()).toString());

		db.insert("NoteBook", null, values);

	}

}
下面我们在进入第一个界面的时候需要访问数据库并且将数据的值不断的更新(比如进行了删除操作的时候或者添加操作之后需要刷新),这样,我们就可能需要重写Activity的onResume(),这样就可以调用Cursor的requery()来刷新我们列表中ListView的结果。还有我们需要长按删除,点击修改,添加笔记这些都需要监听事件,因此,这里还要设置监听
具体MainActivity.java的代码如下:
public class MainActivity extends Activity {

	private Cursor listItemCursor = null;

	@Override

	protected void onCreate(Bundle savedInstanceState) {

		super.onCreate(savedInstanceState);

		setContentView(R.layout.activity_main);

		// 设置添加笔记按钮事件,切换activity

		this.findViewById(R.id.addNote).setOnClickListener(

				new OnClickListener() {

					@Override

					public void onClick(View arg0) {

						Intent in = new Intent();

						in.setClassName(getApplicationContext(),

								"cn.lger.notebook.NoteEditActivity");

						startActivity(in);

					}

				});

		// 查询所有笔记,并将笔记展示出来

		listItemCursor = DBService.queryAll();

		SimpleCursorAdapter adapter = new SimpleCursorAdapter(MainActivity.this,

				R.layout.note_item, listItemCursor, new String[] { "_id",

						"title", "createTime" }, new int[] { R.id.noteId,

						R.id.noteTitle, R.id.noteCreateTime },

				CursorAdapter.FLAG_REGISTER_CONTENT_OBSERVER);

		((ListView) this.findViewById(R.id.listNote)).setAdapter(adapter);

		initListNoteListener();

	}

	/**

	 * 初始化笔记列表的长按和点击事件

	 */

	private void initListNoteListener() {

		// 长按删除

		((ListView) this.findViewById(R.id.listNote))

				.setOnItemLongClickListener(new OnItemLongClickListener() {

					@Override

					public boolean onItemLongClick(AdapterView<?> parent,

							View view, int position, final long id) {

						new AlertDialog.Builder(MainActivity.this)

								.setTitle("提示框")

								.setMessage("确认删除该笔记??")

								.setPositiveButton("确定",

										new DialogInterface.OnClickListener() {

											@Override

											public void onClick(DialogInterface arg0,int arg1) {

												DBService.deleteNoteById((int) id);

												//删除后刷新列表

												MainActivity.this.onResume();

												Toast.makeText(

														MainActivity.this,

														"删除成功!!",

														Toast.LENGTH_LONG)

														.show();

											}

										}).setNegativeButton("取消", null).show();

						return true;

					}

				});

		//点击进行修改操作

		((ListView) this.findViewById(R.id.listNote))

				.setOnItemClickListener(new OnItemClickListener() {

					@Override

					public void onItemClick(AdapterView<?> parent, View view,

							int position, long id) {

						Intent in = new Intent();

						in.setClassName(view.getContext(),

								"cn.lger.notebook.NoteEditActivity");

						// 将id数据放置到Intent,切换视图后可以将数据传递过去

						in.putExtra("id", id);

						startActivity(in);

					}

				});

	}

	@Override

	public boolean onCreateOptionsMenu(Menu menu) {

		getMenuInflater().inflate(R.menu.main, menu);

		return true;

	}

	/**

	 * 当从另一个视图进入该视图会调用该方法

	 */

	@Override

	protected void onResume() {

		super.onResume();

		// 要求刷新主页列表笔记

		if (listItemCursor != null) {

			listItemCursor.requery();

		}

	}

}
上面的代码中还涉及到了一个视图切换后的传递信息的操作,就是通过Intent的putExtra(key, value)这样可以在切换后的视图中调用函数getIntent().get~Extra(key, replace);来接收传递的数据。
下面是我们的编辑界面中对应的具体实现代码,这里有判断是使用更新操作还是添加操作,主要是判断MainActivity.java有没有传递过来id,如果有就是通过这个id来更新操作,没有就是添加操作。
编辑界面对应的具体实现代码如下:
NoteEditActivity.java
public class NoteEditActivity extends Activity {

	private EditText titleEditText = null;

	private EditText contentEditText = null;

	private String noteId = null;

	@Override

	protected void onCreate(Bundle savedInstanceState) {

		super.onCreate(savedInstanceState);

		setContentView(R.layout.note_editor);

		titleEditText = (EditText) NoteEditActivity.this

				.findViewById(R.id.title);

		contentEditText = (EditText) NoteEditActivity.this

				.findViewById(R.id.content);

		initNoteEditValue();

		//取消按钮监听

		this.findViewById(R.id.cancel).setOnClickListener(

				new OnClickListener() {

					@Override

					public void onClick(View arg0) {

						NoteEditActivity.this.finish();

					}

				});

		this.findViewById(R.id.save).setOnClickListener(new OnClickListener() {

			@Override

			public void onClick(View arg0) {

				final String title = titleEditText.getText().toString();

				final String content = contentEditText.getText().toString();

				//判断标题和内容是否为空,不为空才能保存

				if ("".equals(title) || "".equals(content)) {

					Toast.makeText(NoteEditActivity.this, "标题或者内容不能为空",

							Toast.LENGTH_LONG).show();

					return;

				}

				//提示保存

				new AlertDialog.Builder(NoteEditActivity.this)

						.setTitle("提示框")

						.setMessage("确定保存笔记吗??")

						.setPositiveButton("确定",

								new DialogInterface.OnClickListener() {

									@Override

									public void onClick(DialogInterface arg0,

											int arg1) {

										ContentValues values = new ContentValues();

										values.put("title", title);

										values.put("content", content);

										//如果noteId不为空那么就是更新操作,为空就是添加操作

										if (null == noteId || "".equals(noteId))

											DBService.addNote(values);

										else

											DBService.updateNoteById(

													Integer.valueOf(noteId),

													values);

										//结束当前activity

										NoteEditActivity.this.finish();

										Toast.makeText(NoteEditActivity.this, "保存成功!!",

												Toast.LENGTH_LONG).show();

									}

								}).setNegativeButton("取消", null).show();

			}

		});

	}

	/**

	 * 初始化编辑页面的值(如果进入该页面时存在一个id的话),比如标题,内容。

	 */

	private void initNoteEditValue() {

		// 从Intent中获取id的值

		long id = this.getIntent().getLongExtra("id", -1L);

		// 如果有传入id那么id!=-1

		if (id != -1L) {

			// 使用noteId保存id

			noteId = String.valueOf(id);

			// 查询该id的笔记

			Cursor cursor = DBService.queryNoteById((int) id);

			if (cursor.moveToFirst()) {

				// 将内容提取出来

				titleEditText.setText(cursor.getString(1));

				contentEditText.setText(cursor.getString(2));

			}

		}

	}

	@Override

	public boolean onCreateOptionsMenu(Menu menu) {

		getMenuInflater().inflate(R.menu.main, menu);

		return true;

	}

}
以上就将我们的安卓简易记事本完成了,源码已经上传GitHub。
界面采用了拿来主义,可以参考下面文章
http://blog.csdn.net/cjs68/article/details/50211543
最新文章
- Codeforces554A:Kyoya and Photobooks
- Apache+MySQL+PHP开发环境的搭建(二)
- c# 游戏策划配置工具
- DELPHI XE5开发WEB服务器及安卓手机客户端
- jenkins使用deploy-plugin自动构建部署war包
- I2C控制器的Verilog建模之三(完结版)
- CCFlow SDK模式开发
- 批量修改java文件的包名
- HTML5学习笔记简明版(1):HTML5介绍与语法
- 关于Class.forName("oracle.jdbc.driver.OracleDriver");报ClassNotFoundException 的异常
- Solr 安装与集成IK中文分词器
- hadoop容灾能力测试
- Scrapy 爬虫框架入门案例详解
- 在阿里云上搭建自己的git服务器
- 翻译:JVM虚拟机规范1.7中的运行时常量池部分(三)
- 查找已连接过的wifi密码
- selenium 添加动态隧道代理
- Python实现Plugin(插件化开发)
- Android之Android apk动态加载机制的研究(二):资源加载和activity生命周期管理
- php memcache分布式和要注意的问题
热门文章
- OC对象与Core Foundation对象的转换
- Springboot的默认定时任务——Scheduled注解
- org.springframework.web.HttpMediaTypeNotAcceptableException: Could not find acceptable representation
- Java Web Session设置
- 为什么还坚持.NET? 找一门适合自己的语言去做编程
- 小白的Python之路 day2 列表、元组操作
- Python Xcode搭建Python环境以及使用PyCharm CE
- UITextFiled的输入框改成一条下划线
- 关于《ASP.NET MVC企业级实战》
- [array] leetcode - 40. Combination Sum II - Medium