[React Native] Using the Image component and reusable styles
2024-09-01 13:52:38
Let's take a look at the basics of using React Native's Image component, as well as adding some reusable styling to our Dashboard component buttons.
We are going to build Dashboard Component, it will looks like this:
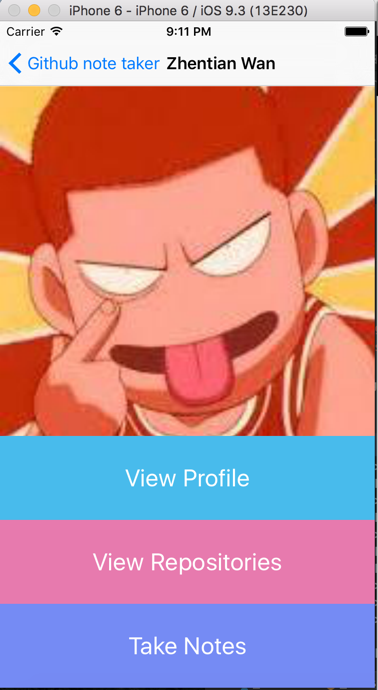
Basicly have one image component and three TouchableHighlight components.
import React, { Component } from 'react';

import {Text, View, StyleSheet, Image, TouchableHighlight} from 'react-native';

var styles = StyleSheet.create({

    container: {

        marginTop: ,

        flex:

    },

    image: {

        height: ,

    },

    buttonText: {

        fontSize: ,

        color: 'white',

        alignSelf: 'center'

    }

});

class Dashboard extends React.Component{

    makeBackground(btn){

        var obj = {

            flexDirection: 'row',

            alignSelf: 'stretch',

            justifyContent: 'center',

            flex:

        }

        if(btn === ){

            obj.backgroundColor = '#48BBEC';

        } else if (btn === ){

            obj.backgroundColor = '#E77AAE';

        } else {

            obj.backgroundColor = '#758BF4';

        }

        return obj;

    }

    goToProfile(){

        console.log('Going to Profile Page');

    }

    goToRepos(){

        console.log('Going to Repos');

    }

    goToNotes(){

        console.log('Going to Notes');

    }

    render(){

        return (

            <View style={styles.container}>

                <Image source={{uri: this.props.userInfo.avatar_url}} style={styles.image}/>

                <TouchableHighlight

                    style={this.makeBackground()}

                    onPress={this.goToProfile.bind(this)}

                    underlayColor="#88D4F5">

                    <Text style={styles.buttonText}>View Profile</Text>

                </TouchableHighlight>

                <TouchableHighlight

                    style={this.makeBackground()}

                    onPress={this.goToRepos.bind(this)}

                    underlayColor="#E39EBF">

                    <Text style={styles.buttonText}>View Repositories</Text>

                </TouchableHighlight>

                <TouchableHighlight

                    style={this.makeBackground()}

                    onPress={this.goToNotes.bind(this)}

                    underlayColor="#9BAAF3">

                    <Text style={styles.buttonText}>Take Notes</Text>

                </TouchableHighlight>

            </View>

        )

    }

};

module.exports = Dashboard;
The data 'this.props.userInfo' was passed from 'navigator' in main.js:
    handleSubmit(event){

        //update our indicatorIOS spinner

        this.setState({

            isLoading: true

        });

        //fetch data from github

        api.getBio(this.state.username)

            .then( (res) => {

                if(res.message === "Not Found"){

                    this.setState({

                        error: 'User not found',

                        isLoading: false

                    })

                }else{

                    //Pass in a new router component

                    this.props.navigator.push({

                        title: res.name || 'Selet an Option',

                        component: Dashboard,

                        passProps: {userInfo: res}

                    });

                    //Clean the search input and loading

                    this.setState({

                        isLoading: false,

                        error: false,

                        username: ''

                    });

                }

            })

    }
最新文章
- C# Cookie
- ORA-39242 错误
- IO(五)----打印流
- 如何在两个activity之间传递bitmap
- HTML5打造的炫酷本地音乐播放器-喵喵Player
- PagerTabStrip在ViewPager的页面中添加标题显示
- So easy Webservice 6.使用EndPoint发布webservice服务
- IOS开发—UIDatePicker 日期/时间选取器(滚轮)
- SQL-LINQ-Lambda语法对照,好记性不如烂笔头
- open行情
- LINUX更改时区和时间
- NSIS:超级轻量皮肤SkinH
- switch条件语句规则
- vagrant扩容
- 结合Nginx以cgi方式安装php5.5.4
- Android轶事之View要去大保健?View大小自己决定?
- Javascript我学之五对象的创建与使用
- 2018—自学Selenium+Python 笔记(一)
- 如何用ABP框架快速完成项目(14) - 结尾? 当然不是, 这只是开始!
- Python字符串capitalize center 方法