Spring Boot入门及第一个案例
一:SpringBoot是什么
springboot是对spring的缺点进行改善和优化,约定大于配置 开箱即用 没有代码生成 也无需xml 文件配置 可以修改属性值来满足需求
1) Spring Boot使编码变简单
2) Spring Boot使配置变简单
3) Spring Boot使部署变简单
4) Spring Boot使监控变简单
二:创建第一个SpringBoot工程
1、点击File--->New--->Project...

2、输入MAVEN,组名、包名等相关参数

3、选择SpringBoot版本,选择项目需要依赖的相关骨架包
注意:有些版本此处显示的是SpringWeb是一样的

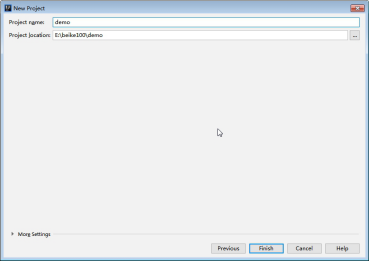
4、设置项目保存目录:
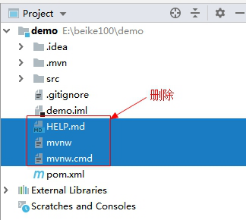
5、项目创建完成,工程主界面如下:
删除多余的这三个文件
6、项目说明
(1)、默认有个Demo001Application类,里面是spring boot的载入函数
(2)、resource目录下有个application.properties文件,这个是Spring boot的配置文件
(3)、test目录下有个测试类Demo001ApplicationTests,这个是spring boot的单元测试
(4)、pom.xml文件
<?xml version="1.0" encoding="UTF-8"?> </project> |
注意观察
一个继承spring-boot-starter-parent,两个依赖,spring-boot-starter-web web项目依赖必须,spring-boot-starter-test spring boot项目单元测试依赖
注意,很多人配置的maven远程仓库地址,其中很多配置的阿里云maven镜像,在这会有找不到最新Springboot相关包的问题,请把远程仓库指向华为云:
|
<mirror> <id>huaweicloud</id> <mirrorOf>*</mirrorOf> <url>https://mirrors.huaweicloud.com/repository/maven/</url> </mirror> |
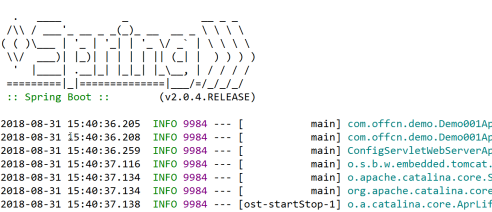
6、启动项目
找到如下文字,表明SpringBoot已经成功启动:
打开浏览器,输入地址:http://localhost:8080 ,出现如下画面

出现上图404错误是正常的,因为我们什么都没写。
7、编写HelloController
|
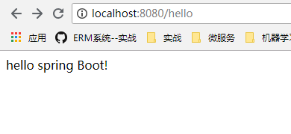
package com.offcn.demo.controller; import org.springframework.stereotype.Controller; import org.springframework.web.bind.annotation.RequestMapping; import org.springframework.web.bind.annotation.RequestMethod; import org.springframework.web.bind.annotation.ResponseBody; @Controller public class HelloController { @RequestMapping(value="/hello",method=RequestMethod.GET) @ResponseBody public String sayHello() { return "hello spring Boot!"; } } |
注意HelloController所在包,必须在com.offcn.demo包,或者子包下面。
重启发现刚才写的hello已经映射出来了
最新文章
- 重拾smslib
- 【Selenium】1.介绍 Selenium
- javascript encodeURI和encodeURIComponent的比较
- jenkins集成自动化部署插件(一) deploy-plugin
- 实现Linux下的ls -l命令
- EventLog实现事件日志操作
- hello MemSQL 入门安装演示样例
- MySQL的索引创建、删除
- ios中XMPP的搭建
- 初次接触Linux
- Maven捆绑TestNG实现测试自动化执行、部署和调度
- (转载)sqlmap用户手册详解
- 五款实用免费的Python机器学习集成开发环境(5 free Python IDE for Machine Learning)(图文详解)
- iOS 几种加密方法
- java 两个日期之间的天数
- LINQ 查询
- 使用Maven创建Java项目
- Linux各主要发行版的包管理命令对照
- linux——Shell编程基础
- C#string数组转换到int数组并得到最大最小值