webservice 学习笔记 1
Webservice-----------》跨语言服务调用 (视频学习总结)
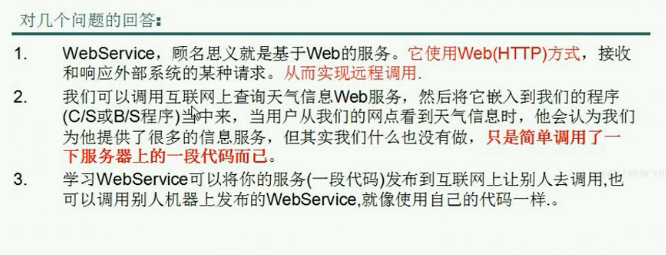
1-1.有OA系统 需要添加一个功能,登录之后显示天气情况 此时可以使用Webservice
eg1: 气象局自己有数据库,不能直接访问,部分公司与其有关联合作,可以有数据,做成天气服务出售,通过webservice调用
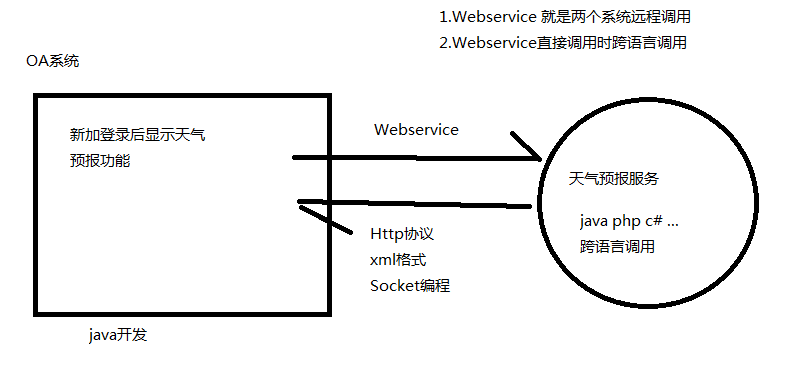
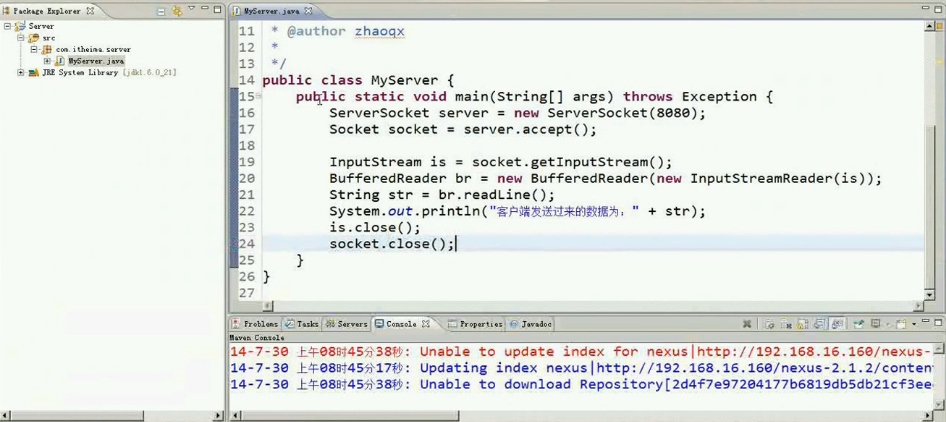
模拟eg1:socket编程模拟服务端客户端访问
提供服务的服务器端:server.accept(); 阻塞等待客户端调用,模拟服务一直等待(只能接受一份请求)
可用 while (true){ ... }包裹读取客户端数据 从而接受多份请求
客户端模拟例子:

1-2 http://www.webxml.com.cn/zh_cn/index.aspx 此网站提供webservice服务 有免费的也有收费的

1-3 WSDL, SOAP 学习

业务层可以发布外部服务,其他应用可以访问此服务 (Webservice)
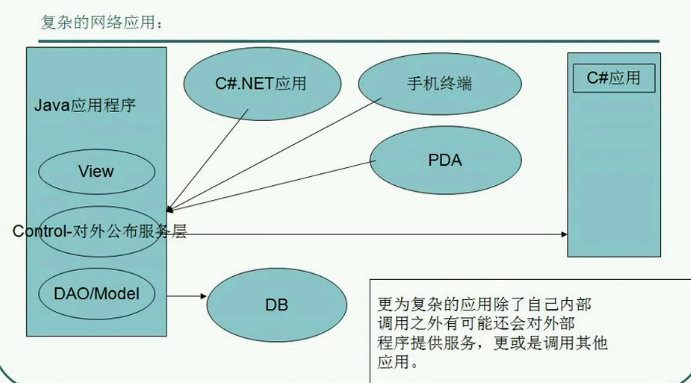
只要使用java写的代码,可以被任意语言调用,实现了跨平台跨语言服务 ------ webservice
WSDL 是给客户端了解的,方法名称 服务提供地址等待
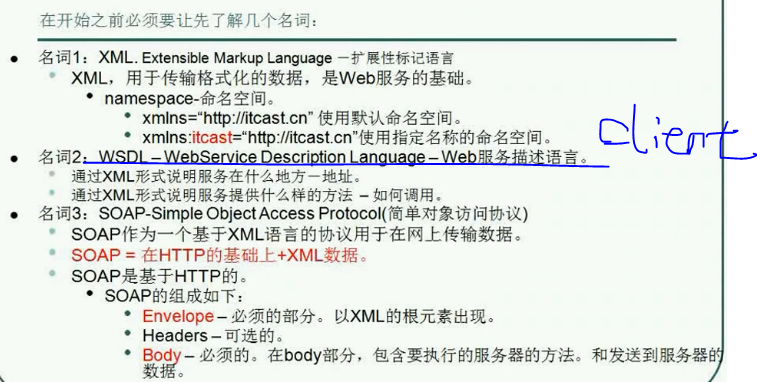
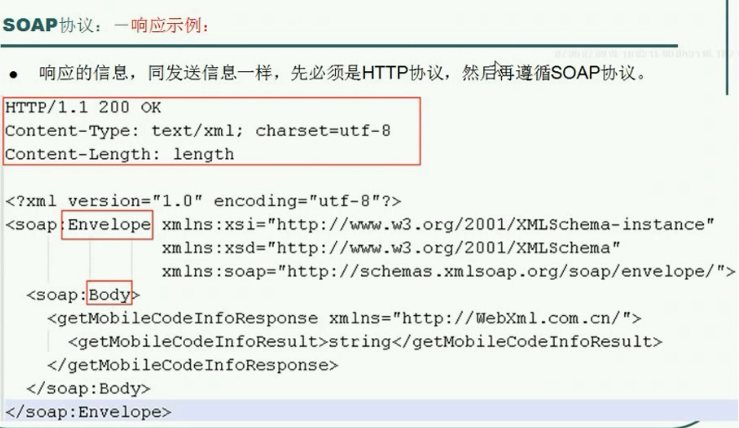
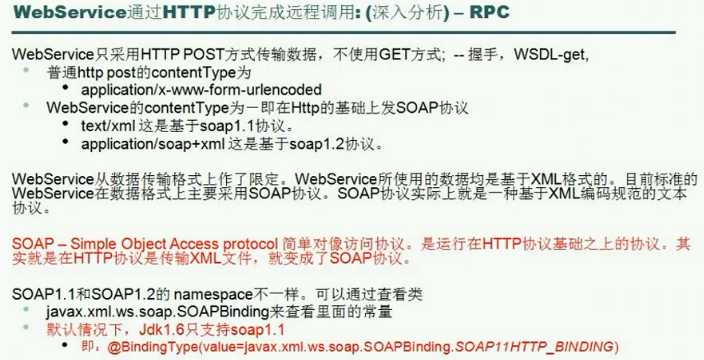
1-4 http 协议和 soap(简单对象访问协议)差别
SOAP本身也是http协议,在http基础之上传输格式变成xml
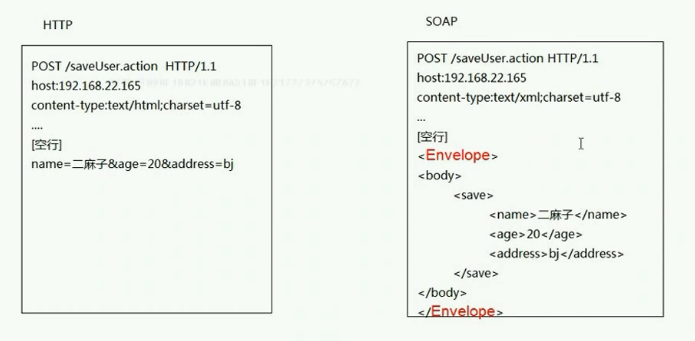
SOAP 发出http请求格式实例

SOAP 发出http响应格式实例
发布一个简单的Webservice 服务
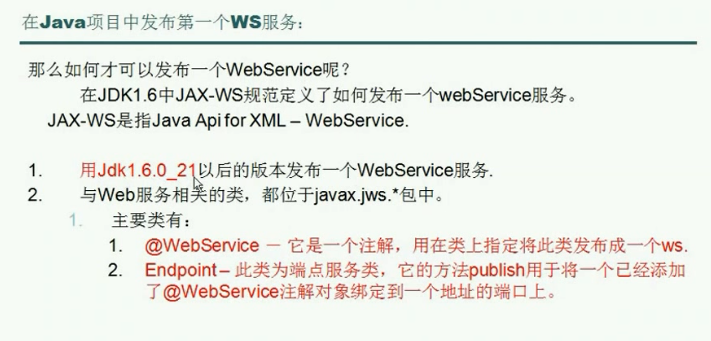
简单创建一个java project
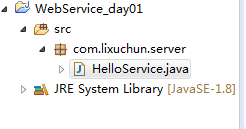
添加一个HelloService方法,启动就可以提供服务
package com.lixuchun.server;

import javax.jws.WebService;

import javax.xml.ws.Endpoint;

/**

 * jdk发布一个webservice服务

 * @author lixuchun

 *

 */

// 只有加了webservice注解类才能发布服务

@WebService

public class HelloService {

    // 有效合法方法不能是静态方法 也不能是final方法,final方法不能被重写

    public String sayHello(String name) {

        return "hello " + name;

    }

    // main方法发布的话报错 不是有效合法方法

    public static void main(String args[]) {

        // 服务发布地址

        String adderss = "http://127.0.0.1:8999/hello";

        // 服务实例

        Object implementor = new HelloService();

        // publish 启动多线程

        Endpoint.publish(adderss, implementor);

        System.out.println("server start success !");

    }

}
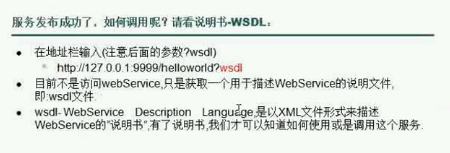
1-5 使用wsimport命令生成客户端代码调用webservice服务

服务启动,在浏览器输入adderss地址?wsdl
可以使用cmd 窗口使用wsimport -s . address?wsdl
-s 表示生成源码
. 表示当前目录
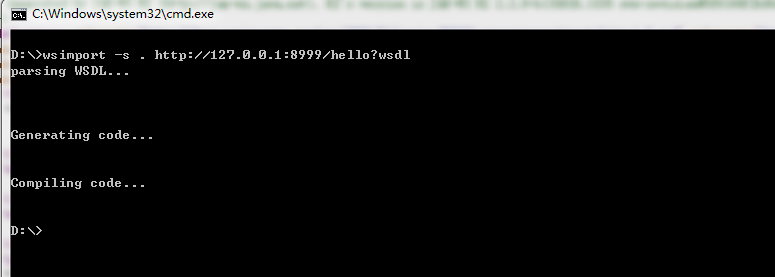
生成编码客户端 D:盘下

创建新client项目 webservice_day01_client 生成java文件复制到项目中

编辑App类调用webservice 服务
package com.lixuchun.server;

/**

 * 使用wsimport 命令生成客户端代码调用webservice服务
 * 方法最简单 不需要关注细节问题

 * @author lixuchun

 *

 */

public class App {

    public static void main(String args[]) {

        // wsdl 看service标签 <service name="HelloServiceService">

        HelloServiceService helloServiceService = new HelloServiceService();

        // wsdl service 标签里头的 port <port name="HelloServicePort" binding="tns:HelloServicePortBinding">

        HelloService hellowService =  helloServiceService.getHelloServicePort();

        String response = hellowService.sayHello("jack");

        System.out.println(response);

    }

}
执行后 客户端出现 hello jack 调用成功
1-6 调用天气预报服务
wsimport -s . http://ws.webxml.com.cn/WebServices/WeatherWS.asmx?wsdl
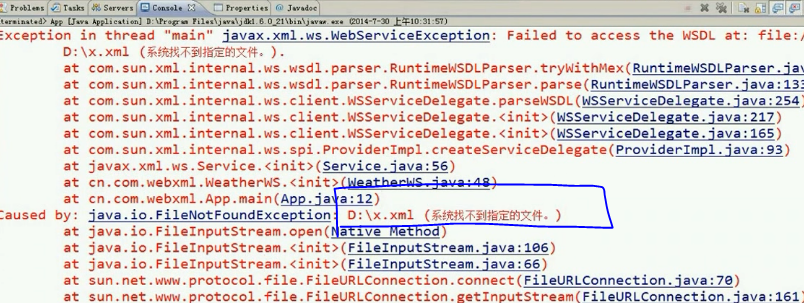
调用时 报错
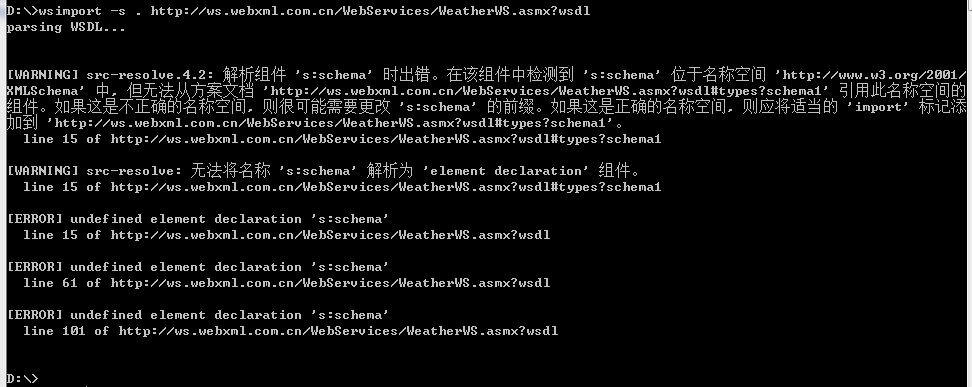
s:schema 报错
处理过程
1. 访问 http://ws.webxml.com.cn/WebServices/WeatherWS.asmx?wsdl 将页面保存到本地 weather.xml
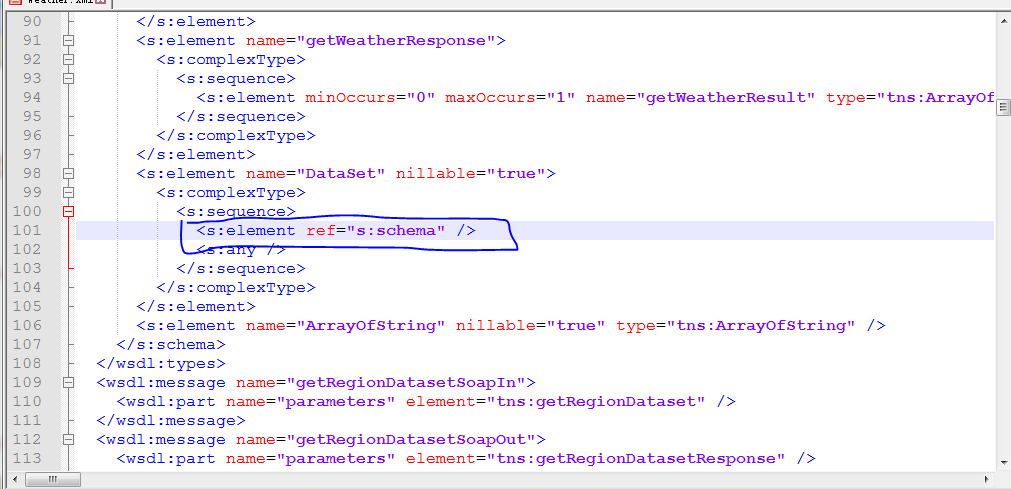
通过cmd窗口 了解到时 上图中s:schema报错 xml中的三处标签
然后重新执行wsimport命令 -->调用本地weather.xml
wsimport -s . weather.xml
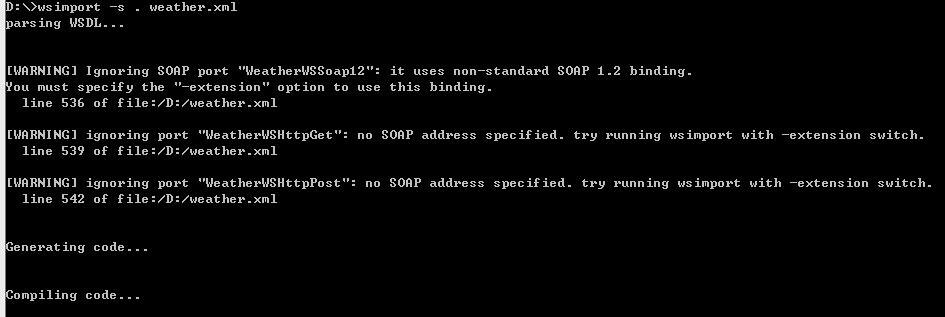
重新执行没有问题了
在D生成java文件
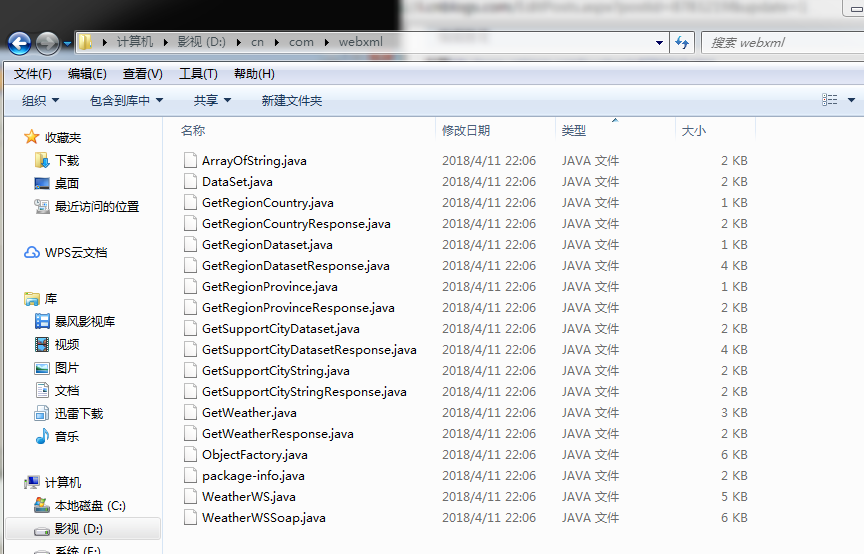
复制文件到新项目中

编写App类调用服务
package cn.com.webxml; import java.util.List; /**
* 使用wsimport生成代码
* @author lixuchun
*
*/
public class App {
public static void main(String args[]) {
// wsdl service 标签
WeatherWS ws = new WeatherWS();
//
WeatherWSSoap soap = ws.getWeatherWSSoap();
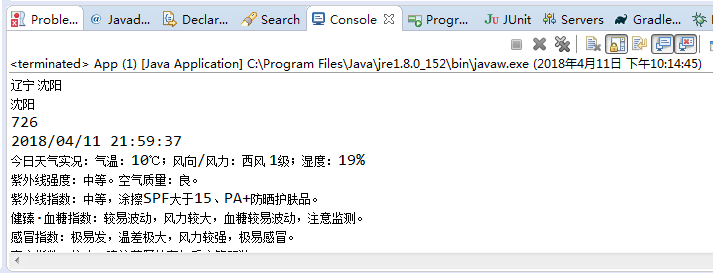
ArrayOfString aos = soap.getWeather("沈阳", null);
List<String> list = aos.getString();
for (String weather : list) {
System.out.println(weather);
}
}
}
执行后客户端显示如下效果 调用成功
此处代码已经生成但是不能删除,删除后执行依然会报错(weather.xml)
找到出错的类
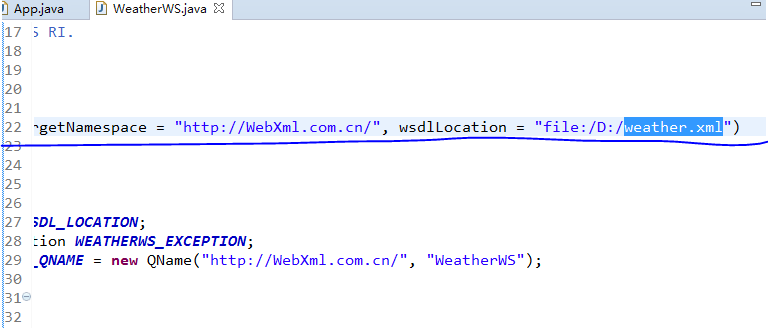
将此类中所有本地地址再改为网上地址 http://ws.webxml.com.cn/WebServices/WeatherWS.asmx?wsdl
在此访问webserice就没有问题了
此过程为 :先访问 WeatherWS 通过wsdlLocation 查看服务是否发布存在,如果存在再发布一个请求进行请求访问 所以
进行了2此请求,所以删除本地weather.xml文件后会报错
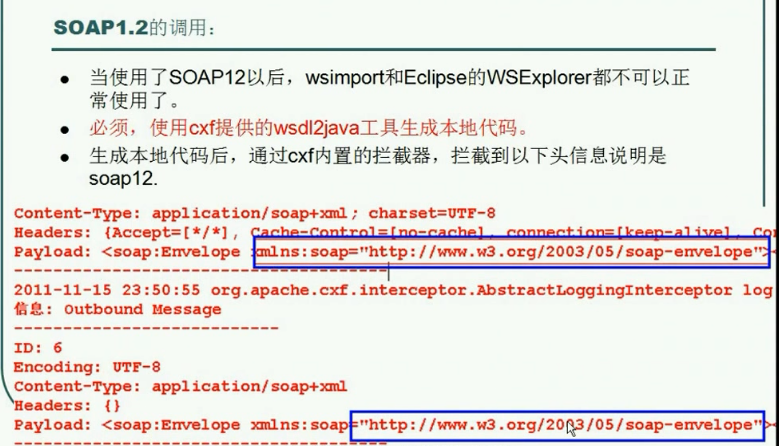
1-7 查看WSDL和 SOAP1.1 1.2对比
helloService中 新加入 sayHi方法 希望本地可以调用但是发布服务的时候外部看不见
可以使用 @WebMethod(exclude = true) 进行排除方法
package com.lixuchun.server;
package com.lixuchun.server;

import javax.jws.WebMethod;

import javax.jws.WebService;

import javax.xml.ws.Endpoint;

/**

 * jdk发布一个webservice服务

 * @author lixuchun

 *

 */

// 只有加了webservice注解类才能发布服务

@WebService

public class HelloService {

    // 有效合法方法不能是静态方法 也不能是final方法,final方法不能被重写

    public String sayHello(String name) {

        return "hello " + name;

    }

    // 内部可以调用 发布外部不能调用

    @WebMethod(exclude = true)

    public String sayHi(String name) {

        return "Hi " + name;

    }

    // main方法发布的话报错 不是有效合法方法

    public static void main(String args[]) {

        // 服务发布地址

        String adderss = "http://127.0.0.1:8999/hello";

        // 服务实例

        Object implementor = new HelloService();

        // publish 启动多线程

        Endpoint.publish(adderss, implementor);

        System.out.println("server start success !");

    }

}
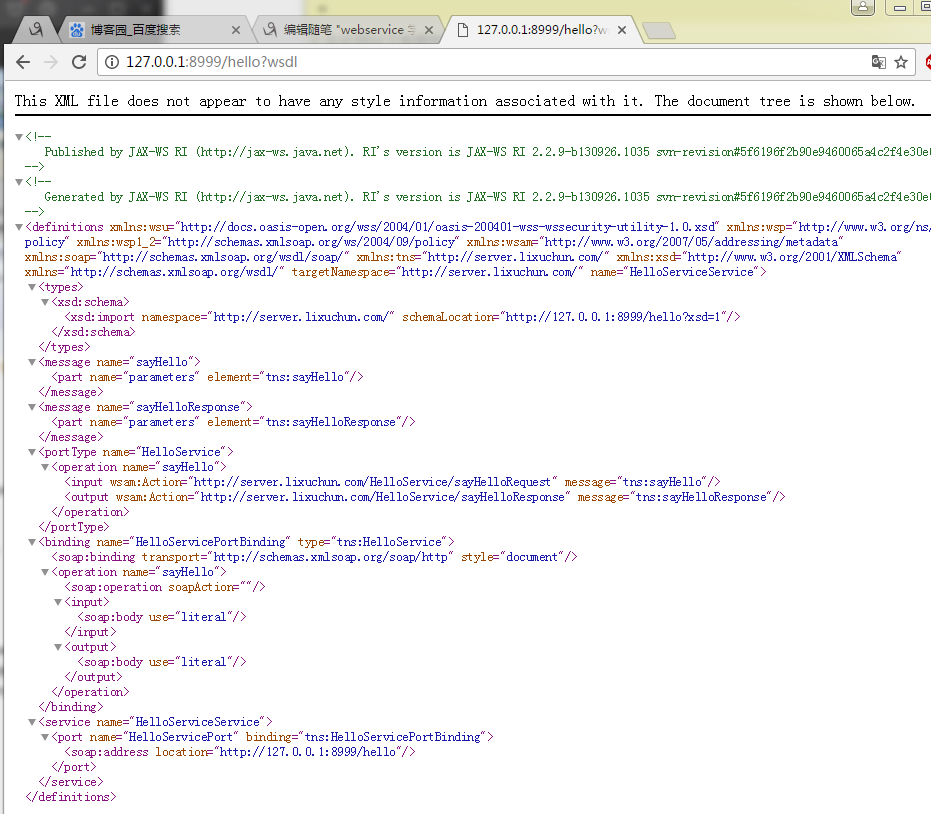
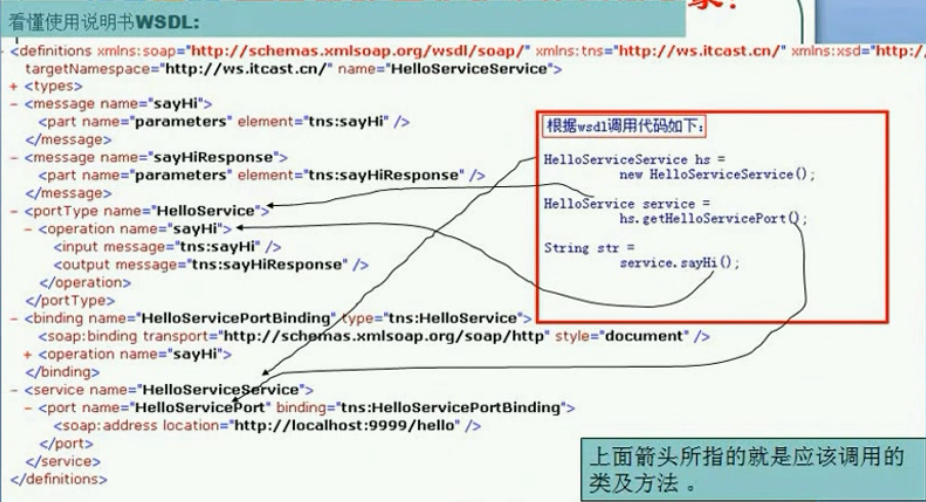
再来了解下WSDL文件
通过 address?wsdl 可以获取到 wsdl.xml 文件
<?xml version="1.0" encoding="utf-8"?>

<definitions

    xmlns="http://schemas.xmlsoap.org/wsdl/"

    xmlns:wsu="http://docs.oasis-open.org/wss/2004/01/oasis-200401-wss-wssecurity-utility-1.0.xsd"

    xmlns:wsp="http://www.w3.org/ns/ws-policy"

    xmlns:wsp1_2="http://schemas.xmlsoap.org/ws/2004/09/policy"

    xmlns:wsam="http://www.w3.org/2007/05/addressing/metadata"

    xmlns:soap="http://schemas.xmlsoap.org/wsdl/soap/"

    xmlns:tns="http://server.lixuchun.com/"

    xmlns:xsd="http://www.w3.org/2001/XMLSchema" targetNamespace="http://server.lixuchun.com/" name="HelloServiceService">

    <types>

        <xsd:schema>

            <xsd:import namespace="http://server.lixuchun.com/" schemaLocation="http://127.0.0.1:8999/hello?xsd=1"/>

        </xsd:schema>

    </types>

    <message name="sayHello">

        <part name="parameters" element="tns:sayHello"/>

    </message>

    <message name="sayHelloResponse">

        <part name="parameters" element="tns:sayHelloResponse"/>

    </message>

    <portType name="HelloService">

        <operation name="sayHello">

            <input wsam:Action="http://server.lixuchun.com/HelloService/sayHelloRequest" message="tns:sayHello"/>

            <output wsam:Action="http://server.lixuchun.com/HelloService/sayHelloResponse" message="tns:sayHelloResponse"/>

        </operation>

    </portType>

    <binding name="HelloServicePortBinding" type="tns:HelloService">

        <soap:binding transport="http://schemas.xmlsoap.org/soap/http" style="document"/>

        <operation name="sayHello">

            <soap:operation soapAction=""/>

            <input>

                <soap:body use="literal"/>

            </input>

            <output>

                <soap:body use="literal"/>

            </output>

        </operation>

    </binding>

    <service name="HelloServiceService">

        <port name="HelloServicePort" binding="tns:HelloServicePortBinding">

            <soap:address location="http://127.0.0.1:8999/hello"/>

        </port>

    </service>

</definitions>
通过文件可以获取: (查看文件倒叙查看)
服务名称
服务地址
服务的方法
方法的参数
参数个数类型
先看service -> HelloServiceService
port -> binding -> HelloServicePortBinding
binding - > type -> HelloService
protType -> HelloService -> operation
operation -> sayHello
input sayHello (sayHello 接收参数) -> message sayHello
output sayHelloResponse (返回参数) -> message sayHelloResponse
message sayHello -> element sayHello -> 指向 http://127.0.0.1:8999/hello?xsd=1
message sayHelloResponse element sayHelloResponse -> 指向 http://127.0.0.1:8999/hello?xsd=1
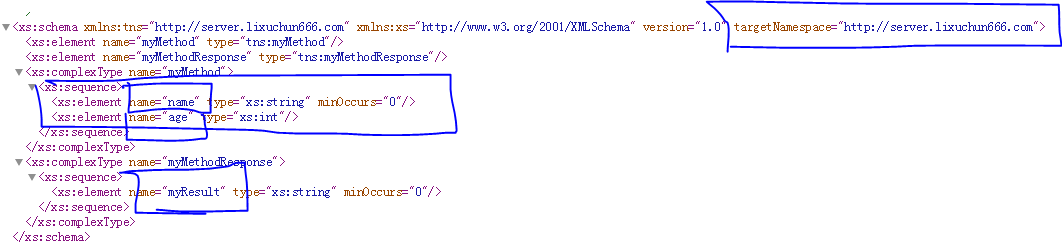
http://127.0.0.1:8999/hello?xsd=1内容为
<xs:schema

    xmlns:tns="http://server.lixuchun.com/"

    xmlns:xs="http://www.w3.org/2001/XMLSchema" version="1.0" targetNamespace="http://server.lixuchun.com/">

    <xs:element name="sayHello" type="tns:sayHello"/>

    <xs:element name="sayHelloResponse" type="tns:sayHelloResponse"/>

    <xs:complexType name="sayHello">

        <xs:sequence>

            <xs:element name="arg0" type="xs:string" minOccurs="0"/>

        </xs:sequence>

    </xs:complexType>

    <xs:complexType name="sayHelloResponse">

        <xs:sequence>

            <xs:element name="return" type="xs:string" minOccurs="0"/>

        </xs:sequence>

    </xs:complexType>

</xs:schema>
element sayHello ->complexType sayHello -> sequence 参数 name type string
element sayHelloResponse ->complexType sayHelloResponse ->return string
WSDL 对应客户端代码结构 如下图:
本地App类中没有具体实现类,HelloService helloService 对象 为 代理对象。
默认情况下 服务和客户端生成包结构是相同的 如下图:

可以自己指定包结构 wsimport -p 包结构 address
cmd 窗口下 wsimport -s . -p com.lixuchun.test http://127.0.0.1:8999/hello?wsdl
可以生成 自定义的包结构给客户端
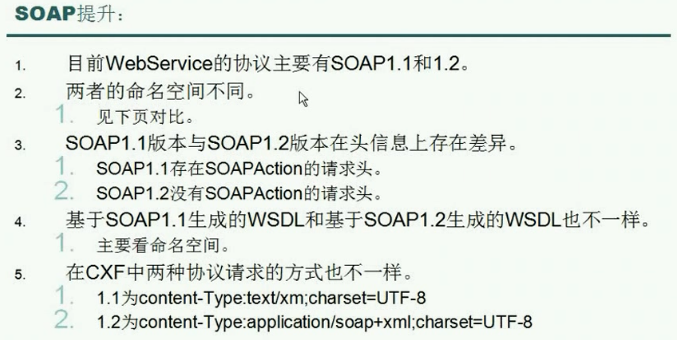
传统xml数据格式,基于SAOP格式的都是post请求 因为需要 请求体
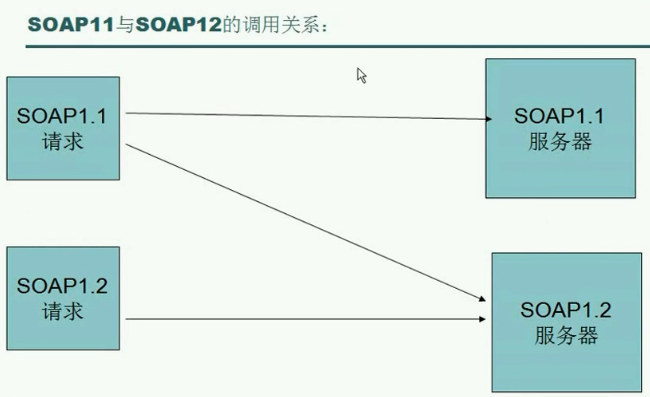
上面例子都是soap1.1例子 使用jdk开发,只支持soap1.1 , 需要cxf框架才能支持soap1.2
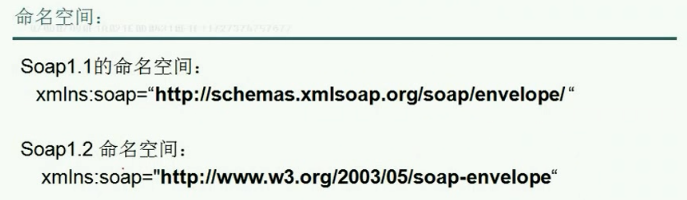
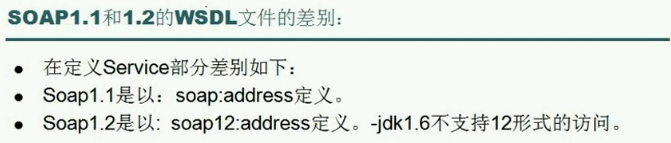
SOAP 1.1 和 1.2差异


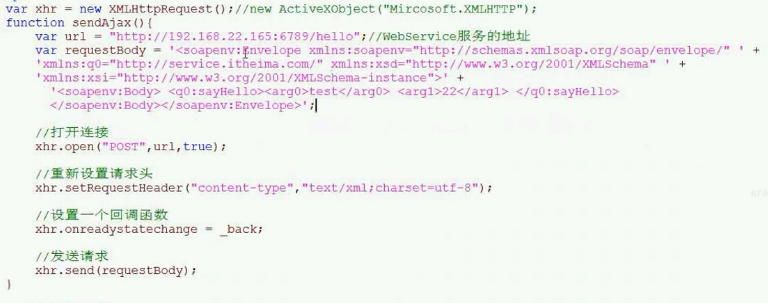
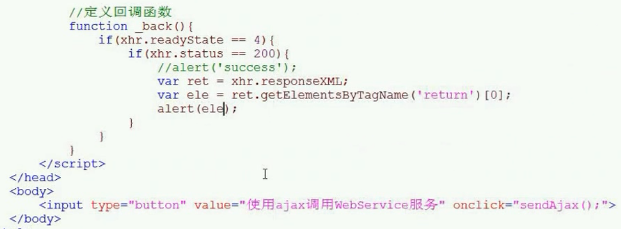
1-9 ajax 请求WebService 服务
1-10 urlconnection调用webservice 代码量少
添加AppUrlConnection.java文件
package com.lixuchun.server;

import java.io.InputStream;

import java.io.OutputStream;

import java.net.HttpURLConnection;

import java.net.URL;

public class AppUrlConnection {

    public static void main(String args[]) throws Exception {

        // webservice 服务地址

        URL url = new URL("http://127.0.0.1:8999/hello");

        HttpURLConnection conn = (HttpURLConnection)url.openConnection();

        // 请求头构建

        // 有请求

        conn.setDoInput(true);

        // 有响应

        conn.setDoOutput(true);

        conn.setRequestMethod("POST");

        conn.setRequestProperty("content-type", "text/xml;charset=utf-8");

        // 构造请求体

        String requestBody = "<soapenv:Envelope xmlns:soapenv=\"http://schemas.xmlsoap.org/soap/envelope/\" "

                + "xmlns:q0=\"http://service.itheima.com/\" xmlns:xsd=\"http://www.w3.org/2001/XMLSchema\" "

                + "xmlns:xsi=\"http://www.w3.org/2001/XMLSchema-instance\">"

                + "<soapenv:Body> <q0:sayHello><arg0>test</arg0> "

                + "</q0:sayHello> </soapenv:Body></soapenv:Envelope>";

        //获得一个输出流

        OutputStream out = conn.getOutputStream();

        out.write(requestBody.getBytes());

        //获得服务端响应状态码

        int code = conn.getResponseCode();

        StringBuffer sb = new StringBuffer();

        if(code == 200){

            //获得一个输入流,读取服务端响应的数据

            InputStream is = conn.getInputStream();

            byte[] b = new byte[1024];

            int len = 0;

            while((len = is.read(b)) != -1){

                String s = new String(b,0,len,"utf-8");

                sb.append(s);

            }

            is.close();

        }

        out.close();

        System.out.println("服务端响应数据为:"+sb.toString());

    }

}
执行后可以看到响应格式为正常的soap响应格式

wsimport方式调用webservice生成代码量过大,URLConnection方式需要自己解析
所以还有客户端编程方式 创建目录 创建appClient类

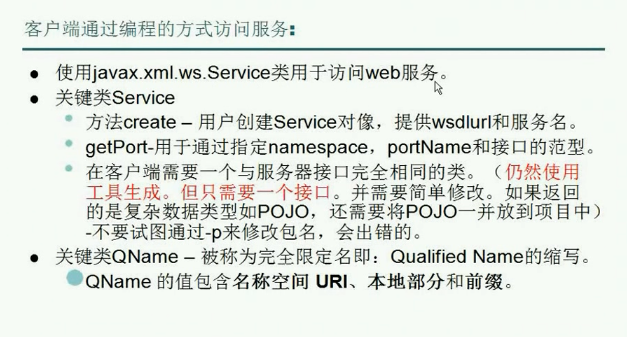
package client;

import java.net.URL;

import javax.xml.namespace.QName;

import javax.xml.ws.Service;

/**

 * 使用客户端编程方式调用webservice

 * 也需要使用 wsimport 生成代码 但是只要导入接口就可以

 * @author lixuchun

 *

 */

public class AppClient {

    public static void main(String args[]) throws Exception {

        String wsdlUrl = "http://127.0.0.1:8999/hello?wsdl";

        // arg1 服务地址 url

        // QName 名称空间 uri wsdl文件 targetNamespace获取, wsdl服务名称

        Service service = Service.create(new URL(wsdlUrl), new QName("http://server.lixuchun.com", "HelloServiceService"));

        HelloService port = service.getPort(new QName("http://itheima.com", "HelloServicePort"), HelloService.class);

        String ret = port.sayHello("test");

        System.out.println(ret);

    }

}
其中QName 2个参数为 uri 第二个为 service标签 服务
%默认情况下 生成URI就是包名的逆向 eg : com.lixuchun.server -> uri server.lixuchun.com
port 中 QName 第一个参数为uri 第二个参数为 service服务下的 port

1-14 通过注解修改WSDL文件内容
SOAP请求过程分析:
客户端先发送get请求 查看服务是否正常运行存在 如果存在再进行第二次post请求 请求数据

注解修改WSDL文件后之前使用的调用类就不好用了 名称都变为注解名称 需要重新wsimport 编译导入
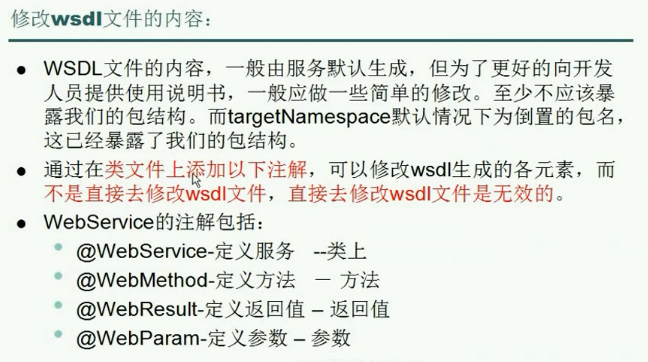
通过注解修改wsdl文件的实例:
package com.lixuchun.service;

import javax.jws.WebMethod;

import javax.jws.WebParam;

import javax.jws.WebResult;

import javax.jws.WebService;

import javax.xml.ws.Endpoint;

/**

 * 注解修改webservice wsdl文件名称

 * @author lixuchun

 */

//只有加了WebService注解的类,才有可能发布为web服务

@WebService(targetNamespace="http://server.lixuchun.com", serviceName="myService")

public class HelloService {

    //提供一个合法的web方法

    @WebMethod(operationName="myMethod")

    @WebResult(name="myResult")

    public String sayHello(

            @WebParam(name="name")

            String name,

            @WebParam(name="age")

            int age){

        System.out.println("sayHello方法被调用了");

        return "hello " + name;

    }

    @WebMethod(exclude=true)//排除当前方法

    public String sayHi(String name){

        System.out.println("sayHi方法被调用了");

        return "hi " + name;

    }

    public static void main(String[] args) {

        String address = "http://127.0.0.1:9999/hello";//服务的发布地址

        HelloService implementor = new HelloService();//提供服务的实例

        Endpoint.publish(address, implementor);

        System.out.println("server ready...");

    }

}
启动服务 再次查看wsdl文件,可以看到更改后的tag标签的变化

1-15 返回自定义对象
创建新的服务
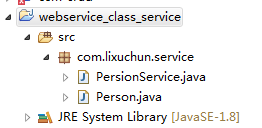
添加自定义类和服务类
package com.lixuchun.service;

public class Person {

    private String id;

    private String name;

    private String address;

    public String getId() {

        return id;

    }

    public void setId(String id) {

        this.id = id;

    }

    public String getName() {

        return name;

    }

    public void setName(String name) {

        this.name = name;

    }

    public String getAddress() {

        return address;

    }

    public void setAddress(String address) {

        this.address = address;

    }

}
package com.lixuchun.service;

import javax.jws.WebService;

import javax.xml.ws.Endpoint;

@WebService

public class PersionService {

    public Person findPersonById(String id) {

        Person p = new Person();

        p.setId(id);

        p.setAddress("沈阳");

        p.setName("jack");

        return p;

    }

    public static void main(String args[]) {

        Endpoint.publish("http://127.0.0.1:9000/findPerson", new PersionService());

        System.out.println("person server start ");

    }

}
启动服务 查看wsdl文件

返回person类型
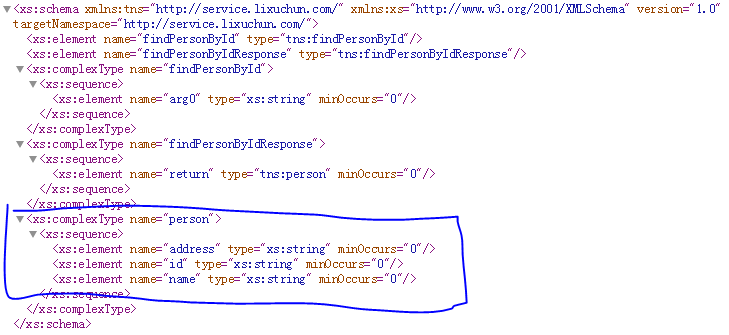
通过eclipse插件查看响应和请求
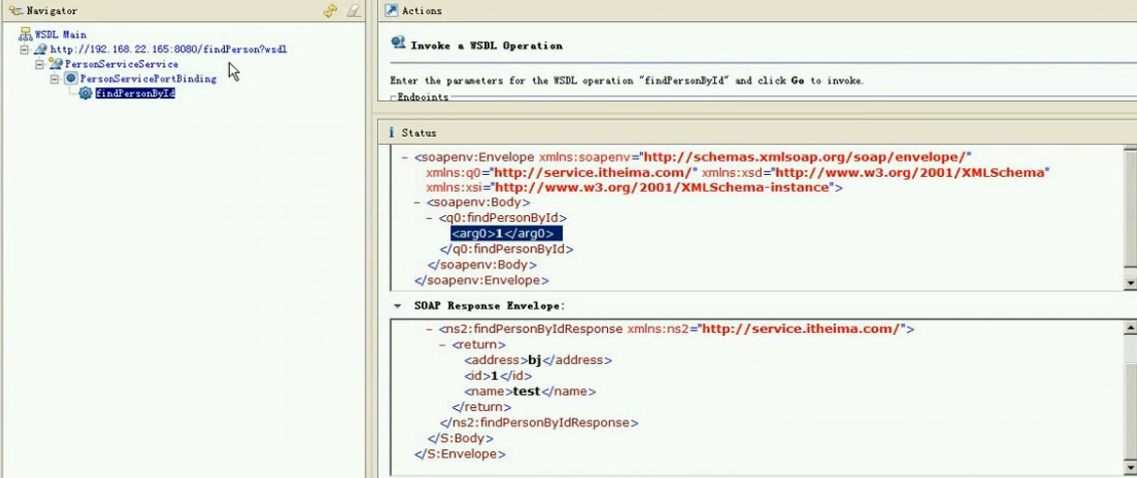
address bj / id 1 / name test
也可以使用 代码进行测试 用wsimport -s . address 生成源代码文件
然后再写调用客户端类
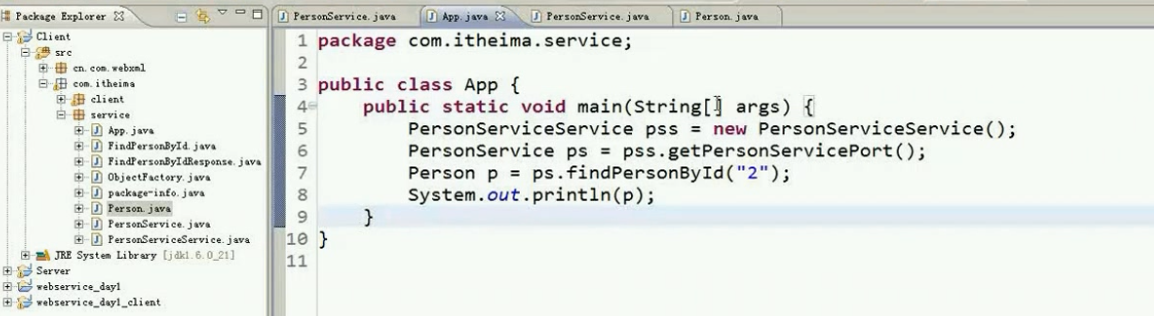
上图可以看到生成代码中有person类生成 为返回对象类
视频学习笔记 -> 视频地址 https://pan.baidu.com/s/1eOqnr4KIajLcaKSk_tYyJA#list/path=%2F 可以自行下载学习
最新文章
- CodeIgniter笔记-去掉index.php
- CLion 2016.1.1 下载 附注册激活码 破解版方法
- maya的卡通渲染
- ios cocos2d 画线出现闪烁问题
- DirectWrite文字排版——字符串去尾
- Webservice初接触
- A题进行时--浙大PAT 1001-1010
- Myeclipse2013 SVN安装方法
- jstack:将Process Explorer中看到的进程ID做16进制转换,到ThreadDump中加上0x 前缀即能找到对应线程(转)
- Tomcat剖析(三):连接器(1)
- Inno Setup入门(十)——操作注册表
- MySQL建立外键(Foreign Key)
- Git - 可视化冲突解决工具P4Merge
- [Swift]LeetCode12. 整数转罗马数字 | Integer to Roman
- Long polling failed, will retry in 16 seconds. appId: zeus-guard, cluster: default, namespaces: application, long polling url: null, reason: Get config services failed from···
- Learning by doing——小黄杉获得感想
- js对象以及DOM
- Tomcat权威指南-读书摘要系列7
- 如何修改Mac截屏保存路径
- python pytest测试框架介绍一