Socket网络通信——IO、NIO、AIO介绍以及区别
一 基本概念
Socket又称”套接字“,应用程序通常通过”套接字“向网路发出请求或者应答网络请求。
Socket和ServerSocket类位于java.net包中。ServerSocket用于服务器端,Socket是建立网络连接时使用的。在连接成功时,应用程序两端都会产生一个Socket实例,操作这个实例,完成所需的会话,对于一个网络连接来说,套接字是平等的,不因为在服务器端或在客户端而产生不同级别,不管是Socket还是ServerSocket它们的工作都是通过SocketImpl类及其子类完成的。
套接字之间的连接过程可以分为四个步骤:服务器监听、客户端请求服务、服务器确认、客户端确认、进行通信。
- 服务器监听: 是服务端套接字并不定位具体的客户端套接字,而是处于等待连接的状态,实时监控网络状态
- 客户端请求:是指由客户端的套接字发出连接请求,要连接的目标是服务器的套接字。为此,客户端的套接字必须首先描述它要连接的服务器的套接字,指出服务器端套接字的地址和端口号,然后就向服务器套接字提出连接请求。
- 服务器端连接确认:是指当服务器套接字监听或者说接收到客户端套接字的连接请求,它就响应客户端套接字的请求,建立一个新的线程,把服务器套接字的描述发给客户端。
- 客户端连接确认:一旦客户确认了此描述,连接就建立好了,双方开始建立通信,有服务器套接字继续处于监听状态,继续接收其他客户端套接字的连接请求。
1.1 同步阻塞式I/O编程
网络编程的基本模型是Client/Server模型,也就是两个进程直接进行相互通信,其中服务端提供配置信息(绑定的IP地址和监听端口),客户端通过连接操作向服务器端监听的地址发起连接请求,通过三次握手建立连接,如果连接成功,则双方即可以进行通信(通信套接字socket)
public class Server {

	final static int PORT = 8763;

	public static void main(String[] args) {

		ServerSocket server = null;

		try {

			server = new ServerSocket(PORT);

			System.out.println("server start...");

			Socket socket = server.accept();

			//新建一个线程执行客户端任务

			new Thread(new ServerHandler(socket)).start();

		} catch (IOException e) {

			// TODO Auto-generated catch block

			e.printStackTrace();

		}

	}

}

public class Client {

	final static String ADDRESS = "127.0.0.1";

	final static int PORT = 8763;

	public static void main(String[] args) {

		Socket socket = null;

		BufferedReader in = null;

		PrintWriter out = null;

		try {

			socket = new Socket(ADDRESS, PORT);

			in = new BufferedReader(new InputStreamReader(socket.getInputStream()));

			out = new PrintWriter(socket.getOutputStream(), true);

			//向服务器端发出数据

			out.println("接收到客户端的请求数据...");

			String response = in.readLine();

			System.out.println("Client : " + response);

		} catch (Exception e) {

			e.printStackTrace();

		} finally {

			if (in != null) {

				try {

					in.close();

				} catch (IOException e) {

					e.printStackTrace();

				}

			}

			if (out != null) {

				out.flush();

				out.close();

			}

			if (socket != null) {

				try {

					socket.close();

				} catch (IOException e) {

					// TODO Auto-generated catch block

					e.printStackTrace();

				}

			}

			socket = null;

		}

	}

}

public class ServerHandler implements Runnable{

	private Socket socket;

	public ServerHandler(Socket socket) {

		super();

		this.socket = socket;

	}

	@Override

	public void run() {

		BufferedReader in = null;

		PrintWriter out = null;

		try {

			in = new BufferedReader(new InputStreamReader(this.socket.getInputStream()));

			out = new PrintWriter(this.socket.getOutputStream(), true);

			String body = null;

			while (true) {

				body = in.readLine();

				if (body == null) break;

				System.out.println("Server : " + body);

				out.println("服务器端回送响应的数据");

			}

		} catch (Exception e) {

			e.printStackTrace();

		} finally {

			if (in != null) {

				try {

					in.close();

				} catch (IOException e) {

					// TODO Auto-generated catch block

					e.printStackTrace();

				}

			}

			if (out != null) {

				out.flush();

				out.close();

			}

			if (socket != null) {

				try {

					socket.close();

				} catch (IOException e) {

					// TODO Auto-generated catch block

					e.printStackTrace();

				}

			}

		}

	}

}
运行结果:
Server端:
server start...
Server : 接收到客户端的请求数据...
Client端:
Client : 服务器端回送响应的数据...
1.2 伪异步IO实现
JDK 1.5之前,采用线程池和任务队列可以实现一种伪异步的IO通信。
将客户端的Socket封装成一个task任务(实现runnable接口的类),然后投递到线程池中去,配置相应的队列进行实现。
public class Server {

	final static int PORT = 8763;

	public static void main(String[] args) {

		ServerSocket server = null;

		try {

			server = new ServerSocket(PORT);

			System.out.println("server start...");

			Socket socket = null;

			HandlerExecutorPool handlerExecutorPool = new HandlerExecutorPool(50, 100);

			while (true) {

				socket = server.accept();

				handlerExecutorPool.execute(new ServerHandler(socket));

			}

			//新建一个线程执行客户端任务

		} catch (IOException e) {

			// TODO Auto-generated catch block

			e.printStackTrace();

		}

	}

}

Client.java 和 ServerHandler.java不变

public class HandlerExecutorPool {

	private ExecutorService executor;

	public HandlerExecutorPool(int maxPoolSize, int queueSize) {

		this.executor = new ThreadPoolExecutor(Runtime.getRuntime().availableProcessors(),

				maxPoolSize,

				120L,

				TimeUnit.SECONDS,

				new ArrayBlockingQueue<>(queueSize));

	}

	public void execute(Runnable task) {

		this.executor.execute(task);

	}

}
1.3 基于NIO的同步非阻塞编程
Buffer(缓冲区)、Channel(管道、通道)、Selector(选择器、多路复用器)
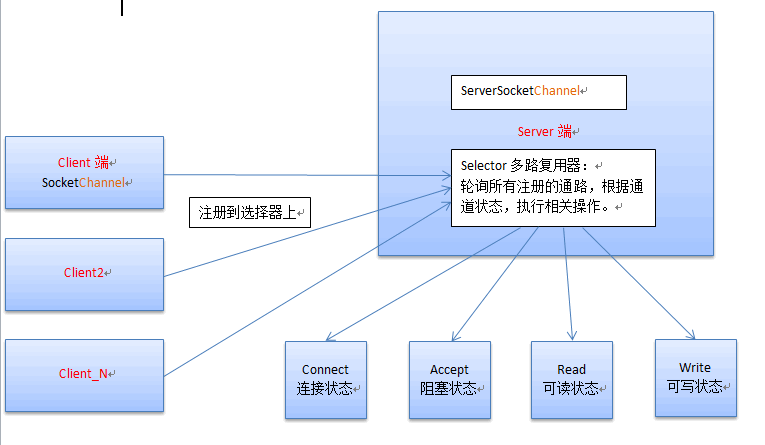
- Buffer缓冲区:Buffer是一个对象,它 包含一些要写入或者要读取的数据。在NIO类库中加入Buffer对象,体现了新库与原库IO的重要区别。在面向流的IO中,可以将数据直接写入或者读取到Stream对象中,在NIO库中,所有数据都是用缓冲区处理的(读写)。缓冲区实质上是一个数组,通常他是一个字节数组(ByteBuffer),也可以使用其他类型的数组。这个数组为缓冲区提供了数据的访问读写等操作属性,如位置、容量、上限等概念,参考API文档。
Buffer类型:我们最常用的就是ByteBuffer,实际上每一种java基本类型都对应了一种缓存区(除了Boolean),比如:byteBuffer、CharBuffer、ShortBuffer、IntBuffer、LongBuffer、FloatBuffer、DoubleBuffer
public class TestBuffer {

	public static void main(String[] args) {

		IntBuffer intBuffer = IntBuffer.allocate(10);

		intBuffer.put(20);

		intBuffer.put(13);

		intBuffer.put(22);

		System.out.println("获取下标为1的元素:" + intBuffer.get(1));

		System.out.println(intBuffer);

		intBuffer.flip();//使用flip给position进行复位,每次put之后都要flip,否则get()时会报错

		System.out.println("使用flip后:" + intBuffer);

		System.out.println("get(index)方法,position位置不变:" + intBuffer);

		intBuffer.put(0, 11); //替换了index为0的元素

		System.out.println("put(index, value)方法,position位置不变:" + intBuffer);

		for (int i = 0; i < intBuffer.limit(); i++) {

			System.out.print(intBuffer.get() + "\t");

		}

		int[] arr = new int[]{1,2,3,4,5};

		IntBuffer intBuffer2 = IntBuffer.wrap(arr);

		System.out.println("\n" + intBuffer2);

		intBuffer2.position(1);

		System.out.println("当前position位置:" + intBuffer2 + "\t当前可获取元素数量:" + intBuffer2.remaining());

		IntBuffer intBuffer3 = IntBuffer.wrap(arr, 0, 2);

		System.out.println(intBuffer3);

		for (int i = 0; i < intBuffer3.limit(); i++) {

			System.out.print(intBuffer3.get() + "\t");

		}

	}

}
运行结果:
获取下标为1的元素:13
java.nio.HeapIntBuffer[pos=3 lim=10 cap=10]
使用flip后:java.nio.HeapIntBuffer[pos=0 lim=3 cap=10]
get(index)方法,position位置不变:java.nio.HeapIntBuffer[pos=0 lim=3 cap=10]
put(index, value)方法,position位置不变:java.nio.HeapIntBuffer[pos=0 lim=3 cap=10]
11 13 22
java.nio.HeapIntBuffer[pos=0 lim=5 cap=5]
当前position位置:java.nio.HeapIntBuffer[pos=1 lim=5 cap=5] 当前可获取元素数量:4
java.nio.HeapIntBuffer[pos=0 lim=2 cap=5]
1 2
- 待添加
public class Server implements Runnable{

	private Selector selector;

	private ByteBuffer readBuf = ByteBuffer.allocate(1024);

	private ByteBuffer writeBuf = ByteBuffer.allocate(1024);

	public Server(int port) {

		try {

			this.selector = Selector.open();

			ServerSocketChannel ssc = ServerSocketChannel.open();

			ssc.configureBlocking(false);

			ssc.bind(new InetSocketAddress(port));

			ssc.register(selector, SelectionKey.OP_ACCEPT);

			System.out.println("Server start, port :" + port);

		} catch (IOException e) {

			e.printStackTrace();

		}

	}

	@Override

	public void run() {

		while (true) {

			try {

				this.selector.select();

				Iterator<SelectionKey> keys = this.selector.selectedKeys().iterator();

				while (keys.hasNext()) {

					SelectionKey key = keys.next();

					keys.remove();

					if (key.isValid()) {

						if (key.isAcceptable())

							this.accept(key);

						if (key.isReadable())

							this.read(key);

						if (key.isWritable())

							this.write(key);

					}

				}

			} catch (IOException e) {

				e.printStackTrace();

			}

		}

	}

	private void write(SelectionKey key) throws ClosedChannelException {

		//ServerSocketChannel ssc = (ServerSocketChannel)key.channel();

		//ssc.register(this.selector, SelectionKey.OP_WRITE);

	}

	private void read(SelectionKey key) {

		try {

			this.readBuf.clear();

			SocketChannel sc = (SocketChannel)key.channel();

			int count = sc.read(readBuf);

			if (count == -1) {

				key.channel().close();

				key.cancel();

				return;

			}

			this.readBuf.flip();

			byte[] bytes = new byte[this.readBuf.remaining()];

			this.readBuf.get(bytes);

			String body = new String(bytes).trim();

			System.out.println("Server :" + body);

		} catch (IOException e) {

			e.printStackTrace();

		}

	}

	private void accept (SelectionKey key) {

		try {

			ServerSocketChannel ssc = (ServerSocketChannel)key.channel();

			SocketChannel sc = ssc.accept();

			sc.configureBlocking(false);

			sc.register(this.selector,  SelectionKey.OP_READ);

		} catch (IOException e) {

			e.printStackTrace();

		}

	}

	public static void main(String[] args) {

		new Thread(new Server(8765)).start();

	}

}

public class Client {

	public static void main(String[] args) {

		InetSocketAddress address = new InetSocketAddress("127.0.0.1", 8765);

		SocketChannel sc = null;

		ByteBuffer buf = ByteBuffer.allocate(1024);

		try {

			sc = SocketChannel.open();

			sc.connect(address);

			while (true) {

				byte[] bytes = new byte[1024];

				System.in.read(bytes);

				buf.put(bytes);

				buf.flip();

				sc.write(buf);

				buf.clear();

			}

		} catch (IOException e) {

			e.printStackTrace();

		} finally {

			if (sc != null) {

				try {

					sc.close();

				} catch (IOException e) {

					// TODO Auto-generated catch block

					e.printStackTrace();

				}

			}

		}

	}

}
NIO的本质就是避免原始的TCP建立连接使用3次握手的操作,减少连接开销
1.4 基于NIO 2.0的异步非阻塞AIO编程
AIO编程,在NIO基础上引入了异步通道的概念,并提高了异步文件和异步套接字通道的实现,从而在真正意义上实现了异步阻塞,之前我们学习的NIO只是非阻塞而并非异步。而AIO它不需要通过多路复用器对注册的通道进行轮询操作即可实现异步读写,从而简化了NIO编程模型。也可以称之为NIO 2.0,这种模式才真正的属于我们异步非阻塞的模型。
AsynchronousServerSocketChannel
AsynchronousSocketChannel
public class Server {

	private ExecutorService executorService;

	//线程池

	private AsynchronousChannelGroup threadGroup;

	//服务器通道

	public AsynchronousServerSocketChannel assc;

	public Server (int port) {

		try {

			executorService = Executors.newCachedThreadPool();

			//创建线程池

			threadGroup = AsynchronousChannelGroup.withCachedThreadPool(executorService, 1);

			//创建线程组

			assc = AsynchronousServerSocketChannel.open(threadGroup);

			//创建服务器通道

			assc.bind(new InetSocketAddress(port));

			//绑定

			System.out.println("Server start, port : " + port);

			assc.accept(this, new ServerCompletionHandler());

			//进行堵塞

			Thread.sleep(Integer.MAX_VALUE);

			//一直阻塞,不让服务器停止

		} catch (Exception e) {

			e.printStackTrace();

		}

	}

	public static void main(String[] args) {

		Server server = new Server(8765);

	}

}

public class ServerCompletionHandler implements CompletionHandler<AsynchronousSocketChannel, Server> {

	@Override

	public void completed(AsynchronousSocketChannel asc, Server attachment) {

		// 当有下一个客户端进入的时候,直接调用Server的accept方法,这样反复下去,保证多个客户端可以阻塞

		attachment.assc.accept(attachment, this);

		read(asc);

	}

	@Override

	public void failed(Throwable exc, Server attachment) {

		exc.printStackTrace();

	}

	private void read(final AsynchronousSocketChannel asc) {

		// 读取数据

		ByteBuffer buf = ByteBuffer.allocate(2014);

		asc.read(buf, buf, new CompletionHandler<Integer, ByteBuffer>() {

			@Override

			public void completed(Integer result, ByteBuffer attachment) {

				//进行读取之前,重置标示符

				attachment.flip();

				//获取读取的字节数

				System.out.println("Server -> " + "收到客户端的数据长度为: " + result);

				//读取获取的数据

				String resultData = new String(attachment.array()).trim();

				System.out.println("Server -> 收到客户端的数据信息为: " + resultData);

				String response = "服务器响应,收到了客户端发来的数据:" + resultData;

				write(asc, response);

			}

			@Override

			public void failed(Throwable exc, ByteBuffer attachment) {

				exc.printStackTrace();

			}

		});

	}

	protected void write(AsynchronousSocketChannel asc, String response) {

		try {

			ByteBuffer buf = ByteBuffer.allocate(1024);

			buf.put(response.getBytes());

			buf.flip();

			asc.write(buf).get();

		} catch (Exception e) {

			e.printStackTrace();

		}

	}

}

public class Client implements Runnable{

	private AsynchronousSocketChannel asc;

	public Client() throws IOException {

		asc = AsynchronousSocketChannel.open();

	}

	public void connect() {

		asc.connect(new InetSocketAddress("127.0.0.1", 8765));

	}

	public void write(String request) {

		try {

			asc.write(ByteBuffer.wrap(request.getBytes())).get();

			read();

		} catch (Exception e) {

			e.printStackTrace();

		}

	}

	public void read() {

		ByteBuffer buf = ByteBuffer.allocate(1024);

		try {

			asc.read(buf).get();

			buf.flip();

			byte[] respBuf = new byte[buf.remaining()];

			buf.get(respBuf);

			System.out.println(new String(respBuf, "utf-8").trim());

		} catch (InterruptedException e) {

			e.printStackTrace();

		} catch (ExecutionException e) {

			e.printStackTrace();

		} catch (UnsupportedEncodingException e) {

			e.printStackTrace();

		}

	}

	@Override

	public void run() {

		while (true) {

		}

	}

	public static void main(String[] args) throws IOException, InterruptedException {

		Client c1 = new Client();

		c1.connect();

		Client c2 = new Client();

		c2.connect();

		Client c3 = new Client();

		c3.connect();

		new Thread(c1, "c1").start();

		new Thread(c2, "c2").start();

		new Thread(c3, "c3").start();

		Thread.sleep(1000);

		c1.write("c1 AAA");

		c2.write("c2 BBB");

		c3.write("c3 CCC");

	}

}
运行结果:
Server端:
Server start, port : 8765
Server -> 收到客户端的数据长度为: 6
Server -> 收到客户端的数据信息为: c1 AAA
Server -> 收到客户端的数据长度为: 6
Server -> 收到客户端的数据信息为: c2 BBB
Server -> 收到客户端的数据长度为: 6
Server -> 收到客户端的数据信息为: c3 CCC
Client端:
服务器响应,收到了客户端发来的数据:c1 AAA
服务器响应,收到了客户端发来的数据:c2 BBB
服务器响应,收到了客户端发来的数据:c3 CCC
二 区别
2.1 IO(BIO)和NIO的区别
其本质就是阻塞和非阻塞的区别
- 阻塞概念:应用程序在获取网络数据的时候,如果网络传输数据很慢,那么程序就一直等着,直到传输完毕为止。
- 非阻塞概念:应用程序直接可以获取已经准备就绪好的数据,无需等待。
- IO为同步阻塞形式,NIO为同步非阻塞形式。NIO并没有实现异步,在JDK 1.7之后,升级了NIO库包,支持异步非阻塞通信模型即NIO 2.0(AIO)
2.2 同步和异步
同步和异步一般是面向操作系统与应用程序对IO操作的层面上来区别的
- 同步时,应用程序会直接参与IO读写操作,并且 我们的应用程序会直接阻塞到某一个方法上,直到数据准备就绪;或者采用轮询的策略实时检查数据的就绪状态,如果就绪则获取数据。
- 异步时,则所有的IO读写操作都交给操作系统处理,与我们的应用程序没有直接关系,我们程序不需要关心IO读写,当操作系统完成了IO读写操作时,就会给我们应用程序发送通知,我们的应用程序直接拿走数据即可。
阻塞说的是具体的技术,接收数据的方式(io, nio)
同步说的是你的server服务器的执行方式
最新文章
- iOS多线程-RunLoop简介
- python 使用pymssql连接sql server数据库
- Android 中MyApplication
- mediawiki的管理与使用
- SpringMVC接收checkbox传值
- boost: tcp client sample
- CentOS 6.X安装LAMP最高版本环境
- WORD神操作!第一个技巧你就傻眼了!
- oracle-行转列
- php基础知识【函数】(5)正则preg
- 关于 Boolean 的转换
- Objective-C Blocks测试题与解析
- 简单聊聊不可或缺的Nginx反向代理服务器--实现负载均衡【上篇】
- 洛谷.5300.[GXOI/GZOI2019]与或和(单调栈)
- git pull时报错:refusing to merge unrelated histories
- Unity数据类型转XML/Json-封装函数直接调用(Chinar)
- (整理)REHL6.5_安装本地yum
- Kafka命令行操作及常用API
- Python爬虫(二)——对开封市58同城出租房数据进行分析
- {Django基础七之Ajax} 一 Ajax简介 二 Ajax使用 三 Ajax请求设置csrf_token 四 关于json 五 补充一个SweetAlert插件(了解)