Nginx负载均衡、SSL原理、生成SSL密钥对、Nginx配置SSL
6月12日任务
12.17 Nginx负载均衡
12.18 ssl原理
12.19 生成ssl密钥对
12.20 Nginx配置ssl
扩展
针对请求的uri来代理 http://ask.apelearn.com/question/1049
根据访问的目录来区分后端的web http://ask.apelearn.com/question/920
nginx长连接 http://www.apelearn.com/bbs/thread-6545-1-1.html
nginx算法分析 http://blog.sina.com.cn/s/blog_72995dcc01016msi.html
12.17 Nginx负载均衡
通过学习了Nginx代理,那么当只有一台机器的时候可以说是代理,如果有多台机器的时候,那就不能够单靠代理了,需要设置负载均衡。
比如有5个用户访问web服务器,如果其中一个服务器挂了,那么用户1不会再去请求web服务器1,而是自动分配其他的web服务器提供服务,这样就叫负载均衡。
操作步骤:
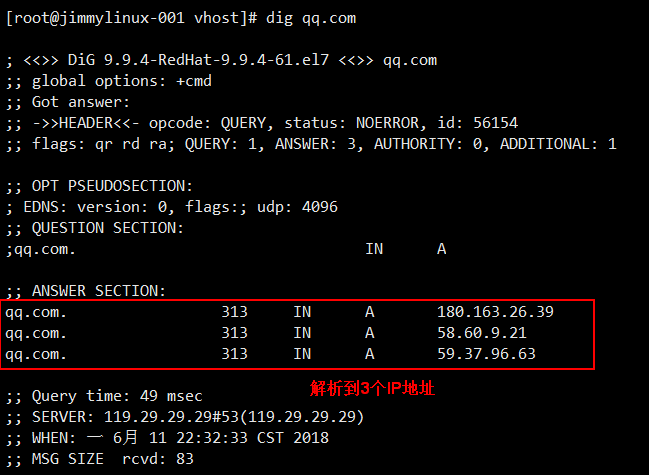
在正式操作之前可以使用dig命令解析网站域名对应的IP地址,如果没有安装,需要先使用 yum install -y bind-utils 安装dig命令。
设置负载均衡操作步骤:
1、新建ld.conf配置文件
[root@jimmylinux- vhost]# vim ld.conf

加入以下内容

upstream qq

{

    ip_hash;

    server 180.163.26.39:;

    server 58.60.9.21:;

    server 59.37.96.63:;

}

server

{

    listen ;

    server_name www.qq.com;

    location /

    {

        proxy_pass      http://qq;

        proxy_set_header Host   $host;

        proxy_set_header X-Real-IP      $remote_addr;

        proxy_set_header X-Forwarded-For $proxy_add_x_forwarded_for;

    }

}
2、直接使用curl访问测试

重新-s加载配置文件,然后在curl访问www.qq.com就可以访问到真正的QQ主页了
[root@jimmylinux- vhost]# /usr/local/nginx/sbin/nginx -s reload

[root@jimmylinux- vhost]# curl -x127.0.0.: www.qq.com
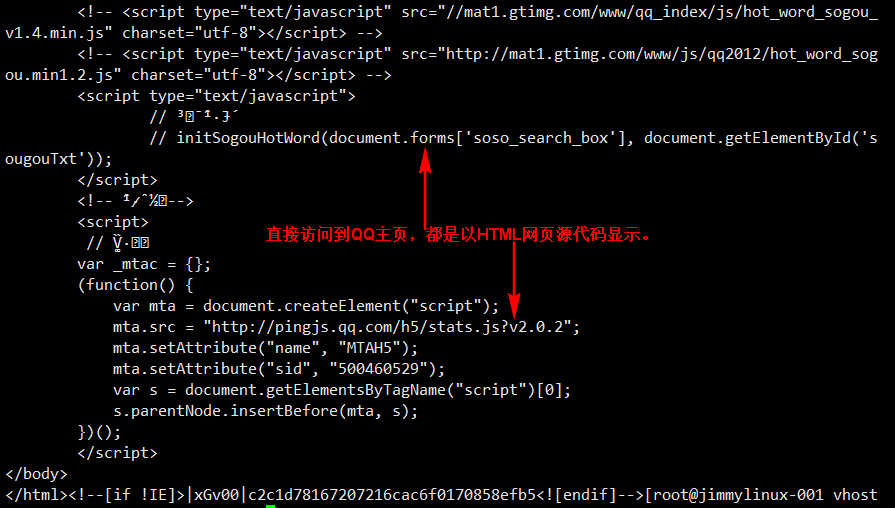
以上操作就是Nginx的负载均衡,另外一个知识点:Nginx代理或负载均衡不支持去代理HTTPS,也就是server后面端口不可以写成443。
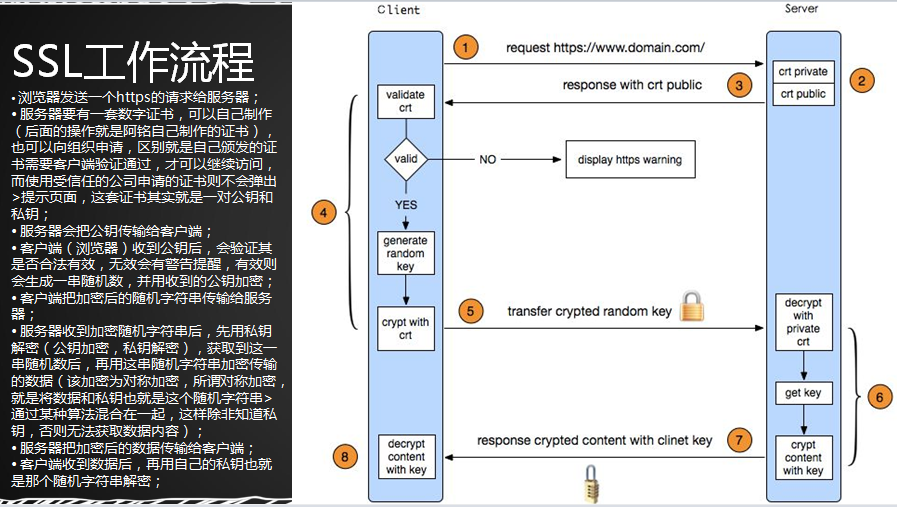
12.18 ssl原理
12.19 生成ssl密钥对
1、进入指定目录并生成私钥文件
[root@jimmylinux- ~]# cd /usr/local/nginx/conf

[root@jimmylinux- conf]# openssl genrsa -des3 -out tmp.key

Generating RSA private key,  bit long modulus

..............................................+++

...............................+++

e is  (0x10001)

Enter pass phrase for tmp.key:              输入密码abcd1234

Verifying - Enter pass phrase for tmp.key:  再次确认密码
2、转换key,取消密码。
[root@jimmylinux- conf]# openssl rsa -in tmp.key -out jimmy.key

Enter pass phrase for tmp.key:

writing RSA key
3、删除tmp.key文件
[root@jimmylinux- conf]# rm -f tmp.key
4、生成证书请求文件,目的是为了和私钥一起生成公钥文件。
[root@jimmylinux- conf]# openssl req -new -key jimmy.key -out jimmy.csr

You are about to be asked to enter information that will be incorporated

into your certificate request.

What you are about to enter is what is called a Distinguished Name or a DN.

There are quite a few fields but you can leave some blank

For some fields there will be a default value,

If you enter '.', the field will be left blank.

-----

Country Name ( letter code) [XX]:China

string is too long, it needs to be less than   bytes long

Country Name ( letter code) [XX]:CN

State or Province Name (full name) []:ShenZhen

Locality Name (eg, city) [Default City]:ShenZhen

Organization Name (eg, company) [Default Company Ltd]:jimmy

Organizational Unit Name (eg, section) []:jimmy

Common Name (eg, your name or your server's hostname) []:jimmylinux

Email Address []:joan2008.lms@gmail.com

Please enter the following 'extra' attributes

to be sent with your certificate request

A challenge password []:abcd1234

An optional company name []:jimmy
5、用生成的证书请求文件jimmy.csr和之前的jimmy.key私钥文件一起生成公钥文件
[root@jimmylinux- conf]# openssl x509 -req -days -in jimmy.csr -signkey jimmy.key -out jimmy.crt


这里的jimmy.key是私钥文件,jimmy.crt是公钥文件。
12.20 Nginx配置ssl
已经有公钥和私钥,那么就可以配置Nginx的SSL了。
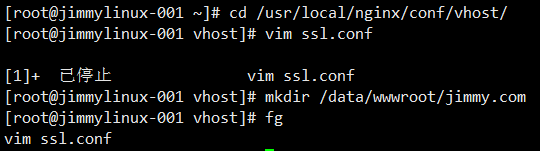
1、进入指定目录、然后新建一个配置文件。
[root@jimmylinux- vhost]# vim ssl.conf    新建配置文件

添加以下内容

server

{

    listen ;                               监听端口

    server_name jimmy.com;

    index index.html index.php;

    root /data/wwwroot/jimmy.com;

    ssl on;                                   开启SSL支持HTTPS

    ssl_certificate jimmy.crt;                指定公钥

    ssl_certificate_key jimmy.key;            指定私钥

    ssl_protocols TLSv1 TLSv1. TLSv1.;      SSL协议

}
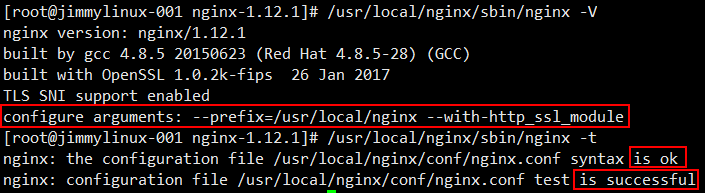
2、-t检查配置文件的语法是否正确,如果出现以下报错,因为最早编辑Nginx的时候并没有指定支持SSL,这里需要重新编译nginx,加上--with-http_ssl_module


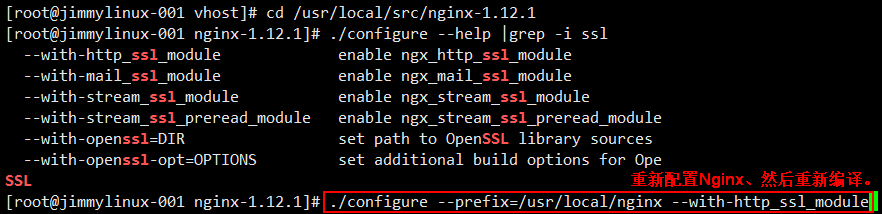
重新配置完以后,执行make和make install
[root@jimmylinux- nginx-1.12.]# make

[root@jimmylinux- nginx-1.12.]# make install
3、刚才编译完以后就会多一个支持HTTPS的SSL,重新-t检查配置文件语法也没有问题了。
重启Nginx并检查监听端口
[root@jimmylinux- nginx-1.12.]# /etc/init.d/nginx restart  重启Nginx

Restarting nginx (via systemctl):                          [  确定  ]

[root@jimmylinux- nginx-1.12.]# netstat -lntp  检查监听端口

Active Internet connections (only servers)

Proto Recv-Q Send-Q Local Address           Foreign Address         State       PID/Program name

tcp               0.0.0.0:              0.0.0.0:*               LISTEN      /nginx: master

tcp               0.0.0.0:              0.0.0.0:*               LISTEN      /sshd

tcp               127.0.0.1:            0.0.0.0:*               LISTEN      /master

tcp        0      0 0.0.0.0:443             0.0.0.0:*               LISTEN      4020/nginx: master  多一个443的端口

tcp               127.0.0.1:          0.0.0.0:*               LISTEN      /php-fpm: maste

tcp6              :::                   :::*                    LISTEN      /sshd

tcp6              :::                  :::*                    LISTEN      /master

tcp6              :::                 :::*                    LISTEN      /mysqld
4、进入指定目录,然后创建一个测试文件。
[root@jimmylinux- nginx-1.12.]# cd /data/wwwroot/jimmy.com/

[root@jimmylinux- jimmy.com]# ls

[root@jimmylinux- jimmy.com]# vim .txt  新建测试文件

添加以下内容

This is SSL test page.

[root@jimmylinux- jimmy.com]# mv .txt index.html  重新更名成index.html文件
5、测试访问
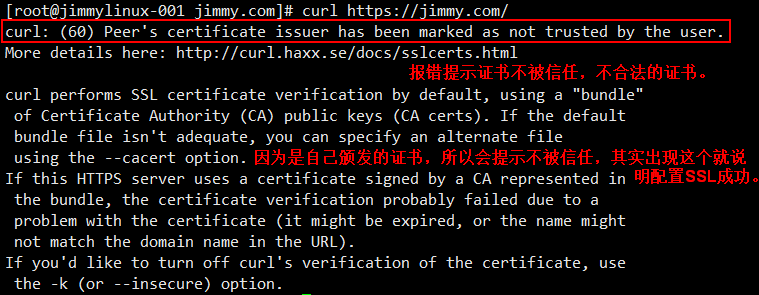
[root@jimmylinux- jimmy.com]# curl -x127.0.0.: https://jimmy.com/  如果直接使用curl方式访问,就会报400的错误状态码。

curl: () Received HTTP code  from proxy after CONNECT
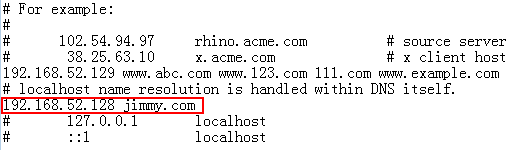
需要修改hosts文件,然后再访问才可以。

可以编辑Windows的hosts文件,通过浏览器访问。
如果浏览器打开很慢无法访问,那么就要检查下防火墙了。
[root@jimmylinux- jimmy.com]# iptables -nvL  检查如果有防火墙

[root@jimmylinux- jimmy.com]# iptables -F    可以直接-F
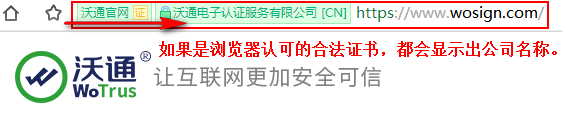
刷新浏览器就可以访问了,如果不被浏览器认可的证书或者不合法的证书,https都会出现红色的显示。

想要有合法认可颁发的证书,可以到这个网站进行购买。
最新文章
- LSTM 分类器笔记及Theano实现
- Unity 单例写法
- CentOS(一)--CentOS6.4环境搭建
- 模板:函数memcpy
- about Q&A in installing linux[centos6,7]
- Nutch的日志系统
- 第八十九节,html5+css3pc端固定布局,热门旅游取,标题介绍区,旅游项目区
- vim 和grep 正则表达式相似和区别
- NFS配置及使用
- mysql时间比较
- 文本分类实战(三)—— charCNN模型
- 第四十九天 mysql 索引 元类
- PHP四大基本排序算法实例
- 解决 liblog4cpp.a: could not read symbols: Bad value
- c++操作mysql入门详解
- (转)Linux开启mysql远程连接的设置步骤
- DIY远程移动图像监测(tiny6410+USB摄像头+motion+yeelink+curl)
- 在windows上安装和启动Elasticseach、Kibana
- zigbee ---- 各种ID的作用
- Python BeautifulSoup 简单笔记