AMQP与RabbitMQ
转载请注明原文地址:https://www.cnblogs.com/ygj0930/p/10922433.html
一:AMQP是什么
AMQP(Advanced Message Queuing Protocol)高级消息队列协议,是基于JMS进行进一步扩展和优化的异步消息处理协议。
其在JMS的基础上,提供了更多的方法。
AMQP引入了消息交换机Exchange的概念,实现了消息生产者与消息队列之间的解耦。消息不再直接发送到队列或者主题,而是统一发送给Exchange,由交换机根据路由规则,将消息分发到不同队列中。
AMQP还引入了Channel概念,将一个connection细分为不同channel,适用于多线程场景下,消息消费者与AMQP服务器只需建立一个TCP连接即可,各个线程对应不同channel,通过channel实现消息的提取。
二:AMQP模型
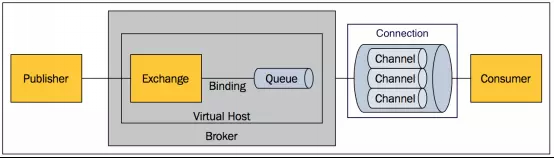
- Broker: 接收和分发消息的应用,RabbitMQ Server就是一个消息处理实体。
- Virtual host: 出于多租户和安全因素设计的,把AMQP的基本组件划分到一个虚拟的分组中,类似于网络中的namespace概念。当多个不同的用户使用同一个RabbitMQ server提供的服务时,可以划分出多个vhost,每个用户在自己的vhost创建exchange/queue等。
- Connection: publisher/consumer和broker之间的TCP连接。断开连接的操作只会在client端进行,Broker不会断开连接,除非出现网络故障或broker服务出现问题。
- Channel: 如果每一次访问RabbitMQ都建立一个Connection,在消息量大的时候建立TCP Connection的开销将是巨大的,效率也较低。Channel是在connection内部建立的逻辑连接,如果应用程序支持多线程,通常每个thread创建单独的channel进行通讯,AMQP method包含了channel id帮助客户端和message broker识别channel,所以channel之间是完全隔离的。Channel作为轻量级的Connection极大减少了操作系统建立TCP connection的开销。
- Exchange: message到达broker的第一站,根据分发规则,匹配查询表中的routing key,分发消息到queue中去。常用的类型有:direct (point-to-point), topic (publish-subscribe) and fanout (multicast)。
- Queue: 消息最终被送到这里等待consumer取走。一个message可以被同时拷贝到多个queue中。
- Binding: exchange和queue之间的虚拟连接,binding中可以包含routing key。Binding信息被保存到exchange中的查询表中,用于message的分发依据。
三:AMQP消息传送模型

发布者(Publisher)发布消息(Message),传送到broker;
在broker中,消息被交换机(Exchange)根据路由规则,通过binding传送到不同的队列;
最后 AMQP 代理会将消息投递给订阅了此队列的消费者(push API),或者消费者按照需求自行获取(pull API)。
四:Exchange分发策略
Direct:当消息的routing key 与 binding 的 routing key 直接匹配,消息路由到该队列
Topic: 当消息routing key 与 binding 的 routing key 符合通配符匹配,消息路由到该队列(请百度通配符匹配)
Headers: 当消息参数表中的头信息和值都与 binding参数表中匹配的话,消息路由到该队列
Fanout: 任何消息直接匹配到所有队列上
五:RabbitMQ的使用
1、SpringBoot集成RabbitMQ
1)配置pom包:spring-boot-starter-amqp
<dependency>

    <groupId>org.springframework.boot</groupId>

    <artifactId>spring-boot-starter-amqp</artifactId>

</dependency>
2)配置RabbitMQ服务器信息
首先,需要一台主机安装并启动RabbitMQ。
然后在项目中配置:
spring.application.name=应用名

spring.rabbitmq.host=RabbitMQ服务器的host

spring.rabbitmq.port=5672

spring.rabbitmq.username=RabbitMQ服务器的登录帐号

spring.rabbitmq.password=密码
3)配置消息队列
@Configuration

public class RabbitConfig {

    @Bean

    public Queue Queue() {

        return new Queue("hello");

    }

}
4)使用模版,实现消息生产者
@component

public class HelloSender {

    @Autowired

    private AmqpTemplate rabbitTemplate;

    public void send() {

        String context = "hello " + new Date();

        System.out.println("Sender : " + context);

        this.rabbitTemplate.convertAndSend("hello", context);//自动转换为消息对象并要求发送到hello队列

    }

}
5)实现消息接收者——创建监听器,监听hello队列,一旦有消息则调用process函数进行处理
@Component

@RabbitListener(queues = "hello")

public class HelloReceiver {

    @RabbitHandler

    public void process(String hello) {

        System.out.println("Receiver  : " + hello);

    }

}
2、Python使用RabbitMQ
1)下载RabbitMQ并解压
下载网址: http://www.rabbitmq.com/install-generic-unix.html
解压后,进入 sbin 目录, 运行 server。
默认端口为5672。
2)pip安装AMQP协议实现模块——pika
3)消息生产者:
# -*- coding: utf-8 -*-

import pika

connection = pika.BlockingConnection(pika.ConnectionParameters('localhost'))

channel = connection.channel()

channel.exchange_declare(exchange='first', type='fanout')

channel.queue_declare(queue='hello')

channel.queue_bind(exchange='first', queue='hello')

channel.basic_publish(exchange='first', routing_key='', body='Hello World!')
- 获取连接.
- 从连接上获取一个 channel.
- 声明一个 exchange . (只会创建一次)
- 声明一个 queue . (只会创建一次)
- 把 queue 绑定到 exchange 上.
- 向指定的 exchange 发送一条消息.
4)消息消费者
# -*- coding: utf-8 -*-

import pika

connection = pika.BlockingConnection(pika.ConnectionParameters('localhost'))

channel = connection.channel()

channel.queue_declare(queue='hello')

def callback(ch, method, properties, body):#消息处理函数

    print body

channel.basic_consume(callback, queue='hello', no_ack=True)

channel.start_consuming()
- 获取连接.
- 从连接上拿到 channel .
- 声明需要的 queue .
- 定义一个从指定 queue 获取消息的回调处理.
- 开始接收消息.
5)查看rabbitMQ的服务状态
使用 rabbitmqctl 这个工具。例如:查看当前的队列情况
./rabbitmqctl list_queues
六:深入
- 持久化
- 调度策略
- 分配策略
- 状态反馈
最新文章
- Web 常用功能测试方法
- Java生成XML文件
- js中NAN、NULL、undefined的区别
- Linux学习笔记---用户管理---组group
- hdu City Game
- iOS机器学习-TensorFlow
- python--函数式编程--9
- UI设计网站参考
- Redis 作为缓存服务器的配置
- 我读<代码整洁之道>--读书笔记整理
- 交换基本数据类型的方法swap,并影响到主方法
- Unity 3D Time 类
- 前端笔记之HTML
- CentOS7.4部署Python3+Django+uWSGI+Nginx
- 在webpack中使用postcss之插件cssnext
- 2015.4.21第一篇cnblog文章
- Ubuntu16.04LTS中使用 apt-get install 出现错误 Could not get lock /var/lib/dpkg/lock 的解决方案
- linux下启动springboot服务
- CentOS6.5 安装mysql-5.7.9
- [NOIP2016 D1T3]换教室 【floyd+概率dp】