java全栈项目
文档地址:https://course.7yue.pro/lin/sleeve/
1、小程序里,我把结构分为三部分:wxml(view)、page里的js(controll)、model
与后端接口对接的代码写在model里,page的js写逻辑并且为wxml准备数据,
2、使用
const promisic = function (func) {

  return function (params = {}) {

    return new Promise((resolve, reject) => {

      const args = Object.assign(params, {

        success: (res) => {

          resolve(res);

        },

        fail: (error) => {

          reject(error);

        }

      });

      func(args);

    });

  };

};

export {

  promisic

}
可以把将小程序内置非promise API转换为promise
使用的例子:
static async request({url, data, method='GET', callback }) {

    await promisic(wx.request)({

      url: `${config.apiBaseUrl}${url}`,

      data,

      method,

      header: {

        appKey: config.appKey

      }

    })

  }
3、组件的意义是什么?
样式、骨架、业务逻辑/行为
灵活性的手段:
外部样式类、插槽
业务逻辑/行为 : 属性、传参、Behavior
如何平衡灵活性和应用性:定义默认值(样式默认值和插槽默认值)
4、小程序中,image会有大约10rpx的间隔,要清除,可以给image设置display:flex

5、scroll-view 要想组件支持flex布局,需要设置enable-flex
6、wxs可以看做是在html页面写的filters代码,现在只支持es5的写法
7、小程序里的slot和抽象节点的区别?
https://developers.weixin.qq.com/miniprogram/dev/framework/custom-component/generics.html 抽象节点
最大的区别在于粒度不一样,
slot插槽我们只需要放入wxml代码就可以
<swiper class="swiper"

          indicator-dots="{{true}}"

          indicator-color="#157658"

          autoplay

          circular

  >

    <block wx:for="{{bannerB.items}}" wx:key="{{item.id}}">

      <swiper-item class="swiper">

        <image class="swiper" src="{{item.img}}"></image>

      </swiper-item>

    </block>

  </swiper>
上面的swiper-item就是slot插槽,放入我们自定义的wxml代码
而抽象节点,我们要传入的是一个自定义的组件,使用起来要比solt插槽复杂
8、小程序中动态计算图片的宽高(home.wxml)
有这样一个需求:在瀑布流中,图片的宽度固定,高度自适应?
方案一、
.img{

  width: %;

}
设置width为100%,height自适应
但是有时候我们需要动态的获取图片的宽高
方案二、
https://developers.weixin.qq.com/miniprogram/dev/component/image.html
在小程序中,可以使用bindload在图片加载完成以后,获取宽高,然后按比例动态设置style
<image bind:load="onImgLoad" mode="widthFix" style="width: {{w}}rpx;height: {{h}}rpx" src="{{data.img}}"></image>
   onImgLoad(event) {

      const {width, height} = event.detail

      this.setData({

        w: ,

        h: *height/width

      })

    }
9、上拉加载以后,底部提示 使用Lin-ui里的Loadmore(spu-preview.wxml)
http://doc.mini.7yue.pro/component/view/loadmore.html#%E6%98%BE%E7%A4%BA%E4%B8%8E%E9%9A%90%E8%97%8F
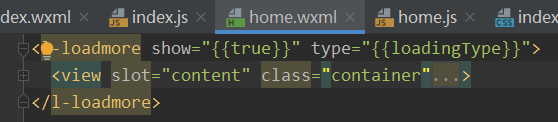
show是用来显示的
type可以设置状态:加载中还是加载完
10、遍历二维数组
/**

   *  金属灰 七龙珠   小号 S

   *  青芒色 灌篮高手 中号 M

   *  青芒色 圣斗士   大号

   *  橘黄色 七龙珠  小号 SL

   *

   *  这是最开始的二维数组,我们要从里面按列来获取,并且去除相同的值

   *

   */

  /**

   * @param cb  回调函数

   * element    二维数组里的每个属性

   * i j        每个属性的行列值

   */

  forEach(cb) {

    for (let j = ; j < this.colsNum; j++) {

      for (let i = ; i < this.rowsNum; i++) {

        const element = this.m[i][j]

        cb(element, i, j)

      }

    }

  }
/**
 * 使用转置处理矩阵
 */
transpose() {
  const desArr = []
  for (let j = 0; j < this.colsNum; j++) {
    desArr[j] = []
    for (let i = 0; i < this.rowsNum; i++) {
      desArr[j][i] = this.m[i][j] // 行列互换
    }
  }
}
11、自定义组件事件跨越组件边界
https://developers.weixin.qq.com/miniprogram/dev/framework/custom-component/events.html#触发事件
在微信小程序中
triggerEvent 可以跨组件传递信息,不需要一层一层传递,使用冒泡的方式,只要在需要捕捉的地方绑定方法就行
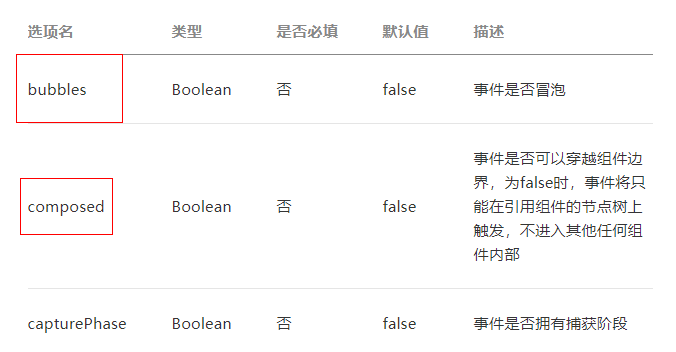
onTap(event) {

      this.triggerEvent('celltap', {

        cell: this.properties.cell

      }, {

        bubbles: true, // 是否冒泡

        composed: true // 可跨域组件边界,直接从孙组件传递到爷爷组件,不用经过父组件

      })

    }
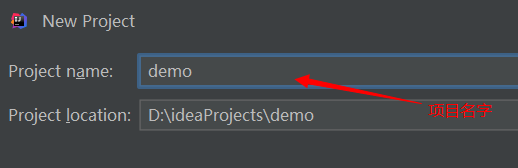
12、使用idea创建spring-boot项目
dpring-boot官网:https://spring.io/projects/spring-boot#overview
第一步
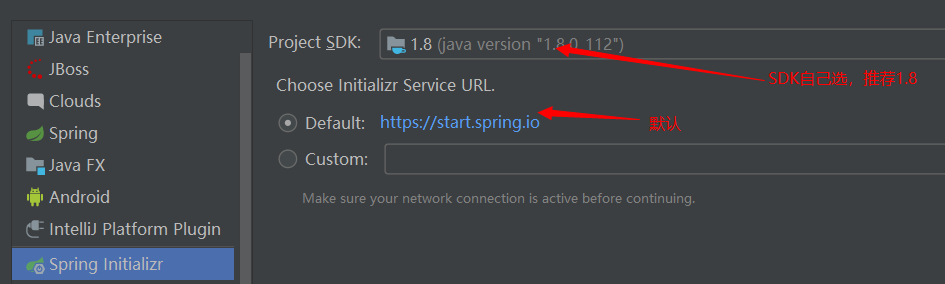
第二步
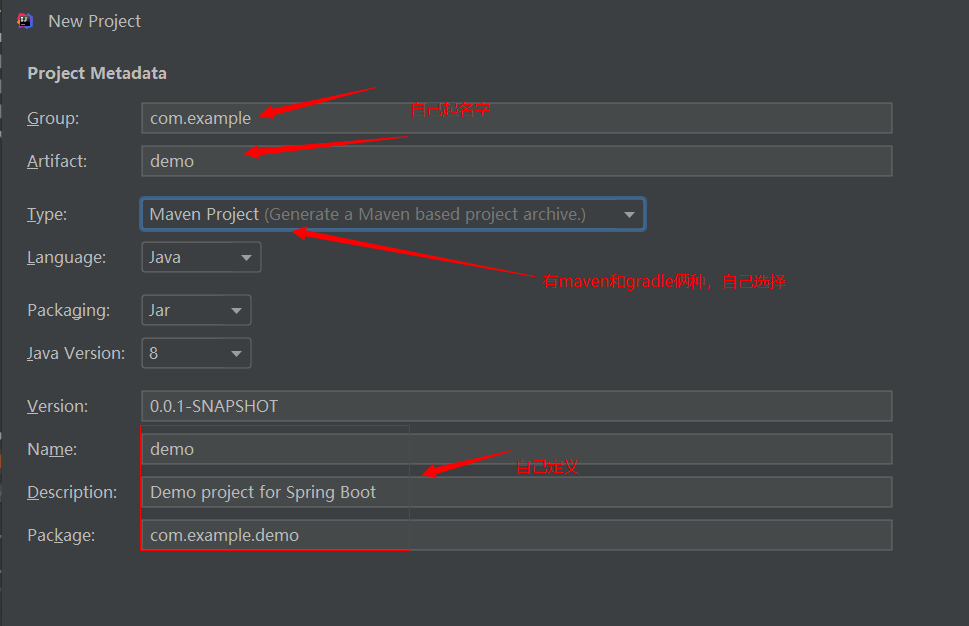
第三步


第四步
13、给spring-boot进行热重启配置
第一步:在pom.xml文件添加spring-boot-devtools插件
<dependency>

            <groupId>org.springframework.boot</groupId>

            <artifactId>spring-boot-devtools</artifactId>

            <scope>runtime</scope>

            <optional>true</optional>  // 必须加这个,不然会不起作用

</dependency>
第二步
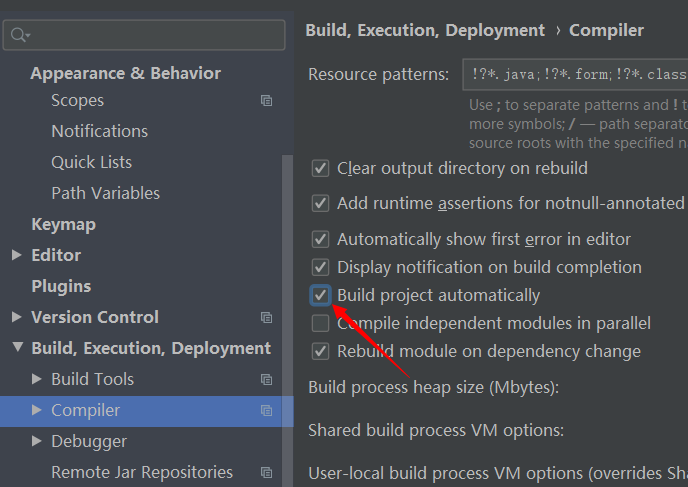
spring-boot-devtools监控的是编译后的文件 ,当编译后的文件改变,就会热重启项目
点击了上面的选择框,就可以利用idea在代码改变后,自动进行编译
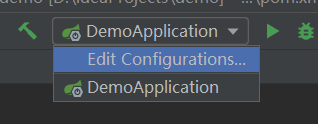
第三步(2019.3版本需要这个)
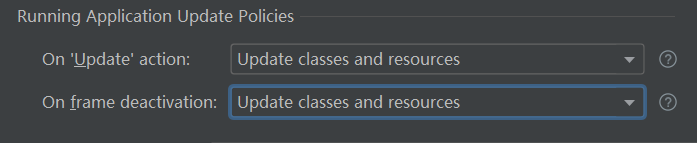
备注:改为代码以后,点击其他地方,编辑区失去鼠标焦点,就会自动重启代码
14、IOC实现:容器(IOC容器,用来生成对象) 加入容器(把类加入到容器中,容器生成对象) 注入(到代码中)
使用spring boot的意义: 把控制权交给用户 更灵活的OCP(开闭原则)
15、spring实例化和依赖注入时机是在容器启动以后就执行(默认情况下)
可以通过@Lazy进行延长实例化
不过加上@Lazy有时候也会立即执行,这是因为使用对象的类中是立即的,要解决办法是在使用的对象里也家还是那个@Lazy
16、spring boot的IOC容器注入有俩种:被动注入(默认)和主动选择注入
被动注入:通过type(默认)和name俩种方式,如果通过type没有找到,就通过name来选择对象注入
主动注入:
注:1、一个bean都找不到,报错;2、只有一个,直接注入;3找到多个bean不一定报错,还要看能否通过name进行匹配,如果匹配了就不报错
17、应对的变化的两种方案(策略模式与属性配置)
策略模式就是创建一个接口类,然后有多个实现
通过传入不同的属性来解决
18、spring-boot默认的情况下,只能扫描当前的启动类同级或子级的类
要想扫描到指定包下的类 可以使用@ComponentScan("")进行指定
19、一个接口有多个实现类,该如何切换?
(1)、使用@Component把需要的类注入到容器,其他不需要的类就去掉@component
(2)、通过byname切换bean的name
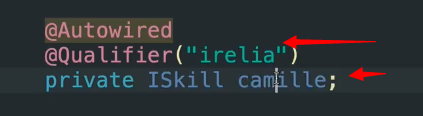
private ISkill diana;
修改ISkill的实现类,改变diana
(3)、使用@Qualifier指定bean
@Qualifier(value = "diana")

private ISkill lreliass;
(4)、使用@Primary 优先的意思 加上这个注解后 会优先用这个类
20、@Conditional条件注解,用来判断当前类是否注入到容器里,只要是@Component注解的都可以使用
@Configuration

public class HeroConfiguration {

   @Bean

   @Conditional(DianaCondition.class)

    public ISkill diana() {

        return new Diana("zb", "");

    }

    @Bean

    public ISkill lrelia() {

        return new Lrelia("zb1", "");

    }

}
DianaCondition.clas
public class DianaCondition implements Condition {

    @Override

    public boolean matches(ConditionContext context, AnnotatedTypeMetadata metadata) {

        // context用来获取项目中其他文件的配置

        // hero.condition这是application.properties里的值

        String name = context.getEnvironment().getProperty("hero.condition");

        // 返回true就可以

        return "irelia".equalsIgnoreCase(name);

    }

}
application.properties
server.port=

hero.condition = irelia
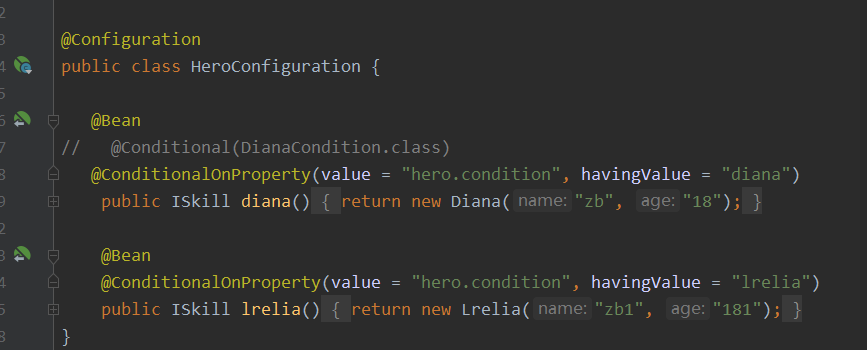
21、 成品条件组件@ConditionalOnProperty 这是内置的,不用我们自己写
@Configuration

public class HeroConfiguration {

   @Bean

//   @Conditional(DianaCondition.class)

   @ConditionalOnProperty(value = "hero.condition", havingValue = "diana")

    public ISkill diana() {

        return new Diana("zb", "");

    }

    @Bean

    @ConditionalOnProperty(value = "hero.condition", havingValue = "lrelia")

    public ISkill lrelia() {

        return new Lrelia("zb1", "");

    }

}
22、@EnableAutoConfiguration的作用是加载bean,然后把它们放进IOC容器
把握住:部分属性是要写在Configuration(配置)中的,允许从配置文件更改配置的bean下面的相关属性
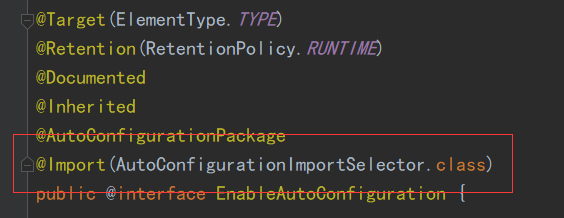
通过@IImponent引入配置文件
问题:已经有了@Configuration,为什么还要有@EnableAutoConfiguration?
因为@Configuration是用来处理我们自己写的bean,而@EnableAutoConfiguration是用来处理通过pom.xml进入的第三方sdk
23、为什么需要将异常信息写在配置文件里?
第一、可以在一个文件里专门管理异常和code 不然会散落在项目的各个地方
第二、为了做国际化
24、SpringBoot主动发现机制和思想
在使用spring-boot的项目中,有些文件明明没有被引入,为什么可以使用?这就是spring-boot主动发现的机制,只要在文件中使用了注解,sprng-boot就会在使用的时候自动发现这些文件。与之相对的:其他语言都是得自己注册
不过发现机制有个不好的地方:就是代码之间感觉没有关联,调试的时候不好调试
25、spring-boot的发现机制有俩种形式
第一种:使用特殊的注解:类似于@ControllerAdvice(全局异常检测)
第二种:使用注解@Component+特定的接口(例如WebMvcRegistrations)
26、自定义PrefixUrl
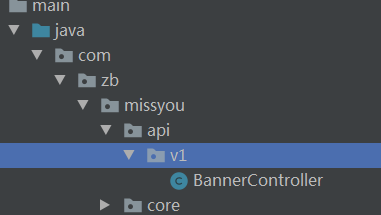
我们的controller有时候会在不同的路径下,url前面都加不同的路径,每次都手写,太麻烦,可以自定义PrefixUrl
步骤如下:
1、创建配置文件AutoPrefixConfiguration(这相当于是入口)
package com.zb.missyou.core.hack;

import org.springframework.beans.factory.annotation.Value;

import org.springframework.stereotype.Component;

import org.springframework.web.servlet.mvc.method.RequestMappingInfo;

import org.springframework.web.servlet.mvc.method.annotation.RequestMappingHandlerMapping;

import java.lang.reflect.Method;

// 继承RequestMappingHandlerMapping,重构 getMappingForMethod方法

public class AutoPrefixUrlMapping extends RequestMappingHandlerMapping {

    // 获取application.properties配置文件里的missyou.api-package

    @Value("${missyou.api-package}")

    private String apiPackagePath;

    @Override

    protected RequestMappingInfo getMappingForMethod(Method method, Class<?> handlerType) {

        // 获取之前的request信息

        RequestMappingInfo mappingInfo = super.getMappingForMethod(method, handlerType);

        if(mappingInfo != null) {

            String prefix = this.getPrefix(handlerType);

            // RequestMappingInfo.paths(prefix).build()这是前缀

            // combine(mappingInfo) 加上原来的

            RequestMappingInfo newMappingInfo = RequestMappingInfo.paths(prefix).build().combine(mappingInfo);

            return newMappingInfo;

        }

        return mappingInfo;

    }

    private String getPrefix (Class<?> handlerType) {

        String packageName = handlerType.getPackage().getName();

        String dotPath = packageName.replaceAll(this.apiPackagePath, "");

        return dotPath.replace(".", "/");

    }

}
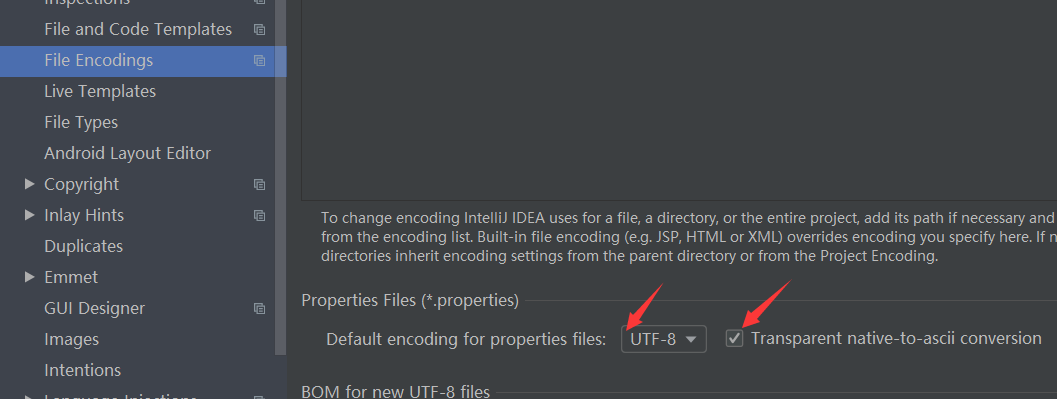
27、读取的异常是properties里的时候,出现中文乱码,
原因:properties文件在有些系统里是gkb格式的
解决办法:
28、获取URL路径中的参数
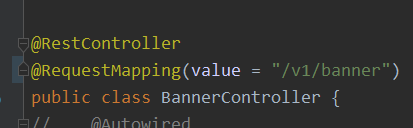
(1)、http://localhost:8081/v1/banner/test/10

这种要使用@PathVariable获取,如果{}和@PathVariable后面的名字不一样,需要使用@PathVariable(name=)指定
备注:其他的语言里获取{}里的参数就不需要加其他对象,为什么Java里需要@PathVariable?
因为其他语言只有一种传入参数的方式,而Java里可以使用依赖注入把参数传入,为了区分依赖注入和url中的参数
所以有了@PathVariable
(2)、http://localhost:8081/v1/banner/test?name=zb

使用@RequestParam获取
29、自定义校验
(1)、先定义校验接口文件PasswordEqual
package com.zb.missyou.validators;

import javax.validation.Constraint;

import javax.validation.Payload;

import java.lang.annotation.*;

@Documented

@Retention(RetentionPolicy.RUNTIME)

@Target({ElementType.TYPE})

// 用来指定这个自定义校验所关联的类(主要的判断逻辑都在这个类里面)

@Constraint(validatedBy = PasswordValidator.class)

public @interface PasswordEqual {

    int min() default ;

    int max() default ;

    String message() default "passwods are not equal";

    // 写自定义校验注解,固定写法

    Class<?>[] groups() default {};

    Class<? extends Payload>[] payload() default {};

}
(2)、创建校验关联文件,校验的逻辑都在这个文件里PasswordValidator
package com.zb.missyou.validators;

import com.zb.missyou.dto.PersonDTO;

import javax.validation.ConstraintValidator;

import javax.validation.ConstraintValidatorContext;

// 参数 泛型 第一个指定自定义注解的类型 第二个指定PasswordEqual修饰的目标的类型(如果修饰的是String name,那么类型就是String)

public class PasswordValidator implements ConstraintValidator<PasswordEqual, PersonDTO> {

    private int max;

    private int min;

    // 用来获取注解传入的参数

    @Override

    public void initialize(PasswordEqual constraintAnnotation) {

        this.max = constraintAnnotation.max();

        this.min = constraintAnnotation.min();

    }

    // 用来对值进行校验

    @Override

    public boolean isValid(PersonDTO personDTO, ConstraintValidatorContext context) {

        String password1 = personDTO.getPassword1();

        String password2 = personDTO.getPassword2();

        boolean match = password1.equals(password2);

        return match;

    }

}
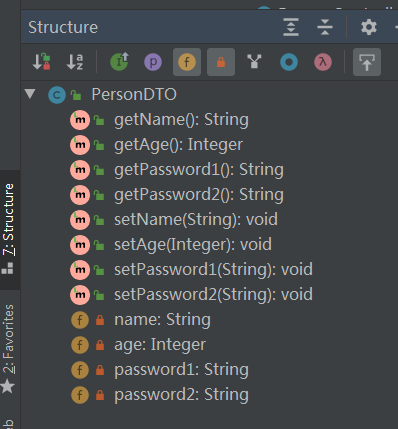
(3)、使用PersonDTO
package com.zb.missyou.dto;

import com.zb.missyou.validators.PasswordEqual;

import lombok.Getter;

import lombok.Setter;

import org.hibernate.validator.constraints.Length;

// 数据传输对象

@Getter

@Setter

@PasswordEqual(min = , message = "俩次密码不一样")

public class PersonDTO {

    @Length(min = , max = , message = "名字个数大于1小于10")

    private String name;

    private Integer age;

    private String password1;

    private String password2;

}
@PasswordEqual就是自定义的校验注解

(4)、校验失败时返回的异常处理  GlobalExceptionAdvice
// 校验出现问题时

    @ExceptionHandler(MethodArgumentNotValidException.class)

    @ResponseBody

    @ResponseStatus(code = HttpStatus.BAD_REQUEST)

    public UnifyResponse handleBeanValidation(HttpServletRequest req, MethodArgumentNotValidException e) {

        String requestUrl = req.getRequestURI();

        String method = req.getMethod();

        List<ObjectError> errors = e.getBindingResult().getAllErrors();

        String messages = this.formatAllErrorMessages(errors);

        UnifyResponse message = new UnifyResponse(, messages, method + " " + requestUrl);

        return message;

    }

    // 把数组拼接成字符串

    private String formatAllErrorMessages(List<ObjectError> errors) {

        StringBuffer errorMsg = new StringBuffer();

        errors.forEach(error ->

                errorMsg.append(error.getDefaultMessage()).append(";"));

        return errorMsg.toString();

    }
30、Lombok的使用
(1)、 pom.xml文件引入
<dependency>

   <groupId>org.projectlombok</groupId>

   <artifactId>lombok</artifactId>

</dependency>
(2)、在相应的Java文件加上@Data注解或者@Getter、@Setter注解
import com.zb.missyou.validators.PasswordEqual;

import lombok.Getter;

import lombok.Setter;

import org.hibernate.validator.constraints.Length;

// 数据传输对象

@Getter

@Setter

@PasswordEqual(min = , message = "俩次密码不一样")

public class PersonDTO {

    @Length(min = , max = , message = "名字个数大于1小于10")

    private String name;

    private Integer age;

    private String password1;

    private String password2;

}
效果:
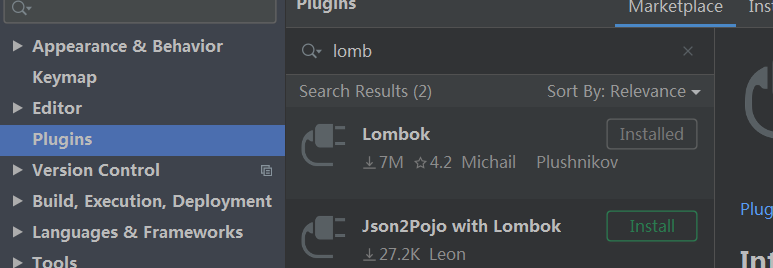
备注:在idea里如果要让Lombok生效,必须安装Lombok插件
30、@MappedSuperClass的作用 (15-2-2)
@Entity 表明类和数据库对应
.@MappedSuperClass表明类不和数据库对应,只是@Entity的副类,用来标记辅助类
例子:
@Getter

@Setter

@MappedSuperclass

public abstract class BaseEntity {

    private Date createTime;

    private Date updateTime;

    private Date deleteTime;

}
将createTime、updateTime、deleteTime公共属性抽取出来,放在抽象类里
public class Banner extends BaseEntity 这样,就可以把上面的三个属性加入到Banner类中
31、jackjson配置:下划线和时间(15-2-3)
jackson:

    # 返回的属性是以下划线连接的

    property-naming-strategy: SNAKE_CASE

    # 返回的时间转换为时间戳(毫秒)

    serialization:

      WRITE_DATES_AS_TIMESTAMPS: true
32、DozerBeanMapper拷贝属性
在项目中,我们会遇到这样的情况,数据库查询到数据非常多,如果全部传递到前端,不仅消耗资源,而且前端用不上。一般的解决办法是:创建相应的vo,里面的属性名称和查询的
实体类一致,把查询到的属性值放到对应的vo属性里。
最笨的办法是一个个遍历放进去,如下:
cartProductVo.setProductMainImage(product.getMainImage());

cartProductVo.setProductName(product.getName());

cartProductVo.setProductSubtitle(product.getSubtitle());

cartProductVo.setProductStatus(product.getStatus());

cartProductVo.setProductPrice(product.getPrice());

cartProductVo.setProductStock(product.getStock());
上面这种方法太笨重,每次都要写很多代码
推荐下面这种,使用DozerBeanMapper
(1)、pom.xml文件引入
<dependency>

     <groupId>com.github.dozermapper</groupId>

     <artifactId>dozer-core</artifactId>

     <version>6.5.</version>

</dependency>
(2)、创建vo文件,属性类型和名称与查询实体类一致
@Getter

@Setter

public class SpuSimplifyVO {

    private Long id;

    private String title;

    private String subtitle;

    private String img;

    private String forThemeImg;

    private String price;

    private String discountPrice;

    private String description;

    private String tags;

    private Long sketchSpecId;

}
(3)赋值
public List<SpuSimplifyVO> getLatestSpuList() {

        // 使用DozerBeanMapper拷贝属性

        Mapper mapper = DozerBeanMapperBuilder.buildDefault();

        // 从数据库查询出的数据

        List<Spu> spuList = spuService.getLatestPagingSpu();

        // new Vo list

        List<SpuSimplifyVO> vos = new ArrayList<>();

        // 将查询出的数据循环赋值到vo中

        spuList.forEach(s -> {

            // s是源文件,SpuSimplifyVO.class是目标文件的class

            SpuSimplifyVO vo = mapper.map(s, SpuSimplifyVO.class);

            vos.add(vo);

        });

        return vos;

    }
33、对分页的封装
import lombok.Getter;

import lombok.NoArgsConstructor;

import lombok.Setter;

import org.springframework.data.domain.Page;

import java.util.List;

//封装分页实体类

@Getter

@Setter

@NoArgsConstructor

public class Paging<T> {

    // 总条数

    private Long total;

    // 当前返回的条数

    private Integer count;

    // 当前页吗

    private Integer page;

    // 总页数

    private Integer totalPage;

    // 结果 不确定数组里元素的类型,所以使用泛型

    private List<T> items;

    public Paging(Page<T> pageT) {

        this.initPageParameters(pageT);

        this.items = pageT.getContent();

    }

    // 静态方法,子类可以调用

    void initPageParameters(Page<T> pageT) {

        this.total = pageT.getTotalElements();

        this.count = pageT.getSize();

        this.page = pageT.getNumber();

        this.totalPage = pageT.getTotalPages();

    }

}
import com.github.dozermapper.core.DozerBeanMapperBuilder;

import com.github.dozermapper.core.Mapper;

import org.springframework.data.domain.Page;

import java.util.ArrayList;

import java.util.List;

// 对分页进行再次封装,添加DozerBeanMapper功能

// 如果不需要进行vo赋值,直接用Paging就行

// 需要俩个泛型 T是源文件的类型  K是目标文件的类型

public class PagingDozer<T, K> extends Paging{

    @SuppressWarnings("unchecked")

    public PagingDozer(Page<T> pageT, Class<K> classk) {

        this.initPageParameters(pageT);

        // 使用DozerBeanMapper拷贝属性

        Mapper mapper = DozerBeanMapperBuilder.buildDefault();

        List<T> tList = pageT.getContent();

        List<K> voList = new ArrayList<>();

        // 将查询出的数据循环赋值到vo中

        tList.forEach(t -> {

            // t是源文件,classk是目标文件的class

            K vo = mapper.map(t, classk);

            voList.add(vo);

        });

        this.setItems(voList);

    }

}
使用
@RequestMapping(value = "/latest", method = RequestMethod.GET)

    public PagingDozer<Spu, SpuSimplifyVO> getLatestSpuList(@RequestParam(defaultValue = "") Integer start,

                                                            @RequestParam(defaultValue = "") Integer count

    ) {

        PageCounter pageCounter = CommonUtil.converToPageParameter(start, count);

        // 从数据库查询出的数据

        Page<Spu> page = spuService.getLatestPagingSpu(pageCounter.getPage(), pageCounter.getCount());

        return new PagingDozer<>(page, SpuSimplifyVO.class);

    }
34、spring-boot访问静态资源
(1)、pom.xml
<dependency>

      <groupId>org.springframework.boot</groupId>

      <artifactId>spring-boot-starter-thymeleaf</artifactId>

</dependency>
(2)、在static文件夹下面新建包imgs
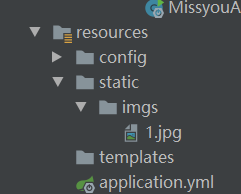
(3)、访问localhost:8081/imgs/1/jpg
35、在Java中,如果返回的异常是runtime异常,那就不会执行后面的代码,也不用return(小技巧)
将非runtime异常转换为runtime异常的方法:可以自定义一个异常,然后把这个异常throw出去
36、在mybatis中,添加完数据后,如果想立马获取当前对象里面的值,需要在mapper对应的xml里进行配置
public Long insertBanner() {

        BannerDO bannerDO = new BannerDO();

        bannerDO.setName("NewBanner");

        bannerDO.setTitle("NewTitle");

        bannerMapper.insertBanner(bannerDO);

        return bannerDO.getId();

    }
调用insert方法后,想在bannerDO直接获取添加数据的id
<insert id="insertBanner" useGeneratedKeys="true" keyProperty="id" parameterType="io.github.talelin.latticy.model.BannerDO">

        INSERT INTO banner (name, title)

        VALUES (#{name}, #{title})

    </insert>
需要新加配置useGeneratedKeys="true" 进行获取 keyProperty="id" 映射到id这个属性上
备注:这样有个问题,只能获取到id的值,其他值都获取不到
37、mybatis是半自动化orm框架,没有jpa智能,很多细节都要自己写
38、mybaits除了可以用xml还可以用注解
@Select("SELECT * FROM banner")

List<BannerDO> getaLLBanners1();
简单的方法直接用注解
39、使用mybatis plugin
(1)、mapper接口继承BaseMapper<BannerDO> 参数是要操作的实体类
@Repository

public interface BannerMapper extends BaseMapper<BannerDO>{

    List<BannerDO> getaLLBanners();

    @Select("SELECT * FROM banner")

    List<BannerDO> getaLLBanners1();

    int insertBanner(BannerDO bannerDO);

}
(2)、在实体类中设置TableName和TableId 不然会报错
@TableName("banner")

@Getter

@Setter

public class BannerDO {

    @TableId(value = "id", type = IdType.AUTO)

    private Long id;

    private String name;

    private String title;
报错信息:
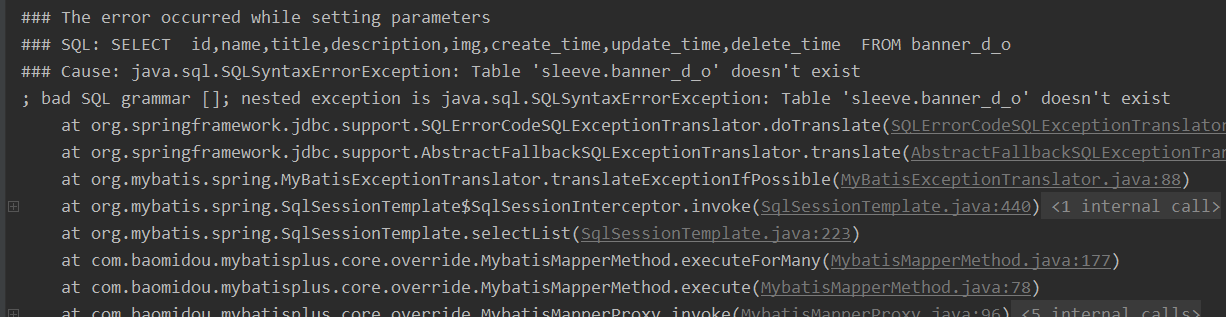
最新文章
- PHP与JAVA构造函数的区别
- CodeForces 165C Another Problem on Strings(组合)
- 《与小卡特一起学Python》Code1
- webSocket详解
- WCF服务部署IIS
- css定位的简单总结
- paip.提升效率---提升绑定层次--form绑定取代field绑定
- sql like模糊查询
- HDU 5293 Tree chain problem 树形dp+dfs序+树状数组+LCA
- 两种局部刷新UITableView的方法的使用条件
- javascript 浏览器执行断点
- Intent的属性及Intent-filter配置——Component属性
- NopCommerce开源项目中很基础但是很实用的C# Helper方法
- 【Python 18】BMR计算器2.0(数值类型转换与while循环)
- select、poll、epoll的区别
- []、()、None的区别
- 使用readAsDataURL方法预览图片
- Python_每日习题_0005_三数排序
- Nginx入门到精通
- 使用Topshelf管理Windows服务