Scrapy模块和Asyncpy模块
Scrapy笔记
scrapy的环境安装
mac or linux:
pip install scrapywindows:
pip install wheel
scrapy框架异步请求基于Twisted,所以先要下载whl包安装 下载twisted url:
https://www.lfd.uci.edu/~gohlke/pythonlibs/#twisted注意python版本twisted当前目录运行
pip install xxxxxxx.whl这一步不能报错pip install pywin32
pip install Scrapy
scrapy调试
scrapy 如果懒得控制台运行,可以在根目录创建py文件from scrapy import cmdline
cmdline.execute(["scrapy","crawl","crawla"])
#分别填写终端的几个参数scrapy基本使用
- 创建一个工程 scrapy startproject projectname(比如命名工程文件名为myspider),此时工程文件会创建如下文件

创建爬虫文件,进入到工程文件根目录后 用scrapy genspider <爬虫文件名> <起始爬取的url>
我们来创建一个爬取百度网站的爬虫文件,取名叫handsome
scrapy genspider handsome www.baidu.com运行爬虫工程文件,
scrapy crawl <爬虫文件名> --nolognolog主要为了不要输出日志记录,或者在配置文件中设置LOG_LEVEL = "ERROR",就只输出错误信息
数据解析
- scrapy内置了xpath,对于数据解析直接respons.xpath("xpath语法"),返回值是一个Selector类型的对象包裹在列表中,如果要提取其中的文本数据要用extract()方法
respons.xpath("xpath语法")[0].extract() - 上面是提取列表某个元素的data值,
respons.xpath("xpath语法").extract()是提取列表中每个元素的data值 - 但是推荐使用extract_first()可以提取第一个元素的data文本,如果提取对象为空返回None
- scrapy内置了xpath,对于数据解析直接respons.xpath("xpath语法"),返回值是一个Selector类型的对象包裹在列表中,如果要提取其中的文本数据要用extract()方法
response对象的常用属性
- response.url
- response.request.url
- response.headers
- response.request.headers
- response.body
- response.status
- 创建一个工程 scrapy startproject projectname(比如命名工程文件名为myspider),此时工程文件会创建如下文件
scrapy的持久化存储
基于终端指令存储:只可以将parse方法的返回值存储到本地文件中去,返回值必须是列表类型,有数据类型局限性
scrapy crawl -o path 例如
scrapy crawl handsome -o ./handome.csv基于终端指令存储只能限定于'json', 'jsonlines', 'jl', 'csv', 'xml', 'marshal', 'pickle'等格式. csv如果中文乱码,
csv的返回值,必须是列表包裹字典([{key:value}]),因为excel需要dataframe格式
setting中配置
FEED_EXPORT_ENCODING ="utf-8-sig"def parse(self, response):
alldata = []
index = 0
empty_dict = {}
article_lists = response.xpath(".//div[@class='col1 old-style-col1']//div[contains(@class,'article block untagged mb15')]")
for article_list in article_lists:
index+=1
content = article_list.xpath(".//span/text()").extract()
content_clean = ["%s"%i.strip("\n, ") for i in content]
ret_data = "".join(content_clean)
empty_dict[index] = ret_data
alldata.append(empty_dict)
return alldata
基于管道存储
数据解析(parse函数)
在item类(items.py文件)中定义相关的属性
将parse函数的解析数据封装到item类型的对象
管道(piplines.py)中自定义父类的spider open和close方法
管道类的process_item中将接收到的item对象进行持久化存储
在配置文件中开启管道
ITEM_PIPELINES = {

   'scrapy_test.pipelines.ScrapyTestPipeline': 300,

    #第一个参数是管道类的实例,第二个是权重,数字越小,优先越高,可以放多个管道实例

}
代码举例:
"""scrapy spider文件.py"""

# 1 数据解析(parse函数)

    def parse(self, response):

        alldata = []

        index = 0

        empty_dict = {}

        article_lists = response.xpath(".//div[@class='col1 old-style-col1']//div[contains(@class,'article block untagged mb15')]")

        for article_list in article_lists:

            index+=1

            content = article_list.xpath(".//span/text()").extract()

            content_clean = ["%s"%i.strip("\n, ") for i in content]

            ret_data = "".join(content_clean)

            # 3 将parse函数的解析数据封装到item类型的对象之创建实例 每次赋值都创建一个实例

            item = ScrapyTestItem()

            # 3 将parse函数的解析数据写到item对象中去

            item["item_ret"]=ret_data

            yield item #将item提交给管道

 -------------------------------------------------------------------

   """item.py"""

  # 2 在item类(items.py文件)中定义相关的属性

class ScrapyTestItem(scrapy.Item):

    item_ret = scrapy.Field() #这个item_ret就是parse函数里item的key值

------------------------------------------------------------

"""piplines.py"""
class ScrapyTestPipeline:

    fp = None

    # 4 管道(piplines.py)中自定义父类的spider open和close方法 这个方法在开始爬虫时候只会调用一次

    def open_spider(self, spider):

        print("开始爬虫")

        self.fp = open("./aaa.txt", "w", encoding="utf-8")

    # 这个方法在parse那每接收一个item就会被调用一次

    # 5 管道类的process_item中将接收到的item对象进行持久化存储

    def process_item(self, item, spider):

        fetch_data = item["item_ret"]

        self.fp.write(fetch_data + "\n" + "/" * 50 + "\n")

        return item

    # 4 管道(piplines.py)中自定义父类的spider open和close方法 这个方法在开始爬虫时候只会调用一次

    def close_spider(self, spider):

        print("爬虫结束")

        self.fp.close()

 # ---------------数据库的存储方法---------------------------

   """piplines.py"""

    import pymysql

    class ScrapyMysqlPipeline:

    conn = None

    cursor = None

    # 4 管道(piplines.py)中自定义父类的spider open和close方法 这个方法在开始爬虫时候只会调用一次

    def open_spider(self, spider):

        print("开始爬取写入数据库")

        self.conn = pymysql.connect(user="root",password="192406",host="127.0.0.1",port=3306,db="test",charset="utf8")

    # 这个方法在parse那每接收一个item就会被调用一次

    # 5 管道类的process_item中将接收到的item对象进行持久化存储

    def process_item(self, item, spider):

        fetch_data = item["item_ret"]

        sql = 'insert into t1 (name) values ("%s");'%fetch_data

        self.cursor = self.conn.cursor()

        try:

            self.cursor.execute(sql)

            self.conn.commit()

        except Exception as e:

            print(e)

            self.conn.rollback()

        return item

    # 4 管道(piplines.py)中自定义父类的spider open和close方法 这个方法在开始爬虫时候只会调用一次

    def close_spider(self, spider):

        print("爬虫结束")

        self.cursor.close()

        self.conn.close()

----------------------------------------------------------------------

""" 6 在配置文件中开启管道"""

ITEM_PIPELINES = {

   'scrapy_test.pipelines.ScrapyTestPipeline': 300,

   'scrapy_test.pipelines.ScrapyMysqlPipeline': 301,

}

"""

这里定义了2个管道,一个是存储到文本的,一个是存储到Mysql的,因为ScrapyTestPipeline 权重比较小,所以会优先执行,先执行的管道需要在 def process_item(self, item, spider) 函数中进行return item,才能把这个数值传到下一个管道中去.所以平时就建议用return item进行闭包,同时会把这个item对象传给下一个管道进行存储

"""
全站数据的爬取
适用场景,我们爬取多个url,并且每个url有特定的组成规律,比如第一页url是
https://www.qiushibaike.com/text/第二页是
https://www.qiushibaike.com/text/page/2/第三页是
https://www.qiushibaike.com/text/page/3/我们通常除了使用start_urls作为起始url外,会自己再构造一个url 看下面代码的5,17行
这种情况需要用到scrapy.Request的callback参数.先看下scrapy中常见的有哪些参数scrapy.Request(url,[callback,method="GET",headers,body,cookies,meta,dont_filter=False])
callback: 回调函数,即当前url响应交给哪个函数处理
meta:实现数据在不同的解析函数中传递,默认有部分数据,比如下载延迟,请求深度(传递参数)等
dont_filter: 过滤请求的url地址,请求过的地址不会被继续请求,如果需要重复请求,可以设置true
```
class HandsomeSpider(scrapy.Spider):

    name = 'handsome'

    # allowed_domains = ['https://www.qiushibaike.com/text/']

    start_urls = ['https://www.qiushibaike.com/text/']

    url = "https://www.qiushibaike.com/text/page/%s/"

    num = 1

    def parse(self, response):

        titles = response.xpath(".//div[@class='col1 old-style-col1']//div[contains(@class,'article block untagged mb15')]")

        for i in titles:

            ret = i.xpath("./div[1]/a[2]/h2/text()").extract_first().strip()

            item = SpiderTestItem()

            item["fetch_ret"]=ret #把解析数据赋值给item对象

            yield item  #这个yield 等待把结果提交给管道

        print("第%s页打印完毕"%self.num)

        if self.num<=5:

            self.num+=1

            #new_url = response.urljoin(string)  response的urljoin方法可以实现url字符串拼接.

            new_url = self.url%self.num

            yield scrapy.Request(url=new_url,callback=self.parse)  #这个yield 是把新的net_url回调给parse函数再次进行数据爬取
请求传参,第18行,就是利用meta参数进行回传参数给
class HandsomeSpider(scrapy.Spider):

 name = 'handsome'

 # allowed_domains = ['https://www.qiushibaike.com/text/']

 start_urls = ['https://www.qiushibaike.com/text/'] # 1.起始url

 url = "https://www.qiushibaike.com/text/page/%s/" # 2.1 手动构造url

 num = 2 #2.2 构造url的页数

 def parse(self, response):

     # 3. 对起始url进行解析

     titles = response.xpath(

         ".//div[@class='col1 old-style-col1']//div[contains(@class,'article block untagged mb15')]")

     for i in titles:

         ret = i.xpath("./a[1]/@href").extract_first().strip()

         item = SpiderTestItem()

         url = "https://www.qiushibaike.com" + ret

         item["url"] = url # 3.1 将起始url中解析出来的25个a标签链接写入item对象,进行管道传输

      print("获取的url为%s" % url)

         # 3.2 利用meta把item对象传给parse_detail的函数

         yield scrapy.Request(url=url, callback=self.parse_detail, meta={"item": item})

	# 4 全站爬取,解析完第一页数据后,继续用callback对自身进行回调,把构造的url和页数作为一个新的url进行请求

  if self.num<4:

         new_url = self.url%self.num

         self.num+=1

         yield scrapy.Request(url=new_url,callback=self.parse)

def parse_detail(self,response):

     # 3.3 用response接收item对象

     item = response.meta["item"]

     ret = response.xpath(".//div[@class='side-user-info clearfix']/div[1]/div[1]/text()").extract_first()

     # 3.4 把解析到的每个详情页中作者的粉丝数写入item的fan_num值中

     item["fan_num"] = ret

     # 3.5 粉丝数提交到item

     yield item

     print("粉丝数为%s"%ret)
图片数据爬取之ImagesPipeline
- parse函数中提取图片的src,提交到管道对象item
```python

class HandsomeSpider(scrapy.Spider):

    name = 'handsome'

    # allowed_domains = ['https://www.qiushibaike.com/text/']

    start_urls = ['https://www.qiushibaike.com/imgrank/']

    def parse(self, response):

        titles = response.xpath(".//div[contains(@class,'article block untagged mb15')]")

        for i in titles:

            ret = i.xpath("./div[@class='thumb']/a/img/@src").extract_first()

            item = SpiderTestItem()

            detail_url = "https:"+ret

            # 提取src,提交到管道item对象

            item["src"] = detail_url

            yield item

```
item对象设定src字段
class SpiderTestItem(scrapy.Item):

    src = scrapy.Field()
piplines中自定义一个管道类,需要继承父类 ImagesPipeline,重写父类的三个方法,
file_path:设置文件名和保存路径,存储路径的父路径在setting里设置
IMAGES_STORE ="./imgs"字段item_completed:自定义的Pipline 运行后继续把item传给下一个管道类,所以如果没有其他管道存储,也可以不写这个方法
get_media_requests :将图片的src进行请求下载
from scrapy.pipelines.images import ImagesPipeline

import scrapy

class Pipline(ImagesPipeline):

    #将图片的src进行请求下载,

    def get_media_requests(self, item, info):

        # print("item的src是",item["src"])

        #这里不需要回调函数,直接进行请求,meta可以把前面的参数给传下去,比如传自定义的文件名

        yield scrapy.Request(item["src"],meta=item)

    # 执行下一个即将执行的管道类,所以如果没有其他管道存储,也可以不写这个方法

    def item_completed(self, results, item, info):

        return item

    # 设定存储文件名,存储路径的父路径在setting里设置 IMAGES_STORE 字段

    def file_path(self, request, response=None, info=None, *, item=None):

        # return item["fname"]   直接把item里的文件名返回

        #这里是把url后面的xxx.jpg截取作为文件名返回保存

        f_name = request.url.split("/")[-1]

        return f_name
中间件
下载中间件:位于引擎和下载器之间,用来拦截工程中所有的请求和响应
- 拦截请求
- UA伪装
- 代理IP
- 拦截响应
- 篡改响应数据,响应对象
- 拦截请求
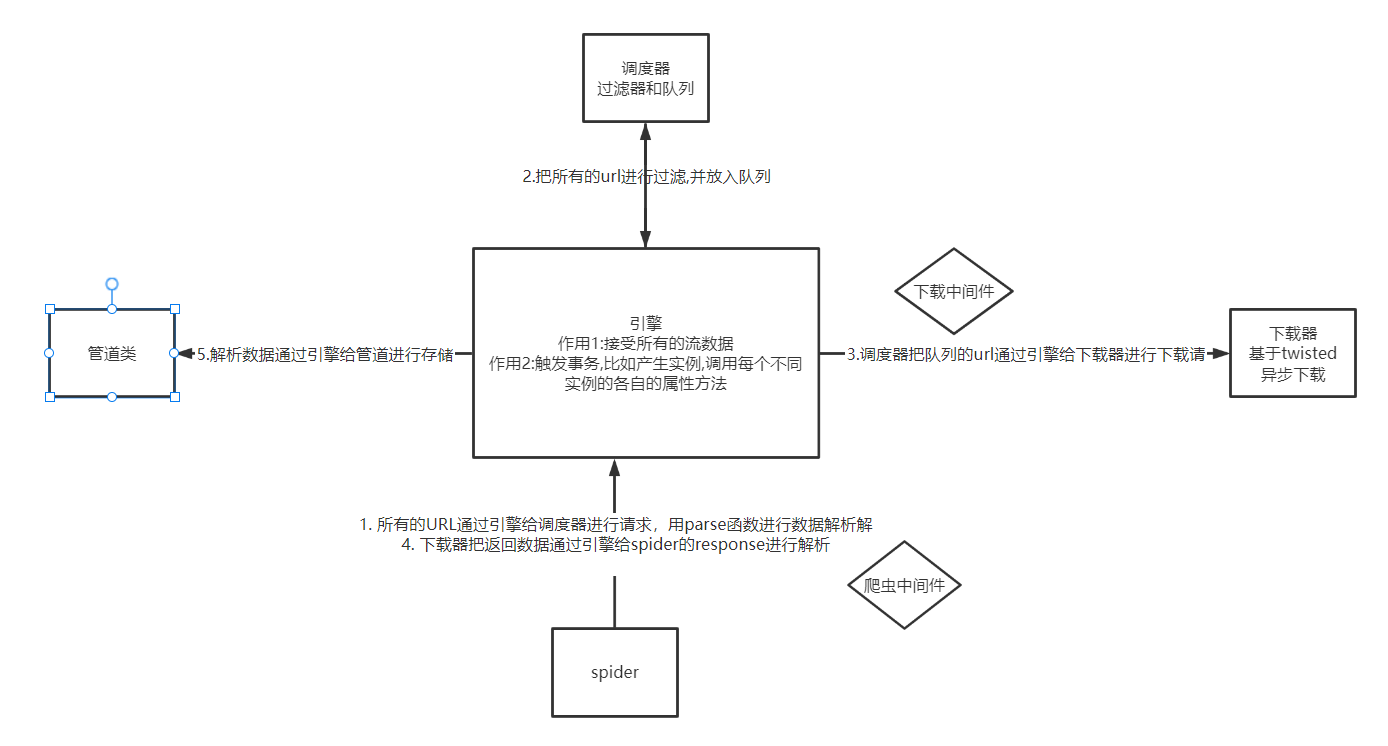
五大核心组件的关系和流程
下载中间件之请求中间件更改代码示例
代码效果主要是爬取云代理的免费代理池前10页的ip,并提取其中的https类型ip,在进行百度查询ip地址前进行替换,然后看保存下来的html文件,显示被篡改后的请求ip,期间获取的ip池没有落地保存文件,都是放在实例的属性中
爬虫代码示例
from spider_test.items import SpiderTestItem

class HandsomeSpider(scrapy.Spider):

 name = 'handsome'

 # allowed_domains = ['www.xxx.com']

 start_urls = ['http://www.ip3366.net/']

 url = "http://www.ip3366.net/?page=%s"

 ip_proxy = {"http": [], "https": []}

 num = 2

 def parse(self, response):

     ip_proxy_lists = response.xpath(".//table[@class='table table-bordered table-striped']/tbody/tr")

     for ip_infos in ip_proxy_lists:

         ip = ip_infos.xpath("./td[1]/text()").extract_first()

         port = ip_infos.xpath("./td[2]/text()").extract_first()

         type = ip_infos.xpath("./td[4]/text()").extract_first().lower()

         ip_port = "%s:%s" % (ip, port)

         self.ip_proxy[type].append(ip_port)

     # 1. 重复爬取前10页的ip地址,存放在ip_proxy,并且分成http和https2个字段

     if self.num < 10:

         follow_url = self.url % self.num

         self.num+=1

         yield scrapy.Request(url=follow_url, callback=self.parse)

     else:

         # 2. 爬取完毕后进行百度网址的访问

         new_url = "https://www.baidu.com/s?wd=ip"

         yield scrapy.Request(url=new_url, callback=self.baidu)

 def baidu(self, response):

     with open("./test.html", "w", encoding="utf-8")as f:

         f.write(response.text)
中间件代码示例
class SpiderTestDownloaderMiddleware:

 def process_request(self, request, spider):

     #对替换所有request的请求headers

     request.headers["User-Agent"]="Mozilla/5.0 (Windows NT 10.0; Win64; x64) AppleWebKit/537.36 (KHTML, like Gecko) Chrome/96.0.4664.45 Safari/537.36"

     # 2.1 通过对request.url对请求进行过滤,但是单独对这个请求更换代理ip

     if request.url.startswith("https://www.baidu.com"):

         print("开始访问百度")

         call_type = request.url.split(":")[0]

         #直接调用spider的ip_proxy属性把前面抓获的ip池数据进行调用,每次取ip池里的第一个ip

         proxy_ip = spider.ip_proxy[call_type].pop(0)

         replaceip = "%s://%s" % (call_type, proxy_ip)

         print("替换的ip是", replaceip)

         # 2.2 替换请求前的数据

         request.meta["proxy"] = replaceip

     return None

 def process_exception(self, request, exception, spider):

     call_type = request.url.split(":")[0]

     proxy_ip = spider.ip_proxy[call_type].pop(0)

     replaceip = "%s://%s" % (call_type, proxy_ip)

     print("异常了,再次替换的ip是",replaceip)

     request.meta["proxy"] = replaceip

     return request
下载中间件之响应中间件更改代码示例
百度新闻里面的新闻也是ajax渲染的,我们通过url
http://news.baidu.com/到新闻首页访问里面的国内,国际军事三个板块新闻.通过中间件一旦识别到url是这三个板块的url,就用selenium进行访问并在加载数据后把数据进行回传
# 爬虫文件

import scrapy

from spider_test.items import SpiderTestItem

from selenium import webdriver

from selenium.webdriver.chrome.options import Options

class HandsomeSpider(scrapy.Spider):

 name = 'handsome'

 # allowed_domains = ['www.xxx.com']

 start_urls = ['http://news.baidu.com']

 fetch_link = []

 ch_options = Options()

 def __init__(self):

     #设置selenium 无头

     self.ch_options.add_argument('--headless')

     self.ch_options.add_argument('blink-settings=imagesEnabled=false') #设置禁止加载图片,加快运行速度

     # 只会运行一次,创建实例

     self.bro = webdriver.Chrome(executable_path=r"D:\coding\chromedriver\chromedriver.exe",options=self.ch_options)

 def parse(self, response):

     # 1.提取新闻主页所有的栏目链接

     title_lists = response.xpath(".//div[@id='menu']/div[1]/div[1]/ul/li")

     # 2. 选择序号为2 3 4的新闻栏目,对应的分别是国内新闻  国际新闻 军事新闻

     page_list = [2,3,4]

     for i in page_list:

         # 3. 提取新闻栏目的url,并进行完整的url拼接

         url = title_lists[i].xpath("./a/@href").extract_first()

         complete_url = self.start_urls[0]+url

         self.fetch_link.append(complete_url)

     for i in self.fetch_link:

         # 4. 新闻板块url分别提交

         yield scrapy.Request(url=i,callback=self.baidu)

 def baidu(self, response):

     # 5. 获取返回内容,此时的返回内容已经是中间件拦截后,用selenuim访问url加载后的内容

     print("response.request.url>>>",response.request.url)

     ret = response.xpath(".//div[contains(@class,'column clearfix')][3]//div[contains(@class,'b-left')]/ul/li")

     for idx,i in enumerate(ret):

         content = i.xpath("./a/text()").extract_first()

         print(content)

 def close(self,spider, reason):

     # 只会运行一次,关闭实例

     self.bro.quit()

# --------------中间件-----------------

from scrapy.http import HtmlResponse

class SpiderTestDownloaderMiddleware:

 def process_request(self, request, spider):

     request.headers["User-Agent"]="Mozilla/5.0 (Windows NT 10.0; Win64; x64) AppleWebKit/537.36 (KHTML, like Gecko) Chrome/96.0.4664.45 Safari/537.36"

     return None

 def process_response(self, request, response, spider):

     if request.url in spider.fetch_link:

         bro = spider.bro

         bro.get(request.url)

         page = bro.page_source

         #4.1 需要创建一个HtmlResponse实例,把这个实例作为返回的对象

         # 4.2 url就是请求的url,body就是响应内容,这里设置的参数其实都是自定义的,在spider.py文件可以按属性调取

         new_response = HtmlResponse(url=request.url,body=page,encoding="utf-8",request=request)

         return new_response

     return response
CrawlSpider 是Spider的一个子类
全站爬取方式可以用spider的手动请求yield,可以用CrawlSpider的自动模式
CrawlSpider使用:
创建工程
cd 目录
创建爬虫文件(CrawlSpider):命令和之前不同,
scrapy genspider -t crawl xxxx www.xxx.com
链接提取器 根据指定规则(allow)进行指定链接提取,并自动进行请求发送,不需要yield手动请求
链接解析器中的follow参数如果为true,会在当前解析出来的链接继续访问其他的链接,进一步解析,然后丢到调度器中进行去重
规则解析器 将连接提取器提取到的链接进行指定规则(callback)的解析操作
CrawlSpider代码示例
# ---------------spider.py--------------------

from scrapy.linkextractors import LinkExtractor

from scrapy.spiders import CrawlSpider, Rule

from crawl_test.items import CrawlTestItem,detail_item

class CrawlaSpider(CrawlSpider):

    name = 'crawla'

    # allowed_domains = ['www.xxx.com']

    #1 从起始url进行访问,然后通过rules第一个链接提取器提取出符合规则的url进行异步访问,

    start_urls = ['https://nb8185.cnnb.com.cn/plus/list.php?tid=1401&TotalResult=8266&PageNo=1']

    rules = (

        # Rule 就是根据链接解析器实例创建一个规则解析器而已

        #2 因为设置的follow参数是false,所以不会对解析出来的链接继续访问,只访问起始url页面中解析出来的所有链接

        #规则解析器做2件事,提取符合规则的url,然后把url发给指定函数提取里面的信息

        Rule(LinkExtractor(allow=r'tid=\d+&TotalResult=\d+&PageNo=\d+'), callback='parse_item', follow=False),

        Rule(LinkExtractor(allow=r'html/292/1401/\d+/\d+/\d+.html'), callback='parse_detail', follow=False),

    )

    def parse_item(self, response):

        # 2.1根据页面分离器提取的页面url,对第1,2,3...页提取里面的url和发布日期

        ret_lists = response.xpath(".//div[@class='modItem1 clearfix']/dl")

        for i in ret_lists:

            title = i.xpath("./dt/a/text()").extract_first().strip()

            url =  "https://nb8185.cnnb.com.cn"+i.xpath("./dt/a/@href").extract_first().strip()

            date =  i.xpath("./em/text()").extract_first().strip()

            item = CrawlTestItem()

            item["url"]=url

            item["date"]=date

            item["title"]=title

            yield item

    def parse_detail(self,response):

        # 2.2 根据第二个规则解析器提取详情页里面的 相关部门和回复内容,标题

        title =response.xpath(".//div[@class='conMod bmhf clearfix' or @class = 'article_content']/h1/text()").extract_first().strip()

        department = response.xpath(".//dl[@id='replydiv1']/dt/text()").extract_first().strip()

        reply = response.xpath(".//dl[@id='replydiv1']/dd/div/text()").extract_first().strip()

        Detail_item = detail_item()

        Detail_item["title"] = title

        Detail_item["department"] = department

        Detail_item["reply"] = reply

        Detail_item["url"] = response.url

        yield Detail_item

    def close(self,spider, reason):

        print("spider 结束了")

# ---------------item.py--------------------

import scrapy

class CrawlTestItem(scrapy.Item):

    # define the fields for your item here like:

    url = scrapy.Field()

    title = scrapy.Field()

    date = scrapy.Field()

class detail_item(scrapy.Item):

    # define the fields for your item here like:

    url = scrapy.Field()

    title = scrapy.Field()

    department = scrapy.Field()

    reply = scrapy.Field()

# ---------------pipelines.py--------------------

from crawl_test.items import CrawlTestItem,detail_item

class CrawlTestPipeline:

    aaa = {}

    bbb = {}

    def open_spider(self,spider):

        pass

    def process_item(self, item, spider):

        if item.__class__.__name__ =="CrawlTestItem":

            self.aaa.update({item["url"]:[item["date"],item["title"]]})

        else:

            self.bbb.update({item["url"]:[item["department"],item["title"],item["reply"]]})

        return item

    def close_spider(self,spider):

        print("关闭爬虫管道CrawlTestPipeline")

        #把aaa的数据整合到bbb的列表中去

        for k,v in self.aaa.items():

            if self.bbb.get(k):

                self.bbb[k].extend(v)

        print(self.bbb)
分布式爬虫
- 概念: 搭建一个分布式集群,对一组资源进行多台设备分布联合爬取
- 分布式实现步骤
原理:原生scrapy不能实现分布式爬虫,因为调度器和管道无法被分布式集群共享,因此需要要借助其他组件实现,这里以scrapy-redis组件为案例
scrapy-redis 可以给原生scrapy框架提供可以被共享的管道和调度器
实现步骤 基于crawlspider类
创建工程
scrapy startporject fbs_pro && scrapy genspider -t crawl fbs www.xxx.com修改爬虫文件
2.1 导包
from scrapy_redis.spiders import RedisCrawlSpider,把start_urls和allowed_domains注释2.2 自定义一个redis_key(被共享的调度器队列名称,后期用来存放起始url)
redis_key = "sun"2.3 将当前爬虫类的父类改为RedisCrawlSpider
修改配置文件setting.py
3.1 修改指定可以被共享的管道
'scrapy_redis.pipelines.RedisPipeline': 300,3.2 修改指定的调度器
# 设置默认使用scrapy_redis的过滤器

DUPEFILTER_CLASS = "scrapy_redis.dupefilter.RFPDupeFilter"

# 设置默认使用scrapy_redis的调度器

SCHEDULER = "scrapy_redis.scheduler.Scheduler"

# 可选的调度器队列   默认为第一个

#SCHEDULER_QUEUE_CLASS = "scrapy_redis.queue.SpiderPriorityQueue"

#SCHEDULER_QUEUE_CLASS = "scrapy_redis.queue.SpiderQueue"

#SCHEDULER_QUEUE_CLASS = "scrapy_redis.queue.SpiderStack"

# 是否保持调度器队列,断点续爬

SCHEDULER_PERSIST = True

#连接redis数据库

REDIS_HOST = '192.168.13.20' #主机名

REDIS_PORT = 6379 #端口号

REDIS_PARAMS = {

  # ‘password’: ‘123’,

  # }

# redis 编码类型默认:'utf-8'

REDIS_ENCODING = "utf-8"
redis配置文件修改
4.1 修改bind 127.0.0.1参数,禁用本地访问
4.2 关闭保护模式 protected-mode 改为no
保护模式作用是在有一个客户端访问的前提下,禁止其他客户端进行访问.
4.3 启动redis服务端
./redis-server ../redis.confredis-server 配置文件路径4.4 启动redis客户端
./redis-cli执行工程文件 要进入到spider.py的文件夹 爬虫文件会开始监听
scrapy runspider xxx.py
向redis客户端的调度器的队列中放入一个起始的url
新开终端后完整的命令为
redis-cli -h redis主机id lpush redis_key名字 起始的url这里因为4.4步骤已经打开了客户端所以直接填后面的
-h redis主机id lpush redis_key名字 起始的url即可如果要重新运行爬虫记得把master上的redis清空,因为master里的数据库“dmoz:dupefilter”是用来过滤重复的请求
增量式爬虫 检测网站更新情况,只会爬取更新出来的资源
实现流程:
- 指定一个起始url,基于crawlspider获取其他页码链接
- 基于rule对其他页码链接进行请求
- 从每一个页码对应的页面源码中解析出一个电影详情url
- 对详情url发请求,解析电影的名称和简介
- 进行持久化存储
Asyncpy模块
参照scrapy的流程做的异步scrapy
视频介绍:https://www.bilibili.com/video/BV1dK411J7Ja/?vd_source=52e346b31d1a88b94ab95ca6e15eddd9
github:https://github.com/lixi5338619/asyncpy
最新文章
- poj 1806 Manhattan 2025
- MyEclipse 2015 CI 14发布(附下载)
- 我的android学习经历40
- [题解]hdu 1009 FatMouse' Trade(贪心基础题)
- static 与 final 修饰符
- .NET 压缩解压库发布,支持进度查看
- 【转】Android Intent Action 大全
- 核稀疏表示分类(KSRC)
- sass最佳实践
- IDS 日志分析
- PHP - PHPExcel操作xls文件
- SpringMVC 流程 配置 接口
- 【最长下降子序列】【动态规划】【二分】XMU 1041 Sequence
- (转)jquery的html,text,val
- < IOS > IOS适配,简单的分析解决一下
- 详解PNG文件结构
- ASP.NET MVC 4 - 上传图片到数据库
- C# 监测每个方法的执行次数和占用时间(测试3)
- Inside the Social Network’s (Datacenter) Network
- 如何利用Reveal神器查看各大APP UI搭建层级