idea设置springboot项目热部署
2024-09-08 17:32:23
转自:
https://www.cnblogs.com/zhukf/p/12672180.html
一、什么是热部署?
热部署,就是在应用正在运行的时候升级软件,却不需要重新启动应用。
二、什么是SpringBoot热部署?
SpringBoot热部署就是在项目正在运行的时候修改代码, 却不需要重新启动项目。
有了SpringBoot热部署后大大提高了开发效率,因为频繁的重启项目,势必会浪费很多时间, 有了热部署后,妈妈再也不用担心我修改代码重启项目了~~~
三、SpringBoot热部署的流程
1.pom文件中导入 spring-boot-devtools 依赖:
|
1
2
3
4
5
6
|
<!--SpringBoot热部署配置 --><br><dependency> <groupId>org.springframework.boot</groupId> <artifactId>spring-boot-devtools</artifactId> <scope>runtime</scope> <optional>true</optional></dependency> |
2.继续在pom.xml中添加插件:
|
1
2
3
4
5
6
7
8
9
10
11
12
|
<build> <plugins> <plugin> <groupId>org.springframework.boot</groupId> <artifactId>spring-boot-maven-plugin</artifactId> <configuration> <fork>true</fork> <addResources>true</addResources> </configuration> </plugin> </plugins></build> |
3.设置application.properties
|
1
2
|
#配置项目热部署spring.devtools.restart.enabled=true |
4.在idea中设置自动编译:
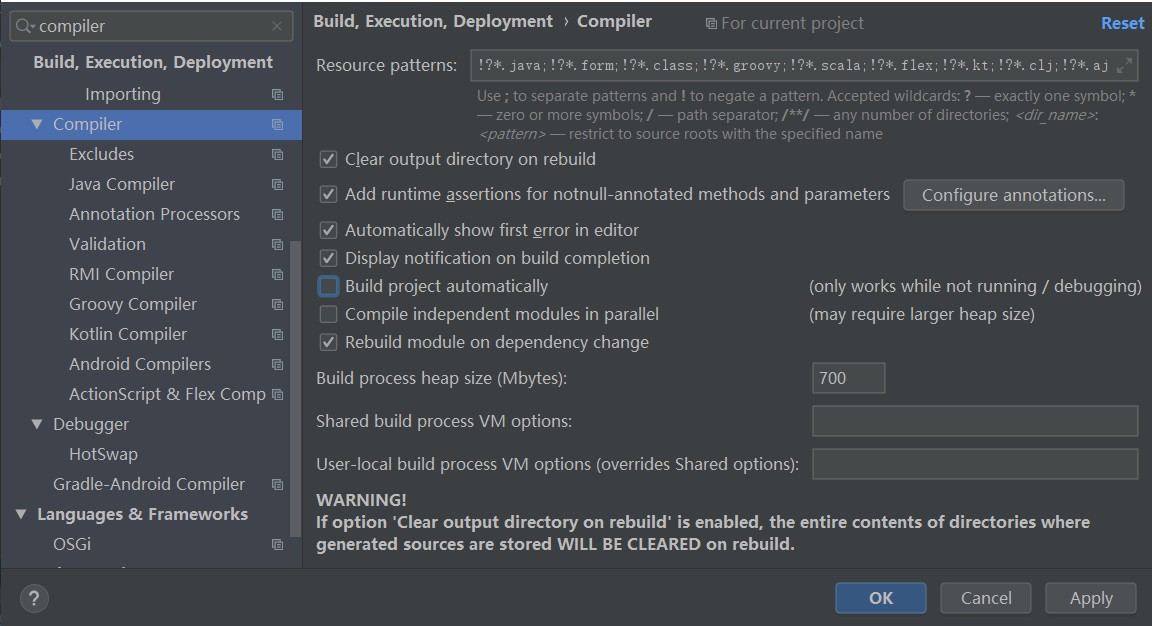
首先ctrl+alt+s打开设置(Other Settings 的设置是对整个工作空间项目都启作用,而Settings…的设置是对整个项目启作用),搜索Compliler,勾选Build project automatically,如下图所示:

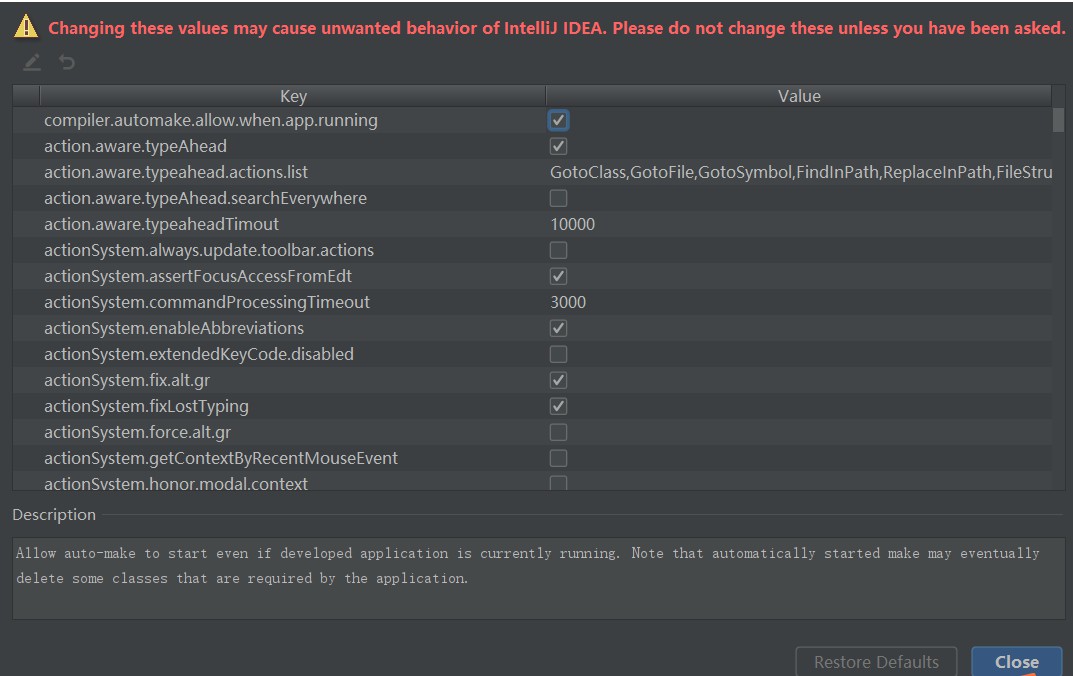
5.按住ctrl + shift + alt + /,出现如下图所示界面,点击Registry...,如下图:

点击进入后,勾选compiler.automake.allow.when.app.running后关闭即可

通过以上步骤,就完成了SpringBoot项目的热部署功能!!!
6.对热部署测试是否成功:
|
1
2
3
4
5
6
7
8
9
10
11
12
13
14
15
|
package com.devtoolsDemo.devtoolsDemo.controller;import org.springframework.web.bind.annotation.RequestMapping;import org.springframework.web.bind.annotation.RestController;@RestController@RequestMapping("/hello")public class HelloDemo { @RequestMapping("/index") public String index() { return "helloworld!"; } } |
启动项目,通过浏览器输入地址:http://localhost:8080/hello/index
结果如下:

新加请求,在不重新启动项目的情况下测试热部署是否配置成功~~~
|
1
2
3
4
5
6
7
8
9
10
11
12
13
14
15
16
17
18
19
20
|
package com.devtoolsDemo.devtoolsDemo.controller;import org.springframework.web.bind.annotation.RequestMapping;import org.springframework.web.bind.annotation.RestController;@RestController@RequestMapping("/hello")public class HelloDemo { @RequestMapping("/index") public String index() { return "helloworld!"; } @RequestMapping("/say") public String say(){ return "I love Java!"; }} |
测试新加请求是否成功,浏览器输入http://localhost:8080/hello/say后结果如下:

说明我们的热部署配置生效啦~~~
最新文章
- jquery-leonaScroll-1.3-自定义竖向自适应滚动条插件
- FAT32 FAT区__FAT表解析
- Bug:播放页面自动跳到首页
- [转]正确使用SQLCipher来加密Android数据库 - 朝野布告
- C++面试题:list和vector有什么区别?
- UVA 705 Slash Maze
- PHP自学之路---报表及绘图技术
- js点击button按钮跳转到另一个新页面
- PHP读取Excel文件(PHPExcel)
- 基于权限安全框架Shiro的登录验证功能实现
- bzoj 4565 状压区间dp
- 任务型对话(一)—— NLU(意识识别和槽值填充)
- IT题库3-线程实现的方式
- Retrofit2 完全解析 探索与okhttp之间的关系
- _itemmod_gem_limit
- 廖雪峰Java5集合-6Stack-1使用Stack
- Java分布式锁的三种实现方案(redis)
- read temperature
- easyui datebox 只选择月份的方法
- import 如何工作
热门文章
- RayLink 远控软件又推出 2 个重磅宝藏功能免费用
- Flink Application Development DataStream API Event Time--Flink应用开发DataStream API事件时间
- 记一次couchbase(memcached)安装以及使用
- go-bindata安装问题
- docker容器生命周期管理
- Expected indentation of 2 spaces but found 4
- 暑假学习二 8.24 Hadoop的环境配置
- win10任务栏图标设置“不合并标签但隐藏文字”
- 突然连不上虚拟机,本地网络里没有VMnet8
- FPGAUSB控制器编程