RHCA-openstack学习部署笔记-CL210
笔记说明:目前考试是基于RHELOSP13(32G)来进行环境部署,引入了容器,而学习是基于RHELOSP6来安装部署的,基于Openstack。
讨论:openstack、虚拟化和云计算的关系以及区别是什么?
答:Openstack自身是不提供虚拟化技术的,调用多种技术实现多资源池的管理,对外提供统一的接口,只是系统的控制面;而虚拟化是openstack底层的技术实现手段之一,并非核心关注点,它主要是环境隔离、资源复用、降低隔离损耗,提升运行效率,提供高级虚拟化特性,虚拟化是云计算的基础;openstack只是构成云计算的关键组件,如内核、骨干、框架、总线,所以openstack不是云计算也不是虚拟化。云计算是一种服务,其本质就是为用户提供优质的服务,利用虚拟化技术、分布式技术、软件定义等技术为用户提供便捷、简单、准确、可用、按需所取的服务。
一、部署方案和规划
1、由于我自己的电脑是24G内存,所有采用以下部署方案:
| 节点名称 | 内存分配 | cpu分配 | 磁盘分配 | 网卡分配 | 备注 | IP地址 |
| controller节点 | 8G | 4cpus | 100G | 2块网卡 | 复用为compute节点 | net1:192.168.122.132 /24 |
| compute节点 | 4G | 4cpus | 100G | 2块网卡 | compute计算节点 | net1:192.168.122.134 /24 |
| ntp节点(master) | 1G | 1cpus | 20G | 2块网卡 | ntp必须单独部署,不可以与控制节点和计算节点复用 | net1:192.168.122.136 /24 |
2、使用到的镜像下载地址
(1)rhel-server-7.1-x86_64-dvd 提取码:8j4z
(2)RHEL7OSP-6.0-2015-02-23.2-x86_64 提取码:3fiw
二、部署openstack教程
1、NTP节点操作(备注:可以使用除RHEL7.1以外的CentOS7系列版本)
(1)关闭selinux、防火墙。开机不自启,设置主机名
setenforce 0

sed -i s/^SELINUX=.*$/SELINUX=disabled/ /etc/selinux/config

systemctl stop firewalld && systemctl disable firewalld

hostnamectl set-hostname  master
(2)设置/etc/hosts文件
vim /etc/hosts

127.0.0.1   localhost localhost.localdomain localhost4 localhost4.localdomain4

::1         localhost localhost.localdomain localhost6 localhost6.localdomain6

192.168.122.132 controller

192.168.122.134 compute01

192.168.122.136 master
(3)查看磁盘大小、并在根/目录下创建iso目录、上传镜像到此目录,在/var/www/html目录下创建rhel7和openstack两个目录
df -h

cd / && mkdir iso / && cd iso/

ls
cd /var/www/html

mkdir rhel7

mkdir openstack
(4)编辑/etc/fstab设置自动挂载,保存完后全部挂载
vim /etc/fstab

/iso/rhel-server-7.1-x86_64-dvd.iso /var/www/html/rhel7 iso9660 defaults 0 0

/iso/RHEL7OSP-6.0-2015-02-23.2-x86_64.iso /var/www/html/openstack iso9660 defaults 0 0

mount -a
(5)编写rhel7和openstack的yum源仓库,然后将rhel7.repo和openstack.repo拷贝到/var/www/html目录下
点击查看代码
vim /etc/yum.repos.d/rhel7.repo

[rhel7.1]

name=rhel7.1

baseurl=http://192.168.122.136/rhel7/

gpgcheck=0

enabled=1
点击查看代码
vim /etc/yum.repos.d/openstack.repo

[RH7-RHOS-6.0]

name=RH7-RHOS-6.0

baseurl=http://192.168.122.136/openstack/RH7-RHOS-6.0/

gpgcheck=0

enabled=1

[RH7-RHOS-6.0-Installer]

name=RH7-RHOS-6.0-Installer

baseurl=http://192.168.122.136/openstack/RH7-RHOS-6.0-Installer/

gpgcheck=0

enabled=1

[RHEL-7-RHSCL-1.2]

name=RHEL-7-RHSCL-1.2

baseurl=http://192.168.122.136/openstack/RHEL-7-RHSCL-1.2/

gpgcheck=0

enabled=1

[RHEL7-Errata]

name=RHEL7-Errata

baseurl=http://192.168.122.136/openstack/RHEL7-Errata/

gpgcheck=0

enabled=1
(6)yum安装必要的软件包bash-com*、wget、vim、httpd、ansible等
yum install -y httpd vim bash-com* wget ansible(7)配置chrony时间同步,我这台ntp可以连外网,所以我和阿里云的ntp服务器做同步
点击查看代码
# Use public servers from the pool.ntp.org project.

# Please consider joining the pool (http://www.pool.ntp.org/join.html).

#server 0.centos.pool.ntp.org iburst

#server 1.centos.pool.ntp.org iburst

#server 2.centos.pool.ntp.org iburst

#server 3.centos.pool.ntp.org iburst

server ntp.aliyun.com iburst

# Record the rate at which the system clock gains/losses time.

driftfile /var/lib/chrony/drift

# Allow the system clock to be stepped in the first three updates

# if its offset is larger than 1 second.

makestep 1.0 3

# Enable kernel synchronization of the real-time clock (RTC).

rtcsync

# Enable hardware timestamping on all interfaces that support it.

#hwtimestamp *

# Increase the minimum number of selectable sources required to adjust

# the system clock.

#minsources 2

# Allow NTP client access from local network.

allow 192.168.122.0/24

# Serve time even if not synchronized to a time source.

#local stratum 10          #如何没连接外网,就把这个注释取消了,允许使用本地

# Specify file containing keys for NTP authentication.

#keyfile /etc/chrony.keys

# Specify directory for log files.

logdir /var/log/chrony

# Select which information is logged.

#log measurements statistics tracking
(8)重启httpd服务和chrony服务并设置开机自启
systemctl restart httpd && systemctl enable httpd && systemctl restart chronyd.service && systemctl enable chronyd(9)开启网络时间同步以及ntp服务状态
timedatectl set-ntp true

chronyc sourcestats
2、controller和compute节点操作
方法一:
【1】相同操作
(1)重复NTP节点(1)、(2)操作
(2)下载192.168.122.136的本地yum源
wget -O /etc/yum.repos.d/rhel7.repo http://192.168.122.136/rhel7.repo

wget -O /etc/yum.repos.d/openstack.repo http://192.168.122.136/openstack.repo

yum clean all

yum makecache
(3)进行ntp时间同步
vim /etc/chrony.conf

server 192.168.122.136

systemctl enable chronyd && systemctl restart chronyd

ntpdate 192.168.122.136

chronyc sources
(4)将控制节点和计算节点进行升级(实验环境可这样操作,生产环境切记不能这么操作)然后重启机器
yum -y update

reboot
【2】不同操作
(1)在controller节点上安装自动化工具openstack-packstack(OPS6基于pupput自动化工具搞的)并生成自动化配置文件(应答文件)
yum install openstack-packstack

packstack --help | grep answer

packstack --gen-answer-file=answer.txt   #生成名字answer.txt的应答文件
(2)在controller上修改应答文件,NTP、CONTROLLER、COMPUTE、NETWORK、HORIZON_SSL、DEMO、ADMIN、REGION等配置文件
CONFIG_NTP_SERVERS=192.168.122.136 #NTP时间服务器的地址
CONFIG_CONTROLLER_HOST=192.168.122.132 #设置控制节点地址
CONFIG_COMPUTE_HOSTS=192.168.122.132,192.168.122.134 #设置计算节点地址
CONFIG_NETWORK_HOSTS=192.168.122.132 #设置网络节点(neutron复用控制节点)
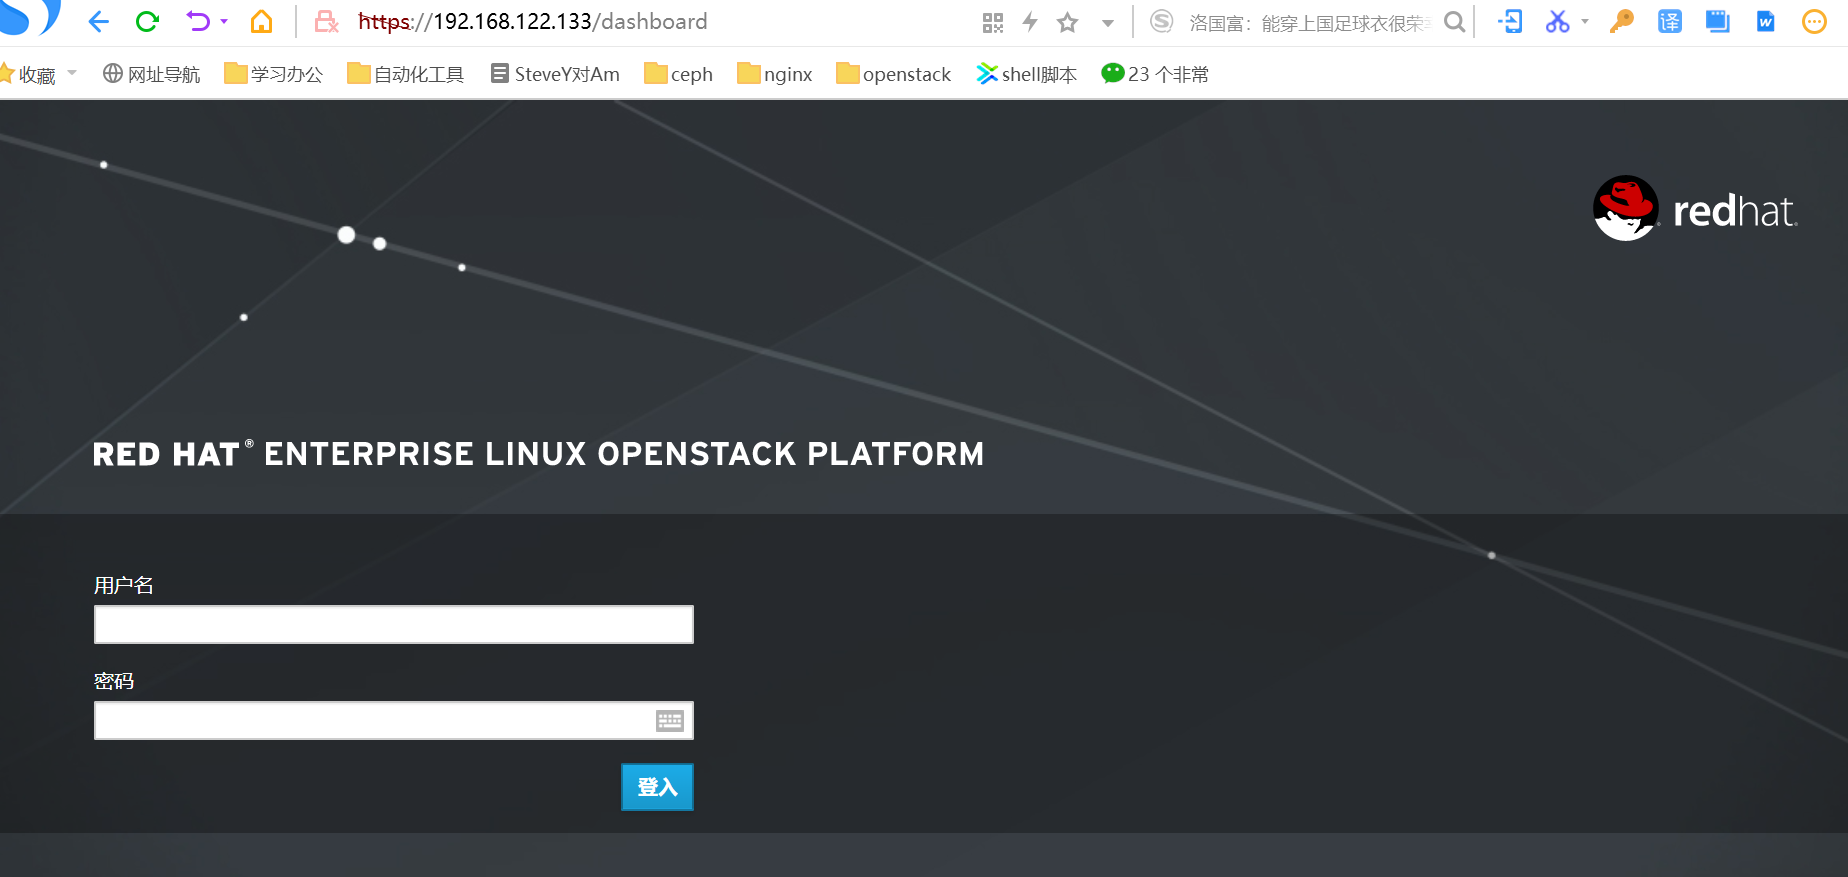
CONFIG_HORIZON_SSL=y #要HORIZON的SSL加密
CONFIG_PROVISION_DEMO=n #不开启演示 all-in-one 一般是测试用的
CONFIG_KEYSTONE_ADMIN_PW=redhat #配置登陆密码
CONFIG_KEYSTONE_REGION=BeiJing #配置区域为BeiJing(3)在controller上执行应答文件,自动部署openstack
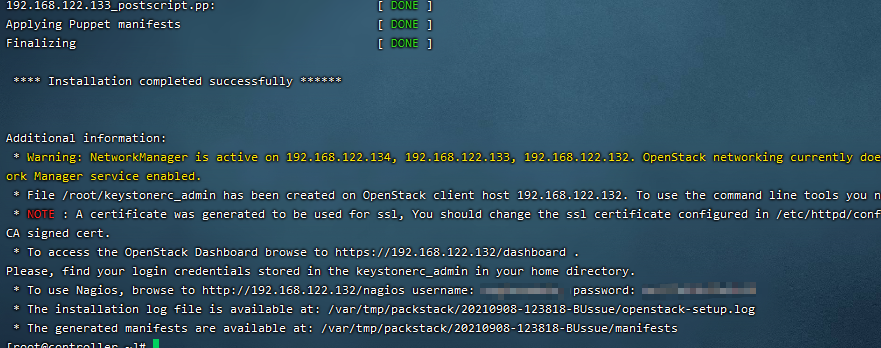
packstack --answer-file=answer.txt
(4)部署成功图
最新文章
- 1、linux网络服务实验 用PuTTY连接Linux
- Node.js 学习资源
- 在Ubuntu 14.04中安装最新版Eclipse
- Daily Scrum 11.9
- 雷军北大演讲:除了聪明和勤奋我们还需要什么(关键是有了梦想以后,你能不能把这个东西付诸实践)good
- ZooKeeper介绍,安装,配置文件解析
- nyoj940 A dp problem 打表
- 【译】Java、Kotlin、RN、Flutter 开发出来的 App 大小,你了解过吗?
- 申请JetBrains学生免费注册码
- Anaconda python环境管理
- 添加jar包到本地Maven仓库
- 【Luogu3731】[HAOI2017]新型城市化(网络流,Tarjan)
- QT 开发小记
- mariadb-主主
- 一个例子来看C#泛型是如何登场的
- 20165211 2017-2018-2 《Java程序设计》第6周学习总结
- 在windows 下将 chm 格式的文件 转换成 html 的文件
- HBase介绍及简易安装
- LintCode 407: Plus One
- python基础(12)--初识Socket
热门文章
- 前端知识点--CSS overflow 属性
- synchronized 加锁 this 和 class 的区别!
- 使用vue实现用户管理 添加及删除功能
- SQL语句(五)子查询
- 仅用CSS实现图片渲染特效 (有学习到了)
- Ubuntu开启SSH端口并且搭建Vulhub环境
- VMware 安装 Centos 7 虚拟机配置网络
- 35岁Android程序员被阿里辞退,生活压力太大痛哭,中年危机如何自救?
- 关于:org.apache.catalina.connector.ClientAbortException及getOutputStream() has already been called for this response的异常处理
- rancher恢复kubecfg配置文件