第八周作业-N67044-张铭扬
1. 完成ftp的mysql虚拟用户
数据库服务器:10.0.0.152
FTP服务器:10.0.0.156
#配置数据库服务器

[root@centos8 ~]# yum -y install mariadb-server

[root@centos8 ~]# systemctl enable --now mariadb-service

Failed to enable unit: Unit file mariadb-service.service does not exist.

[root@centos8 ~]# systemctl enable --now mariadb.service

Created symlink /etc/systemd/system/mysql.service → /usr/lib/systemd/system/mariadb.service.

Created symlink /etc/systemd/system/mysqld.service → /usr/lib/systemd/system/mariadb.service.

Created symlink /etc/systemd/system/multi-user.target.wants/mariadb.service → /usr/lib/systemd/system/mariadb.service.

[root@centos8 ~]# mysql

MariaDB [(none)]> create database vsftpd;

Query OK, 1 row affected (0.000 sec)

MariaDB [(none)]> use vsftpd;

Database changed

MariaDB [vsftpd]> create table users(id int AUTO_INCREMENT NOT NULL PRIMARY KEY,name CHAR(50) BINARY NOT NULL,password CHAR(48) BINARY NOT NULL);

Query OK, 0 rows affected (0.004 sec)

MariaDB [vsftpd]> insert into users(name,password) values('ftp_zhang',password('123456'));

Query OK, 1 row affected (0.012 sec)

MariaDB [vsftpd]> insert into users(name,password) values('ftp_linux',password('123456'));

Query OK, 1 row affected (0.001 sec)

MariaDB [vsftpd]> select * from users;

+----+-----------+-------------------------------------------+

| id | name      | password                                  |

+----+-----------+-------------------------------------------+

|  1 | ftp_zhang | *6BB4837EB74329105EE4568DDA7DC67ED2CA2AD9 |

|  2 | ftp_linux | *6BB4837EB74329105EE4568DDA7DC67ED2CA2AD9 |

+----+-----------+-------------------------------------------+

2 rows in set (0.000 sec)
MariaDB [vsftpd]> grant select on vsftpd.* to vsftpd@'10.0.0.%' identified by '123456';
Query OK, 0 rows affected (0.001 sec)
MariaDB [vsftpd]> flush privileges;
Query OK, 0 rows affected (0.001 sec)
#布置FTP服务器

[root@centos7 ~]# yum -y install vsftpd

[root@centos7 ~]# yum -y install gcc gcc-c++ make mariadb-devel pam-devel

#下载pam-mysql源码进行编译

[root@centos7 ~]#wget http://prdownloads.sourceforge.net/pam-mysql/pam_mysql0.7RC1.tar.gz

[root@centos7 ~]# tar xvf pam_mysql-0.7RC1.tar.gz

[root@centos7 ~]# cd pam_mysql-0.7RC1

[root@centos7 pam_mysql-0.7RC1]# ./configure --with-pam-mods-dir=/lib64/security

[root@centos7 pam_mysql-0.7RC1]# make install

[root@centos7 ~]# vim /etc/pam.d/vsftpd.mysql

[root@centos7 ~]# cat /etc/pam.d/vsftpd.mysql

auth required pam_mysql.so user=vsftpd passwd=123456 host=10.0.0.152 db=vsftpd table=users usercolumn=name passwdcolumn=password crypt=2

account required pam_mysql.so user=vsftpd passwd=123456 host=10.0.0.152 db=vsftpd table=users usercolumn=name passwdcolumn=password crypt=2

#建立相应用户和修改vsftpd配置文件

[root@centos7 ~]# useradd -s /sbin/nologin -d /data/ftproot -r vuser

[root@centos7 ~]# mkdir -pv /data/ftproot/upload

mkdir: created directory ‘/data/ftproot’

mkdir: created directory ‘/data/ftproot/upload’

[root@centos7 ~]# setfacl -m u:vuser:rwx /data/ftproot/upload

[root@centos7 ~]# vim /etc/vsftpd/vsftpd.conf

#添加以下两行

guest_enable=YES

guest_username=vuser

#修改

pam_service_name=vsftpd.mysql

[root@centos7 ~]# systemctl enable --now vsftpd

Created symlink from /etc/systemd/system/multi-user.target.wants/vsftpd.service to /usr/lib/systemd/system/vsftpd.service.
#在客户端登录

[root@centos8 ~]# ftp 10.0.0.156

Connected to 10.0.0.156 (10.0.0.156).

220 (vsFTPd 3.0.2)

Name (10.0.0.156:root): ftp_zhang

331 Please specify the password.

Password:

230 Login successful.

Remote system type is UNIX.

Using binary mode to transfer files.

ftp> pwd

257 "/"

ftp> ls

227 Entering Passive Mode (10,0,0,156,75,17).

150 Here comes the directory listing.

drwxrwxr-x    2 0        0               6 Sep 06 15:40 upload

226 Directory send OK.

ftp> exit

221 Goodbye.

[root@centos8 ~]# ftp 10.0.0.156

Connected to 10.0.0.156 (10.0.0.156).

220 (vsFTPd 3.0.2)

Name (10.0.0.156:root): ftp_linux

331 Please specify the password.

Password:

230 Login successful.

Remote system type is UNIX.

Using binary mode to transfer files.

ftp> pwd

257 "/"
#在FTP服务器上配置虚拟用户具有不同的访问权限

[root@centos7 ~]# vim /etc/vsftpd/vsftpd.conf

user_config_dir=/etc/vsftpd/conf.d/

[root@centos7 ~]# mkdir /etc/vsftpd/conf.d/

[root@centos7 ~]# vim /etc/vsftpd/conf.d/ftp_zhang

[root@centos7 ~]# cat /etc/vsftpd/conf.d/ftp_zhang

non_upload_enable=YES

anon_mkdir_write_enable=YES

anon_other_write_enable=YES

local_root=/data/ftproot1

[root@centos7 ~]# #mkdir -pv /data/ftproot/upload

[root@centos7 ~]# mkdir -pv /data/ftproot1/upload

mkdir: created directory ‘/data/ftproot1’

mkdir: created directory ‘/data/ftproot1/upload’

[root@centos7 ~]# chown vuser.vuser /data/ftproot1/upload/

[root@centos7 ~]# ll -d /data/ftproot1/upload/

drwxr-xr-x 2 vuser vuser 6 Sep  7 00:17 /data/ftproot1/upload/

[root@centos7 ~]# systemctl restart vsftpd
2. 完成rsyslog远程日志收集,及采集mysql日志。
rsyslog服务器:10.0.0.152
mariadb服务器:10.0.0.153
[root@rsyslog ~]# yum -y install rsyslog-mysql

[root@rsyslog ~]# scp /usr/share/doc/rsyslog/mysql-createDB.sql 10.0.0.153:/data

The authenticity of host '10.0.0.153 (10.0.0.153)' can't be established.

ECDSA key fingerprint is SHA256:1ncw1W9JSRN6C3N37UgzhsUcubjSL2BG/AihY10VQ1k.

Are you sure you want to continue connecting (yes/no/[fingerprint])? yes

Warning: Permanently added '10.0.0.153' (ECDSA) to the list of known hosts.

root@10.0.0.153's password:

mysql-createDB.sql

[root@rsyslog ~]# vim /etc/rsyslog.conf

####MODULES####

module(load="ommysql")

####RULES####

#facility.priority   :ommysql:DBHOST,DBNAME,DBUSER, PASSWORD

*.info :ommysql:10.0.0.18,Syslog,rsyslog,magedu

[root@rsyslog ~]# systemctl restart rsyslog.service
[root@mariadb ~]# yum -y install mariadb-server

[root@mariadb ~]# systemctl start mariadb

[root@mariadb data]# mysql

Welcome to the MariaDB monitor.  Commands end with ; or \g.

Your MariaDB connection id is 9

Server version: 10.3.28-MariaDB MariaDB Server

Copyright (c) 2000, 2018, Oracle, MariaDB Corporation Ab and others.

Type 'help;' or '\h' for help. Type '\c' to clear the current input statement.

MariaDB [(none)]> source /data/mysql-createDB.sql

Query OK, 1 row affected (0.000 sec)

Database changed

Query OK, 0 rows affected (0.014 sec)

Query OK, 0 rows affected (0.003 sec)

MariaDB [Syslog]> show databases;

+--------------------+

| Database           |

+--------------------+

| Syslog             |

| information_schema |

| mysql              |

| performance_schema |

+--------------------+

4 rows in set (0.000 sec)

MariaDB [Syslog]> grant all on Syslog.* to rsyslog@'10.0.0.%' identified by '123456';

Query OK, 0 rows affected (0.000 sec)
测试
[root@rsyslog ~]# logger "this is a test log"

#mariadb服务器

MariaDB [Syslog]> select * from SystemEvents\G;

*************************** 9. row ***************************

                ID: 9

        CustomerID: NULL

        ReceivedAt: 2022-09-10 13:20:03

DeviceReportedTime: 2022-09-10 13:20:03

          Facility: 1

          Priority: 5

          FromHost: rsyslog

           Message: this is a test log

        NTSeverity: NULL

        Importance: NULL

       EventSource: NULL

         EventUser: NULL

     EventCategory: NULL

           EventID: NULL

   EventBinaryData: NULL

      MaxAvailable: NULL

         CurrUsage: NULL

          MinUsage: NULL

          MaxUsage: NULL

        InfoUnitID: 1

         SysLogTag: root[1334]:

      EventLogType: NULL

   GenericFileName: NULL

          SystemID: NULL

9 rows in set (0.000 sec)
3. 解析ftp主动和被动模式工作原理。
主动模式:户端向服务器的FTP端口发送连接请求,服务器接受连接,建立一条命令链路。当需要传送数据时,客户端在命令链路上用PORT命令告诉服务器:“我打开了XXXX端口,你过来连接我”。于是服务器向客户端的XXXX端口发送连接请求,建立一条数据链路来传送数据。
被动模式:客户端向服务器的FTP端口发送连接请求,服务器接受连接,建立一条命令链路。当需要传送数据时,服务器在命令链路上用PASV命令告诉客户端:“我打开了XXXX端口,你过来连接我”。于是客户端向服务器的XXXX端口发送连接请求,建立一条数据链路来传送数据。
4. 利用sesync, inotify分别实现数据备份
基于rsync daemon 实现 sersync
#备份服务器

[root@backup-server ~]# yum -y install rsync-deamon

[root@backup-server ~]# vim /etc/rsyncd.conf

uid = root

gid = root

max connections = 0

ignore errors

exclude = lost+found/

log file = /var/log/rsyncd.log

pid file = /var/run/rsyncd.pid

lock file = /var/run/rsyncd.lock

reverse lookup = no

[backup]

path = /data/backup/

comment = backup dir

read only = no

auth users = rsyncuser

secrets file = /etc/rsync.pas

[root@backup-server ~]# mkdir /data/backup/

[root@backup-server ~]# echo "rsyncuser:zhang" > /etc/rsync.pas

[root@backup-server ~]# chmod 600 /etc/rsync.pas

[root@backup-server ~]# systemctl start rsyncd
#数据服务器

[root@data-server ~]# yum -y install rsync

[root@data-server ~]# rsync rsync://10.0.0.153

backup             backup dir

[root@data-server ~]# rsync     rsync://rsyncuser@10.0.0.153/backup

Password:

drwxr-xr-x              6 2022/09/16 23:37:16

[root@data-server ~]# tar xf sersync2.5.4_64bit_binary_stable_final.tar.gz

[root@data-server ~]# ls

anaconda-ks.cfg  GNU-Linux-x86  reset_centos.sh  sersync2.5.4_64bit_binary_stable_final.tar.gz

[root@data-server ~]# cd GNU-Linux-x86/

[root@data-server GNU-Linux-x86]# ls

confxml.xml  sersync2

[root@data-server GNU-Linux-x86]# cd

[root@data-server ~]# mv GNU-Linux-x86/ /usr/local/sersync

[root@data-server ~]# ln /usr/local/sersync/sersync2  /usr/bin/

[root@data-server sersync]# vim confxml.xml

<attrib start="true"/>

 <sersync>

 <localpath watch="/data/www">

   <remote ip="10.0.0.153" name="backup"/>

<auth start="true" users="rsyncuser" passwordfile="/etc/rsync.pas"/>
[root@data-server www]# sersync2 -dro /usr/local/sersync/confxml.xml
set the system param
execute:echo 50000000 > /proc/sys/fs/inotify/max_user_watches
execute:echo 327679 > /proc/sys/fs/inotify/max_queued_events
parse the command param
option: -d run as a daemon
option: -r rsync all the local files to the remote servers before the sersync work
option: -o config xml name: /usr/local/sersync/confxml.xml
daemon thread num: 10
parse xml config file
host ip : localhost host port: 8008
daemon start,sersync run behind the console
use rsync password-file :
user is rsyncuser
passwordfile is /etc/rsync.pas
config xml parse success
please set /etc/rsyncd.conf max connections=0 Manually
sersync working thread 12 = 1(primary thread) + 1(fail retry thread) + 10(daemon sub threads)
Max threads numbers is: 22 = 12(Thread pool nums) + 10(Sub threads)
please according your cpu ,use -n param to adjust the cpu rate
------------------------------------------
rsync the directory recursivly to the remote servers once
working please wait...
execute command: cd /data/www && rsync -artuz -R --delete ./ rsyncuser@10.0.0.153::backup --password-file=/etc/rsync.pas >/dev/null 2>&1
run the sersync:
watch path is: /data/www
数据服务器:10.0.0.152
备份服务器:10.0.0.153
#备份服务器

[root@centos8 ~]# yum -y install rsync

[root@centos8 ~]# touch /etc/rsyncd.conf

[root@centos8 ~]# rsync --daemon

[root@centos8 ~]# ss -ntl

State     Recv-Q    Send-Q       Local Address:Port         Peer Address:Port    Process

LISTEN    0         5                  0.0.0.0:873               0.0.0.0:*

LISTEN    0         128                0.0.0.0:111               0.0.0.0:*

LISTEN    0         128                0.0.0.0:22                0.0.0.0:*

LISTEN    0         5                     [::]:873                  [::]:*

LISTEN    0         128                   [::]:111                  [::]:*

LISTEN    0         128                   [::]:22                   [::]:*

[root@centos8 ~]# vim /etc/rsyncd.conf

[root@centos8 ~]# mkdir /data/backup

[root@centos8 ~]# cat /etc/rsyncd.conf

[backup]

path = /data/backup/

read only = no

[root@centos8 ~]# rsync --daemon

#数据服务器

[root@centos8 ~]# yum -y install rsync

[root@centos8 ~]# rsync rsync://10.0.0.153

backup
#备份服务器

[root@centos8 ~]# setfacl -m u:nobody:rwx /data/backup/

#数据服务器

[root@centos8 ~]# rsync /etc/networks   root@10.0.0.153::backup

#备份服务器

[root@centos8 ~]# ll /data/backup/

total 4

-rw-r--r--. 1 nobody nobody 58 Sep 12 23:17 networks
[root@data-server etc]# vim inotify_rsync.sh

[root@data-server etc]# cat inotify_rsync.sh

#!/bin/bash

SRC='/data/www'

DEST='rsyncuser@10.0.0.153::backup'

inotifywait -mrp --exclude=".*\.swp" --timefmt '%Y-%m-%d %H:%M:%S' --format '%T %W %F' -e create,delete,moved_to,close_write,attrib ${SRC} | while read DATE TIME DIR FILE ;

do

    FILEPATH=${DIR}${FILE}

    rsync -az -delete --password-file==/etc/rsync.pas $SRC $DEST && echo "At ${TIME} on ${DATE}, file $FILEPATH was backuped up via rsync" >> /var/log/changelist.log

done

[root@data-server etc]# bash inotify_rsync.sh

[root@backup-server backup]# watch -n0.5 ls -l /data/backup/
5. 解析LVS调度算法及几种工作模式原理,实现LVS+DR高可用nginx。
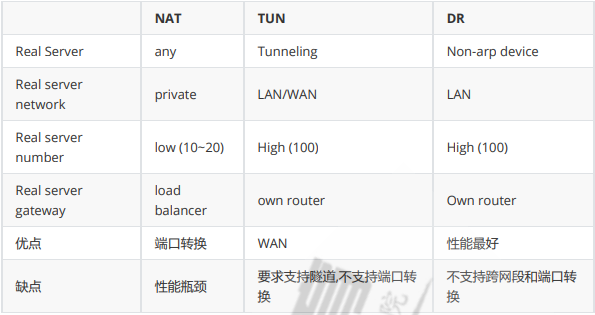
LVS集群的工作模式
lvs-nat:修改请求报文的目标IP,多目标IP的DNAT
lvs-dr:操纵封装新的MAC地址
lvs-tun:在原请求IP报文之外新加一个IP首部
lvs-fullnat:修改请求报文的源和目标IP
LVS的NAT模式
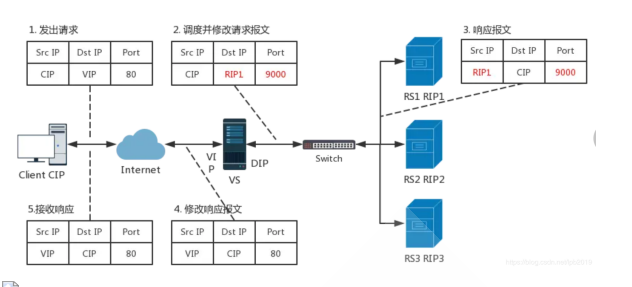
lvs-nat:本质是多目标IP的DNAT,通过将请求报文中的目标地址和目标端口修改为某挑出的RS的RIP和 PORT实现转发
(1)RIP和DIP应在同一个IP网络,且应使用私网地址;RS的网关要指向DIP
(2)请求报文和响应报文都必须经由Director转发,Director易于成为系统瓶颈
(3)支持端口映射,可修改请求报文的目标PORT
(4)VS必须是Linux系统,RS可以是任意O
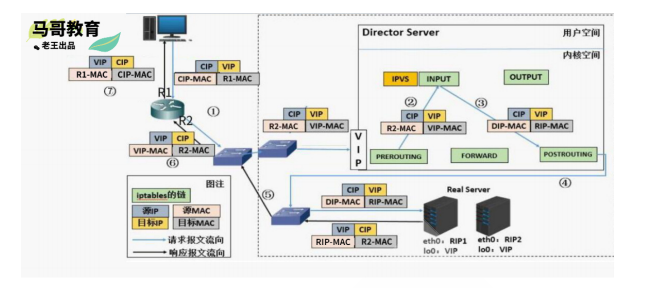
LVS的DR模式
LVS-DR:Direct Routing,直接路由,LVS默认模式,应用最广泛,通过为请求报文重新封装一个MAC首部 进行转发,源MAC是DIP所在的接口的MAC,目标MAC是某挑选出的RS的RIP所在接口的MAC地址;源 IP/PORT,以及目标IP/PORT均保持不变
1. Director和各RS都配置有VIP
2. 确保前端路由器将目标IP为VIP的请求报文发往Director
在前端网关做静态绑定VIP和Director的MAC地址
在RS上使用arptables工具
在RS上修改内核参数以限制arp通告及应答级别
3. RS的RIP可以使用私网地址,也可以是公网地址;RIP与DIP在同一IP网络;RIP的网关不能指向 DIP,以确保响应报文不会经由Director
4. RS和Director要在同一个物理网络
5. 请求报文要经由Director,但响应报文不经由Director,而由RS直接发往Client
6. 不支持端口映射(端口不能修改)
7. 无需开启 ip_forward 8. RS可使用大多数OS系统
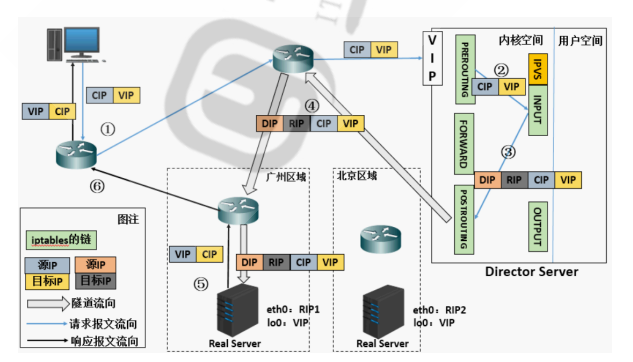
LVS的TUN模式
转发方式:不修改请求报文的IP首部(源IP为CIP,目标IP为VIP),而在原IP报文之外再封装一个IP首部 (源IP是DIP,目标IP是RIP),将报文发往挑选出的目标RS;RS直接响应给客户端(源IP是VIP,目标IP 是CIP)
TUN模式特点:
1. RIP和DIP可以不处于同一物理网络中,RS的网关一般不能指向DIP,且RIP可以和公网通信。也就是 说集群节点可以跨互联网实现。DIP, VIP, RIP可以是公网地址
2. RealServer的tun接口上需要配置VIP地址,以便接收director转发过来的数据包,以及作为响应的 报文源IP
3. Director转发给RealServer时需要借助隧道,隧道外层的IP头部的源IP是DIP,目标IP是RIP,而 RealServer响应给客户端的IP头部是根据隧道内层的IP头分析得到的,源IP是VIP,目标IP是CIP
4. 请求报文要经由Director,但响应不经由Director,响应由RealServer自己完成
5. 不支持端口映射
6. RS的OS须支持隧道功能
LVS工作模式总结和比较
LVS 调试算法
ipvs scheduler:根据其调度时是否考虑各RS当前的负载状态分为两种:静态方法和动态方法
1.静态方法
1、RR:roundrobin,轮询,较常用
2、WRR:Weighted RR,加权轮询,较常用
3、SH:Source Hashing,实现session sticky,源IP地址hash;将来自于同一个IP地址的请求始终发往 第一次挑中的RS,从而实现会话绑定
4、DH:Destination Hashing;目标地址哈希,第一次轮询调度至RS,后续将发往同一个目标地址的 请求始终转发至第一次挑中的RS,典型使用场景是正向代理缓存场景中的负载均衡,如: Web缓存
2. 动态方法
1、LC:least connections 适用于长连接应用
Overhead=activeconns*256+inactiveconns
2、WLC:Weighted LC,默认调度方法,较常用
Overhead=(activeconns*256+inactiveconns)/weight
3、SED:Shortest Expection Delay,初始连接高权重优先,只检查活动连接,而不考虑非活动连接
Overhead=(activeconns+1)*256/weight
4、NQ:Never Queue,第一轮均匀分配,后续SED
5、LBLC:Locality-Based LC,动态的DH算法,使用场景:根据负载状态实现正向代理,实现Web Cache等
6、LBLCR:LBLC with Replication,带复制功能的LBLC,解决LBLC负载不均衡问题,从负载重的复制 到负载轻的RS,,实现Web Cache等
内核版本 4.15 版本后新增调度算法:FO和OVF
FO(Weighted Fail Over)调度算法,在此FO算法中,遍历虚拟服务所关联的真实服务器链表,找到还未 过载(未设置IP_VS_DEST_F_OVERLOAD标志)的且权重最高的真实服务器,进行调度,属于静态算法
OVF(Overflow-connection)调度算法,基于真实服务器的活动连接数量和权重值实现。将新连接调度 到权重值最高的真实服务器,直到其活动连接数量超过权重值,之后调度到下一个权重值最高的真实服 务器,在此OVF算法中,遍历虚拟服务相关联的真实服务器链表,找到权重值最高的可用真实服务器。属于动态算法
一个可用的真实服务器需要同时满足以下条件:
未过载(未设置IP_VS_DEST_F_OVERLOAD标志)
真实服务器当前的活动连接数量小于其权重值
其权重值不为零
实现LVS+DR高可用nginx
环境:五台主机

一台:客户端 eth0:仅主机 192.168.10.6/24 GW:192.168.10.200

一台:ROUTER

eth0 :NAT  10.0.0.200/24

eth1: 仅主机 192.168.10.200/24

启用 IP_FORWARD

一台:LVS

eth0:NAT:DIP:10.0.0.154/24 GW:10.0.0.200

两台RS:

RS1:eth0:NAT:10.0.0.156/24   GW:10.0.0.200

RS2:eth0:NAT:10.0.0.157/24 GW:10.0.0.200
#客户端网络配置

root@ubuntu18:~# cat /etc/netplan/eth0.yaml

# This file describes the network interfaces available on your system

# For more information, see netplan(5).

network:

  version: 2

  renderer: networkd

  ethernets:

    eth0:

      addresses: [192.168.10.6/24]

      gateway4: 192.168.10.200

root@ubuntu18:~# netplan apply

root@ubuntu18:~# route -n

Kernel IP routing table

Destination     Gateway         Genmask         Flags Metric Ref    Use Iface

0.0.0.0         192.168.10.200  0.0.0.0         UG    0      0        0 eth0

192.168.10.0    0.0.0.0         255.255.255.0   U     0      0        0 eth0
#Router网络配置

[root@router ~]# cat /etc/sysconfig/network-scripts/ifcfg-eth0

DEVICE=eth0

NAME=eth0

BOOTPROTO=none

ONBOOT=yes

IPADDR=10.0.0.200

PREFIX=24

[root@router ~]# cat /etc/sysconfig/network-scripts/ifcfg-eth1

DEVICE=eth1

NAME=eth1

BOOTPROTO=none

ONBOOT=yes

IPADDR=192.168.10.200

PREFIX=24

[root@router ~]# nmcli connection reload

[root@router ~]# nmcli connection up eth0

[root@router ~]# nmcli connection

NAME  UUID                                  TYPE      DEVICE

eth0  5fb06bd0-0bb0-7ffb-45f1-d6edd65f3e03  ethernet  eth0

eth1  9c92fad9-6ecb-3e6c-eb4d-8a47c6f50c04  ethernet  eth1

#测试能否连接成功

[root@router ~]# ping 192.168.10.6

PING 192.168.10.6 (192.168.10.6) 56(84) bytes of data.

64 bytes from 192.168.10.6: icmp_seq=1 ttl=64 time=0.372 ms

[root@router ~]# ping 10.0.0.156

PING 10.0.0.156 (10.0.0.156) 56(84) bytes of data.

64 bytes from 10.0.0.156: icmp_seq=1 ttl=64 time=0.404 ms

[root@router ~]# ping 10.0.0.157

PING 10.0.0.157 (10.0.0.157) 56(84) bytes of data.

64 bytes from 10.0.0.157: icmp_seq=1 ttl=64 time=0.357 ms
#LVS网络配置

[root@centos8 ~]# cat /etc/sysconfig/network-scripts/ifcfg-eth0

DEVICE=eth0

NAME=eth0

BOOTPROTO=none

ONBOOT=yes

IPADDR=10.0.0.154

PREFIX=24

GATEWAY=10.0.0.200

[root@centos8 ~]# nmcli connection reload

[root@centos8 ~]# nmcli connection up eth0

Connection successfully activated (D-Bus active path: /org/freedesktop/NetworkManager/ActiveConnection/4)

[root@centos8 ~]# route -n

Kernel IP routing table

Destination     Gateway         Genmask         Flags Metric Ref    Use Iface

0.0.0.0         10.0.0.200      0.0.0.0         UG    100    0        0 eth0

10.0.0.0        0.0.0.0         255.255.255.0   U     100    0        0 eth0
[root@lvs ~]# ifconfig lo:1 10.0.0.100/32
[root@lvs ~]# ip a
1: lo: <LOOPBACK,UP,LOWER_UP> mtu 65536 qdisc noqueue state UNKNOWN group default qlen 1000
link/loopback 00:00:00:00:00:00 brd 00:00:00:00:00:00
inet 127.0.0.1/8 scope host lo
valid_lft forever preferred_lft forever
inet 10.0.0.100/0 scope global lo:1
valid_lft forever preferred_lft forever
inet6 ::1/128 scope host
valid_lft forever preferred_lft forever
2: eth0: <BROADCAST,MULTICAST,UP,LOWER_UP> mtu 1500 qdisc mq state UP group default qlen 1000
link/ether 00:0c:29:8e:f0:82 brd ff:ff:ff:ff:ff:ff
inet 10.0.0.154/24 brd 10.0.0.255 scope global noprefixroute eth0
valid_lft forever preferred_lft forever
inet6 fe80::20c:29ff:fe8e:f082/64 scope link
valid_lft forever preferred_lft forever
#服务器1

[root@centos7 ~]# echo 1 > /proc/sys/net/ipv4/conf/all/arp_ignore

[root@centos7 ~]# echo 2 > /proc/sys/net/ipv4/conf/all/arp_announce

[root@centos7 ~]# echo 1 > /proc/sys/net/ipv4/conf/lo/arp_ignore

[root@centos7 ~]# echo 2 > /proc/sys/net/ipv4/conf/lo/arp_announce

[root@centos7 ~]# ifconfig lo:1 10.0.0.100/32

[root@centos7 ~]# ip a

1: lo: <LOOPBACK,UP,LOWER_UP> mtu 65536 qdisc noqueue state UNKNOWN group default qlen 1000

    link/loopback 00:00:00:00:00:00 brd 00:00:00:00:00:00

    inet 127.0.0.1/8 scope host lo

       valid_lft forever preferred_lft forever

    inet 10.0.0.100/0 scope global lo:1

       valid_lft forever preferred_lft forever

    inet6 ::1/128 scope host

       valid_lft forever preferred_lft forever

2: eth0: <BROADCAST,MULTICAST,UP,LOWER_UP> mtu 1500 qdisc pfifo_fast state UP group default qlen 1000

    link/ether 00:0c:29:a9:52:80 brd ff:ff:ff:ff:ff:ff

    inet 10.0.0.156/24 brd 10.0.0.255 scope global noprefixroute eth0

       valid_lft forever preferred_lft forever

    inet6 fe80::20c:29ff:fea9:5280/64 scope link

       valid_lft forever preferred_lft forever

#服务器2相同步骤
#LVS配置

[root@lvs ~]# ipvsadm -Ln

IP Virtual Server version 1.2.1 (size=4096)

Prot LocalAddress:Port Scheduler Flags

  -> RemoteAddress:Port           Forward Weight ActiveConn InActConn

TCP  10.0.0.100:80 rr

  -> 10.0.0.156:80                Route   1      0          0

  -> 10.0.0.157:80                Route   1      0          0
root@ubuntu18:~# curl 10.0.0.100

10.0.0.156

10.0.0.157
6. 完成nginx编译安装及平滑升级
[root@centos7 ~]# useradd -s /sbin/nologin ngi
[root@centos7 ~]# cd /usr/local/src/
[root@centos7 src]# rz -E

rz waiting to receive.

[root@centos7 src]# ls

nginx-1.18.0.tar.gz

[root@centos7 src]# tar xf nginx-1.18.0.tar.gz

[root@centos7 src]# cd nginx-1.18.0

[root@centos7 nginx-1.18.0]# ./configure --prefix=/apps/nginx \

> --user=nginx \

> --group=nginx \

> --with-http_ssl_module \

> --with-http_v2_module \

> --with-http_realip_module \

> --with-http_stub_status_module \

> --with-http_gzip_static_module \

> --with-pcre \

> --with-stream \

> --with-stream_ssl_module \

> --with-stream_realip_module

[root@centos7 nginx-1.18.0]# make && make install

[root@centos7 nginx-1.18.0]# ln -s /apps/nginx/sbin/nginx  /usr/sbin/

[root@centos7 nginx-1.18.0]# chown -R nginx.nginx /apps/nginx

[root@centos7 nginx-1.18.0]# nginx -V

nginx version: nginx/1.18.0

built by gcc 4.8.5 20150623 (Red Hat 4.8.5-44) (GCC)

built with OpenSSL 1.0.2k-fips  26 Jan 2017

TLS SNI support enabled

configure arguments: --prefix=/apps/nginx --user=nginx --group=nginx --with-http_ssl_module --with-http_v2_module --with-http_realip_module --with-http_stub_status_module
--with-http_gzip_static_module --with-pcre --with-stream --with-stream_ssl_module --with-stream_realip_module
平滑升级
 wget http://nginx.org/download/nginx-1.22.0.tar.gz -P /usr/local/src

[root@centos7 src]# cd /usr/local/src/

[root@centos7 src]# ls

nginx-1.18.0  nginx-1.18.0.tar.gz  nginx-1.22.0.tar.gz

[root@centos7 src]# tar xvf nginx-1.22.0.tar.gz

[root@centos7 src]# cd nginx-1.22.0

[root@centos7 nginx-1.22.0]# ls

auto  CHANGES  CHANGES.ru  conf  configure  contrib  html  LICENSE  man  README  src

[root@centos7 nginx-1.22.0]# nginx -V

nginx version: nginx/1.18.0

built by gcc 4.8.5 20150623 (Red Hat 4.8.5-44) (GCC)

built with OpenSSL 1.0.2k-fips  26 Jan 2017

TLS SNI support enabled

configure arguments: --prefix=/apps/nginx --user=nginx --group=nginx --with-http_ssl_module --with-http_v2_module --with-http_realip_module --with-http_stub_status_module --with-http_gzip_static_module --with-pcre --with-stream --with-stream_ssl_module --with-stream_realip_module

./configure --prefix=/apps/nginx --user=nginx --group=nginx --with-http_ssl_module --with-http_v2_module --with-http_realip_module --with-http_stub_status_module --with-http_gzip_static_module --with-pcre --with-stream --with-stream_ssl_module --with-stream_realip_module

root@centos7 nginx-1.22.0]# make

root@centos7 ~]# mv /apps/nginx/sbin/nginx{,.bak}

[root@centos7 ~]# cd -

/usr/local/src/nginx-1.22.0

[root@centos7 nginx-1.22.0]# cp objs/nginx /apps/nginx/sbin/

[root@centos7 nginx-1.22.0]# ls /apps/nginx/sbin/

nginx  nginx.bak

[root@centos7 nginx-1.22.0]# /apps/nginx/sbin/nginx -t

nginx: the configuration file /apps/nginx/conf/nginx.conf syntax is ok

nginx: configuration file /apps/nginx/conf/nginx.conf test is successful

[root@centos7 nginx-1.22.0]# kill -USR2 `cat /apps/nginx/logs/nginx.pid`

[root@centos7 nginx-1.22.0]# ps auxf |grep nginx

root       7945  0.0  0.0 112812   980 pts/1    S+   22:24   0:00          \_ grep --color=auto nginx

root       4541  0.0  0.1  46348  2044 ?        Ss   21:57   0:00 nginx: master process nginx

nginx      4560  0.0  0.1  46772  2032 ?        S    22:02   0:00  \_ nginx: worker process

nginx      4561  0.0  0.1  46772  2032 ?        S    22:02   0:00  \_ nginx: worker process

root       7834  0.0  0.3  42448  5512 ?       S     22:27   0:00   \_ nginx: master process /apps/nginx/sbin/nginx -c /apps/nginx/conf/nginx.conf

nginx      7835  0.0  0.2  77192  4904 ?       S     22:30   0:00     \_ nginx: worker process

nginx      7836  0.0  0.2  77192  4908 ?       S     22:30   0:00     \_ nginx: worker process
最新文章
- 第三天--html列表
- C# 文件下载 : WebClient
- 关于classList的API
- No.010:Regular Expression Matching
- WordPress的body_class()函数详解
- 解决qt程序的链接阶段出现 undefined reference 错误
- Qt之阴影边框(转)
- git使用问题汇总
- SQL-LINQ-Lambda语法对照,好记性不如烂笔头
- [Java] Java 技术和 JVM 基础
- LInux 2.6 编译内核出现Question
- Hibernate操作数据库的回调机制--Callback
- Java并发编程笔记1-竞争条件&初识原子类&可重入锁
- MVC Razor
- shell 自加
- MySQL数据库导入错误:ERROR 1064 (42000) 和 ERROR at line xx: Unknown command '\Z'.
- Linux系统命令符01
- MongoDb进阶实践之八 MongoDB的聚合初探
- mysql 解决 timestamp 的2038问题
- systemd&systemctl