【Android】详解Android动画
目录结构:
在这篇文章中,笔者会详细介绍Android的动画。安卓中的动画大致分为tweened animation(补间动画)、frame-by-frame animation(逐帧动画)、Property Animation(属性动画),这个三个概念之间有点重合,下面介绍三种属性动画的产生时间顺序,其中补间动画和逐帧动画是Android1.0中被加入的,随着时间的推移简单的动画已经不能满足需求了,在Android4.0之后就加入了属性动画。本文还会介绍View、surfaceView和GLSurfaceView之间的比较。
1.补间动画
补间动画(tweened animation)都继承自android.view.animation.Animation抽象类,android.view.animation.Animation有五个直接实现子类:AlphaAnimation,AnimationSet,RotateAnimation,ScaleAnimation,TranslateAnimation。
其中AlphaAnimation,RotateAnimation,ScaleAnimation,TranslateAnimation是效果动画类,而AnimationSet是用于完成一系列组合动画的。
1.1 使用java代码实现Alpha、Rotate、Scale、Translate动画
下面这个栗子,演示了Alpha(淡入淡出)、Rotate(旋转)、Scale(缩放)、Translate(移动)的效果:
xml文件布局如下:
    <LinearLayout

        android:layout_width="fill_parent"

        android:layout_height="wrap_content"

        android:orientation="horizontal" >

         <Button

            android:id="@+id/rotateButton"

            android:layout_width="wrap_content"

            android:layout_height="wrap_content"

            android:text="旋转" />

         <Button

            android:id="@+id/scaleButton"

            android:layout_width="wrap_content"

            android:layout_height="wrap_content"

            android:text="缩放" />

         <Button

            android:id="@+id/alphaButton"

            android:layout_width="wrap_content"

            android:layout_height="wrap_content"

            android:text="淡入淡出" />

         <Button

            android:id="@+id/translateButton"

            android:layout_width="wrap_content"

            android:layout_height="wrap_content"

            android:text="移动" />

    </LinearLayout>

         <ImageView

             android:id="@+id/image"

             android:layout_width="wrap_content"

             android:layout_height="wrap_content"

             android:layout_centerHorizontal="true"

             android:layout_centerVertical="true"

             android:src="@drawable/ic_launcher" />
java代码如下:
public class MainActivity extends Activity {

    private Button rotateButton = null;

    private Button scaleButton = null;

    private Button alphaButton = null;

    private Button translateButton = null;

    private ImageView image = null;

    @Override

    protected void onCreate(Bundle savedInstanceState) {

        super.onCreate(savedInstanceState);

        setContentView(R.layout.activity_main);

        rotateButton = (Button)findViewById(R.id.rotateButton);

        scaleButton = (Button)findViewById(R.id.scaleButton);

        alphaButton = (Button)findViewById(R.id.alphaButton);

        translateButton = (Button)findViewById(R.id.translateButton);

        image = (ImageView)findViewById(R.id.image);

        rotateButton.setOnClickListener(new RotateButtonListener());

        scaleButton.setOnClickListener(new ScaleButtonListener());

        alphaButton.setOnClickListener(new AlphaButtonListener());

        translateButton.setOnClickListener(new TranslateButtonListener());

    }

    class AlphaButtonListener implements OnClickListener{

        public void onClick(View v) {

            //创建一个AnimationSet对象,参数为Boolean型,

            //true表示使用Animation的interpolator,false则是使用自己的

            AnimationSet animationSet = new AnimationSet(true);

            //创建一个AlphaAnimation对象,参数从完全的透明度,到完全的不透明

            AlphaAnimation alphaAnimation = new AlphaAnimation(1, 0);

            //设置动画执行的时间

            alphaAnimation.setDuration(2000);

            //将alphaAnimation对象添加到AnimationSet当中

            animationSet.addAnimation(alphaAnimation);

            //使用ImageView的startAnimation方法执行动画

            image.startAnimation(animationSet);

        }

     }

    class RotateButtonListener implements OnClickListener{

        public void onClick(View v) {

            AnimationSet animationSet = new AnimationSet(true);

            //参数1:从哪个旋转角度开始

            //参数2:转到什么角度

            //后4个参数用于设置围绕着旋转的圆的圆心在哪里

            //参数3:确定x轴坐标的类型,有ABSOLUT绝对坐标、RELATIVE_TO_SELF相对于自身坐标、RELATIVE_TO_PARENT相对于父控件的坐标

            //参数4:x轴的值,0.5f表明是以自身这个控件的一半长度为x轴

            //参数5:确定y轴坐标的类型

            //参数6:y轴的值,0.5f表明是以自身这个控件的一半长度为x轴

            RotateAnimation rotateAnimation = new RotateAnimation(0, 360,

                   Animation.RELATIVE_TO_SELF,0.5f,

                   Animation.RELATIVE_TO_SELF,0.5f);

            rotateAnimation.setDuration(2000);

            animationSet.addAnimation(rotateAnimation);

            image.startAnimation(animationSet);

        }

    }

    class ScaleButtonListener implements OnClickListener{

        public void onClick(View v) {

                AnimationSet animationSet = new AnimationSet(true);

                //0f从相对0点开始(若x和y的开始点都是0,那么就是从一个点开始),1f表示目前一个控件长度的位置(若x和y的结束点都是1f,那么就是缩放到原本大小。)

                //参数1:x轴的初始值

                //参数2:x轴收缩后的值

                //参数3:y轴的初始值

                //参数4:y轴收缩后的值

                //参数5:确定x轴坐标的类型

                //参数6:x轴的值,0.5f表明是以自身这个控件的一半长度为x轴

                //参数7:确定y轴坐标的类型

                //参数8:y轴的值,0.5f表明是以自身这个控件的一半长度为x轴

                ScaleAnimation scaleAnimation = new ScaleAnimation(

                       0f, 1f,0f,1f,

                       Animation.RELATIVE_TO_SELF,0.5f,

                       Animation.RELATIVE_TO_SELF,0.5f);

                scaleAnimation.setDuration(2000);

                animationSet.addAnimation(scaleAnimation);

                image.startAnimation(animationSet);

        }

    }

    class TranslateButtonListener implements OnClickListener{

        public void onClick(View v) {

                AnimationSet animationSet = new AnimationSet(true);

                //参数1~2:x轴的开始位置,0f代表从当前x轴点移动,1f代表以右移当前控件长度开始

                //参数3~4:y轴的开始位置,0f代表从当前y轴点移动,1f代表下移当前控件长度开始

                //参数5~6:x轴的结束位置

                //参数7~8:y轴的结束位置

                TranslateAnimation translateAnimation =

                   new TranslateAnimation(

                       Animation.RELATIVE_TO_SELF,0f,

                       Animation.RELATIVE_TO_SELF,0f,

                       Animation.RELATIVE_TO_SELF,0f,

                       Animation.RELATIVE_TO_SELF,2f);

                translateAnimation.setDuration(2000);

                animationSet.addAnimation(translateAnimation);

                image.startAnimation(animationSet);

       }

   }

}
效果图如下: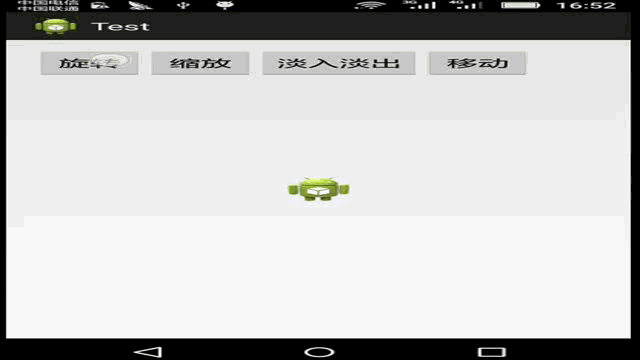
1.2 通过xml文件实现Alpha、Rotate、Scale、Translate动画
上面是在java代码中使用的使用Animation,这样的方式方便调试、运行,但是代码的重用性却不好,下面通过xml来实现Animation。
1.2.1 步骤
1) 在res文件夹下面建立anim文件夹
2) 创建xml文件,并加入set标签
3) 向set标签中加入rotate,alpha,scale或者translate标签
4) 使用AnimationUtils类加载xml文件
1.2.2 xml实现Animation案例
建立如下图的文件格式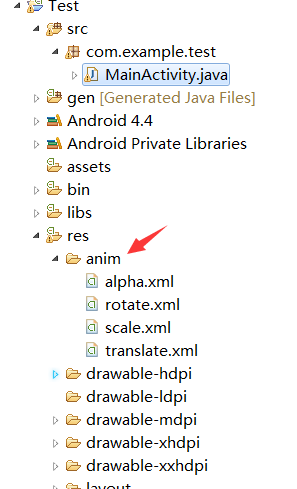
alpha.xml 文件
<?xml version="1.0" encoding="utf-8"?>

<set xmlns:android="http://schemas.android.com/apk/res/android"

    android:interpolator="@android:anim/accelerate_interpolator">

    <!-- fromAlpha和toAlpha是起始透明度和结束时透明度 -->

    <alpha

        android:fromAlpha="1.0"

        android:toAlpha="0.0"

        android:duration="2000"/>

</set>
alpha.xml
rotate.xml 文件
<?xml version="1.0" encoding="utf-8"?>

<set xmlns:android="http://schemas.android.com/apk/res/android"

    android:interpolator="@android:anim/accelerate_interpolator">

    <!--

        fromDegrees:开始的角度

        toDegrees:结束的角度,+表示是正的

        pivotX:用于设置旋转时的x轴坐标

        例

           1)当值为"50",表示使用绝对位置定位

           2)当值为"50%",表示使用相对于控件本身定位

           3)当值为"50%p",表示使用相对于控件的父控件定位

        pivotY:用于设置旋转时的y轴坐标

      -->

    <rotate

        android:fromDegrees="0"

        android:toDegrees="+360"

        android:pivotX="50%"

        android:pivotY="50%"

        android:duration="2000"/>

</set>
rotate.xml
scale.xml文件
<?xml version="1.0" encoding="utf-8"?>

<set xmlns:android="http://schemas.android.com/apk/res/android"

    android:interpolator="@android:anim/accelerate_interpolator">

   <!--

       起始x轴坐标

           止x轴坐标

           始y轴坐标

           止y轴坐标

           轴的坐标

           轴的坐标

     -->

   <scale

       android:fromXScale="1.0"

       android:toXScale="0.0"

       android:fromYScale="1.0"

       android:toYScale="0.0"

       android:pivotX="50%"

       android:pivotY="50%"

       android:duration="1000"/>

</set>
scale.xml
translate.xml文件
<?xml version="1.0" encoding="utf-8"?>

<set xmlns:android="http://schemas.android.com/apk/res/android"

    android:interpolator="@android:anim/accelerate_interpolator">

    <!--

           始x轴坐标

           止x轴坐标

           始y轴坐标

           止y轴坐标

      -->

    <translate

        android:fromXDelta="0%"

        android:toXDelta="100%"

        android:fromYDelta="0%"

        android:toYDelta="100%"

        android:duration="2000"/>

</set>
translate.xml
java调用代码如下:
public class MainActivity extends Activity {

    private Button rotateButton = null;

    private Button scaleButton = null;

    private Button alphaButton = null;

    private Button translateButton = null;

    private ImageView image = null;

    @Override

    protected void onCreate(Bundle savedInstanceState) {

        super.onCreate(savedInstanceState);

        setContentView(R.layout.activity_main);

        Interpolator t;

        rotateButton = (Button) findViewById(R.id.rotateButton);

        scaleButton = (Button) findViewById(R.id.scaleButton);

        alphaButton = (Button) findViewById(R.id.alphaButton);

        translateButton = (Button) findViewById(R.id.translateButton);

        image = (ImageView) findViewById(R.id.image);

        rotateButton.setOnClickListener(new RotateButtonListener());

        scaleButton.setOnClickListener(new ScaleButtonListener());

        alphaButton.setOnClickListener(new AlphaButtonListener());

        translateButton.setOnClickListener(new TranslateButtonListener());

    }

    class AlphaButtonListener implements OnClickListener {

        public void onClick(View v) {

            // 使用AnimationUtils装载动画配置文件

            Animation animation = AnimationUtils.loadAnimation(

                    MainActivity.this, R.anim.alpha);

            // 启动动画

            image.startAnimation(animation);

        }

    }

    class RotateButtonListener implements OnClickListener {

        public void onClick(View v) {

            Animation animation = AnimationUtils.loadAnimation(

                    MainActivity.this, R.anim.rotate);

            image.startAnimation(animation);

        }

    }

    class ScaleButtonListener implements OnClickListener {

        public void onClick(View v) {

            Animation animation = AnimationUtils.loadAnimation(

                    MainActivity.this, R.anim.scale);

            image.startAnimation(animation);

        }

    }

    class TranslateButtonListener implements OnClickListener {

        public void onClick(View v) {

            Animation animation = AnimationUtils.loadAnimation(

                    MainActivity.this, R.anim.translate);

            image.startAnimation(animation);

        }

    }

}
MainActivity.java
1.3 动画叠加
在上面我们介绍了AlphaAnimation,RotateAnimation,ScaleAnimation,TranslateAnimation,但这些只能是单独表现的动画。如果想把这些动画融合到一起,那么应该使用AnimationSet类,AnimationSet是Animation的派生类,它主要用于将多个动画效果融合在一起。
融合的代码如下:
       //定义AnimationSet对象

        AnimationSet animationSet = new AnimationSet(true);

        //定义淡入淡出动画

        AlphaAnimation alphaAnimation = new AlphaAnimation(1, 0);

        //定义旋转动画

        RotateAnimation rotateAnimation = new RotateAnimation(0, 360,

               Animation.RELATIVE_TO_SELF,0.5f,

               Animation.RELATIVE_TO_SELF,0.5f);

        rotateAnimation.setDuration(1000);//设置旋转动画的结束时间

        //将rotateAnimation添加到animationSet中

        animationSet.addAnimation(rotateAnimation);

        //将alphaAnimation添加到animationSet中

        animationSet.addAnimation(alphaAnimation);

        //开始动画

        image.startAnimation(animationSet);
如果想通过配置xml文件的方式来实现的话,只需要在<set></set>中多定义一组动画即可
<?xml version="1.0" encoding="utf-8"?>

<set xmlns:android="http://schemas.android.com/apk/res/android"

    android:interpolator="@android:anim/accelerate_interpolator"

    android:shareInterpolator="true">

    <!-- fromAlpha和toAlpha是起始透明度和结束时透明度 -->

    <alpha

        android:fromAlpha="1.0"

        android:toAlpha="0.0"

        android:startOffset="500"

        android:duration="500"/>

    <translate

        android:fromXDelta="0%"

        android:toXDelta="100%"

        android:fromYDelta="0%"

        android:toYDelta="100%"

        android:duration="2000"/>

</set>
1.4 动画速率
上面我们使用的所有动画速率都是默认的,
Interpolator定义了动画变化的速率,在Animations框架当中定义了一下几种Interpolator
AccelerateDecelerateInterpolator:在动画开始与结束的地方速率改变比较慢,在中间的时候速率快。

AccelerateInterpolator:在动画开始的地方速率改变比较慢,然后开始加速

CycleInterpolator:动画循环播放特定的次数,速率改变沿着正弦曲线

DecelerateInterpolator:在动画开始的地方速率改变比较慢,然后开始减速

LinearInterpolator:动画以均匀的速率改变
Interpolator在xml文件中的使用主要分为以下几种情况:
a)在set标签中
<set xmlns:android="http://schemas.android.com/apk/res/android"

    android:interpolator="@android:anim/accelerate_interpolator"/>
b)如果在一个set标签中包含多个动画效果,如果想让这些动画效果共享一个Interpolator。
android:shareInterpolator="true"
c)如果不想共享一个interpolator,则设置android:shareInterpolator="true",并且需要在每一个动画效果处添加interpolator。
<alpha

        android:interpolator="@android:anim/accelerate_decelerate_interpolator"

        android:fromAlpha="1.0"

        android:toAlpha="0.0"

        android:startOffset="500"

        android:duration="500"/>
Interpolator在java代码中的使用,又可以分为以下几种情况:
a)如果是在代码上设置共享一个interpolator,则可以在AnimationSet设置interpolator。
AnimationSet animationSet = new AnimationSet(true);

animationSet.setInterpolator(new AccelerateInterpolator());
b)如果不设置共享一个interpolator则可以在每一个Animation对象上面设置interpolator。
//false不使用默认的AnimationSet

AnimationSet animationSet = new AnimationSet(false);

alphaAnimation.setInterpolator(new AccelerateInterpolator());

rotateAnimation.setInterpolator(new DecelerateInterpolator());
2.逐帧动画
Frame-By-Frame Animations(逐帧动画)是一帧一帧的格式显示动画效果。类似于电影胶片拍摄的手法。
逐帧动画依靠AnimationDrawable类,AnimationDrawable对ImageView进行动画时,原来的ImageView中是不能设置初始图片的。
2.1 实现小熊快跑动画效果
下面使用小熊快跑这个动画来讲解AnimationDrawable的使用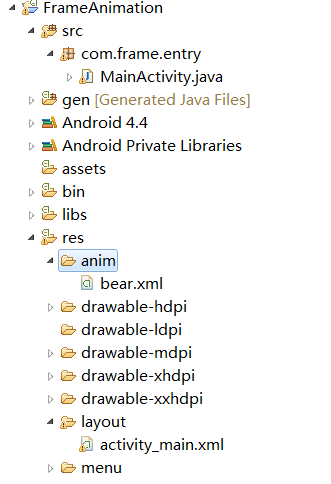
bear.xml文件
<?xml version="1.0" encoding="utf-8"?>

<animation-list xmlns:android="http://schemas.android.com/apk/res/android"

    android:oneshot="false">

    <item android:drawable="@drawable/littlebear1" android:duration="50"/>

    <item android:drawable="@drawable/littlebear2" android:duration="50"/>

    <item android:drawable="@drawable/littlebear3" android:duration="50"/>

    <item android:drawable="@drawable/littlebear4" android:duration="50"/>

    <item android:drawable="@drawable/littlebear5" android:duration="50"/>

    <item android:drawable="@drawable/littlebear6" android:duration="50"/>

    <item android:drawable="@drawable/littlebear7" android:duration="50"/>

</animation-list>
bear.xml
activity_main.xml文件
<RelativeLayout xmlns:android="http://schemas.android.com/apk/res/android"

    xmlns:tools="http://schemas.android.com/tools"

    android:layout_width="match_parent"

    android:layout_height="match_parent"

    android:paddingBottom="@dimen/activity_vertical_margin"

    android:paddingLeft="@dimen/activity_horizontal_margin"

    android:paddingRight="@dimen/activity_horizontal_margin"

    android:paddingTop="@dimen/activity_vertical_margin"

    tools:context=".MainActivity" >

    <Button

           android:id="@+id/startbutton"

               android:layout_width="wrap_content"

               android:layout_height="wrap_content"

               android:text="开始"/>

           <Button

              android:id="@+id/endbutton"

              android:layout_width="wrap_content"

              android:layout_height="wrap_content"

              android:layout_toEndOf="@+id/startbutton"

              android:text="停止" />

          <ImageView

           android:id="@+id/image"

            android:layout_width="wrap_content"

            android:layout_height="wrap_content"

            android:layout_centerInParent="true"

            android:layout_centerVertical="true"/>

</RelativeLayout>
activity_main.xml
java代码:
public class MainActivity extends Activity {

    Button startbutton=null;

    Button endbutton=null;

    ImageView imageView=null;

    AnimationDrawable animationDrawable=null;

    @Override

    protected void onCreate(Bundle savedInstanceState) {

        super.onCreate(savedInstanceState);

        setContentView(R.layout.activity_main);

        startbutton = (Button)findViewById(R.id.startbutton);

        imageView = (ImageView)findViewById(R.id.image);

        startbutton.setOnClickListener(new OnClickListener() {

            @Override

            public void onClick(View arg0) {

                   imageView.setBackgroundResource(R.anim.bear);

                   animationDrawable = (AnimationDrawable)

                      imageView.getBackground();

                   animationDrawable.start();

            }

        });

        endbutton=(Button)findViewById(R.id.endbutton);

        endbutton.setOnClickListener(new OnClickListener() {

            @Override

            public void onClick(View paramView) {

                if(animationDrawable!=null){

                    animationDrawable.stop();

                }

            }

        });

    }

}
MainActivity.java
效果图:
2.2 Movie 类的使用(GIF动图)
说起逐帧动画,肯定大家会想到的就是GIF动图,上面我们使用AnimationDrawable来绘制逐帧动画,但这样未免太过于麻烦,在Android API中还提供了另外一个类就是android.graphics.Movie。接下来看看这个案例:
customGifView文件
import java.io.InputStream;

import android.content.Context;

import android.graphics.Canvas;

import android.graphics.Movie;

import android.util.AttributeSet;

import android.view.View;

public class CustomGifView extends View {

 private InputStream gifInputStream;

 private Movie gifMovie;

 private int movieWidth, movieHeight;

 private long movieDuration;

 private long mMovieStart;

 public CustomGifView(Context context) {

  super(context);

  init(context);

 }

 public CustomGifView(Context context, AttributeSet attrs) {

  super(context, attrs);

  init(context);

 }

 public CustomGifView(Context context, AttributeSet attrs,

   int defStyleAttr) {

  super(context, attrs, defStyleAttr);

  init(context);

 }

 private void init(Context context){

  setFocusable(true);

  gifInputStream = context.getResources()

    .openRawResource(R.drawable.YOUR_GIF);

  /**

   * Movie 提供了三个decodeXXX方法,分别是

   * decodeByteArray(byte[] data, int offset, int length)

   * decodeFile(String pathName)

   * decodeStream(InputStream is)

   */

  gifMovie = Movie.decodeStream(gifInputStream);

  movieWidth = gifMovie.width();

  movieHeight = gifMovie.height();

  //持续获得持续时间

  movieDuration = gifMovie.duration();

 }

 @Override

 protected void onMeasure(int widthMeasureSpec,

   int heightMeasureSpec) {

  setMeasuredDimension(movieWidth, movieHeight);

 }

 public int getMovieWidth(){

  return movieWidth;

 }

 public int getMovieHeight(){

  return movieHeight;

 }

 public long getMovieDuration(){

  return movieDuration;

 }

 @Override

 protected void onDraw(Canvas canvas) {

        long now = android.os.SystemClock.uptimeMillis();

        if (mMovieStart == 0) {   // first time

            mMovieStart = now;

        }

        if (gifMovie != null) {

            int dur = gifMovie.duration();

            if (dur == 0) {

                dur = 1000;

            }

            int relTime = (int)((now - mMovieStart) % dur);//设置要被显示的帧

            gifMovie.setTime(relTime);

            gifMovie.draw(canvas, 0, 0);

            invalidate();

        }

     }

 }
CustomGifView.java
可以在XML中使用:
<Your_PackageName.CustomGifView

        android:id="@+id/gifview"

        android:layout_width="wrap_content"

        android:layout_height="wrap_content" />
修改硬件加速关闭:
android:hardwareAccelerated="false"
或
View.setLayerType(View.LAYER_TYPE_SOFTWARE, null);
然后就可以看到GIF动图了。
3.LayoutAnimationController
LayoutAnimationController用于对layout中或View Group中的子元素进行动画的,每个子元素使用的都是相同的动画,但是每个子元素的启动时间不一样。如果想要定义自己的延迟启动时间,那么可以重写LayoutAnimationController类的getDelayForView(android.view.View)方法。
下面是使用对ListView使用LayoutAnimationController的案例,通过这个案例我们来讲解一下LayoutAnimationController是如何工作的: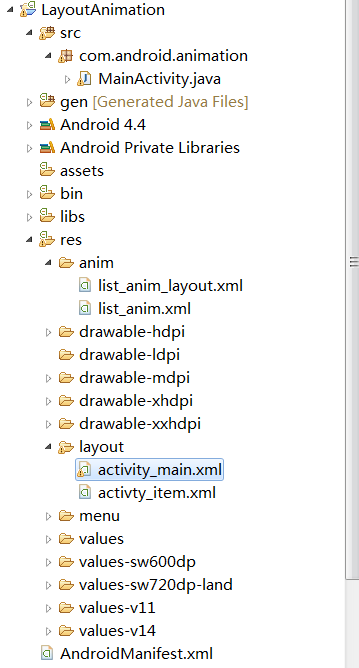
list_anim.xml文件
<?xml version="1.0" encoding="utf-8"?>

<set xmlns:android="http://schemas.android.com/apk/res/android"

    android:interpolator="@android:anim/accelerate_interpolator"

    android:shareInterpolator="true">

    <alpha

       android:fromAlpha="0.0"

       android:toAlpha="1.0"

       android:duration="2000"/>

</set>
list_anim.xml
list_anim_layout.xml文件
<?xml version="1.0" encoding="utf-8"?>

<layoutAnimation

    xmlns:android="http://schemas.android.com/apk/res/android"

    android:delay="0.5"

    android:animationOrder="normal"

    android:animation="@anim/list_anim"/>
list_anim_layout.xml
activity_main.xml文件
<RelativeLayout xmlns:android="http://schemas.android.com/apk/res/android"

    xmlns:tools="http://schemas.android.com/tools"

    android:layout_width="match_parent"

    android:layout_height="match_parent"

    android:paddingBottom="@dimen/activity_vertical_margin"

    android:paddingLeft="@dimen/activity_horizontal_margin"

    android:paddingRight="@dimen/activity_horizontal_margin"

    android:paddingTop="@dimen/activity_vertical_margin"

    tools:context=".MainActivity" >

<LinearLayout

    android:orientation="vertical"

    android:layout_width="fill_parent"

    android:layout_height="fill_parent"

    >

    <ListView

       android:id="@+id/list"

        android:layout_width="wrap_content"

        android:layout_height="wrap_content"

        android:scrollbars="vertical"

        android:layoutAnimation="@anim/list_anim_layout"

        />

       <Button

        android:id="@+id/button"

        android:layout_width="fill_parent"

        android:layout_height="wrap_content"

        android:text="测试"/>

</LinearLayout>

</RelativeLayout>
activity_main.xml
activity_item.xml文件
<?xml version="1.0" encoding="utf-8"?>

<LinearLayout xmlns:android="http://schemas.android.com/apk/res/android"

    android:layout_width="fill_parent"

    android:layout_height="fill_parent"

    android:orientation="horizontal"

    android:paddingLeft="10dip"

    android:paddingRight="10dip"

    android:paddingTop="1dip"

    android:paddingBottom="1dip">

    <TextView android:id="@+id/name"

       android:layout_width="180dip"

       android:layout_height="30dip"

       android:textSize="5pt"

       android:singleLine="true" />

    <TextView android:id="@+id/sex"

       android:layout_width="fill_parent"

       android:layout_height="fill_parent"

       android:textSize="5pt"

       android:singleLine="true"/>

</LinearLayout>
activity_item.xml
mainActivity.java文件
public class MainActivity extends Activity {

    private Button button = null;

    private ListView listView = null;

    @Override

    protected void onCreate(Bundle savedInstanceState) {

        super.onCreate(savedInstanceState);

        setContentView(R.layout.activity_main);

        listView = (ListView)findViewById(R.id.list);

        button=(Button)findViewById(R.id.button);

        button.setOnClickListener(new OnClickListener() {

            @Override

            public void onClick(View arg0) {

                   listView.setAdapter(createListAdapter());

            }

        });

    }

    private ListAdapter createListAdapter() {

        List<HashMap<String,String>> list =

            new ArrayList<HashMap<String,String>>();

        HashMap<String,String> m1 = new HashMap<String,String>();

        m1.put("name", "bauble");

        m1.put("sex", "male");

        HashMap<String,String> m2 = new HashMap<String,String>();

        m2.put("name", "Allorry");

        m2.put("sex", "male");

        HashMap<String,String> m3 = new HashMap<String,String>();

        m3.put("name", "Allotory");

        m3.put("sex", "male");

        HashMap<String,String> m4 = new HashMap<String,String>();

        m4.put("name", "boolbe");

        m4.put("sex", "male");

        list.add(m1);

        list.add(m2);

        list.add(m3);

        list.add(m4);

        SimpleAdapter simpleAdapter = new SimpleAdapter(

               this,list,R.layout.activty_item,new String[]{"name","sex"},

               new int[]{R.id.name,R.id.sex});

        return simpleAdapter;

     }

}
mainActivity.java
效果图: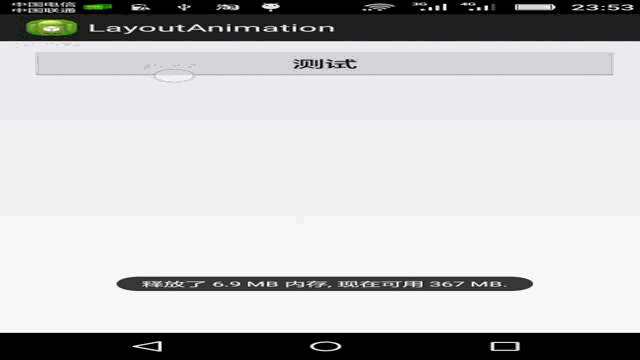
4.属性动画
4.1 基本简介
属性动画是在Android3.0之后加入的,在一定时间间隔内,通过不断对值进行改变,并不断将该值赋给对象的属性,从而实现该对象在该属性上的动画效果。
ValueAnimator是属性动画机制中最核心的一个类,除了ValueAnimator类,AnimatorSet、ObjectAnimator类也是属性动画机制中的核心类,其中ObjectAnimator是ValueAnimator的派生类。下面笔者会详细介绍这个三个类。
4.2 ValueAnimator类
现在开始介绍ValueAnimator类的使用,ValueAnimator提供了一种简单的定时引擎,它可以计算动画的属性值,然后通过手动将变化的值设置到对象属性上。默认情况下,ValueAnimator使用的是非线性的Interpolation(AccelerateDecelerateInterpolator),AccelerateDecelerateInterpolator类对象的Interpolator在开始的时候加速,在动画结束的时候减速。也可以通过setInterpolator(TimeInterpolator)方法来设置自己的Interpolator。
valueAnimator有如下几个比较常用的方法:
//将开始值以浮点数值的形式过度到结束值

public static ValueAnimator ofFloat (float... values)

//将开始值以整数的形式过度到结束值

public static ValueAnimator ofInt (int... values)

//使用指定的TypeEvaluator对象,将 开始值以对象的形式过度到结束值。

public static ValueAnimator ofObject (TypeEvaluator evaluator, Object... values)

//开始动画

public void start();

//结束动画

public void end();

//取消动画

public void cancle();

//添加更新监听器

public void addUpdateListener (ValueAnimator.AnimatorUpdateListener listener)

//设置自定义的TimerInterpolator

public void setInterpolator (TimeInterpolator value)

//设置执行时间

public ValueAnimator setDuration (long duration)

//设置启动的延迟时间

public void setStartDelay (long startDelay)
下面通过改变按钮的宽度来展示ValueAnimator的用法,
xml布局如下:
    <Button

        android:id="@+id/button1"

        style="?android:attr/buttonStyleSmall"

        android:layout_width="200px"

        android:layout_height="wrap_content"

        android:layout_centerHorizontal="true"

        android:layout_centerVertical="true"

        android:text="属性动画" />
java代码如下:
public class MainActivity extends Activity {

    Button button=null;

    ValueAnimator valueAnimator=null;

    @Override

    protected void onCreate(Bundle savedInstanceState) {

        super.onCreate(savedInstanceState);

        setContentView(R.layout.activity_main);

        button=(Button)findViewById(R.id.button1);

        //对指定Button对象的with属性创建ValueAnimator对象

        valueAnimator = ValueAnimator.ofInt(button.getLayoutParams().width, 500);

        //设置持续时间

        valueAnimator.setDuration(2000);

        //添加AnimatorUpdateListener监听器,每当属性值改变就会调用onAnimationUpdate方法

        valueAnimator.addUpdateListener(new AnimatorUpdateListener() {

            @Override

            public void onAnimationUpdate(ValueAnimator animator) {

                //获得变化的值

                int currentValue = (Integer) animator.getAnimatedValue();

                Log.i("info", currentValue+"");

                //重新设置属性值

                button.getLayoutParams().width=currentValue;

                //重新显示

                button.requestLayout();

            }

        });

        button.setOnClickListener(new OnClickListener() {

            @Override

            public void onClick(View paramView) {

                valueAnimator.start();

            }

        });

    }

}
效果图: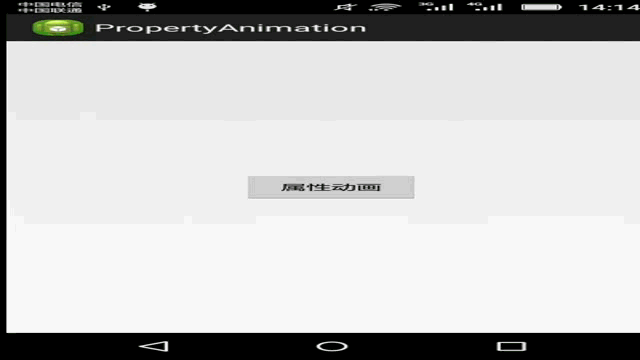
观察上面的代码我们知道,ValueAnimator只是负责值的改变,若想要把改变后的值重新赋给对象,那么这个过程应该由程序员应该手动来完成。幸好官方提供了ObjectAnimator类,来帮我们实现这个过程。
4.3 ObjectAnimator类
ObjectAnimator是ValueAnimator的派生类,它对ValueAnimator进行了改进,它可以直接对对象的属性进行动画设置,但是被动画的属性必须要提供set/get方法。
由于ObjectAnimator派生自ValueAnimator,ObjectAnimator能使用ValueAnimator中的大部分方法(除private外)。
下面这个案例展示了利用ObjectAnimator来实现旋转、平移、缩放、淡入淡出
xml文件布局如下:
<RelativeLayout xmlns:android="http://schemas.android.com/apk/res/android"

    xmlns:tools="http://schemas.android.com/tools"

    android:layout_width="match_parent"

    android:layout_height="match_parent"

    android:paddingBottom="@dimen/activity_vertical_margin"

    android:paddingLeft="@dimen/activity_horizontal_margin"

    android:paddingRight="@dimen/activity_horizontal_margin"

    android:paddingTop="@dimen/activity_vertical_margin"

    tools:context=".MainActivity" >

    <LinearLayout

        android:layout_width="fill_parent"

        android:layout_height="wrap_content"

        android:orientation="horizontal">

        <Button

            android:id="@+id/move"

            android:text="平移"

            android:layout_height="wrap_content"

            android:layout_width="wrap_content"/>

        <Button

            android:id="@+id/rotate"

            android:text="旋转"

            android:layout_width="wrap_content"

            android:layout_height="wrap_content"/>

        <Button

            android:id="@+id/scale"

            android:text="缩放"

            android:layout_width="wrap_content"

            android:layout_height="wrap_content"/>

        <Button

            android:id="@+id/alpha"

            android:text="淡入淡出"

            android:layout_width="wrap_content"

            android:layout_height="wrap_content"/>

    </LinearLayout>

    <ImageView

        android:id="@+id/image"

        android:layout_width="wrap_content"

        android:layout_height="wrap_content"

        android:layout_centerHorizontal="true"

        android:layout_centerVertical="true"

        android:src="@drawable/ic_launcher" />

</RelativeLayout>
java的调用代码如下:
public class MainActivity extends Activity {

    Button move=null;

    Button rotate=null;

    Button scale=null;

    Button alpha=null;

    ImageView image=null;

    @Override

    protected void onCreate(Bundle savedInstanceState) {

        super.onCreate(savedInstanceState);

        setContentView(R.layout.activity_main);

        move= (Button)findViewById(R.id.move);

        rotate=(Button)findViewById(R.id.rotate);

        scale=(Button)findViewById(R.id.scale);

        alpha=(Button)findViewById(R.id.alpha);

        image=(ImageView)findViewById(R.id.image);

        move.setOnClickListener(new OnClickListener() {

            @Override

            public void onClick(View v) {

                ObjectAnimator objectAnimator=ObjectAnimator.ofFloat(image,"TranslationX",0,100,0);//移动

                objectAnimator.setDuration(2000);

                objectAnimator.start();

            }

        });

        rotate.setOnClickListener(new OnClickListener() {

            @Override

            public void onClick(View v) {

                ObjectAnimator objectAnimator=ObjectAnimator.ofFloat(image,"Rotation",0,360);//旋转

                objectAnimator.setDuration(2000);

                objectAnimator.start();

            }

        });

        scale.setOnClickListener(new OnClickListener() {

            @Override

            public void onClick(View v) {

                ObjectAnimator objectAnimator=ObjectAnimator.ofFloat(image,"ScaleX",1,2,1);//缩放

                objectAnimator.setDuration(2000);

                objectAnimator.start();

            }

        });

        alpha.setOnClickListener(new OnClickListener() {

            @Override

            public void onClick(View v) {

                ObjectAnimator objectAnimator=ObjectAnimator.ofFloat(image,"Alpha",1,0,1);//淡入淡出

                objectAnimator.setDuration(2000);

                objectAnimator.start();

            }

        });

    }

}
效果图: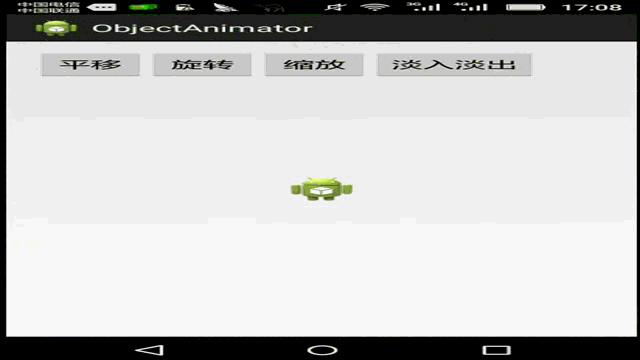
下面介绍一些常用的属性的名:
| 属性 | 作用 | 数值类型 |
| Alpha | 控制View的透明度 | float |
| TranslationX | 控制X方向的位移 | float |
| TranslationY | 控制Y方向的位移 | float |
| ScaleX | 控制X方向的缩放倍数 | float |
| ScaleY | 控制Y方向的缩放倍数 | float |
| Rotation | 控制以屏幕方向为轴的旋转度数 | float |
| RotationX | 控制以x轴为轴的旋转度数 | float |
| RotationY | 控制以Y轴为轴的旋转度数 | float |
4.4 AnimatorSet类
AnimatorSet类可以实现Animation的组合动画,其中的Animation可以按照指定的顺序或交叉方式进行显示。
该类有一些常用方法:
AnimatorSet.play(Animator anim)   :播放当前动画

AnimatorSet.after(long delay)     :将现有动画延迟x毫秒后执行

AnimatorSet.with(Animator anim)   :将现有动画和传入的动画同时执行

AnimatorSet.after(Animator anim)  :将现有动画插入到传入的动画之后执行

AnimatorSet.before(Animator anim) :将现有动画插入到传入的动画之前执行
下面是一个混合旋转和移动动画案例:
xml布局文件:
    <Button

        android:layout_width="wrap_content"

        android:layout_height="wrap_content"

        android:text="开始"

        android:id="@+id/start"/>

    <ImageView

        android:id="@+id/image"

        android:layout_width="wrap_content"

        android:layout_height="wrap_content"

        android:layout_centerHorizontal="true"

        android:layout_centerVertical="true"

        android:src="@drawable/ic_launcher" />
java代码:
public class MainActivity extends Activity {

    ImageView image=null;

    Button start=null;

    @Override

    protected void onCreate(Bundle savedInstanceState) {

        super.onCreate(savedInstanceState);

        setContentView(R.layout.activity_main);

        image=(ImageView)findViewById(R.id.image);

        start=(Button)findViewById(R.id.start);

        start.setOnClickListener(new OnClickListener() {

            @Override

            public void onClick(View v) {

                ObjectAnimator transX=ObjectAnimator.ofFloat(image, "TranslationX", 0,100,0);

                ObjectAnimator transY=ObjectAnimator.ofFloat(image, "TranslationY", 0,100,0);

                ObjectAnimator rotate=ObjectAnimator.ofFloat(image, "Rotation", 0,360);

                AnimatorSet animatorSet=new AnimatorSet();

                Builder builder= animatorSet.play(transX).with(transY);//移动

                builder.before(rotate);//旋转

                animatorSet.setDuration(2000);

                //启动

                animatorSet.start();

            }

        });

    }

}
效果图:
4.5 估值器(TypeEvaluator)
接下来我们继续讲解估值器,估值器(TypeEvaluator)是一个接口,该接口允许开发人员自定义动画中的属性值。
TypeEvaluator有一些已知的实现类,例如ArgbEvaluator、FloatEvaluator、IntEvaluator、RectEvaluator、PointEvaluator等等。其中Argb是在用于计算Argb之间的值时使用的,RectEvaluator是在用于计算Rect之间的值时使用的,FloatEvaluator是在用于计算Float之间值使用的,IntEvaluator是在用于计算Int之间值时使用的。
TypeEvaluator接口只有一个抽象方法:
public abstract T evaluate (float fraction, T startValue, T endValue);
TypeEvaluator只有一个抽象方法evaluate。evaluate中包含三个形参,其中startValue形参表示动画的结束值,endValue形参表示动画的结束值。由于startValue,endValue以及方法的返回值都是泛型类型,所以我们可以在TypeEvaluator的实现类中为泛型指定任何类型,比如Integer,Double,或者自定义的类型,显然该类型必须和属性动画中的动画属性保持一致。
evaluate方法中有一个形参比较特殊,它就是fraction,fraction形参是float类型。fraction表示单个动画的完成比例(重复动画可以认为是单个动画的多次运行),它的值是[0~1],当fraction = 0时表示单个动画还未开始,fraction = 1表示单个动画的已经完成。当我们使用属性动画类(ValueAnimator或ObjectAnimator类)运行动画时,属性动画类会根据当前动画的运行时间(Elapsed time)和当前动画的运行速率(Interpolator),得出动画的完成比例,在调用我们的TypeEvaluator的实现类时把它传给fraction参数。因此在我们使用fraction参数计算时,无需额外考虑运行速率。
有了这些概念后,我们来自定义一个CircleEvaluator: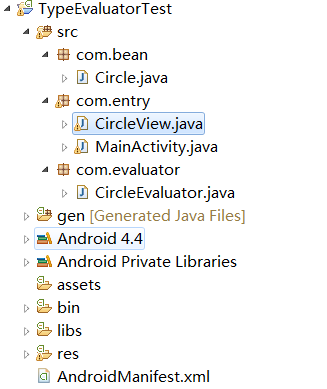
Circle.java文件
package com.bean;

public class Circle {

    /**

     * 圆心的横坐标

     */

    private float x;

    /**

     * 圆心的纵坐标

     */

    private float y;

    /**

     * 圆的半径

     */

    private float radius;

    public Circle(float x,float y,float radius)

    {

        this.x=x;

        this.y=y;

        this.radius=radius;

    }

    public float getX() {

        return x;

    }

    public void setX(float x) {

        this.x = x;

    }

    public float getY() {

        return y;

    }

    public void setY(float y) {

        this.y = y;

    }

    public float getRadius() {

        return radius;

    }

    public void setRadius(float radius) {

        this.radius = radius;

    }

}
Circle.java
CircleEvaluator.java 文件
package com.evaluator;

import com.bean.Circle;

import android.animation.TypeEvaluator;

public class CircleEvaluator implements TypeEvaluator<Circle>{

    @Override

    public Circle evaluate(float fraction, Circle startValue, Circle endValue) {

        //圆心的横坐标

        float x=startValue.getX()+fraction*(endValue.getX()-startValue.getX());

        //圆心的纵坐标

        float y=startValue.getY()+fraction*(endValue.getY()-startValue.getY());

        //圆的半径

        float radius=startValue.getRadius()+fraction*(endValue.getRadius()-startValue.getRadius());

        return new Circle(x, y, radius);

    }

}
CircleEvaluator.java
CircleView.java 文件
package com.entry;

import com.bean.Circle;

import android.content.Context;

import android.graphics.Canvas;

import android.graphics.Paint;

import android.graphics.Paint.Style;

import android.view.View;

public class CircleView extends View {

    private Circle circle=null;

    public CircleView(Context context,Circle circle) {

        super(context);

        this.circle=circle;

    }

    @Override

    protected void onDraw(Canvas canvas) {

        Paint paint=new Paint();

        paint.setStyle(Style.STROKE);

        canvas.drawCircle(circle.getX(), circle.getY(), circle.getRadius(),paint);

        super.onDraw(canvas);

    }

    public Circle getCircle() {

        return circle;

    }

    public void setCircle(Circle circle) {

        this.circle = circle;

    }

}
CircleView.java
MainActivity.java 文件
package com.entry;

import com.bean.Circle;

import com.evaluator.CircleEvaluator;

import android.os.Bundle;

import android.animation.ObjectAnimator;

import android.animation.ValueAnimator;

import android.animation.ValueAnimator.AnimatorUpdateListener;

import android.app.Activity;

import android.view.Menu;

import android.view.View;

import android.view.View.OnClickListener;

import android.widget.Button;

import android.widget.RelativeLayout;

public class MainActivity extends Activity {

    RelativeLayout layout=null;

    Button button=null;

    CircleView circleView=null;

    Circle startCircle=null;

    @Override

    protected void onCreate(Bundle savedInstanceState) {

        super.onCreate(savedInstanceState);

        setContentView(R.layout.activity_main);

        startCircle=new Circle(200,200,60);

        circleView=new CircleView(this,startCircle);

        layout=(RelativeLayout)findViewById(R.id.main);

        layout.addView(circleView);

        button=(Button)findViewById(R.id.button1);

        button.setOnClickListener(new OnClickListener() {

            @Override

            public void onClick(View v) {

                CircleEvaluator circleEvaluator= new CircleEvaluator();

                Circle endCircle=new Circle(250, 300, 100);

                ObjectAnimator objectAnimator=ObjectAnimator.ofObject(circleView,"circle",circleEvaluator,startCircle,endCircle);

                objectAnimator.setDuration(2000);//两秒内完成

                objectAnimator.addUpdateListener(new AnimatorUpdateListener() {

                    @Override

                    public void onAnimationUpdate(ValueAnimator animation) {

                        circleView.invalidate();

                    }

                });

                objectAnimator.start();

            }

        });

    }

}
MainActivity.java
效果图: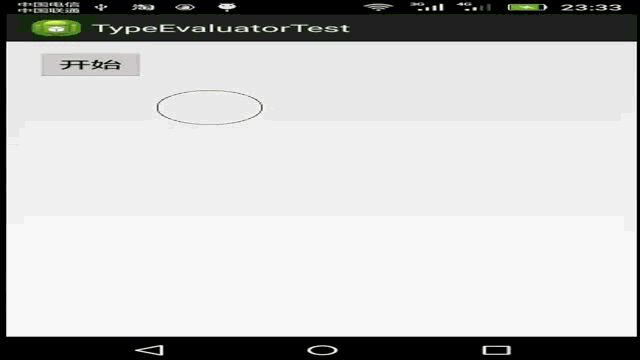
4.6 实现贝塞尔曲线动画
在开始之前,介绍一下Path类,Path类中提供了一个quadTo(float x1, float y1, float x2, float y2)方法,该方法可以用于绘制二阶贝塞尔曲线。
笔者介绍三个贝塞尔曲线的网站:The Bezier Game,Canvas Bezier Curve Example,Bezier Curve
贝塞尔曲线的应用非常广泛,栗如:
QQ小红点拖拽效果

360火箭发射

加入购物车动画

一些炫酷的下拉刷新控件

阅读软件的翻书效果

一些平滑的折线图的制作

很多炫酷的动画效果
这里对贝塞尔曲线不做过多的解释,关于贝塞尔曲线读者可以自行度娘。
下面介绍实现贝塞尔曲线动画的思想:
a)自定义估值器(TypeEvaluator),在public abstract T evaluate (float fraction, T startValue, T endValue);方法中利用贝塞尔公式计算出下一个图形的属性的值。
b)对组件动画对象设置新的值,如果是ObjectValuator的话,这一步可以省略,在上面的分析中已经知道ObjectValuator会自动帮我们完成这一步。
c)调用invalidate()重新刷新组件。
接下来我们要利用贝塞尔曲线,实现如下这样的功能: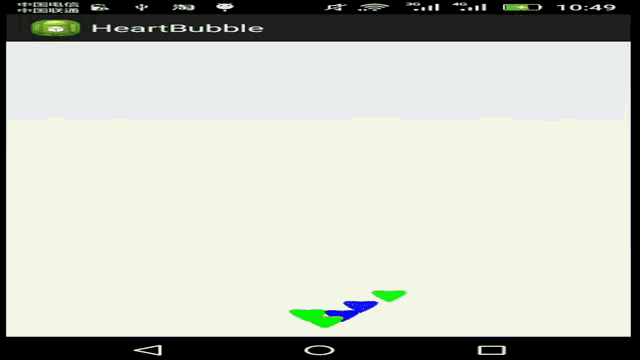
结构图: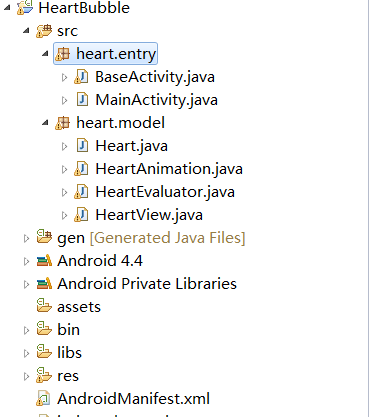
Heart.java 文件
package heart.model;

public class Heart {

    /**

     * 横坐标

     */

    private float x=0;

    /**

     * 纵坐标

     */

    private float y=0;

    /**

     * 颜色值

     */

    private int color=0;

    public Heart(float x,float y,int color){

        this.x=x;

        this.y=y;

        this.color=color;

    }

    public int getColor() {

        return color;

    }

    public void setColor(int color) {

        this.color = color;

    }

    public float getX() {

        return x;

    }

    public void setX(float x) {

        this.x = x;

    }

    public float getY() {

        return y;

    }

    public void setY(float y) {

        this.y = y;

    }

}
Heart.java
HeartView.java 文件
package heart.model;

import android.content.Context;

import android.graphics.Canvas;

import android.graphics.Paint;

import android.graphics.Paint.Style;

import android.graphics.Path;

import android.view.View;

public class HeartView extends View{

    private Heart heart=null;

    public float getAlpha() {

        return super.getAlpha();

    }

    public void setAlpha(float alpha) {

        super.setAlpha(alpha);

    }

    public Heart getHeart() {

        return heart;

    }

    public void setHeart(Heart heart) {

        this.heart = heart;

    }

    private final float h=40;

    public HeartView(Context context,Heart heart){

        super(context);

        this.heart=heart;

    }

    @Override

    protected void onDraw(Canvas canvas) {

        super.onDraw(canvas);

        Paint p=new Paint();

        //设置透明度

        p.setAlpha((int) getAlpha());

        //设置样式

        p.setStyle(Style.FILL);

        //设置画笔颜色

        p.setColor(heart.getColor());

        //使用二阶贝塞尔曲线绘制心形图案

        Path path=new Path();

        float x=heart.getX();//获得起始点的横坐标

        float y=heart.getY();//获得起始点的纵坐标

        path.moveTo(x,y);

        path.quadTo(x+h,y-0.268f*h,x,y+h);

        path.moveTo(x,y+h);

        path.quadTo(x-h,y-0.268f*h,x,y);

        canvas.drawPath(path,p);

    }

}
HeartView.java
HeartEvaluator.java 文件
package heart.model;

import java.util.Random;

import android.animation.TypeEvaluator;

public class HeartEvaluator implements TypeEvaluator<Heart>{

    private int orientation=1;

    private static Random r=new Random(System.currentTimeMillis());

    public HeartEvaluator(){

        orientation=getOrientation();

    }

    /**

     * 利用三阶贝塞尔曲线公式,得出位置。

     */

    @Override

    public Heart evaluate(float t, Heart startValue, Heart endValue) {

        Heart[] points=createPoints(startValue,endValue);

        Heart p0=points[0];//开始点

        Heart p1=points[1];//第一个辅佐点

        Heart p2=points[2];//第二个辅佐点

        Heart p3=points[3];//终点

        //使用三阶贝塞尔曲线算出横坐标

        Double dx= p0.getX()*Math.pow((1-t),3)+

                3*p1.getX()*t*Math.pow((1-t), 2)+

                3*p2.getX()*Math.pow(t, 2)*(1-t)+

                p3.getX()*Math.pow(t, 3);

        float x=Float.parseFloat(dx.toString());

        //使用三阶贝塞尔曲线算出纵坐标

        Double dy= p0.getY()*Math.pow((1-t),3)+

                3*p1.getY()*t*Math.pow((1-t), 2)+

                3*p2.getY()*Math.pow(t, 2)*(1-t)+

                p3.getY()*Math.pow(t, 3);

        float y=Float.parseFloat(dy.toString());

        return new Heart(x,y,startValue.getColor());

    }

    /**

     * 根据起始点和终点 算出其余两个辅佐点,

     * 算法自定义

     * @param heart0 开始点

     * @param heart3 终点

     * @return

     */

    public Heart[] createPoints(Heart heart0,Heart heart3){

        float wx=Math.abs(heart0.getX()-heart3.getX());

        Heart heart1=new Heart(heart3.getX(), heart0.getY()-wx, heart0.getColor());

        Heart heart2=new Heart(heart0.getX(),wx,heart3.getColor());

        return new Heart[]{heart0,heart1,heart2,heart3};

    }

    /**

     * 获得飘动的方向

     * @return 一个Int类型的数据,数字为1或是-1。

     */

    private int getOrientation(){

        if(r.nextFloat()>=0.5){

            return 1;

        }

        return -1;

    }

}
HeartEvaluator.java
在这个HeartEvaluator估值器中,我们使用三阶贝塞尔曲线公式,实现单个图形按如下路径移动:
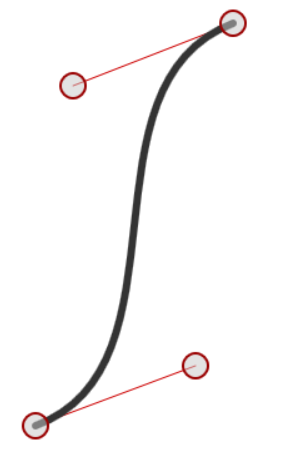
三阶贝塞尔曲线的公式为:

HeartAnimation.java 文件
package heart.model;

import java.util.ArrayList;

import java.util.List;

import java.util.Random;

import java.util.Timer;

import java.util.TimerTask;

import android.animation.Animator;

import android.animation.Animator.AnimatorListener;

import android.animation.AnimatorSet;

import android.animation.ObjectAnimator;

import android.animation.ValueAnimator;

import android.animation.ValueAnimator.AnimatorUpdateListener;

import android.content.Context;

import android.graphics.Color;

import android.os.Handler;

import android.os.Message;

import android.view.ViewGroup;

public class HeartAnimation {

    private int width;

    private int height;

    private List<HeartView> heartViews=null;

    private static Random random=new Random();

    private ViewGroup parent=null;

    private Context context=null;

    private static final int COLOR_LIMIT=4;

    /**

     * 有参数构造器

     * @param width 宽度

     * @param height 高度

     * @param parent 容器组件

     * @param context 上下文对象

     */

    public HeartAnimation(int width,int height,ViewGroup parent,Context context){

        this.width=width;

        this.height=height;

        this.parent=parent;

        this.context=context;

        heartViews=new ArrayList<HeartView>();

    }

    /**

     * 设置需要显示图形的个数

     * @param count 图形的个数

     * @return 返回一个HeartAnimation类型的数据,当前对象。

     */

    public HeartAnimation setCount(int count){

        if(heartViews!=null)

            heartViews.clear();

        for(int i=0;i<count;i++){

            HeartView heartView=new HeartView(context, new Heart(width/2-25, height-100,getColor()));

            heartViews.add(heartView);

            addAnimation(heartView);//添加动画

        }

        return this;

    }

    public HeartAnimation addAnimation(final HeartView heartView){

        //创建一个估值器

        HeartEvaluator heartEvaluator=new HeartEvaluator();

        //获得起点的图形

        Heart startHeart=heartView.getHeart();

        //获得终点的图形

        Heart endHeart=new Heart(getXPosition(),0,startHeart.getColor());

        ValueAnimator animator=ValueAnimator.ofObject(heartEvaluator, startHeart,endHeart);

        ObjectAnimator alphaAnimator=ObjectAnimator.ofFloat(heartView, "alpha", 1,0);

        animator.addUpdateListener(new AnimatorUpdateListener() {

            @Override

            public void onAnimationUpdate(ValueAnimator animation) {

                //获得改变后的值

                heartView.setHeart((Heart)animation.getAnimatedValue());

                //重新设置新值

                heartView.invalidate();

            }

        });

        animator.addListener(new AnimatorListener() {

            @Override

            public void onAnimationStart(Animator animation) {

            }

            @Override

            public void onAnimationRepeat(Animator animation) {

            }

            @Override

            public void onAnimationEnd(Animator animation) {

                parent.removeView(heartView);//移除

                HeartView fHeartView= new HeartView(context, new Heart(width/2-25, height-100,getColor()));

                addAnimation(fHeartView);//重新开始动画

                parent.addView(fHeartView);//将该新图形添加到容器中

            }

            @Override

            public void onAnimationCancel(Animator animation) {

            }

        });

        AnimatorSet animatorSet=new AnimatorSet();

        animatorSet.play(animator).with(alphaAnimator);

        animatorSet.setDuration(getDuration());

        animatorSet.setStartDelay(getStartDelay());

        //开始

        animatorSet.start();

        return this;

    }

    /**

     * 开始

     */

    public void start(){

        for(HeartView heartView : heartViews){

            parent.addView(heartView);//将心图形对象依次添加到容器中

        }

    }

    /**

     * 终点横坐标的随机数

     * @return 终点的横坐标

     */

    private int getXPosition(){

        return random.nextInt(width);

    }

    /**

     * @return 一个long类型的整数,表示延迟的毫秒数。

     */

    public static long getStartDelay(){

        return (random.nextInt(5)+1)*1000;

    }

    /**

     * @return 一个long类型的数据,表示持续毫秒时间,返回值在[3000,5000)之间;

     */

    public long getDuration(){

        return (random.nextInt(2)+3)*1000;

    }

    /**

     * @return 一个int类型的数据,表示颜色值。

     */

    public int getColor(){

        int colorType= random.nextInt(COLOR_LIMIT);

        int color=0;

        switch (colorType) {

        case 0:

            color=Color.RED;

            break;

        case 1:

            color=Color.BLUE;

            break;

        case 2:

            color=Color.YELLOW;

            break;

        default:

            color=Color.GREEN;

            break;

        }

        return color;

    }

}
HeartAnimation.java
笔者在addAnimation方法中,同时播放alpha和Heart的动画,然后监听addUpdateListener,在有新值后,重新设置新值。
Mainctivity.java 文件
package heart.entry;

import heart.model.HeartAnimation;

import cn.heart.R;

import android.os.Bundle;

import android.widget.RelativeLayout;

public class MainActivity extends BaseActivity {

    RelativeLayout relativeLayout=null;

    @Override

    protected void onCreate(Bundle savedInstanceState) {

        super.onCreate(savedInstanceState);

        setContentView(R.layout.activity_main);

        ViewShowListen(R.id.layout, 10001);

    }

    @Override

    public void ViewAfterShow(final int width,final int height) {

        relativeLayout=(RelativeLayout)findViewById(R.id.layout);

        HeartAnimation heartAnimation=new HeartAnimation(width, height,relativeLayout,MainActivity.this);

        heartAnimation.setCount(20).start();

    }

}
MainActivity.java
5.View、surfaceView和GLSurfaceView的区别
5.1 View、surfaceView和GLSurfaceView的区别
Android游戏当中主要的除了控制类外就是显示类View。SurfaceView是从View基类中派生出来的显示类。android游戏开发中常用的三种视图是:
view、SurfaceView和GLSurfaceView的区别如下:
View:显示视图,内置画布,提供图形绘制函数、触屏事件、按键事件函数等;必须在UI主线程内更新画面,速度较慢
SurfaceView:基于view视图进行拓展的视图类,更适合2D游戏的开发;是view的子类,类似使用双缓机制,在新的线程中更新画面所以刷新界面速度比view快。
GLSurfaceView:基于SurfaceView视图再次进行拓展的视图类,专用于3D游戏开发的视图;是SurfaceView的子类,openGL专用。
在2D游戏开发中,大致可以分为两种游戏框架,View和SurfaceView。
View和SurfaceView区别:
View:必须在UI的主线程中更新画面,用于被动更新画面。
surfaceView:UI线程和子线程中都可以。在一个新启动的线程中重新绘制画面,主动更新画面。
UI的主线程中更新画面 可能会引发问题,比如你更新画面的时间过长,那么你的主UI线程会被你正在画的函数阻塞。那么将无法响应按键,触屏等消息。
当使用surfaceView 由于是在新的线程中更新画面所以不会阻塞你的UI主线程。但这也带来了另外一个问题,就是事件同步,涉及到线程同步。
所以基于以上,根据游戏特点,一般分成两类。
1 被动更新画面的。比如棋类,这种用view就好了。因为画面的更新是依赖于 onTouch 来更新,可以直接使用 invalidate。 因为这种情况下,这一次Touch和下一次的Touch需要的时间比较长些,不会产生影响。
2 主动更新。比如一个人在一直跑动。这就需要一个单独的thread不停的重绘人的状态,避免阻塞main UI thread。所以显然view不合适,需要surfaceView来控制
上面的所有的案例的,笔者都是用的View来实现的(这并不是最理想的选择,尤其是最后一个贝塞尔曲线动画),在知道了这一节的知识后,读者可以尝试使用SurfaceView来实现那些2D动画。
5.2 SurfaceView
5.2.1 SurfaceView的使用
1.创建SurfaceView,需要创建一个新的扩展了SurfaceView的类,并实现SurfaceHolder.Callback
2.需要重写的方法
(1)public void surfaceChanged(SurfaceHolder holder,int format,int width,int height){}
//在surface的大小发生改变时激发
(2)public void surfaceCreated(SurfaceHolder holder){}
//在创建时激发,一般在这里调用画图的线程。
(3)public void surfaceDestroyed(SurfaceHolder holder) {}
//销毁时激发,一般在这里将画图的线程停止、释放。
整个过程:继承SurfaceView并实现SurfaceHolder.Callback接口 ----> SurfaceView.getHolder()获得SurfaceHolder对象 ---->SurfaceHolder.addCallback(callback)添加回调函数---->SurfaceHolder.lockCanvas()获得Canvas对象并锁定画布----> Canvas绘画 ---->SurfaceHolder.unlockCanvasAndPost(Canvas canvas)结束锁定画图,并提交改变,将图形显示。
3、SurfaceHolder
这里用到了一个类SurfaceHolder,可以把它当成surface的控制器,用来操纵surface。处理它的Canvas上画的效果和动画,控制表面,大小,像素等。
几个需要注意的方法:
(1)、abstract void addCallback(SurfaceHolder.Callback callback);
// 给SurfaceView当前的持有者一个回调对象。
(2)、abstract Canvas lockCanvas();
// 锁定画布,一般在锁定后就可以通过其返回的画布对象Canvas,在其上面画图等操作了。
(3)、abstract Canvas lockCanvas(Rect dirty);
// 锁定画布的某个区域进行画图等..因为画完图后,会调用下面的unlockCanvasAndPost来改变显示内容。
// 相对部分内存要求比较高的游戏来说,可以不用重画dirty外的其它区域的像素,可以提高速度。
(4)、abstract void unlockCanvasAndPost(Canvas canvas);
// 结束锁定画图,并提交改变。
栗子:
public class MainActivity extends Activity {

    public void onCreate(Bundle savedInstanceState) {

        super.onCreate(savedInstanceState);

        setContentView(new MyView(this));

     }

    class MyView extends SurfaceView implements SurfaceHolder.Callback,Runnable{

        boolean mRunning=false;

        SurfaceHolder holder=null;

        Thread td=null;

        public MyView(Context context) {

            super(context);

            holder=getHolder();

            holder.addCallback(this);

            setFocusable(true);

            setFocusableInTouchMode(true);

            this.setKeepScreenOn(true);

        }

        @Override

        public void surfaceCreated(SurfaceHolder holder) {

            mRunning=true;//允许开始绘制

            td=new Thread(this);

            td.start();//开始线程

        }

        @Override

        public void surfaceChanged(SurfaceHolder holder, int format, int width,

                int height) {

        }

        @Override

        public void surfaceDestroyed(SurfaceHolder holder) {

            mRunning=false;//停止

        }

        @Override

        public void run() {

            Canvas c = null;

            int count=0;

            while(mRunning){

                try{

                            c = holder.lockCanvas();//锁定画布,一般在锁定后就可以通过其返回的画布对象Canvas,在其上面画图等操作了。

                            c.drawColor(Color.BLACK);//设置画布背景颜色,如何背景是透明的话,那么建议设置成c.drawColor(Color.TRANSPARENT);如果需要在设置画布之前,清楚画布上的所有东西,那么建议设置成c.drawColor(Color.TEANSPARENT,Mode.CLEAR)

                            Paint p = new Paint(); //创建画笔

                            p.setColor(Color.WHITE);

                            Rect r = new Rect(100, 50, 300, 250);

                            c.drawRect(r, p);

                            c.drawText("这是第"+(count++)+"秒", 100, 310, p);

                            Thread.sleep(1000);//睡眠时间为1秒

                }catch(Exception e){

                    e.printStackTrace();

                }finally{

                    if(c!= null)

                        holder.unlockCanvasAndPost(c);//结束锁定画图,并提交改变。

                }

            }

        }

    }

}
5.2.2 SurfaceView的分层
在使用Surface类开发时,常常需要使绘制出来的图案背景色透明,以实现背景图片和绘制出来的图案融为一体,具体操作方法如下:
首先继承surfaceview类的子类(即你写的类)的构造方法中设置背景图片:
setBackgroundResource(R.drawable.background);
再加入下面这两行:
    setZOrderOnTop(true);//使surfaceview放到最顶层

    getHolder().setFormat(PixelFormat.TRANSLUCENT);//使窗口支持透明度
然后在绘制方法(一般为onDraw())中加入:
canvas.drawColor(Color.TRANSPARENT,Mode.CLEAR);//绘制透明色
在Surface开发中,是常常需要进行分层开发的,这时候可能需要在界面上加入好几个的Surface的实现类。
比如:
        RelativeLayout rl=(RelativeLayout)findViewById(R.id.idVal);

        rl.addView(SurfaceSubClass1);

        rl.addView(SurfaceSubClass2);
如果SurfaceSubClass2覆盖了SurfaceSubClass1的图案,那么这显然不是我们希望的,所以应该把SurfaceSubClass2设置为背景透明。
上面讨论是进行两层的开发,那么如果是需要进行三层或是三层以上分层开发,那么应该怎么办呢?
例如:
        RelativeLayout rl=(RelativeLayout)findViewById(R.id.idVal);

        rl.addView(SurfaceSubClass1);//

        rl.addView(SurfaceSubClass2);//

        rl.addView(SurfaceSubClass3);//
上面的代码中,读者知道1,2,3条语句的哪一个SurfaceSubClass最先被加载到RelativeLayout(三个SurfaceSubClass都没有设置setZOrderOnTop(true))中吗?答案是SurfaceSubClass3,注意这里的三个SurfaceSubClass被加载到RelativeLayout中的顺序是3-2-1。知道了这一点后,进行多层开发就简单了,比如上面的三个SurfaceSubClass中,SurfaceSubClass3应该是最底层的图案(不需要设置透明),再上面一层应该是SurfaceSubClass2的图案(需要设置为透明,否则看不到底层图案),最上面一层是SurfaceSubClass1的图案(需要设置为透明),注意:这三个SurfaceSubClass都没有设置setZOrderOnTop(true)。
最新文章
- Oracle
- ppp数据帧的格式
- 3dsMax用到的网格优化
- ArcMap 操作笔记
- 十二、Java基础---------异常处理机制
- webView--总结
- delphi 保存网页
- dive into python 读笔(1)
- Unity给力插件之MeshBaker
- exec与xargs区别
- Github Atom
- 大约Android PopupWindow有用Spinner控件点击APP Crash案例整理!
- 2016年团体程序设计天梯赛-决赛 L2-3. 互评成绩(25)
- javascript:void(0); 是什么意思
- bzoj 3212 Pku3468 A Simple Problem with Integers
- Vim-latex 插件 的安装
- CentOS7.5 安装ssh
- 破解idea
- Java 高级开发必修知识---内部类
- 苹果电脑thunderbolt连接两台电脑启动方法
热门文章
- 自己定义View时,用到Paint Canvas的一些温故,简单的帧动画(动画一 ,&quot;掏粪男孩Gif&quot;顺便再提提onWindowFocusChanged)
- 转:C++操作mysql方法总结(1)
- [Javascript] Avoiding Mutations in JavaScript with Immutable Data Structures
- 【Nodejs】使用http.request批量下载MP3,发现网络文件大于1000K时下载文件为0K
- HDU1069(还是dp基础)
- javascript数组操作大全,数组方法总汇
- LintCode: Fizz Buzz
- 微信小程序 - 自定义导航栏(提示)
- Maven进行Mahout编程,使其兼容Hadoop2.2.0环境运行 (转)
- Hibernate学习笔记一:项目创建与基本配置文件