ActiveMQ实例2--Spring JMS发送消息
2024-10-12 21:07:35
参考文章:http://my.oschina.net/xiaoxishan/blog/381209#OSC_h3_7
一,步骤参照参考文献
二、新建的项目

三、补充
web.xml
 <?xml version="1.0" encoding="UTF-8"?>

 <web-app version="3.0" xmlns="http://java.sun.com/xml/ns/javaee"

     xmlns:xsi="http://www.w3.org/2001/XMLSchema-instance"

     xsi:schemaLocation="http://java.sun.com/xml/ns/javaee

     http://java.sun.com/xml/ns/javaee/web-app_3_0.xsd">

     <display-name>activemq</display-name>

     <!-- Spring ApplicationContext配置文件的路径,可使用通配符,用于后面的Spring Context Loader -->

     <context-param>

         <param-name>contextConfigLocation</param-name>

         <param-value>

             classpath:applicationContext.xml

         </param-value>

     </context-param>

     <!--Spring ApplicationContext 载入 -->

     <listener>

         <listener-class>org.springframework.web.context.ContextLoaderListener</listener-class>

     </listener>

     <!-- Spring MVC Servlet -->

     <servlet>

         <servlet-name>dispatcher</servlet-name>

         <servlet-class>com.alibaba.dubbo.remoting.http.servlet.DispatcherServlet</servlet-class>

         <init-param>

             <param-name>contextConfigLocation</param-name>

             <param-value>classpath:DispatcherServlet.xml</param-value>

         </init-param>

         <load-on-startup>1</load-on-startup>

     </servlet>

     <servlet-mapping>

         <servlet-name>dispatcher</servlet-name>

         <url-pattern>/</url-pattern>

     </servlet-mapping>

     <welcome-file-list>

         <welcome-file>index.html</welcome-file>

     </welcome-file-list>

 </web-app>
applicationContext.xml
 <?xml version="1.0" encoding="UTF-8"?>

 <beans

         xmlns="http://www.springframework.org/schema/beans"

         xmlns:xsi="http://www.w3.org/2001/XMLSchema-instance"

         xmlns:context="http://www.springframework.org/schema/context"

         xmlns:goldfish="http://www.fangdd.com/schema/goldfish"

         xsi:schemaLocation="http://www.springframework.org/schema/beans http://www.springframework.org/schema/beans/spring-beans.xsd

           http://www.springframework.org/schema/context http://www.springframework.org/schema/context/spring-context.xsd

           http://www.fangdd.com/schema/goldfish http://www.fangdd.com/schema/goldfish/goldfish-1.0.0.xsd">

       <context:annotation-config/>

     <context:component-scan base-package="com.zp.test" >

     </context:component-scan>

     <!-- 使用annotation 自动注册bean,并保证@Required,@Autowired的属性被注入 -->

     <context:component-scan base-package="com.activemqtest.*"/>

     <!-- 配置JMS连接工厂 -->

     <bean id="connectionFactory" class="org.apache.activemq.ActiveMQConnectionFactory">

         <property name="brokerURL" value="failover:(tcp://localhost:61616)" />

     </bean>

     <!-- 定义消息队列(Queue) -->

     <bean id="queueDestination" class="org.apache.activemq.command.ActiveMQQueue">

         <!-- 设置消息队列的名字 -->

         <constructor-arg>

             <value>queue1</value>

         </constructor-arg>

     </bean>

     <!-- 配置JMS模板(Queue),Spring提供的JMS工具类,它发送、接收消息。 -->

     <bean id="jmsTemplate" class="org.springframework.jms.core.JmsTemplate">

         <property name="connectionFactory" ref="connectionFactory" />

         <property name="defaultDestination" ref="queueDestination" />

         <property name="receiveTimeout" value="10000" />

     </bean>

     <!--queue消息生产者 -->

     <bean id="producerService" class="com.activemqtest.serviceImpl.ProducerServiceImpl">

         <property name="jmsTemplate" ref="jmsTemplate"></property>

     </bean>

     <!--queue消息消费者 -->

     <bean id="consumerService" class="com.activemqtest.serviceImpl.ConsumerServiceImpl">

         <property name="jmsTemplate" ref="jmsTemplate"></property>

     </bean>

     <!-- 定义消息队列(Queue),我们监听一个新的队列,queue2 -->

     <bean id="queueDestination2" class="org.apache.activemq.command.ActiveMQQueue">

         <!-- 设置消息队列的名字 -->

         <constructor-arg>

             <value>queue2</value>

         </constructor-arg>

     </bean>

     <!-- 配置消息队列监听者(Queue),代码下面给出,只有一个onMessage方法 -->

     <bean id="queueMessageListener" class="com.activemqtest.serviceImpl.QueueMessageListener" />

     <!-- 消息监听容器(Queue),配置连接工厂,监听的队列是queue2,监听器是上面定义的监听器 -->

     <bean id="jmsContainer"

         class="org.springframework.jms.listener.DefaultMessageListenerContainer">

         <property name="connectionFactory" ref="connectionFactory" />

         <property name="destination" ref="queueDestination2" />

         <property name="messageListener" ref="queueMessageListener" />

     </bean>

     <!-- 定义消息主题(Topic) -->

     <bean id="topicDestination" class="org.apache.activemq.command.ActiveMQTopic">

         <constructor-arg>

             <value>JY_topic</value>

         </constructor-arg>

     </bean>

     <!-- 配置JMS模板(Topic),pubSubDomain="true"-->

     <bean id="topicJmsTemplate" class="org.springframework.jms.core.JmsTemplate">

         <property name="connectionFactory" ref="connectionFactory" />

         <property name="defaultDestination" ref="topicDestination" />

         <property name="pubSubDomain" value="true" />

         <property name="receiveTimeout" value="10000" />

     </bean>

     <!--topic消息发布者 -->

     <bean id="topicProvider" class="com.activemqtest.serviceImpl.TopicProvider">

         <property name="topicJmsTemplate" ref="topicJmsTemplate"></property>

     </bean>

     <!-- 消息主题监听者 和 主题监听容器 可以配置多个,即多个订阅者 -->

     <!-- 消息主题监听者(Topic) -->

     <bean id="topicMessageListener" class="com.activemqtest.serviceImpl.TopicMessageListener" />

     <!-- 主题监听容器 (Topic) -->

     <bean id="topicJmsContainer"

         class="org.springframework.jms.listener.DefaultMessageListenerContainer">

         <property name="connectionFactory" ref="connectionFactory" />

         <property name="destination" ref="topicDestination" />

         <property name="messageListener" ref="topicMessageListener" />

     </bean>

     </beans>
DispactcherServlet.xml
 <?xml version="1.0" encoding="UTF-8"?>

 <beans xmlns="http://www.springframework.org/schema/beans"

        xmlns:xsi="http://www.w3.org/2001/XMLSchema-instance"

        xmlns:context="http://www.springframework.org/schema/context"

        xmlns:mvc="http://www.springframework.org/schema/mvc"

        xsi:schemaLocation="http://www.springframework.org/schema/mvc http://www.springframework.org/schema/mvc/spring-mvc-4.0.xsd

         http://www.springframework.org/schema/beans http://www.springframework.org/schema/beans/spring-beans-4.0.xsd

         http://www.springframework.org/schema/context http://www.springframework.org/schema/context/spring-context-4.0.xsd">

     <context:annotation-config />

     <context:component-scan base-package="com.zp.test.controller">

         <context:include-filter type="annotation" expression="org.springframework.stereotype.Controller"/>

     </context:component-scan>

  </beans>
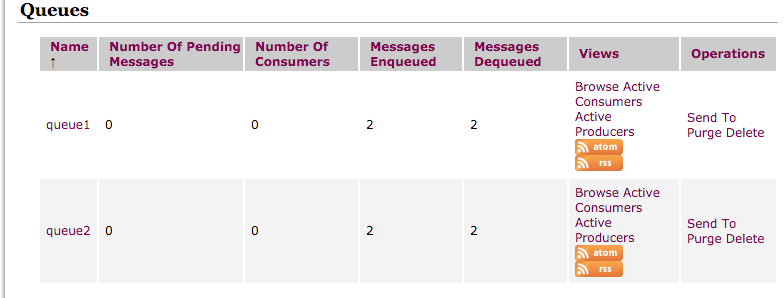
四、运行结果

因为运行了两遍,所以是双数
五、遇到的问题
问题:Java.lang.IllegalStateException: Failed to load ApplicationContext
原因:因为applicationContext里的包没有与实际的包对应,或者是没有注解导入对应的变量
最新文章
- C和指针 第六章 指针6.2 6.3字符串中查找的两个版本
- 【重要!】告K2老客户书
- Bootstrap v4.0.0-alpha.5 发布,大量更新
- NSURLSession从网络上下载资源,此程序下载的是视频
- fbset 移植
- 使用easyUI 创建复杂的toolbar到datagrid
- ThinkPad告别蓝快,自己使用VHD安 WIN8.1并成功激活
- ToolBar Style
- Codeforces Round #339 Div.2 C - Peter and Snow Blower
- 锋利的JQuery-Jquery选择器
- 使用LINQ 對List分頁/區
- 08_使用TCP/IP Monitor监视SOAP协议
- group by 替代distinct
- 函数fold 或reduce用法
- VS2010/MFC对话框三:创建对话框类和添加控件变量
- 关于 Rijndael 加密
- ASP.Net Core MVC+Ajax 跨域
- Ubuntu zsh shell 一站式解决方案
- 实战深度学习(上)OpenCV库
- 20175204 张湲祯 2018-2019-2《Java程序设计》第二周学习总结