The Quantum L3 router and floating IPs
This post shows how the Quantum L3 Agent uses the Linux IP stack to implement the Quantum L3 Routing and NAT API extensions. It explains in detail how external access with floating IP works and how it can be debugged.
The setup is from the Grizzly on Ubuntu 12.04 installer script where the OVS (Open vSwitch) plugin is used and IP namespaces are enabled. This post focuses on the quantum-l3-agent and assumes you are already familiar with Quantum - if not see the doc here. How the quantum-ovs-plugin-agent provides layer-2 connectivity for instances and agents was briefly described in this post.
First setup some networks and boot an instance - see the doc for more details. Note: you can use the web dashboard (Horizon) for this instead.
$ quantum net-create net1

Created a new network:

+---------------------------+--------------------------------------+

| Field                     | Value                                |

+---------------------------+--------------------------------------+

| admin_state_up            | True                                 |

| id                        | a7e512cf-1ca0-4ec7-be75-46a8998cf9ca |

| name                      | net1                                 |

| provider:network_type     | gre                                  |

| provider:physical_network |                                      |

| provider:segmentation_id  | 1                                    |

| router:external           | False                                |

| shared                    | False                                |

| status                    | ACTIVE                               |

| subnets                   |                                      |

| tenant_id                 | 1b1590f268f548a2afff003aa00292b8     |

+---------------------------+--------------------------------------+

$ quantum subnet-create net1 172.17.17.0/24 \

>     --name sub1 --dns-nameserver 8.8.8.8

Created a new subnet:

+------------------+--------------------------------------------------+

| Field            | Value                                            |

+------------------+--------------------------------------------------+

| allocation_pools | {"start": "172.17.17.2", "end": "172.17.17.254"} |

| cidr             | 172.17.17.0/24                                   |

| dns_nameservers  | 8.8.8.8                                          |

| enable_dhcp      | True                                             |

| gateway_ip       | 172.17.17.1                                      |

| host_routes      |                                                  |

| id               | cec6d941-369c-49da-8fdd-450900e2a218             |

| ip_version       | 4                                                |

| name             | sub1                                             |

| network_id       | a7e512cf-1ca0-4ec7-be75-46a8998cf9ca             |

| tenant_id        | 1b1590f268f548a2afff003aa00292b8                 |

+------------------+--------------------------------------------------+

$ quantum net-create ext-net --provider:network_type local \

>     --router:external true

Created a new network:

+---------------------------+--------------------------------------+

| Field                     | Value                                |

+---------------------------+--------------------------------------+

| admin_state_up            | True                                 |

| id                        | ba37130b-366d-4ded-a768-aad92a1e6ed2 |

| name                      | ext-net                              |

| provider:network_type     | local                                |

| provider:physical_network |                                      |

| provider:segmentation_id  |                                      |

| router:external           | True                                 |

| shared                    | False                                |

| status                    | ACTIVE                               |

| subnets                   |                                      |

| tenant_id                 | 1b1590f268f548a2afff003aa00292b8     |

+---------------------------+--------------------------------------+

$ quantum subnet-create ext-net 192.168.101.0/24 \

>     --enable_dhcp false --gateway_ip 192.168.101.1

Created a new subnet:

+------------------+------------------------------------------------------+

| Field            | Value                                                |

+------------------+------------------------------------------------------+

| allocation_pools | {"start": "192.168.101.2", "end": "192.168.101.254"} |

| cidr             | 192.168.101.0/24                                     |

| dns_nameservers  |                                                      |

| enable_dhcp      | False                                                |

| gateway_ip       | 192.168.101.1                                        |

| host_routes      |                                                      |

| id               | fe59f3db-11af-4848-82e8-d482c48c64e1                 |

| ip_version       | 4                                                    |

| name             |                                                      |

| network_id       | ba37130b-366d-4ded-a768-aad92a1e6ed2                 |

| tenant_id        | 1b1590f268f548a2afff003aa00292b8                     |

+------------------+------------------------------------------------------+

$ quantum router-create router1

Created a new router:

+-----------------------+--------------------------------------+

| Field                 | Value                                |

+-----------------------+--------------------------------------+

| admin_state_up        | True                                 |

| external_gateway_info |                                      |

| id                    | 4cdb0354-7732-4d8f-a3d0-9fbc4b93a62d |

| name                  | router1                              |

| status                | ACTIVE                               |

| tenant_id             | 1b1590f268f548a2afff003aa00292b8     |

+-----------------------+--------------------------------------+

$ quantum router-gateway-set router1 ext-net

Set gateway for router router1

$ quantum router-interface-add router1 sub1

Added interface to router router1

$ nova boot --flavor micro --image cirros-030-x86_64 \

>    --nic net-id=a7e512cf-1ca0-4ec7-be75-46a8998cf9ca \

>    --security-groups test-vms test1

...
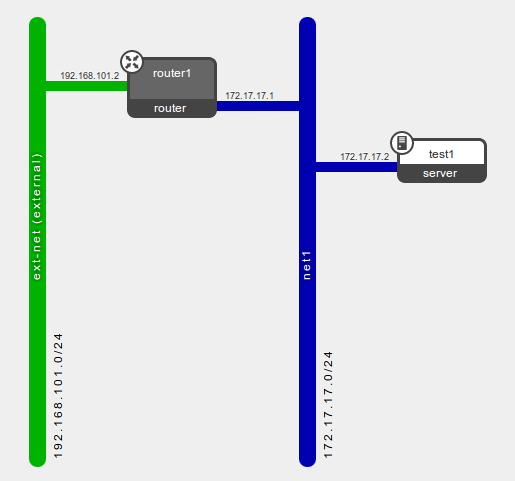
Now the logical diagram in Horizon looks like:
Next create a floating IP and associate it with the instance's port:
$ quantum floatingip-create ext-net

Created a new floatingip:

+---------------------+--------------------------------------+

| Field               | Value                                |

+---------------------+--------------------------------------+

| fixed_ip_address    |                                      |

| floating_ip_address | 192.168.101.3                        |

| floating_network_id | ba37130b-366d-4ded-a768-aad92a1e6ed2 |

| id                  | 31069cae-e210-4de5-9c6f-cc0719c7f057 |

| port_id             |                                      |

| router_id           |                                      |

| tenant_id           | 1b1590f268f548a2afff003aa00292b8     |

+---------------------+--------------------------------------+

$ nova list

+--------------------------------------+-------+--------+------------------+

| ID                                   | Name  | Status | Networks         |

+--------------------------------------+-------+--------+------------------+

| cedf9919-8271-422f-b07c-da9f1e8c9eee | test1 | ACTIVE | net1=172.17.17.2 |

+--------------------------------------+-------+--------+------------------+

$ quantum port-list --fields id \

>     -- --device_id cedf9919-8271-422f-b07c-da9f1e8c9eee

+--------------------------------------+

| id                                   |

+--------------------------------------+

| 6bb3d372-e920-451f-9f2d-855aec5dd6d7 |

+--------------------------------------+

$ quantum floatingip-associate \

>    31069cae-e210-4de5-9c6f-cc0719c7f057 \

>    6bb3d372-e920-451f-9f2d-855aec5dd6d7

Associated floatingip 31069cae-e210-4de5-9c6f-cc0719c7f057

$ quantum floatingip-show 31069cae-e210-4de5-9c6f-cc0719c7f057

+---------------------+--------------------------------------+

| Field               | Value                                |

+---------------------+--------------------------------------+

| fixed_ip_address    | 172.17.17.2                          |

| floating_ip_address | 192.168.101.3                        |

| floating_network_id | ba37130b-366d-4ded-a768-aad92a1e6ed2 |

| id                  | 31069cae-e210-4de5-9c6f-cc0719c7f057 |

| port_id             | 6bb3d372-e920-451f-9f2d-855aec5dd6d7 |

| router_id           | 4cdb0354-7732-4d8f-a3d0-9fbc4b93a62d |

| tenant_id           | 1b1590f268f548a2afff003aa00292b8     |

+---------------------+--------------------------------------+
Now the setup is all done, its time to look at what the quantum-l3-agent did on the network node. First the OVS config:
root@netnode:/# ovs-vsctl show

368a5610-6586-428f-a238-ecbae1c4f561

    Bridge br-int

        Port patch-tun

            Interface patch-tun

                type: patch

                options: {peer=patch-int}

        Port "qr-9f1fa61e-1e"

            tag: 1

            Interface "qr-9f1fa61e-1e"

                type: internal

        Port "tap1470cfd3-a6"

            tag: 1

            Interface "tap1470cfd3-a6"

                type: internal

        Port br-int

            Interface br-int

                type: internal

    Bridge br-ex

        Port "qg-1423ba35-7c"

            Interface "qg-1423ba35-7c"

                type: internal

        Port "eth3"

            Interface "eth3"

        Port br-ex

            Interface br-ex

                type: internal

    Bridge br-tun

        Port br-tun

            Interface br-tun

                type: internal

        Port patch-int

            Interface patch-int

                type: patch

                options: {peer=patch-tun}

        Port "gre-2"

            Interface "gre-2"

                type: gre

                options: {in_key=flow, out_key=flow, remote_ip="10.0.20.12"}

    ovs_version: "1.4.0+build0"
The OVS bridge br-int (integration bridge) has two ports. The port named tap1470cfd3-a6 was added by the dhcp-agent. More relevant to this post is the port named qr-9f1fa61e-1e which was added by the quantum-l3-agent for router1's interface on net1. Both ports in br-int have the same tag as they belong to the same Quantum network (net1).
The OVS bridge br-ex (external bridge) was created manually at install time with "physical" nic eth3 bridged in - seedoc. Now the quantum-l3-agent has added port qg-1423ba35-7c to it in order to uplink router1 to the external network.
The names for the OVS ports and interfaces are made from a prefix (qr-, qg- or tap) followed by the first 11 chars of the Quantum port they represent.
$ quantum router-port-list router1

+--------------------------------------+------+-------------------+--------------------------------------------------------------------------------------+

| id                                   | name | mac_address       | fixed_ips                                                                            |

+--------------------------------------+------+-------------------+--------------------------------------------------------------------------------------+

| 1423ba35-7c78-44b1-9a1a-319e8133a6ca |      | fa:16:3e:3a:97:7b | {"subnet_id": "fe59f3db-11af-4848-82e8-d482c48c64e1", "ip_address": "192.168.101.2"} |

| 9f1fa61e-1e3b-4091-a8cb-59651eab214d |      | fa:16:3e:ea:80:95 | {"subnet_id": "cec6d941-369c-49da-8fdd-450900e2a218", "ip_address": "172.17.17.1"}   |

+--------------------------------------+------+-------------------+--------------------------------------------------------------------------------------+
The router gets its own IP namespace that is separate from the DHCP namespace and the main host operating system namespace. And within it are the interfaces that are plugged into the OVS bridges:
root@netnode:/# ip netns

qdhcp-a7e512cf-1ca0-4ec7-be75-46a8998cf9ca

qrouter-4cdb0354-7732-4d8f-a3d0-9fbc4b93a62d

root@netnode:/# ip netns exec qrouter-4cdb0354-7732-4d8f-a3d0-9fbc4b93a62d ip address

10: lo: <LOOPBACK,UP,LOWER_UP> mtu 16436 qdisc noqueue state UNKNOWN

    link/loopback 00:00:00:00:00:00 brd 00:00:00:00:00:00

    inet 127.0.0.1/8 scope host lo

    inet6 ::1/128 scope host

       valid_lft forever preferred_lft forever

11: qg-1423ba35-7c: <BROADCAST,MULTICAST,PROMISC,UP,LOWER_UP> mtu 1500 qdisc noqueue state UNKNOWN

    link/ether fa:16:3e:3a:97:7b brd ff:ff:ff:ff:ff:ff

    inet 192.168.101.2/24 brd 192.168.101.255 scope global qg-1423ba35-7c

    inet 192.168.101.3/32 brd 192.168.101.3 scope global qg-1423ba35-7c

    inet6 fe80::f816:3eff:fe3a:977b/64 scope link

       valid_lft forever preferred_lft forever

12: qr-9f1fa61e-1e: <BROADCAST,MULTICAST,PROMISC,UP,LOWER_UP> mtu 1500 qdisc noqueue state UNKNOWN

    link/ether fa:16:3e:ea:80:95 brd ff:ff:ff:ff:ff:ff

    inet 172.17.17.1/24 brd 172.17.17.255 scope global qr-9f1fa61e-1e

    inet6 fe80::f816:3eff:feea:8095/64 scope link

       valid_lft forever preferred_lft forever
The agent has bound IP addresses 192.168.101.2 (for gateway SNAT) and 192.168.101.3 (the floating IP) to the gateway interface qg-1423ba35-7c.
It has also bound 172.17.17.1 (sub1's gateway_ip) to qr-9f1fa61e-1e (router1's interface for sub1). DHCP pushes this IP to instances connected to sub1 for their default gateway.
The agent has also enabled IP forwarding within the namespace:
root@netnode:/# ip netns exec qrouter-4cdb0354-7732-4d8f-a3d0-9fbc4b93a62d sysctl net.ipv4.ip_forward

net.ipv4.ip_forward = 1

root@netnode:/# ip netns exec qrouter-4cdb0354-7732-4d8f-a3d0-9fbc4b93a62d route -n

Kernel IP routing table

Destination     Gateway         Genmask         Flags Metric Ref    Use Iface

0.0.0.0         192.168.101.1   0.0.0.0         UG    0      0        0 qg-1423ba35-7c

172.17.17.0     0.0.0.0         255.255.255.0   U     0      0        0 qr-9f1fa61e-1e

192.168.101.0   0.0.0.0         255.255.255.0   U     0      0        0 qg-1423ba35-7c
If additional interfaces were added to router1 for other Quantum subnets, then their qr-xxxxxxxx-xx interfaces and routes would be added to the namespace.
Note in this case the default gateway 192.168.101.1 is an IP on the laptop running the VirtualBox VM netnode.
NAT
The quantum-l3-agent configures rules in the iptables nat table for floating IPs and the snat gateway. See here for iptables packet flow diagrams.
root@netnode:/# ip netns exec qrouter-4cdb0354-7732-4d8f-a3d0-9fbc4b93a62d iptables-save

# Generated by iptables-save v1.4.12 on Wed May 15 16:20:07 2013

*nat

:PREROUTING ACCEPT [175:53900]

:INPUT ACCEPT [175:53900]

:OUTPUT ACCEPT [0:0]

:POSTROUTING ACCEPT [1:84]

:quantum-l3-agent-OUTPUT - [0:0]

:quantum-l3-agent-POSTROUTING - [0:0]

:quantum-l3-agent-PREROUTING - [0:0]

:quantum-l3-agent-float-snat - [0:0]

:quantum-l3-agent-snat - [0:0]

:quantum-postrouting-bottom - [0:0]

-A PREROUTING -j quantum-l3-agent-PREROUTING

-A OUTPUT -j quantum-l3-agent-OUTPUT

-A POSTROUTING -j quantum-l3-agent-POSTROUTING

-A POSTROUTING -j quantum-postrouting-bottom

-A quantum-l3-agent-OUTPUT -d 192.168.101.3/32 -j DNAT --to-destination 172.17.17.2

-A quantum-l3-agent-POSTROUTING ! -i qg-1423ba35-7c ! -o qg-1423ba35-7c -m conntrack ! --ctstate DNAT -j ACCEPT

-A quantum-l3-agent-PREROUTING -d 169.254.169.254/32 -p tcp -m tcp --dport 80 -j REDIRECT --to-ports 9697

-A quantum-l3-agent-PREROUTING -d 192.168.101.3/32 -j DNAT --to-destination 172.17.17.2

-A quantum-l3-agent-float-snat -s 172.17.17.2/32 -j SNAT --to-source 192.168.101.3

-A quantum-l3-agent-snat -j quantum-l3-agent-float-snat

-A quantum-l3-agent-snat -s 172.17.17.0/24 -j SNAT --to-source 192.168.101.2

-A quantum-postrouting-bottom -j quantum-l3-agent-snat

COMMIT

# Completed on Wed May 15 16:20:07 2013

# Generated by iptables-save v1.4.12 on Wed May 15 16:20:07 2013

*filter

:INPUT ACCEPT [260:56620]

:FORWARD ACCEPT [4:336]

:OUTPUT ACCEPT [0:0]

:quantum-filter-top - [0:0]

:quantum-l3-agent-FORWARD - [0:0]

:quantum-l3-agent-INPUT - [0:0]

:quantum-l3-agent-OUTPUT - [0:0]

:quantum-l3-agent-local - [0:0]

-A INPUT -j quantum-l3-agent-INPUT

-A FORWARD -j quantum-filter-top

-A FORWARD -j quantum-l3-agent-FORWARD

-A OUTPUT -j quantum-filter-top

-A OUTPUT -j quantum-l3-agent-OUTPUT

-A quantum-filter-top -j quantum-l3-agent-local

-A quantum-l3-agent-INPUT -d 127.0.0.1/32 -p tcp -m tcp --dport 9697 -j ACCEPT

COMMIT

# Completed on Wed May 15 16:20:07 2013
So a connection initiated from our instance to the outside will hit this rule in the nat table (post routing):
-A quantum-l3-agent-float-snat -s 172.17.17.2/32 -j SNAT --to-source 192.168.101.3
And connection initiated from the outside to the instance's floating IP will hit this rule:
-A quantum-l3-agent-PREROUTING -d 192.168.101.3/32 -j DNAT --to-destination 172.17.17.2
So if an instance has a floating IP, then that will be used for both inbound and outbound traffic. But if an instance does not have a floating IP, it can still make connections out using the gateway IP, then this rule will be hit:
-A quantum-l3-agent-snat -s 172.17.17.0/24 -j SNAT --to-source 192.168.101.2
Finally this rule prevents snatting on traffic being routed between internal Quantum subnets:
-A quantum-l3-agent-POSTROUTING ! -i qg-1423ba35-7c ! -o qg-1423ba35-7c -m conntrack ! --ctstate DNAT -j ACCEPT
Troubleshooting
The logs are the first place to start. All Openstack services have a log and the easiest thing is to jump to the end and page-up looking for a stack trace. The quantum-l3-agent's log is in /var/log/quantum/l3-agent.log on Ubuntu.
For more subtle problems, tcpdump is a winner. The physical interface in br-ex (eth3 in the diagram above) would be a good candidate to start with floating IP problems. For interfaces within the router namespace, I found it necessary to use line buffering ( -l ) to make it print packets as they happened.
root@netnode:/# ip netns exec qrouter-4cdb0354-7732-4d8f-a3d0-9fbc4b93a62d tcpdump -ln -i qg-1423ba35-7c
To see which iptables rules are being hit, you can zero the nat table counters with 'iptables -t nat -Z', then do a ping or whatever and do 'iptables-save -c' and look for the non-zero counters.
DNS requests from the instances to dnsmasq do not work. I think this is because dnsmasq is isolated in the dhcp namespace and cannot pass on requests. A workaround is to create (or update) the fixed IP subnet with a dns server specified with --dns-nameserver and the dhcp-agent will ensure it is pushed out to instances on the subnet.
root@netnode:/# cat /var/lib/quantum/dhcp/a7e512cf-1ca0-4ec7-be75-46a8998cf9ca/opts

tag:tag0,option:dns-server,8.8.8.8

tag:tag0,option:router,172.17.17.1
This also shows how the instances get the subnet's gateway_ip for their default gateway.
cirros$ route -n

Kernel IP routing table

Destination     Gateway         Genmask         Flags Metric Ref    Use Iface

0.0.0.0         172.17.17.1     0.0.0.0         UG    0      0        0 eth0

172.17.17.0     0.0.0.0         255.255.255.0   U     0      0        0 eth0

cirros$ cat /etc/resolv.conf

search openstacklocal

nameserver 8.8.8.8
Internet access for instances
If the floating IP (or gateway snat IP) is not a routable public IP, then you will need to do additional work outside of OpenStack. In my case I needed my home-router to snat the packets again with the public IP my ISP provides. So I had to configure my laptop's Linux and firewall to allow IP forwarding. And a static route was needed on the home-router to send packets destined for 192.168.101.0/24 to the laptop. Another option would be to add snat (or masquerade) rules to the laptop iptables instead - then there would be 3 levels of nat.
http://techbackground.blogspot.com/2013/05/the-quantum-l3-router-and-floating-ips.html
最新文章
- jQuery初始化加载的实现
- 为什么要使用 Node.js
- [Windows驱动开发](四)内存管理
- SQL初级
- 使用Font Awesome替换你的网站图标
- ImageMagick又一处命令执行
- MFC编程入门之十三(对话框:属性页对话框及相关类的介绍)
- struts2.3.16所需的基本的jar包
- 2016.3.22考试(HNOI难度)
- linux ps命令(转载)
- POJ2996Help Me with the Game
- JsonPath详解
- hdoj 1405 The Last Practice
- Java内存模型JMM与可见性
- 【设计模式 - 19】之观察者模式(Observer)
- cf C. Jeff and Rounding
- input时间输入框小解
- 如何在spring中获取request对象
- 深入浅出AQS之条件队列
- Python编程笔记 - 列表