iPhoneX && iOS11 适配
最近实在是蛮闲的,这都得益于苹果爸爸给力的审核,已经半个月了(委屈)
这个问题已经很久了,但是还是希望分享给各位,当然网上的教程的确很多;
1、automaticallyAdjustsScrollViewInsets
automaticallyAdjustsScrollViewInsets是在iOS11之前为ScrollView自动处理内边距的,讲实话这个属性我从来都是禁止的,不喜欢被别人自动控制,主要原因还是因为控制不住别人的自动控制。
当设置为YES时(默认YES),如果视图里面存在唯一一个UIScrollView或其子类View,那么它会自动设置相应的内边距,这样可以让scroll占据整个视图,又不会让导航栏遮盖。
当controller上的第一个子视图不是scrollview以及其子类的时候,就会取消内边距。此时原本全屏的scrollview设置的frame(0,0,self.view.frame.size.width,xx)就会从状态栏开始算起,如果应用有导航栏的话,那么就会遮盖住视图的64个高度
当然这很绕,简单的方法就是不要去管他,当视图出现故障的时候一定要第一时间想起它!
在iOS11,你会发现这个属性失效了,查询可以看到下面的说明:在iOS11使用UIScrollView's contentInsetAdjustmentBehavior instead
@property(nonatomic,assign) BOOL automaticallyAdjustsScrollViewInsets API_DEPRECATED("Use UIScrollView's contentInsetAdjustmentBehavior instead", ios(7.0,11.0),tvos(7.0,11.0)); // Defaults to YES
你可以这样做:
if (@available(iOS 11.0, *)) {

    self.scrollview.contentInsetAdjustmentBehavior = UIApplicationBackgroundFetchIntervalNever;

} else {

    self.automaticallyAdjustsScrollViewInsets = false;

}
swift:
  if #available(iOS 11.0, *) {

            tableView.contentInsetAdjustmentBehavior = .never

        } else {

            self.automaticallyAdjustsScrollViewInsets = false

        }
有位大神写了个宏供各位参考:
#define  adjustsScrollViewInsets_NO(scrollView,vc)\

do { \

_Pragma("clang diagnostic push") \

_Pragma("clang diagnostic ignored \"-Warc-performSelector-leaks\"") \

if ([UIScrollView instancesRespondToSelector:NSSelectorFromString(@"setContentInsetAdjustmentBehavior:")]) {\

[scrollView   performSelector:NSSelectorFromString(@"setContentInsetAdjustmentBehavior:") withObject:@()];\

} else {\

vc.automaticallyAdjustsScrollViewInsets = NO;\

}\

_Pragma("clang diagnostic pop") \

} while ()
或者下面屌丝一点的宏定义:
#define AdjustsScrollViewInsetNever(controller,view) if(@available(iOS 11.0, *)) {view.contentInsetAdjustmentBehavior = UIScrollViewContentInsetAdjustmentNever;} else if([controller isKindOfClass:[UIViewController class]]) {controller.automaticallyAdjustsScrollViewInsets = false;}
2 、齐刘海
众所周知,导航的高度为64,在哪个手机上面都是不变的,iPhone X没出来之前是对的,随便写64,iPhone X出来后,大家都傻眼了,导航栏高度变了有可能为88,傻眼了吧,如果你纯码写的都是64,这时候你写出了下面的代码:
-(UITableView *)goodsTypeTableView{

    if (!_goodsTypeTableView) {

        _goodsTypeTableView = [[UITableView alloc]initWithFrame:CGRectMake(, , kScreen_width, kScreen_height -  - ) style:UITableViewStylePlain];

        _goodsTypeTableView.delegate = self;

        _goodsTypeTableView.dataSource = self;

        [_goodsTypeTableView registerClass:[XJMarketGoodsTableViewCell class] forCellReuseIdentifier:NSStringFromClass([XJMarketGoodsTableViewCell class])];

    }

    return _goodsTypeTableView;

}
哇赛!很炸天嘛,你发现要么是上面的内容被遮挡了,要么是下面的内容被遮挡了,这都是因为写死了64和49造成的。所以你应该这样做:
#define SafeAreaTopHeight (kScreen_height == 812.0 ? 88 : 64)
&&
#define SafeAreaBottomHeight (kScreen_height == 812.0 ? 83 : 49)
3 、UIBarButtonItem
在iOS 11 里面使用
CustomView创建的item造成frame错乱以及设置边距item.width = -20等失效问题,归根结底是因为苹果更改了iOS11上面uinavigationBar的结构

iOS 11以前的navigationBar添加的
right和left直接添加到navigationBar上面,并且使用的是frame布局的

有图我们可以看到, 添加的
right和left的UIBarButtonItem并不是直接添加到nagitionBar上面。而是在外面嵌套了一个uibuttonBarStackView,而StackView并不是使用的frame,而是用的约束来布局,所以必须得用 AutoLayout 了!
 /// 适配iOS11 UIBarButtonItem 添加自定义布局

 if (@available(iOS 9.0,*)) { /// 强迫症的朋友这里也是可以写成11.0

    [backbtn.widthAnchor constraintEqualToConstant:size.width].active = true;

    [backbtn.heightAnchor constraintEqualToConstant:size.height].active = true;

  }
iOS11里面正确效果:

4 、tableView
iOS11 tableView默认启用了Self-Sizing,这个应该是UITableView最大的改变。我们知道在iOS8引入Self-Sizing 之后,我们可以通过实现estimatedRowHeight相关的属性来展示动态的内容,实现了estimatedRowHeight属性后,得到的初始contenSize是个估算值,是通过estimatedRowHeight 乘以 cell的个数得到的,并不是最终的contenSize,只是当前屏幕能够显示的cell个数,滑动时,tableView不停地得到新的cell,更新自己的contenSize。
Self-Sizing在iOS11下是默认开启的,Headers, footers, and cells都默认开启Self-Sizing,所有estimated 高度默认值从iOS11之前的 0 改变为UITableViewAutomaticDimension:
如果目前项目中没有使用estimateRowHeight属性,在iOS11的环境下就要注意了,因为开启Self-Sizing之后,tableView是使用estimateRowHeight属性的,这样就会造成contentSize和contentOffset值的变化,如果是有动画是观察这两个属性的变化进行的,就会造成动画的异常,因为在估算行高机制下,contentSize的值是一点点地变化更新的,所有cell显示完后才是最终的contentSize值。因为不会缓存正确的行高,tableView reloadData的时候,会重新计算contentSize,就有可能会引起contentOffset的变化。
iOS11下不想使用Self-Sizing的话,可以通过以下方式关闭:
//添加以下代码

self.tableView.estimatedRowHeight =;

self.tableView.estimatedSectionHeaderHeight =;

self.tableView.estimatedSectionFooterHeight =;
或者进行全局的配置:
- (BOOL)application:(UIApplication *)application didFinishLaunchingWithOptions:(NSDictionary *)launchOptions {

    //适配iOS11的tableView问题

    [UITableView appearance].estimatedRowHeight = ;

    [UITableView appearance].estimatedSectionHeaderHeight = ;

    [UITableView appearance].estimatedSectionFooterHeight = ;

    if (@available(iOS , *)) {

        [UIScrollView appearance].contentInsetAdjustmentBehavior = UIScrollViewContentInsetAdjustmentNever;

//iOS11 解决SafeArea的问题,同时能解决pop时上级页面scrollView抖动的问题

    }

    return YES;

}
如果你发现你的表头表尾单元格突然变得大了,问题就在这里!
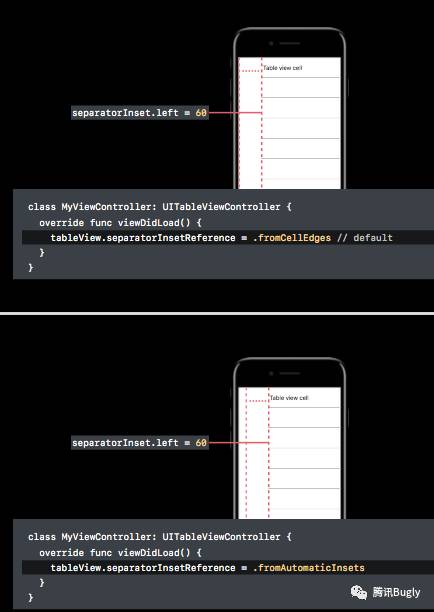
5 、tableView分割线
iOS 7 引入separatorInset属性,用以设置 cell 的分割线边距,在 iOS 11 中对其进行了扩展。可以通过新增的UITableViewSeparatorInsetReference枚举类型的separatorInsetReference属性来设置separatorInset属性的参照值。
typedef NS_ENUM(NSInteger, UITableViewSeparatorInsetReference) {
// The value set to the separatorInset property is interpreted as an offset from the edges of the cell.
UITableViewSeparatorInsetFromCellEdges,
// The value set to the separatorInset property is interpreted as an offset from the automatic separator insets.
UITableViewSeparatorInsetFromAutomaticInsets
} API_AVAILABLE(ios(11.0), tvos(11.0));
- (void)_setTableViewAppearace {

    [[UITableView appearance]setTableFooterView:[UIView new]];

    [[UITableView appearance]setSeparatorInset:UIEdgeInsetsZero];

}
基本就是这样了,如果有其它的问题会继续补充!
最新文章
- Git的使用的简单介绍
- php file_get_contents失败[function.file-get-contents]: failed to open stream: HTTP request failed!解决
- mobile cpu上禁用alpha test的相关总结
- 2013 Multi-University Training Contest 10
- 指针转换(C# 编程指南)
- 使用ContentProvider管理联系人------搜索联系人
- 必须会的SQL语句(六)查询
- Linux--------------更改yum
- dedecms一些技巧
- linux下安装python3.3.4
- C# DLL文件注册问题(涉及AxInterop.WMPLib.dll等)
- 微信小程序,前端大梦想(三)
- contain_of宏定义
- OO前三次作业总结
- weblogic静默方式创建域
- 用Maven实现一个protobuf的Java例子
- ES 6 系列 - 赋值的新方式:解构赋值
- vi 复制或剪切多行超级强大方法
- C#编程(八十二)---------- 用户自定义异常类
- jQuery做字符串分隔