Docker基础内容之仓库
前言
Docker提供了开放的中央仓库dockerhub,同时也允许我们使用registry搭建本地私有仓库。搭建私有仓库有如下的优点:
- 节省网络带宽,提升Docker部署速度,不用每个镜像从DockerHub上去下载,只需从私有仓库下载就可;
- 私有镜像,包含公司敏感信息,不方便公开对外,只在公司内部使用。
私有仓库基本部署
部署步骤
下载镜像仓库
要想部署docker私有仓库必须使用官方给定的镜像来进行构造。
docker pull registry
创建容器
docker run -d -p : --restart=always --name=registry-srv -v /mydata/dockerRegistry:/var/lib/registry registry

-d:后台运行

-p:将容器的5000端口映射到宿主机的5000端口--name:容器的名称

-v:将容器内的/var/lib/registry映射到宿主机的/mydata/dockerRegistry目录,默认情况下,会将仓库存放于容器的/tmp/registry目录下;
搭建容器相关的web服务
docker pull hyper/docker-registry-web

docker run -it -p : --restart=always --name registry-web --link registry-srv -e REGISTRY_URL=http://registry-srv:5000/v2 -e REGISTRY_NAME=localhost:5000 hyper/docker-registry-web

-it: 以交互模式运行

--link:链接其它容器(registry-srv),在此容器中,使用registry-srv等同于registry-srv容器的局域网地址

-e:设置环境变量
上传测试
docker push 192.168.1.87:/cbbing/hcharts
下载测试
docker pull 192.168.1.87:/hcharts
注意:
如果你不想使用 127.0.0.1:5000 作为仓库地址,比如想让本网段的其他主机也能把镜像推送到私有仓库。你就得把例如 192.168.199.100:5000 这样的内网地址作为私有仓库地址,这时你会发现无法成功推送镜像。
这是因为 Docker 默认不允许非 HTTPS 方式推送镜像。我们可以通过 Docker 的配置选项来取消这个限制,或者查看下一节配置能够通过 HTTPS 访问的私有仓库。
对于使用 systemd 的系统,请在 /etc/docker/daemon.json 中写入如下内容(如果文件不存在请新建该文件);修改完配置之后记得重启docker。
{

  "registry-mirror": [

    "https://registry.docker-cn.com"

  ],

  "insecure-registries": [

    "192.168.199.100:5000"

  ]

}
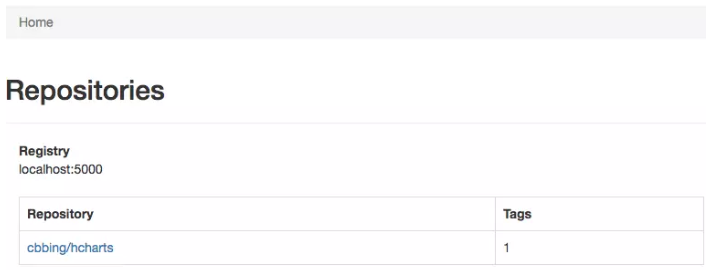
web端查看私有仓库镜像
访问:http://192.168.1.87:8080/,网页上呈现:
私有仓库高级部署
环境准备
新建一个文件夹,以下步骤均在该文件夹中进行
[root@host- ~]# mkdir /opt/ssl

[root@host- ssl]# cd /opt/ssl/
准备站点证书
这里假设我们将要搭建的私有仓库地址为 docker.domain.com,下面我们介绍使用 openssl 自行签发 docker.domain.com 的站点 SSL 证书。
创建 CA 私钥
[root@host- ssl]# openssl genrsa -out "root-ca.key"

Generating RSA private key,  bit long modulus

...........................++

................++

e is  (0x10001)
创建 CA 根证书请求文件
[root@host- ssl]# openssl req -new -key "root-ca.key" -out "root-ca.csr" -sha256 -subj '/C=CN/ST=beijing/L=chaoyang/O=emaxdata/CN=docker.domain.com'

# 以上命令中 -subj 参数里的 /C 表示国家,如 CN;/ST 表示省;/L 表示城市或者地区;/O 表示组织名;/CN 通用名称。
配置 CA 根证书
[root@host- ssl]# touch root-ca.cnf

[root@host- ssl]# vi root-ca.cnf

[root_ca]

basicConstraints = critical,CA:TRUE,pathlen:

keyUsage = critical, nonRepudiation, cRLSign, keyCertSign

subjectKeyIdentifier=hash
签发根证书
[root@host- ssl]# openssl x509 -req  -days   -in "root-ca.csr" -signkey "root-ca.key" -sha256 -out "root-ca.crt" -extfile "root-ca.cnf" -extensions root_ca

Signature ok

subject=/C=CN/ST=beijing/L=chaoyang/O=emaxdata/CN=docker.domain.com

Getting Private key
生成站点 SSL 私钥
[root@host- ssl]# openssl genrsa -out "docker.domain.com.key"

Generating RSA private key,  bit long modulus

................................................................................................++

.......................................................................................................................................++

e is  (0x10001)
生成证书请求文件
[root@host- ssl]# openssl req -new -key "docker.domain.com.key" -out "site.csr" -sha256 -subj '/C=CN/ST=beijing/L=chaoyang/O=emaxdata/CN=docker.domain.com'
配置证书
[root@host- ssl]# touch site.cnf

[root@host- ssl]# vi site.cnf

[server]

authorityKeyIdentifier=keyid,issuer

basicConstraints = critical,CA:FALSE

extendedKeyUsage=serverAuth

keyUsage = critical, digitalSignature, keyEncipherment

subjectAltName = DNS:docker.domain.com, IP:127.0.0.1

subjectKeyIdentifier=hash
签署站点 SSL 证书
root@host- ssl]# openssl x509 -req -days  -in "site.csr" -sha256 -CA "root-ca.crt" -CAkey "root-ca.key"  -CAcreateserial -out "docker.domain.com.crt" -extfile "site.cnf" -extensions server

Signature ok

subject=/C=CN/ST=beijing/L=chaoyang/O=emaxdata/CN=docker.domain.com

Getting CA Private Key

# 这样已经拥有了 docker.domain.com 的网站 SSL 私钥 docker.domain.com.key 和 SSL 证书 docker.domain.com.crt 及 CA 根证书 root-ca.crt。保留docker.domain.com.key docker.domain.com.crt root-ca.crt这三个文件,删除其他文件
将证书相关内容迁移到docker配置中
[root@host- ssl]# mkdir -p /etc/docker/registry

[root@host- ssl]# cd /etc/docker/registry/

[root@host- registry]# mv /opt/ssl /etc/docker/registry/
配置私有仓库信息
[root@host- registry]# vi /etc/docker/registry/config.yml

version: 0.1

log:

  accesslog:

    disabled: true

  level: debug

  formatter: text

  fields:

    service: registry

    environment: staging

storage:

  delete:

    enabled: true

  cache:

    blobdescriptor: inmemory

  filesystem:

    rootdirectory: /var/lib/registry

auth:

  htpasswd:

    realm: basic-realm

    path: /etc/docker/registry/auth/nginx.htpasswd

http:

  addr: :

  host: https://docker.domain.com

  headers:

    X-Content-Type-Options: [nosniff]

  http2:

    disabled: false

  tls:

    certificate: /etc/docker/registry/ssl/docker.domain.com.crt

    key: /etc/docker/registry/ssl/docker.domain.com.key

health:

  storagedriver:

    enabled: true

    interval: 10s

threshold:
生成http认证文件
[root@host- registry]# mkdir -p /etc/docker/registry/auth/

[root@host- registry]# docker run --rm --entrypoint htpasswd registry -Bbn admin admin > /etc/docker/registry/auth/nginx.htpasswd
生成compose文件
[root@host- registry]# vi  /etc/docker/registry/docker-compose.yml

version: ''

services:

  registry:

    image: registry

    ports:

      - "443:443"

    volumes:

      - ./:/etc/docker/registry

      - registry-data:/var/lib/registry     # 这里的存储路劲就是容器存储中映射到宿主机的挂载点,挂载点在/var/lib/docker下;详情请参考volume的使用

volumes:

  registry-data:
修改hosts
vi /etc/hosts

127.0.0.1 docker.domain.com
启动容器
[root@host- registry]# cd /etc/docker/registry/

[root@host- registry]# curl -L https://github.com/docker/compose/releases/download/1.24.1/docker-compose-`uname -s`-`uname -m` -o /usr/local/bin/docker-compose

[root@host- registry]# chmod a+x /usr/local/bin/docker-compose

[root@host- registry]# docker-compose up -d
这样我们就搭建好了一个具有权限认证、TLS 的私有仓库,接下来我们测试其功能是否正常。
测试功能
由于自行签发的 CA 根证书不被系统信任,所以我们需要将 CA 根证书 ssl/root-ca.crt 移入 /etc/docker/certs.d/docker.domain.com 文件夹中。
[root@host- registry]# mkdir -p /etc/docker/certs.d/docker.domain.com

[root@host- registry]# cp /etc/docker/registry/ssl/root-ca.crt /etc/docker/certs.d/docker.domain.com/ca.crt
登录私有仓库
docker login docker.domain.com # 输入上面创建的用户与密码
尝试推送、拉取镜像
[root@host- centos]# docker tag centos:latest docker.domain.com/admin/centos:latest

[root@host- docker]# docker push docker.domain.com/admin/centos

[root@host- centos]# docker rmi -f 9f38484d220f

[root@host- centos]# docker pull docker.domain.com/admin/centos
文章来自转载:https://yeasy.gitbooks.io/docker_practice/content/repository/registry_auth.html
最新文章
- RF 基本方法
- C/C++二维数组分配内存
- Elasticsearch——Search的基本介绍
- Web应用网络模型
- RabbitMQ 异常与任务分发
- java常量池存放在哪里
- Linux 下安装服务器安全狗
- CentOS中基于不同版本安装重复包的解决方案
- 'ManyRelatedManager' object is not iterable
- 关于Get和Post
- 使用SyncToy 同步两台机器上的文件夹
- Spring中对资源的读取支持
- iOS-RAC从新手开始
- Kubernetes 1.10.0离线安装
- 章节十、1-用ID和XPath、name定位元素
- win10在Pycharm中安装scrapy
- Python3 读写文件
- 51Nod 1185 威佐夫游戏 V2
- svn树冲突的解决方法
- Codeforces 311B Cats Transport【斜率优化DP】