使用Truffle 部署智能合约
使用Truffle 部署智能合约
之前我们使用Geth,原生的以太坊Golang工具,分析了创世区块的参数内容,在本地创建了私有以太坊区块链,并使用两个账户进行了挖矿和转账操作,对以太坊有了基本了解。
该篇章开始使用一个新的平台Truffle Suite,学习部署示例的智能合约,和一个稍微复杂一些的实用智能合约,学习Solidity语言的基本语法和智能合约的使用。
本文绝大多数参考资料来源于Solidity官方文档和Truffle官方文档。
1. 安装Truffle
Truffle Suite套件包括三个组件:
- Truffle:命令行工具,用来部署智能合约
- Ganache:GUI工具,用来可视化查看区块、账户、合约、交易等内容
- drizzle:Javascript库,用于前端开发
虽然Truffle套件在全平台通用,但在Windows上可能会出现莫名其妙的命名空间冲突问题,本次全部使用Ubuntu进行操作。
使用npm即可安装Truffle:(如何安装npm,换源等问题不在本篇的讨论范围内)
npm install -g truffle
后续使用Ganache做可视化浏览,Ganache为Linux提供了Appimage打包,下载后记得为其赋予可执行属性才能打开:
下载地址:https://github.com/trufflesuite/ganache/releases

chmod +x ganache-<Version>-linux-x86_64.AppImage
2. 学习示例智能合约 MetaCoin
2.1 准备
Truffle作为集成平台,提供了类似npm的功能,使用truffle unbox <projectname>,可以下载其他人发布的智能合约。
Metacoin是一个非常简单的智能合约,他设计了一种新货币Metacoin(下文可能称其为代币),其汇率为 1 Metacoin = 2 ETH,使用Metacoin智能合约可以进行Metacoin转账等操作。
新建文件夹Metacoin,打开终端输入:
truffle unbox metacoin
如果执行unbox命令时提示 RequestError: Error: connect ECONNREFUSED 错误,可以尝试使用export https_proxy为bash设置代理,加快访问速度
下载成功后,会看到文件夹内多出了一下内容:

其中contracts文件夹内有三个sol文件,是Solidity语言编写的只能合约文件;
migrations文件夹中的两个js文件是truffle部署智能合约时的部署文件,用来管理和升级智能合约,而且这些文件执行是有顺序的,必须以数字为开头;
test文件夹中是测试文件,可以使用js或者solidity语言编写测试脚本;
truffle-config.js 是truffle 的配置文件,包含truffle使用什么版本的编译器,在什么端口开放区块链的rpc协议等;
LICENSE为该代码的许可证。
2.2 交互
我们首先演示一下这个智能合约的实际效果,之后观察代码思考其运行的方法。
要部署智能合约,我们首先需要生成一条区块链。Truffle 可以快速帮我们生成开发环境的区块链,并构造出10个账户:
truffle develop

可以看到,一条新的区块链已经生成,并在9545端口打开了http服务(rpc服务),并预先生成了10个账户,每个账户中默认存有100个ETH,当前的控制台使用的是默认的第0个账户。
在truffle控制台可以使用Web3进行交互,例如:
truffle(develop)> web3.eth.getAccounts()

[ '0xB836A85f25f9Ab41290f2a63D1Ee83AEa9F53b94',

  '0x0fC57BdDf263df2C70A5468B15b6fD620a366Cb4',

  '0x9A2219312B49cd833650067427874204dC5e261c',

  '0xfB440A02DCE4Aea19374902b57bEDEb23342d38f',

  '0x78d551ECe5749D3453960460D337b283F6315174',

  '0x737173efe01E9B720A310535fa513a23099d6fa2',

  '0x39313f35e7549aEE9Df037936190a923a897B437',

  '0x6F12D8eaC6996ba70Ca12e44E47669FEEDFD7ED7',

  '0xDbe225FAc5F4CA0f74466af1b0625d2d7a4C7c75',

  '0x56c467638B135C8584d871b1F468B8bb2363Db1a' ]

truffle(develop)> web3.eth.getBalance('0xB836A85f25f9Ab41290f2a63D1Ee83AEa9F53b94')

'100000000000000000000'
部署智能合约之前,需要编译sol文件:
truffle(develop)> compile
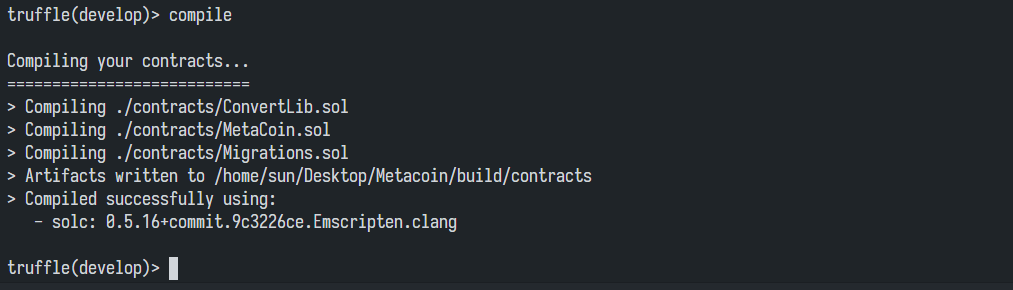
同时我们会看到Metacoin文件夹内多出来一个build文件夹,其中存放了编译好的智能合约。使用migrate命令部署之恩那个合约:
truffle(develop)> migrate
结果如下:
truffle(develop)> migrate

Compiling your contracts...

===========================

> Everything is up to date, there is nothing to compile.

Starting migrations...

======================

> Network name:    'develop'

> Network id:      5777

> Block gas limit: 6721975 (0x6691b7)

1_initial_migration.js

======================

   Deploying 'Migrations'

   ----------------------

   > transaction hash:    0x9d236e01303e2fc44c0717733120fe28669d5f2dacdd2b66561170331e72ff35

   > Blocks: 0            Seconds: 0

   > contract address:    0x65ae7471c845a10049053a15Be43EE86E76cF1F5

   > block number:        1

   > block timestamp:     1611852614

   > account:             0xB836A85f25f9Ab41290f2a63D1Ee83AEa9F53b94

   > balance:             99.9967165

   > gas used:            164175 (0x2814f)

   > gas price:           20 gwei

   > value sent:          0 ETH

   > total cost:          0.0032835 ETH

   > Saving migration to chain.

   > Saving artifacts

   -------------------------------------

   > Total cost:           0.0032835 ETH

2_deploy_contracts.js

=====================

   Deploying 'ConvertLib'

   ----------------------

   > transaction hash:    0xb2e3678a744446e6d3d98a43f3195994666b0e948f87b24eb5612ab20dcf08f9

   > Blocks: 0            Seconds: 0

   > contract address:    0xb59dBD1609f0982B0f7d64d3592D8390092442C7

   > block number:        3

   > block timestamp:     1611852614

   > account:             0xB836A85f25f9Ab41290f2a63D1Ee83AEa9F53b94

   > balance:             99.99396028

   > gas used:            95470 (0x174ee)

   > gas price:           20 gwei

   > value sent:          0 ETH

   > total cost:          0.0019094 ETH

   Linking

   -------

   * Contract: MetaCoin <--> Library: ConvertLib (at address: 0xb59dBD1609f0982B0f7d64d3592D8390092442C7)

   Deploying 'MetaCoin'

   --------------------

   > transaction hash:    0xf9b71d6dca179dddeac7bc1fba8d52f0b1ba430ac6c623aa4aeb7ea5ece09110

   > Blocks: 0            Seconds: 0

   > contract address:    0x8Baf7f61EEBb19eB22cC165AC9291338bF857522

   > block number:        4

   > block timestamp:     1611852614

   > account:             0xB836A85f25f9Ab41290f2a63D1Ee83AEa9F53b94

   > balance:             99.98822922

   > gas used:            286553 (0x45f59)

   > gas price:           20 gwei

   > value sent:          0 ETH

   > total cost:          0.00573106 ETH

   > Saving migration to chain.

   > Saving artifacts

   -------------------------------------

   > Total cost:          0.00764046 ETH

Summary

=======

> Total deployments:   3

> Final cost:          0.01092396 ETH
可以看到,由于刚刚编译过sol文件,部署时跳过了编译,直接使用1_initial_migration.js和2_deploy_contracts.js部署智能合约,最终消耗了0.01092396 ETH
truffle(develop)> web3.eth.getBalance('0xB836A85f25f9Ab41290f2a63D1Ee83AEa9F53b94')

'99987682400000000000'
Truffle控制台支持async/await 方法,我们新建变量时更加方便了。新建一个变量instance,为刚刚部署的合约的实例。
truffle(development)> let instance = await MetaCoin.deployed()
查看账户余额(代币的余额,即Metacoin的余额):
truffle(develop)> let balance = await instance.getBalance('0xB836A85f25f9Ab41290f2a63D1Ee83AEa9F53b94')

undefined

truffle(develop)> balance.toNumber()

10000
查看以太坊汇率转换后的余额:
truffle(develop)> let ether = await instance.getBalanceInEth('0xB836A85f25f9Ab41290f2a63D1Ee83AEa9F53b94')

undefined

truffle(develop)> ether.toNumber()

20000
向第1个账户发送一些代币:
truffle(develop)> instance.sendCoin('0x0fC57BdDf263df2C70A5468B15b6fD620a366Cb4', 500)
查看其余额:
truffle(development)> let received = await instance.getBalance('0x0fC57BdDf263df2C70A5468B15b6fD620a366Cb4')

undefined

truffle(development)> received.toNumber()

500
2.3 解析
接下来我们详细分析三个sol文件:
Migrations.sol
Migrations文件是使用truffle部署智能合约时必要的文件,其内容一般不会变。
MetaCoin.sol
// SPDX-License-Identifier: MIT

pragma solidity >=0.4.25 <0.7.0;

// 第一行声明了solidity的编译器版本

import "./ConvertLib.sol";

// 表示引用了当前目录下的库文件ConvertLib.sol

// 定义了一个合约,名为MetaCoin

contract MetaCoin {

// 变量balances本身时一个address类型,但被映射为无符号整型

mapping (address => uint) balances;

// 事件用来记录日志

event Transfer(address indexed _from, address indexed _to, uint256 _value);

// constructor函数为构造函数,在合约部署时运行

// tx.origin 是一个特殊的全局变量,意味最初调用合约的账户地址

// 向部署调用合约的人的余额添加10000个代币

constructor() public {

	balances[tx.origin] = 10000;

}

// sendCoin函数接收两个参数(收件人和代币数量),返回布尔值

function sendCoin(address receiver, uint amount) public returns(bool sufficient) {

	// 首先判断调用合约的人(发件人)的余额,如果余额小于要发送的代币数量,则返回false

	// msg.sender是一个特殊的变量,意味调用合约的账户的地址

	if (balances[msg.sender] < amount) return false;

	// 修改发件人和收件人的余额

	balances[msg.sender] -= amount;

	balances[receiver] += amount;

	// 记录这个event

	emit Transfer(msg.sender, receiver, amount);

	// 最终返回 true

	return true;

}

// 查看代币转换为以太币后的价值

function getBalanceInEth(address addr) public view returns(uint){

	// 调用了ConvertLib中的汇率转换函数

	return ConvertLib.convert(getBalance(addr),2);

}

// 查看代币的数量

function getBalance(address addr) public view returns(uint) {

	return balances[addr];

}

}
- ConvertLib.sol
// SPDX-License-Identifier: MIT

pragma solidity >=0.4.25 <0.7.0;

library ConvertLib{

	// convert函数接受两个参数:amount和conversionRate,即货币数量和汇率,返回uint转换后的货币数量

	// 该文件主要是为我们演示了如何在Solidity中引用Library

	function convert(uint amount,uint conversionRate) public pure returns (uint convertedAmount)

	{

		return amount * conversionRate;

	}

}
convert函数接受两个参数:amount和conversionRate,即货币数量和汇率,返回uint转换后的货币数量
该文件主要是为我们演示了如何在Solidity中引用Library
深入理解Truffle部署配置
上述三个文件完成了智能合约内容的编写,要部署合约,需要使用migrations中的两个js文件:
//TODO: 有关合约迁移的具体内容,会在后续补充
- 1_initial_migration.js
const Migrations = artifacts.require("Migrations");

module.exports = function(deployer) {

 deployer.deploy(Migrations);

};
- 2_deploy_constracts.js
const ConvertLib = artifacts.require("ConvertLib");

const MetaCoin = artifacts.require("MetaCoin");

module.exports = function(deployer) {

 deployer.deploy(ConvertLib);

 deployer.link(ConvertLib, MetaCoin);

 deployer.deploy(MetaCoin);

};
最后来看一下truffle-config.js 文件:
module.exports = {

  // Uncommenting the defaults below

  // provides for an easier quick-start with Ganache.

  // You can also follow this format for other networks;

  // see <http://truffleframework.com/docs/advanced/configuration>

  // for more details on how to specify configuration options!

  //

  //networks: {

  //  development: {

  //    host: "127.0.0.1",

  //    port: 7545,

  //    network_id: "*"

  //  },

  //  test: {

  //    host: "127.0.0.1",

  //    port: 7545,

  //    network_id: "*"

  //  }

  //}

  //

};
MetaCoin的truffle-config.js文件是一个简陋版本,只定义了两种network(development和test),并且默认时被注释掉的。
默认情况下,使用truffle develop会开放一个9545端口,我们也可以在配置文件中写好配置并在使用时指定:
truffle develop --network <network_config_name>
实际上完整的truffle-config.js文件应该长这样:
/**

 * Use this file to configure your truffle project. It's seeded with some

 * common settings for different networks and features like migrations,

 * compilation and testing. Uncomment the ones you need or modify

 * them to suit your project as necessary.

 *

 * More information about configuration can be found at:

 *

 * trufflesuite.com/docs/advanced/configuration

 *

 * To deploy via Infura you'll need a wallet provider (like @truffle/hdwallet-provider)

 * to sign your transactions before they're sent to a remote public node. Infura accounts

 * are available for free at: infura.io/register.

 *

 * You'll also need a mnemonic - the twelve word phrase the wallet uses to generate

 * public/private key pairs. If you're publishing your code to GitHub make sure you load this

 * phrase from a file you've .gitignored so it doesn't accidentally become public.

 *

 */

// const HDWalletProvider = require('@truffle/hdwallet-provider');

// const infuraKey = "fj4jll3k.....";

//

// const fs = require('fs');

// const mnemonic = fs.readFileSync(".secret").toString().trim();

module.exports = {

  /**

   * Networks define how you connect to your ethereum client and let you set the

   * defaults web3 uses to send transactions. If you don't specify one truffle

   * will spin up a development blockchain for you on port 9545 when you

   * run `develop` or `test`. You can ask a truffle command to use a specific

   * network from the command line, e.g

   *

   * $ truffle test --network <network-name>

   */

  networks: {

    // Useful for testing. The `development` name is special - truffle uses it by default

    // if it's defined here and no other network is specified at the command line.

    // You should run a client (like ganache-cli, geth or parity) in a separate terminal

    // tab if you use this network and you must also set the `host`, `port` and `network_id`

    // options below to some value.

    //

    development: {

     host: "127.0.0.1",     // Localhost (default: none)

     port: 7545,            // Standard Ethereum port (default: none)

     network_id: "*",       // Any network (default: none)

    },

    // Another network with more advanced options...

    // advanced: {

    // port: 8777,             // Custom port

    // network_id: 1342,       // Custom network

    // gas: 8500000,           // Gas sent with each transaction (default: ~6700000)

    // gasPrice: 20000000000,  // 20 gwei (in wei) (default: 100 gwei)

    // from: <address>,        // Account to send txs from (default: accounts[0])

    // websocket: true        // Enable EventEmitter interface for web3 (default: false)

    // },

    // Useful for deploying to a public network.

    // NB: It's important to wrap the provider as a function.

    // ropsten: {

    // provider: () => new HDWalletProvider(mnemonic, `https://ropsten.infura.io/v3/YOUR-PROJECT-ID`),

    // network_id: 3,       // Ropsten's id

    // gas: 5500000,        // Ropsten has a lower block limit than mainnet

    // confirmations: 2,    // # of confs to wait between deployments. (default: 0)

    // timeoutBlocks: 200,  // # of blocks before a deployment times out  (minimum/default: 50)

    // skipDryRun: true     // Skip dry run before migrations? (default: false for public nets )

    // },

    // Useful for private networks

    // private: {

    // provider: () => new HDWalletProvider(mnemonic, `https://network.io`),

    // network_id: 2111,   // This network is yours, in the cloud.

    // production: true    // Treats this network as if it was a public net. (default: false)

    // }

  },

  // Set default mocha options here, use special reporters etc.

  mocha: {

    // timeout: 100000

  },

  // Configure your compilers

  compilers: {

    solc: {

      version: "0.7.1",    // Fetch exact version from solc-bin (default: truffle's version)

      // docker: true,        // Use "0.5.1" you've installed locally with docker (default: false)

      // settings: {          // See the solidity docs for advice about optimization and evmVersion

      //  optimizer: {

      //    enabled: false,

      //    runs: 200

      //  },

      //  evmVersion: "byzantium"

      // }

    }

  }

};
我们还可以定义构造区块链时的gasLimit,使用from字段定义使用的账户(默认使用第0个账户),在compilers中,还可以指定编译器版本。
学习另一个实用智能合约 Ballot
在 Solidity 的文档中给出了一个实现投票的智能合约,请注意,这个 sol 文件需要 0.7.0 以上的编译器版本才能编译:
// SPDX-License-Identifier: GPL-3.0

pragma solidity >=0.7.0 <0.9.0;

// 请注意,这个sol文件需要0.7.0以上的编译器版本才能编译

/// @title Voting with delegation.

contract Ballot {

    // This declares a new complex type which will

    // be used for variables later.

    // It will represent a single voter.

    struct Voter {

        uint weight; // weight is accumulated by delegation

        bool voted;  // if true, that person already voted

        address delegate; // person delegated to

        uint vote;   // index of the voted proposal

    }

    // This is a type for a single proposal.

    struct Proposal {

        bytes32 name;   // short name (up to 32 bytes)

        uint voteCount; // number of accumulated votes

    }

    address public chairperson;

    // This declares a state variable that

    // stores a `Voter` struct for each possible address.

    mapping(address => Voter) public voters;

    // A dynamically-sized array of `Proposal` structs.

    Proposal[] public proposals;

    /// Create a new ballot to choose one of `proposalNames`.

    constructor(bytes32[] memory proposalNames) {

        chairperson = msg.sender;

        voters[chairperson].weight = 1;

        // For each of the provided proposal names,

        // create a new proposal object and add it

        // to the end of the array.

        for (uint i = 0; i < proposalNames.length; i++) {

            // `Proposal({...})` creates a temporary

            // Proposal object and `proposals.push(...)`

            // appends it to the end of `proposals`.

            proposals.push(Proposal({

                name: proposalNames[i],

                voteCount: 0

            }));

        }

    }

    // Give `voter` the right to vote on this ballot.

    // May only be called by `chairperson`.

    function giveRightToVote(address voter) public {

        // If the first argument of `require` evaluates

        // to `false`, execution terminates and all

        // changes to the state and to Ether balances

        // are reverted.

        // This used to consume all gas in old EVM versions, but

        // not anymore.

        // It is often a good idea to use `require` to check if

        // functions are called correctly.

        // As a second argument, you can also provide an

        // explanation about what went wrong.

        require(

            msg.sender == chairperson,

            "Only chairperson can give right to vote."

        );

        require(

            !voters[voter].voted,

            "The voter already voted."

        );

        require(voters[voter].weight == 0);

        voters[voter].weight = 1;

    }

    /// Delegate your vote to the voter `to`.

    function delegate(address to) public {

        // assigns reference

        Voter storage sender = voters[msg.sender];

        require(!sender.voted, "You already voted.");

        require(to != msg.sender, "Self-delegation is disallowed.");

        // Forward the delegation as long as

        // `to` also delegated.

        // In general, such loops are very dangerous,

        // because if they run too long, they might

        // need more gas than is available in a block.

        // In this case, the delegation will not be executed,

        // but in other situations, such loops might

        // cause a contract to get "stuck" completely.

        while (voters[to].delegate != address(0)) {

            to = voters[to].delegate;

            // We found a loop in the delegation, not allowed.

            require(to != msg.sender, "Found loop in delegation.");

        }

        // Since `sender` is a reference, this

        // modifies `voters[msg.sender].voted`

        sender.voted = true;

        sender.delegate = to;

        Voter storage delegate_ = voters[to];

        if (delegate_.voted) {

            // If the delegate already voted,

            // directly add to the number of votes

            proposals[delegate_.vote].voteCount += sender.weight;

        } else {

            // If the delegate did not vote yet,

            // add to her weight.

            delegate_.weight += sender.weight;

        }

    }

    /// Give your vote (including votes delegated to you)

    /// to proposal `proposals[proposal].name`.

    function vote(uint proposal) public {

        Voter storage sender = voters[msg.sender];

        require(sender.weight != 0, "Has no right to vote");

        require(!sender.voted, "Already voted.");

        sender.voted = true;

        sender.vote = proposal;

        // If `proposal` is out of the range of the array,

        // this will throw automatically and revert all

        // changes.

        proposals[proposal].voteCount += sender.weight;

    }

    /// @dev Computes the winning proposal taking all

    /// previous votes into account.

    function winningProposal() public view

            returns (uint winningProposal_)

    {

        uint winningVoteCount = 0;

        for (uint p = 0; p < proposals.length; p++) {

            if (proposals[p].voteCount > winningVoteCount) {

                winningVoteCount = proposals[p].voteCount;

                winningProposal_ = p;

            }

        }

    }

    // Calls winningProposal() function to get the index

    // of the winner contained in the proposals array and then

    // returns the name of the winner

    function winnerName() public view

            returns (bytes32 winnerName_)

    {

        winnerName_ = proposals[winningProposal()].name;

    }

    // 以下为作者新添加的两个函数

    function getProposalName(uint index) public view returns (bytes32) {

        require(index < proposals.length, "No This Proposal");

        require(index >= 0, "Not a positive Number");

        return proposals[index].name;

    }

    function getProposalVoteCount(uint index) public view returns (uint) {

        require(index < proposals.length, "No this Proposal");

        require(index >= 0, "Not a positive Number");

        return proposals[index].voteCount;

    }

}
这个智能合约实现了基本的投票功能,分析构造函数,我们知道该合约部署时需要传入一个bytes32[]参数,是一个由被选举人构成的列表,构造函数还将msg.sender设置为新变量chairperson;
结构体Voter代表一个投票人,其中包含权重、是否已投票、该投票人的委托投票人,以及投票投给了谁;
结构体Proposal代表一个被选举人,包含名字、得票数量;
函数giveRightToVote只能被 chairperson 调用,接受一个参数 voter,如果这个 voter 还没有投过票,并且这个 voter 还没有投票权,则赋予其投票权;
函数delegate是一个委托投票权的函数,允许投票人将自己的投票权委托给另一个人;
函数vote 是投票函数,拥有投票权的投票人可以为被选举人投票;
函数winningProposal 计算得票数最高的被选举人,返回其编号;
函数winnerName通过上个函数的编号,返回被选举人的名字;
函数getProposalName 和getProposalVoteCount 返回被选举人的名字和其当前得票数量。
3.1 准备
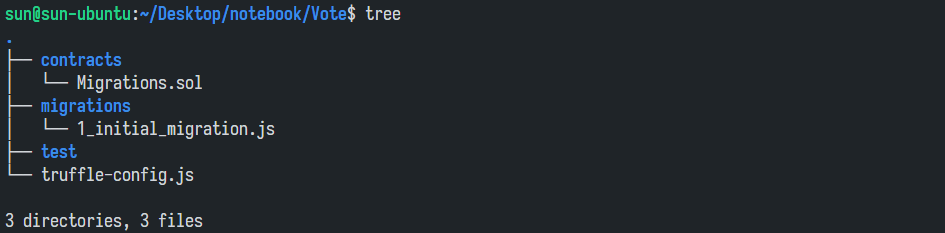
新建一个Vote文件夹,要创建一个空的truffle项目,在终端内运行:
truffle init
可以看到文件夹内产生了一些变化:
我们在contracts文件夹内新建Ballot.sol,复制上述的投票智能合约代码;
在migrations文件夹内新建2_deploy_contracts.js文件:
const Ballot = artifacts.require("Ballot");

module.exports = function(deployer) {

    deployer.deploy(

        Ballot,

        [

            "0x0000000000000000000000000000000000000000000000000000000000000000",

            "0x0000000000000000000000000000000000000000000000000000000000000001",

            "0x0000000000000000000000000000000000000000000000000000000000000002",

            "0x0000000000000000000000000000000000000000000000000000000000000003"

        ]

    );

};
部署Ballot智能合约时,其构造函数需要传入一个bytes32[] 类型的参数,代表被选举人。Truffle会在部署智能合约时为其传入这个参数。
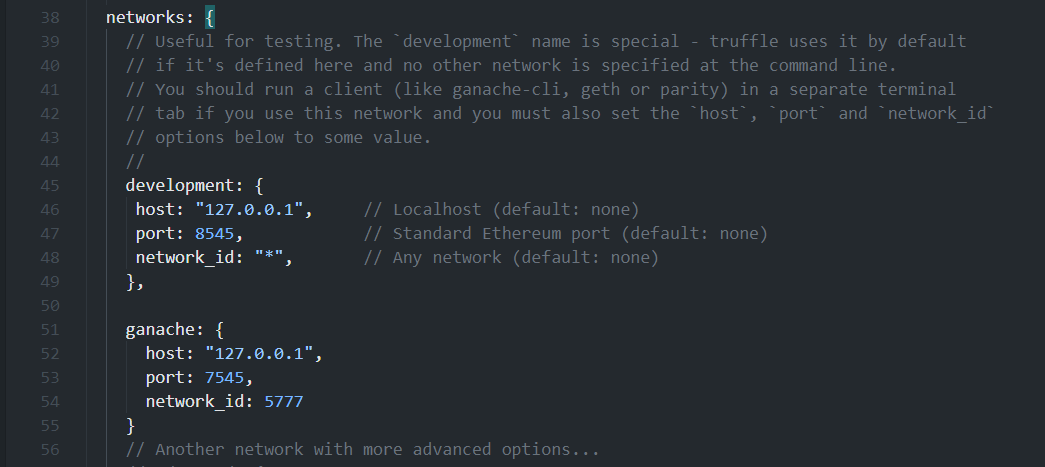
打开truffle-config.js文件,修改配置,接下来我们使用可视化工具Ganache观察区块链变化。首先设置网络,新建一个ganache网络,为了与之后的Ganache做适配:
同时为了匹配0.7.0以上的编译器版本,修改compiler字段:
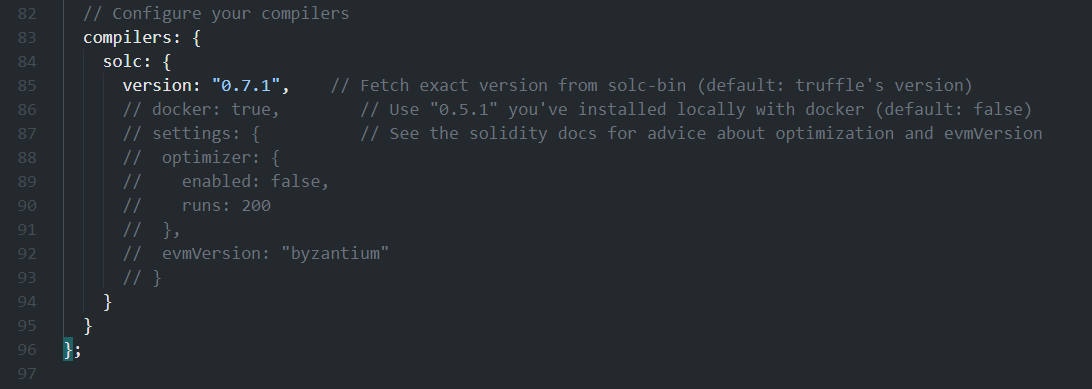
最后的目录长这样:

3.2 交互
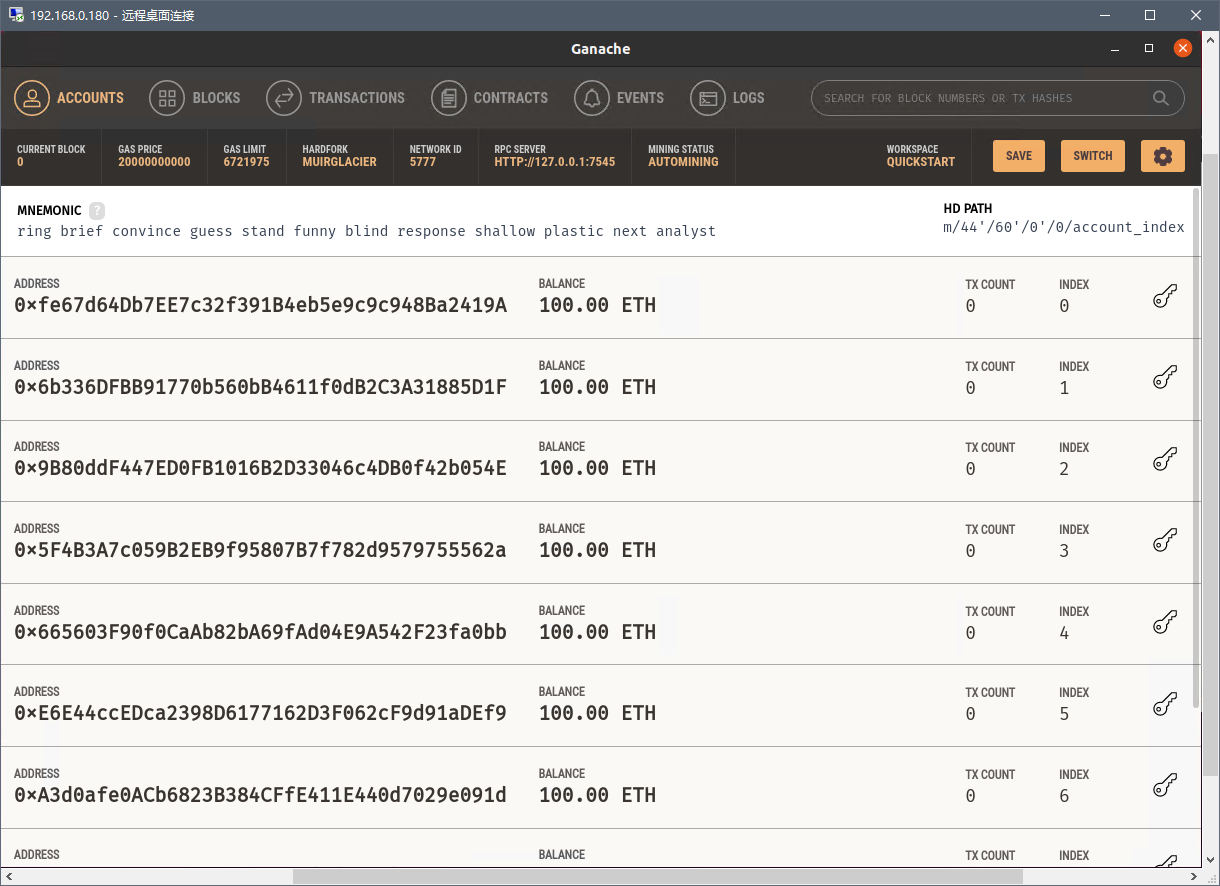
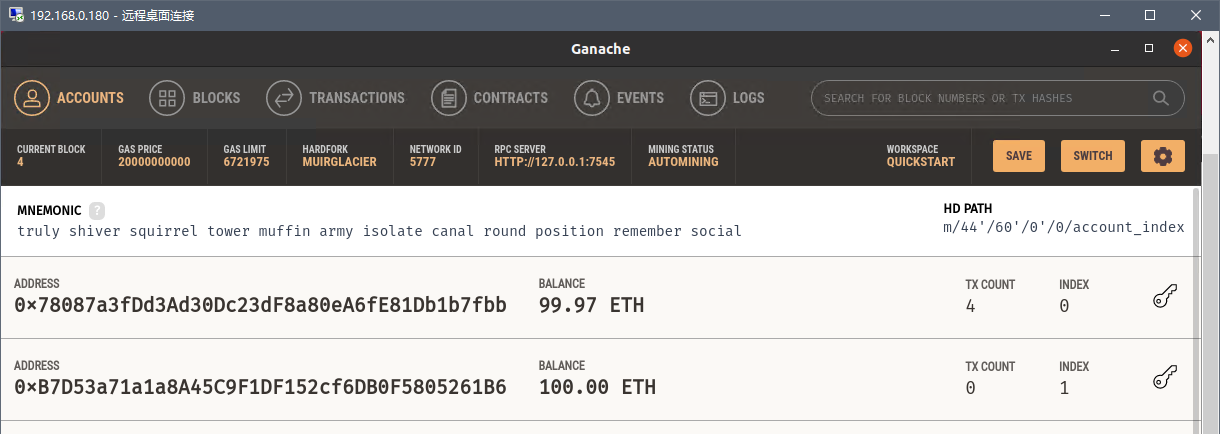
打开 Ganache,选 Quickstart,可以看到 Ganache 也会帮我们生成一条区块链,并预先设置 10 个账户,每个账户内含 100 ETH。
我们点击右上角的齿轮按钮进入设置:
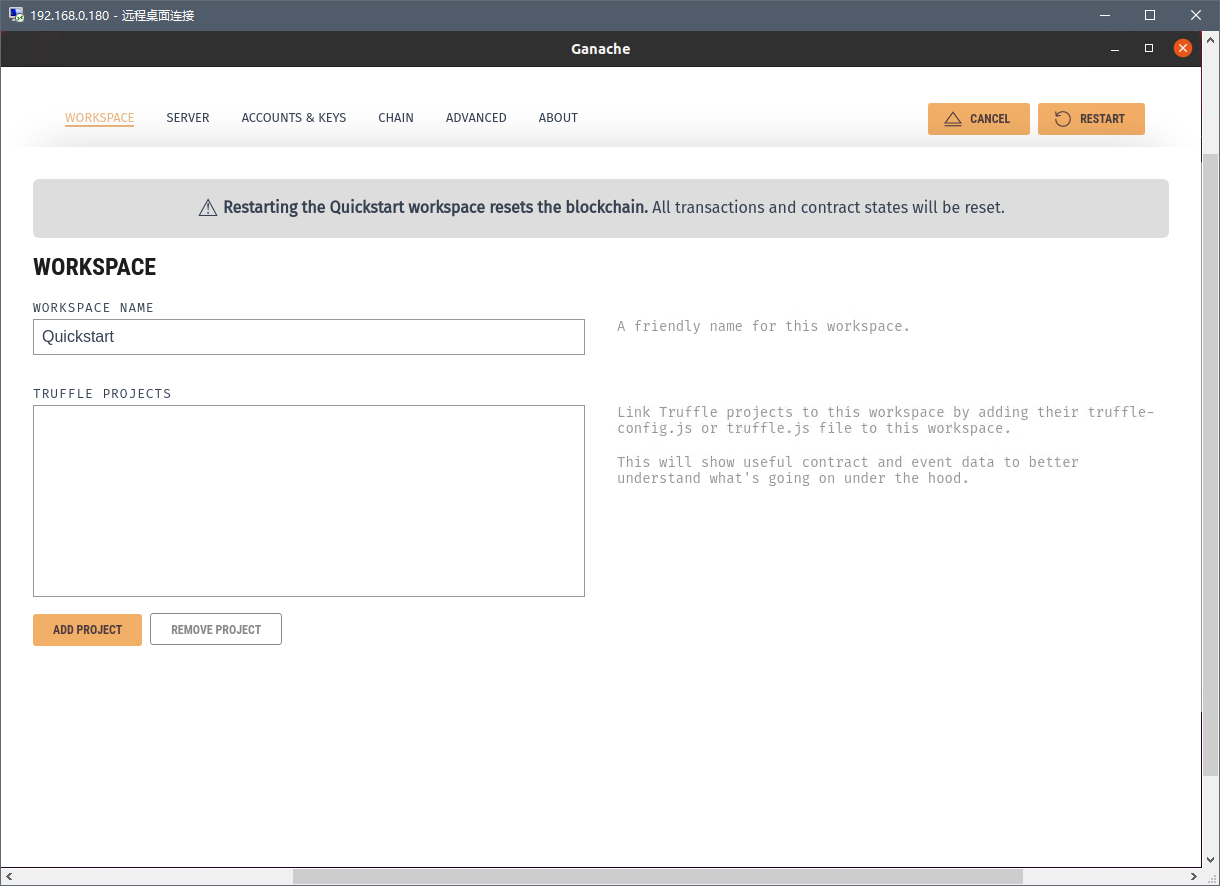
点击ADD PROJECT,选择truffle-config.js 文件,加载我们的Truffle项目
在 Server 菜单中,可以看到 Ganache 生成的区块链的地址、开放的 RPC 端口,NetworkID 等,这些值与我们刚刚创建好的 Ganache 网络配置匹配,稍后可以使用 truffle 命令部署智能合约:
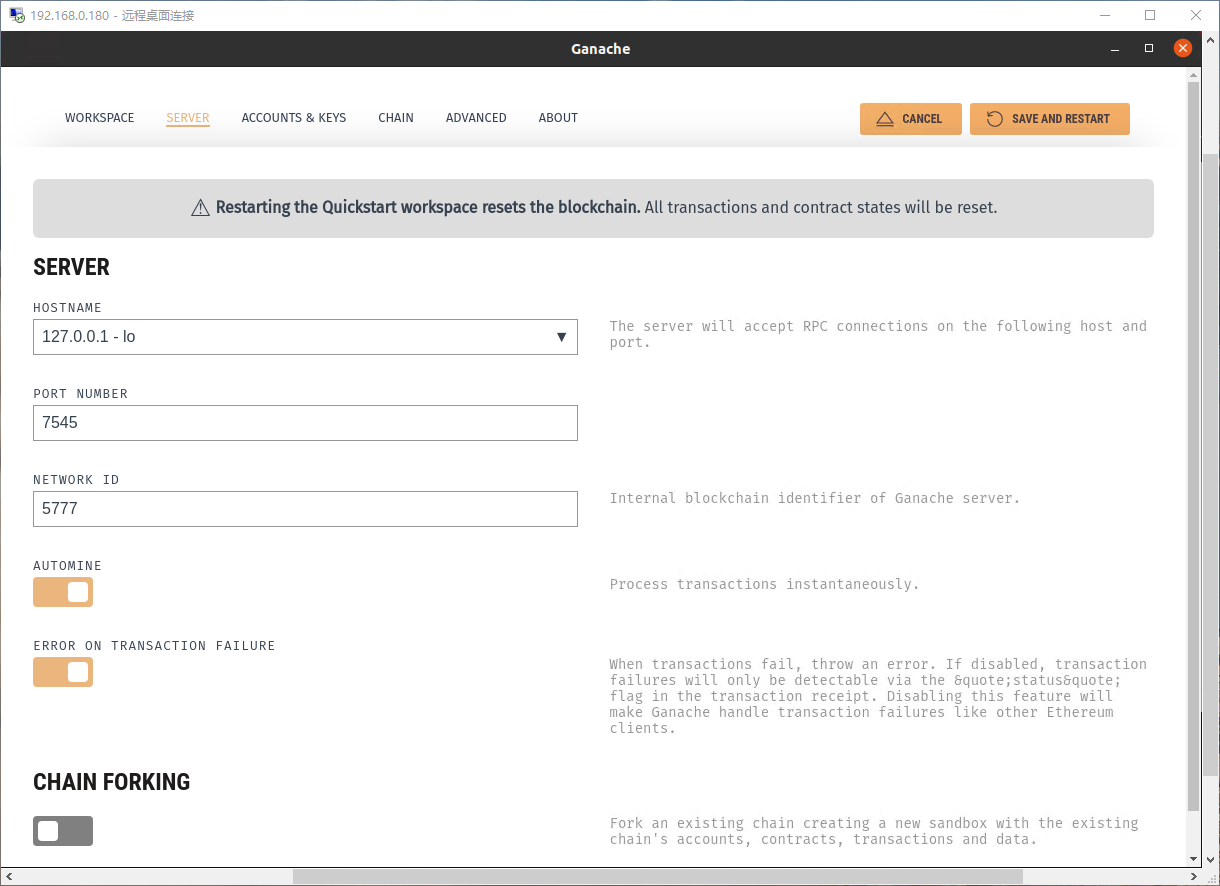
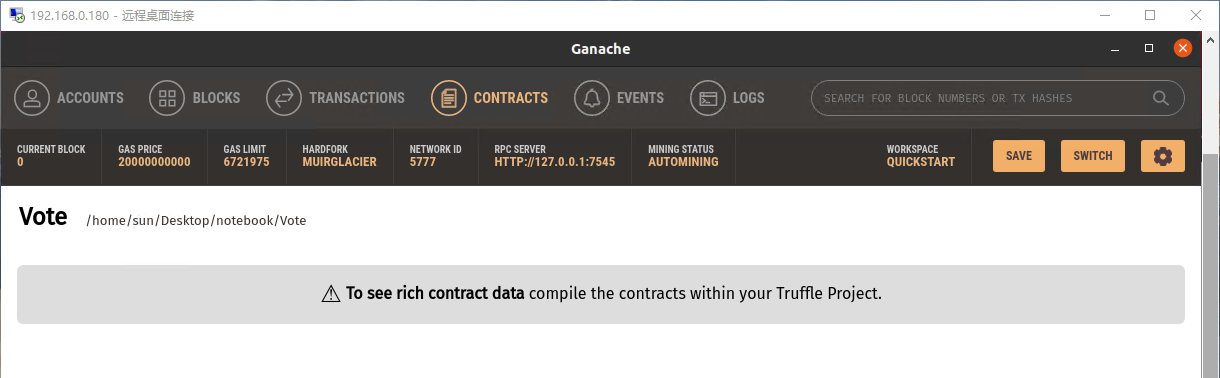
点击SAVE AND RESTART 保存更改。在 CONTRACTS 菜单中,提示我们需要使用 Truffle 部署智能合约:
打开终端,输入以下命令:
truffle migrate --network ganache

合约成功部署:
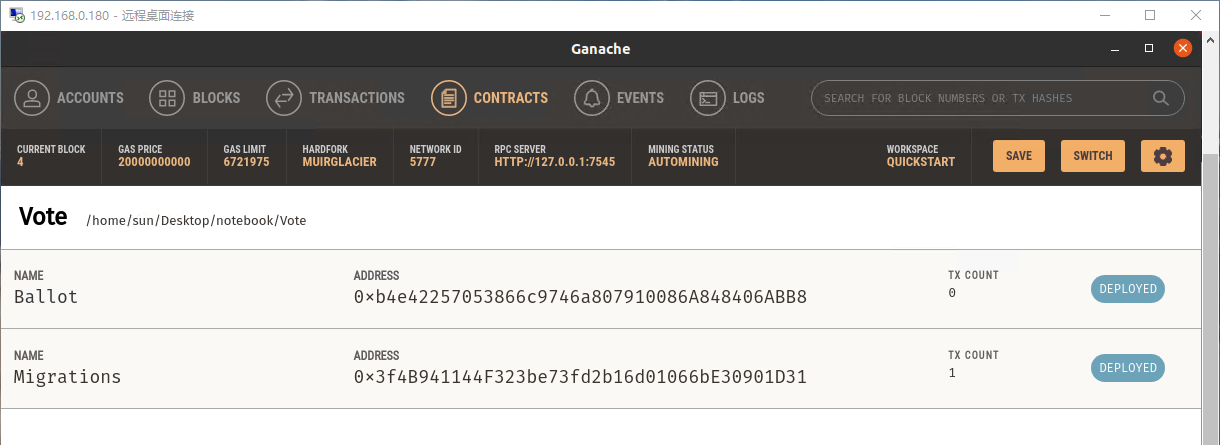
部署合约需要消耗 ETH,查看ACCOUNTS可以看到默认的第 0 个账户消耗掉 0.02380284 个 ETH:
BLOCK 和 TRANSACTIONS 记录了区块链和交易,可以查看学习。
Ganache 本身不具备 web3 交互,因此要使用合约,还需要进入 Truffle 控制台进行操作:
truffle console --network ganache
第一步依然是获得刚刚部署过的智能合约的实例:
truffle(ganache)> let instance = await Ballot.deployed()

undefined

truffle(ganache)> instance.address

'0xb4e42257053866c9746a807910086A848406ABB8'
可以看到这个智能合约实例地址与 Ganache 显示的地址是一致的。
由于目前第0个账户是部署合约的账户,因此 chairperson 的地址应该为第0个账户的地址。同时,由于我们在进入控制台之前没有设置使用的账户,因此默认控制台正在使用的也是第0个账户。
现在我们有权利为其他账户赋予投票权利,我们当然可以直接在 Ganache 内抄下某个账户地址,也可以使用 web3 获得账户地址:
truffle(ganache)> let allAccounts = web3.eth.getAccounts()

undefined

truffle(ganache)> allAccounts

[ '0x78087a3fDd3Ad30Dc23dF8a80eA6fE81Db1b7fbb',

  '0xB7D53a71a1a8A45C9F1DF152cf6DB0F5805261B6',

  '0x605227a90d1566EEeC77AE2e36Ad48dcAe5d6CD4',

  '0x8c4491074a1623A96D62288FCA0aFeD73Ab710e3',

  '0xaB750d95277e2Cd67bA1Effd00d2cb8319170620',

  '0xd619b30e8f019569D59fe6aD557e52E5302F227f',

  '0x5BB81474c351a28507DD5317F4023088b8912f41',

  '0xb5528106D4c92262C3da2d3E29282fd1687eAAA6',

  '0xf79a3C4a0881F879Ddf5D18beB37e5B5767aEFED',

  '0xf3e67be6A334CB438282BCB09A57d7A92eacE03f' ]
将投票权赋予账户'0xB7D53a71a1a8A45C9F1DF152cf6DB0F5805261B6':
instance.giveRightToVote('0xB7D53a71a1a8A45C9F1DF152cf6DB0F5805261B6')
此时发生了一笔交易,在Ganache内也可以同步查看:
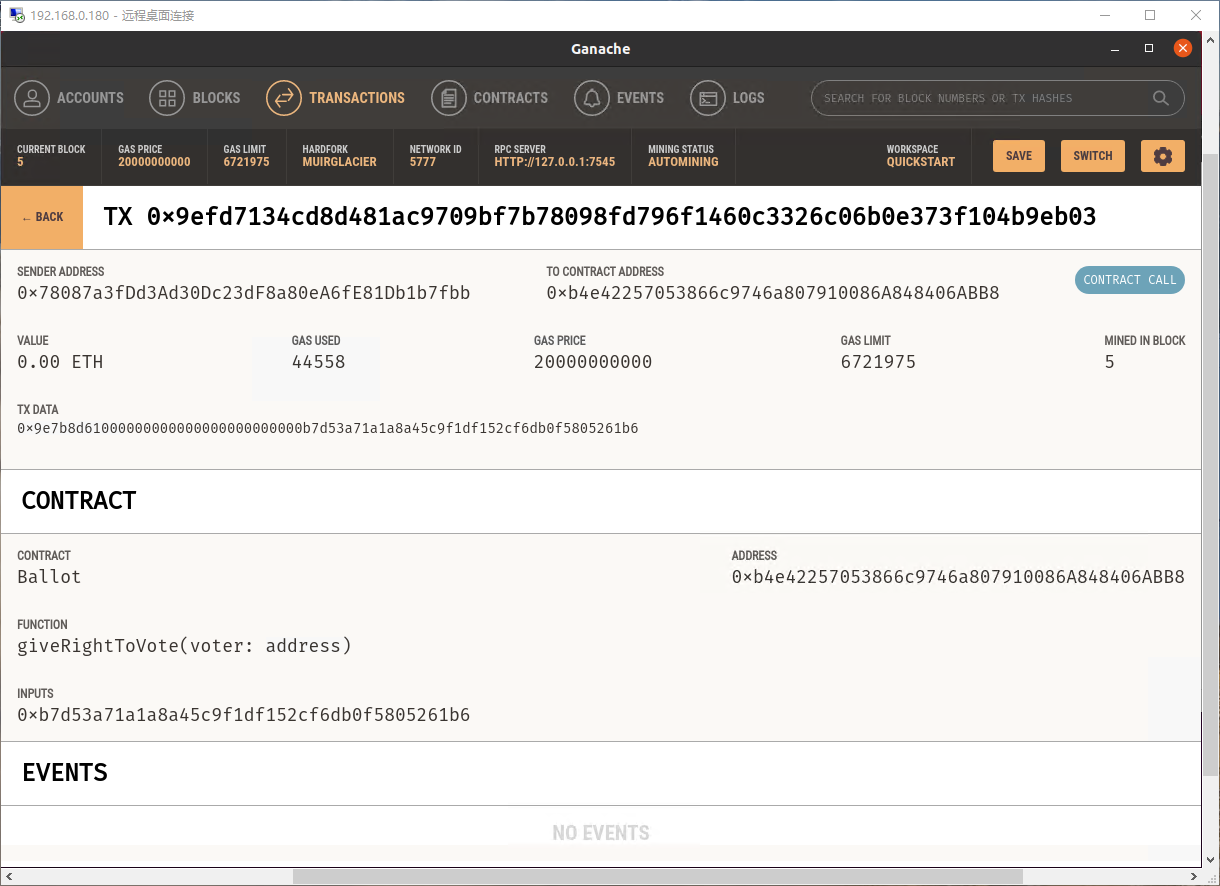
目前账户 '0xB7D53a71a1a8A45C9F1DF152cf6DB0F5805261B6' 获得了投票权,现在怎么使用该账户为某个被选举人投票呢?
刚才我们提到,默认进入truffle控制台会使用第0个账户,要切换账户,需要修改网络配置文件。我们首先退出目前的控制台,修改truffle-config.js文件:
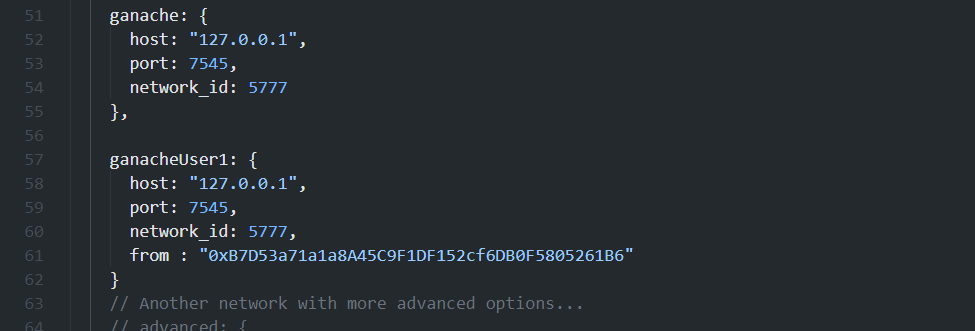
新建一个 ganacheUser1 配置,指定 from 地址,使用此网络配置文件重新进入控制台:
truffle console --network ganacheUser1
使用投票函数 vote,为某个被选举人投票,当然首先还是需要获得智能合约实例:
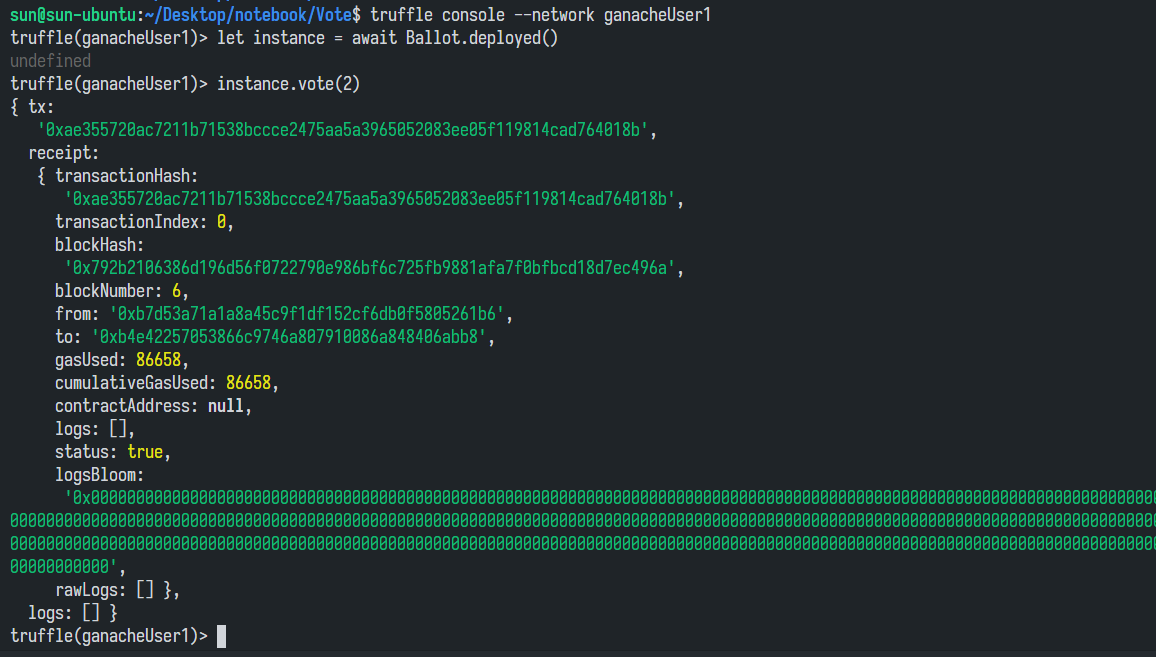
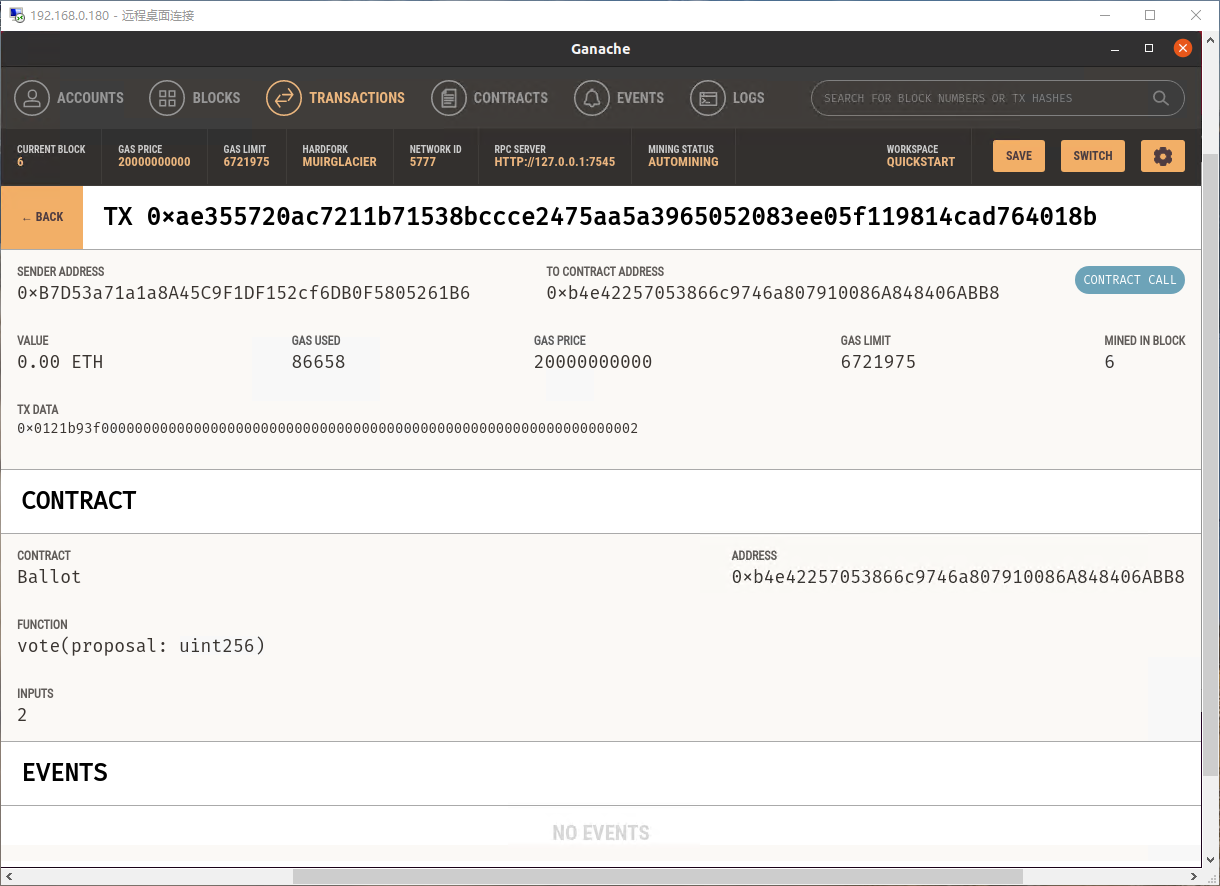
投票成功了。我们同时可以在 Ganache 内看到交易信息和区块信息:
使用 winnerName 函数查看得票数最高的被选举人:
truffle(ganacheUser1)> instance.winnerName()

'0x0000000000000000000000000000000000000000000000000000000000000002'
总结
相比于Remin编辑器,Truffle套件为我们提供了完整的以太坊区块链智能合约开发系统,其自带的develop模块可以直接生成容易上手的区块链,比geth更加简单。Ganache是Truffle套件内的可视化应用程序,帮助我们直观地查看交易和区块变化。
通过亲自部署智能合约,与智能合约进行交互,可以快速理解Solidity语言的用法。
其他参考文档:
详解 Solidity 事件Event - 完全搞懂事件的使用 - Tiny熊 - 博客园 (cnblogs.com)
testrpc - truffle always says ".my_function is not a function" - Ethereum Stack Exchange
智能合约概述 — Solidity develop 文档 (solidity-cn.readthedocs.io)
Solidity by Example — Solidity 0.8.1 documentation (soliditylang.org)
快速入门 Truffle | Truffle 中文文档 - DApp 开发框架 | 深入浅出区块链 (learnblockchain.cn)
How to switch account from default in testrpc - Ethereum Stack Exchange
最新文章
- java即时通信小例子
- 使用UDP协议与韩国OACIS压机通讯
- search--搜索引擎的使用笔记
- 免安装版MySQL安装步骤
- 重新组织 vs 重新生成索引
- zoj 3209.Treasure Map(DLX精确覆盖)
- poj2926 曼哈顿最远距离
- Linux学习之进程管理
- Windows内核之进程的终止和子进程
- String和intern()浅析
- 【设计模式系列】之OO面向对象设计七大原则
- android adb shell and monkey 学习记录
- Guava常用方法
- Alpha冲刺Day10
- [Codeforces 864F]Cities Excursions
- vue加elementui开发的分页显示
- 微信小程序开发工具
- monkeyrunner学习笔记
- 一、Unity Editor自定义菜单
- 对于不返回任何键列信息的 selectcommand 不支持 updatecommand 的动态 sql 生成