CentOS下搭建自动化测试基础框架:Jenkins+Maven+TestNG+ReportNG
1. 安装JDK
1.1 卸载系统默认已安装的open-jdk
rpm -qa|grep java 查出来openjdk相关的应用,把查出来的所有都要通过下面的命令给卸载掉
rpm -e --nodeps 应用A
rpm -e --nodeps 应用B
再次通过java -version和javac -version来确认openjdk确实已经被删除。
1.2 下载Oracle JDK
根据自己的操作系统下载对应版本的JDK,我的是64位CentOS,所以用的是jdk-8u77-linux-x64.tar.gz.
下载方法:
1、(推荐)在windows下将文件下载下来,通过ssh工具将文件传到linux环境下。
2、使用wget命令下载文件,参考http://blog.csdn.net/bichir/article/details/42522113
1.3 安装JDK
tar -xvzf jdk-8u77-linux-x64.tar.gz -C /opt/jdk18 将tar.gz文件解压到/opt/jdk18下,解压后jdk主目录为/opt/jdk18/jdk1.8.0_77
1.4 配置jdk环境变量
vi /etc/profile,在文件最后加上下面几句话后保存退出:
export JAVA_HOME=/opt/jdk18/jdk1.8.0_77
export JAVA_BIN=$JAVA_HOME/bin
export JAVA_LIB=$JAVA_HOME/lib
export CLASSPATH=.:$JAVA_LIB/tools.jar:$JAVA_LIB/dt.jar
export PATH=$JAVA_BIN:$PATH
运行source /etc/profile是设置立即生效。
1.5 检查JDK是否安装成功
java -version
javac -version
2. 安装maven
2.1. tar -xvf apache-maven-3.3.3-bin.tar.gz -C /opt/下,解压后maven主目录是/opt/apache-maven-3.3.3
2.2. 配置maven环境变量:
vi /etc/profile,在文件最后加上下面几句话后保存退出:
export MAVEN_HOME=/opt/apache-maven-3.3.3
export PATH=${PATH}:${MAVEN_HOME}/bin
运行source /etc/profile是设置立即生效。
2.3. 检查是否安装成功
运行mvn -v
3. 安装jenkins(根据官网说明进行,https://wiki.jenkins-ci.org/display/JENKINS/Installing+Jenkins+on+Red+Hat+distributions)
3.1 添加jenkins的源
sudo wget -O /etc/yum.repos.d/jenkins.repo http://pkg.jenkins-ci.org/redhat/jenkins.repo
sudo rpm --import https://jenkins-ci.org/redhat/jenkins-ci.org.key
3.2 安装jenkins
sudo yum install jenkins
安装完成之后,产生目录/usr/lib/jenkins,该目录下有一个jenkins.war
jenkins配置文件/etc/sysconfig/jenkins,“端口”,“JENKINS_HOME”等都可以在这里配置。
默认的JENKINS_HOME是/var/lib/jenkins/
Jenkins日志文件是/var/log/jenkins/jenkins.log
3.3 启动jenkins
sudo service jenkins start
如果启动出现错误:“Starting Jenkins -bash: /usr/bin/java: No such file or directory”。
这时就需要“vi /etc/init.d/jenkins”,把java路径加上(如下):
# Search usable Java. We do this because various reports indicated
# that /usr/bin/java may not always point to Java 1.5
# see http://www.nabble.com/guinea-pigs-wanted-----Hudson-RPM-for-RedHat-Linux-td25673707.html
for candidate in /etc/alternatives/java /usr/lib/jvm/java-1.6.0/bin/java /usr/lib/jvm/jre-1.6.0/bin/java /usr/lib/jvm/java-1 .5.0/bin/java /usr/lib/jvm/jre-1.5.0/bin/java /opt/jdk18/jdk1.8.0_77/bin/java
do
[ -x "$JENKINS_JAVA_CMD" ] && break
JENKINS_JAVA_CMD="$candidate"
done
3.4 登录Jenkins
如果没有特别配置端口,使用http://<ip address>:8080/登录Jenkins,并进行相关配置(插件安装、权限配置、View/Job创建等等)。
4. 创建一个maven项目
我是用的windows下得eclipse创建的maven项目,项目中以TestNG组织的测试用例,并用ReportNG作为测试报告样式,POM文件如下:
<project xmlns="http://maven.apache.org/POM/4.0.0" xmlns:xsi="http://www.w3.org/2001/XMLSchema-instance" xsi:schemaLocation="http://maven.apache.org/POM/4.0.0 http://maven.apache.org/xsd/maven-4.0.0.xsd">

  <modelVersion>4.0.0</modelVersion>

  <groupId>org.uncommons</groupId>

  <artifactId>GridTest</artifactId>

  <version>1.0</version>

  <!-- maven 运行测试name -->

   <name>Report_Test</name>

   <url>http://maven.apache.org</url>

   <!-- maven 引用远程库 -->

    <repositories>

        <repository>

            <id>java-net</id>

            <url>http://download.java.net/maven/2</url>

        </repository>

    </repositories>

   <!-- maven 参数配置,这里引用不同的testng.xml -->

    <properties>

        <project.build.sourceEncoding>UTF-8</project.build.sourceEncoding>

        <xmlFileName>res/testNg.xml</xmlFileName>

    </properties>

    <pluginRepositories>

        <pluginRepository>

            <id>apache.snapshots</id>

            <url>

                http://people.apache.org/repo/m2-snapshot-repository/

            </url>

        </pluginRepository>

    </pluginRepositories>

  <!-- maven 引用依赖不同的jar -->

  <dependencies>

      <dependency>

        <groupId>org.seleniumhq.selenium</groupId>

        <artifactId>selenium-server</artifactId>

        <version>2.48.2</version>

        <scope>test</scope>

    </dependency>

    <dependency>

        <groupId>log4j</groupId>

        <artifactId>log4j</artifactId>

        <version>1.2.17</version>

    </dependency>

    <!-- 依赖testNg -->

    <dependency>

      <groupId>org.testng</groupId>

      <artifactId>testng</artifactId>

      <version>6.8.8</version>

      <scope>test</scope>

    </dependency>

    <!-- 依赖reportNg 关联testNg-->

    <dependency>

        <groupId>org.uncommons</groupId>

        <artifactId>reportng</artifactId>

        <version>1.1.4</version>

        <scope>test</scope>

        <exclusions>

            <exclusion>

                <groupId>org.testng</groupId>

                <artifactId>testng</artifactId>

            </exclusion>

        </exclusions>

    </dependency>

    <!-- 依赖Guice -->

    <dependency>

        <groupId>com.google.inject</groupId>

        <artifactId>guice</artifactId>

        <version>3.0</version>

        <scope>test</scope>

    </dependency>

  </dependencies>

  <build>

      <plugins>

       <!-- 添加插件,添加ReportNg的监听器,修改最后的TestNg的报告 -->

       <plugin>

            <groupId>org.apache.maven.plugins</groupId>

            <artifactId>maven-surefire-plugin</artifactId>

            <version>2.5</version>

            <configuration>

                <includes>

                   <include>**/*Tests.java</include>

                   <include>Tests*.java</include>

                </includes>

                <properties>

                    <property>

                        <name>usedefaultlisteners</name>

                        <value>false</value>

                    </property>

                    <property>

                        <name>listener</name>

                        <value>org.uncommons.reportng.HTMLReporter,  org.uncommons.reportng.JUnitXMLReporter</value>

                    </property>

                </properties>

                <suiteXmlFiles>

                  <suiteXmlFile>${xmlFileName}</suiteXmlFile>

                  </suiteXmlFiles>

                <workingDirectory>target/</workingDirectory>

                <forkMode>always</forkMode>

            </configuration>

        </plugin>

  </plugins>

</build>

</project>
5. 将maven项目提交到svn
6. 配置Jenkins
使用浏览器打开Jenkins页面,“系统管理”--》“系统设置”
6.1 配置JDK和Maven环境

6.2 新建一个maven项目 “LinuxJenkinsTest1”
6.3 配置该maven项目
6.3.1 配置svn

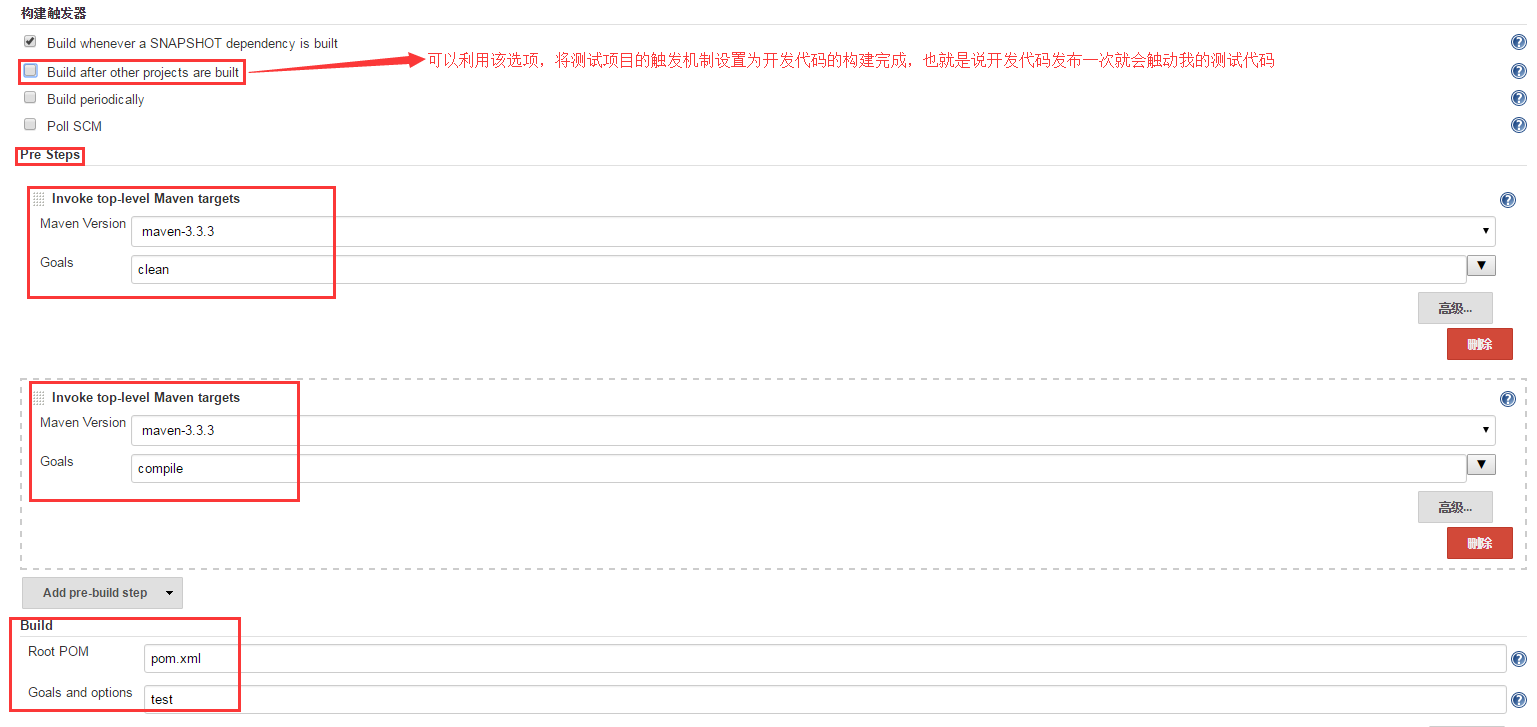
6.3.2 构建触发器的配置
我配置的jenkins是用来运行测试用例的,我的设计是运行mvn clean compile test
7. 运行完测试之后,将报告以邮件的形式发送给指定邮箱
7.1 构建后执行一个shell脚本,将测试报告目录打包为tar.gz,稍后将该文件通过邮件发送

GenerateReportsForMail.sh内容如下:
#!/bin/bash

tar -zcvf surefirereports.tar.gz target/surefire-reports
7.2 安装Email Extension Plugin
安装完之后,在系统管理下多了一个Extended E-mail Notification,我的配置如下,具体配置请参考Email Extension Plugin的说明书


7.3 在具体的项目中配置

这就是我的配置过程,总算写完了,NND。
最新文章
- 上网八个常用cmd命令你掌握了几个?
- position格式布局
- javascript学习笔记1-document.write
- sharepoint2010问卷调查(1)-实现问卷的图片调查(采用JS实现)
- 用nodejs搭建一个简单的服务器
- Win10下IIS配置图解、MVC项目发布图解、IIS添加网站图解
- -webkit-text-size-adjust: none;该如何处理
- System.Reflection.Assembly.GetEntryAssembly()获取的为当前已加载的程序集
- Linux写配置HDF5的python包h5py
- eclipse 搭建Robotium环境--apk 环境搭建
- 获得span里面价值(在特殊情况下 )
- TD配置安装方式
- Java项目集成SAP BO
- (转)认识java中的堆和栈
- github+hexo搭建自己的博客网站(二)更换主题yilia
- 数据库~dotnetcore连接Mysql插入中文失败
- 如何去掉wordpress网站url里面的index.php(Apache服务器)
- inout口在modelsim仿真的方法
- Python_day6
- ansible一键部署k8s单机环境
热门文章
- 按需引入element-ui报错
- C# .net 使用rabbitmq消息队列——EasyNetQ插件介绍
- 初识MASA Blazor
- 一键抠除路人甲,昇腾CANN带你识破神秘的“AI消除术”
- Python_获取全部异常信息
- MySQL主从复制作用和配置
- nginxWebUI
- sqlcl - Exception in thread "main" java.lang.UnsupportedClassVersionError: Bad version number in .class file
- NIO【同步非阻塞io模型】关于 NIO socket 的详细总结【Java客户端+Java服务端 + 业务层】【可以客户端间发消息】
- spring security 关于 http.sessionManagement().maximumSessions(1);的探究