Day03_WebCrawler(网络爬虫)
学于黑马和传智播客联合做的教学项目 感谢
黑马官网
传智播客官网
微信搜索"艺术行者",关注并回复关键词"webcrawler"获取视频和教程资料!
b站在线视频
教学目标
- 能够说出定时任务的作用
- 能够使用工具生成Cron表达式
- 能够理解网页去重的作用
- 能够理解代理服务器的作用
- 能够使用代理服务器爬取数据
- 能够安装ElasticSearch服务和IK分词器
- 能够使用SpringData完成ElasticSearch的增删改查
- 能够把MySQL的数据导入到索引库
- 能够实现查询招聘信息案例
1. 课程计划
案例扩展
a 定时任务
b 网页去重
c 代理的使用
ElasticSearch环境准备
Spring Data ElasticSearch回顾
a 完成ES基本使用
b 完成复杂查询
查询案例实现
2. 案例扩展
2.1. 定时任务
在案例中我们使用的是Spring内置的Spring Task,这是Spring3.0加入的定时任务功能。我们使用注解的方式定时启动爬虫进行数据爬取。
我们使用的是@Scheduled注解,其属性如下:
1)cron:cron表达式,指定任务在特定时间执行;
2)fixedDelay:上一次任务执行完后多久再执行,参数类型为long,单位ms
3)fixedDelayString:与fixedDelay含义一样,只是参数类型变为String
4)fixedRate:按一定的频率执行任务,参数类型为long,单位ms
5)fixedRateString: 与fixedRate的含义一样,只是将参数类型变为String
6)initialDelay:延迟多久再第一次执行任务,参数类型为long,单位ms
7)initialDelayString:与initialDelay的含义一样,只是将参数类型变为String
8)zone:时区,默认为当前时区,一般没有用到
我们这里的使用比较简单,固定的间隔时间来启动爬虫。例如可以实现项目启动后,每隔一小时启动一次爬虫。
但是有可能业务要求更高,并不是定时定期处理,而是在特定的时间进行处理,这个时候我们之前的使用方式就不能满足需求了。例如我要在工作日(周一到周五)的晚上八点执行。这时我们就需要Cron表达式了。
2.1.1. Cron表达式
cron的表达式是字符串,实际上是由七子表达式,描述个别细节的时间表。这些子表达式是分开的空白,代表:
Seconds
Minutes
Hours
Day-of-Month
Month
Day-of-Week
Year (可选字段)
例 :"0 0 12 ? * WED" 在每星期三下午12:00 执行, “*” 代表整个时间段
每一个字段都有一套可以指定有效值,如
Seconds (秒) :可以用数字0-59 表示,
Minutes(分) :可以用数字0-59 表示,
Hours(时) :可以用数字0-23表示,
Day-of-Month(天) :可以用数字1-31 中的任一一个值,但要注意一些特别的月份
Month(月) :可以用0-11 或用字符串:JAN, FEB, MAR, APR, MAY, JUN, JUL, AUG, SEP, OCT, NOV, DEC
Day-of-Week(天) :可以用数字1-7表示(1 = 星期日)或用字符口串:SUN, MON, TUE, WED, THU, FRI, SAT
“/”:为特别单位,表示为“每”。如“0/15”表示每隔15分钟执行一次,“0”表示为从“0”分开始, “3/20”表示表示每隔20分钟执行一次,“3”表示从第3分钟开始执行
“?”:表示每月的某一天,或第周的某一天
“L”:用于每月,或每周,表示为每月的最后一天,或每个月的最后星期几。如“6L”表示“每月的最后一个星期五”
可以使用资料的CronExpBuilder(表达式生成器)生成表达式。进入存放该jar包的目录下,使用命令java - jar CronExpBuilder(表达式生成器) .jar 启动该程序(双击该程序也可以启动)。

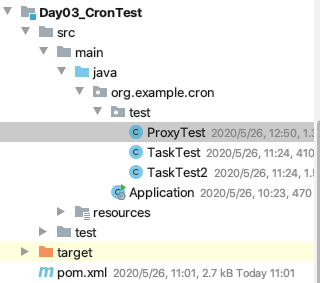
2.1.1. Cron测试
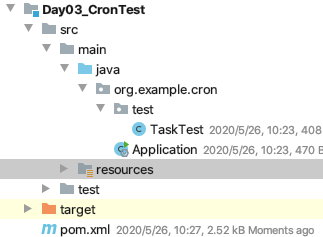
包结构:
Application类的代码:
package org.example.cron;

import org.springframework.boot.SpringApplication;

import org.springframework.boot.autoconfigure.SpringBootApplication;

import org.springframework.scheduling.annotation.EnableScheduling;

/**

 * @author HackerStar

 * @create 2020-05-24 10:39

 */

@SpringBootApplication

@EnableScheduling//开启定时任务

public class Application {

    public static void main(String[] args) {

        SpringApplication.run(Application.class, args);

    }

}
TaskTest类的代码:
package org.example.cron.test;

import org.springframework.scheduling.annotation.Scheduled;

import org.springframework.stereotype.Component;

import java.time.LocalDateTime;

/**

 * @author HackerStar

 * @create 2020-05-26 10:21

 */

@Component

public class TaskTest {

    @Scheduled(cron = "0/5 * * * * *")

    public void test () {

        System.out.println(LocalDateTime.now()+"任务执行了");

    }

}
pom文件:
<build>

        <plugins>

            <plugin>

                <groupId>org.apache.maven.plugins</groupId>

                <artifactId>maven-compiler-plugin</artifactId>

                <configuration>

                    <source>8</source>

                    <target>8</target>

                </configuration>

            </plugin>

        </plugins>

    </build>

    <dependencies>

        <!--SpringMVC-->

        <dependency>

            <groupId>org.springframework.boot</groupId>

            <artifactId>spring-boot-starter-web</artifactId>

        </dependency>

        <!--SpringData Jpa-->

        <dependency>

            <groupId>org.springframework.boot</groupId>

            <artifactId>spring-boot-starter-data-jpa</artifactId>

        </dependency>

        <!--MySQL连接包-->

        <dependency>

            <groupId>mysql</groupId>

            <artifactId>mysql-connector-java</artifactId>

        </dependency>

        <!--WebMagic核心包-->

        <dependency>

            <groupId>us.codecraft</groupId>

            <artifactId>webmagic-core</artifactId>

            <version>0.7.3</version>

            <exclusions>

                <exclusion>

                    <groupId>org.slf4j</groupId>

                    <artifactId>slf4j-log4j12</artifactId>

                </exclusion>

            </exclusions>

        </dependency>

        <!--WebMagic扩展-->

        <dependency>

            <groupId>us.codecraft</groupId>

            <artifactId>webmagic-extension</artifactId>

            <version>0.7.3</version>

        </dependency>

        <!--WebMagic对布隆过滤器的支持-->

        <dependency>

            <groupId>com.google.guava</groupId>

            <artifactId>guava</artifactId>

            <version>16.0</version>

        </dependency>

        <!--工具包-->

        <dependency>

            <groupId>org.apache.commons</groupId>

            <artifactId>commons-lang3</artifactId>

        </dependency>

    </dependencies>
resources目录下的application.properties文件:
#DB Configuration:

spring.datasource.driverClassName=com.mysql.jdbc.Driver

spring.datasource.url=jdbc:mysql://127.0.0.1:3306/WebCrawler?useUnicode=true&characterEncoding=utf-8&useSSL=false

spring.datasource.username=root

spring.datasource.password=root

#JPA Configuration:

spring.jpa.database=MySQL

spring.jpa.show-sql=true
测试结果(每5秒执行一次输出语句):

2.2. 网页去重
之前我们对下载的url地址进行了去重操作,避免同样的url下载多次。其实不光url需要去重,我们对下载的内容也需要去重。
在网上我们可以找到许多内容相似的文章。但是实际我们只需要其中一个即可,同样的内容没有必要下载多次,那么如何进行去重就需要进行处理了。
2.2.1. 去重方案介绍
指纹码对比
最常见的去重方案是生成文档的指纹码。例如对一篇文章进行MD5加密生成一个字符串,我们可以认为这是文章的指纹码,再和其他的文章指纹码对比,一致则说明文章重复。
但是这种方式是完全一致则是重复的,如果文章只是多了几个标点符号,那仍旧被认为是不重复的,这种方式并不合理。
BloomFilter
这种方式就是我们之前对url进行去重的方式,使用在这里的话,也是对文章进行计算得到一个数,再进行对比,缺点和方法1是一样的,如果只有一点点不一样,也会认为不重复,这种方式不合理。
KMP算法
KMP算法是一种改进的字符串匹配算法。KMP算法的关键是利用匹配失败后的信息,尽量减少模式串与主串的匹配次数以达到快速匹配的目的。能够找到两个文章有哪些是一样的,哪些不一样。
这种方式能够解决前面两个方式的“只要一点不一样就是不重复”的问题。但是它的时空复杂度太高了,不适合大数据量的重复比对。
还有一些其他的去重方式:最长公共子串、后缀数组、字典树、DFA等等,但是这些方式的时空复杂度并不适合数据量较大的工业应用场景。我们需要找到一款性能高速度快,能够进行相似度对比的去重方案。
Google 的 simhash 算法产生的签名,可以满足上述要求。这个算法并不深奥,比较容易理解。这种算法也是目前Google搜索引擎所目前所使用的网页去重算法。
2.2.2. SimHash
2.2.2.1. 流程介绍
simhash是由 Charikar 在2002年提出来的,为了便于理解尽量不使用数学公式,分为这几步:
1、分词,把需要判断文本分词形成这个文章的特征单词。
2、hash,通过hash算法把每个词变成hash值,比如“美国”通过hash算法计算为 100101,“51区”通过hash算法计算为 101011。这样我们的字符串就变成了一串串数字。
3、加权,通过第2步的hash生成结果,需要按照单词的权重形成加权数字串,“美国”的hash值为“100101”,通过加权计算为“4 -4 -4 4 -4 4”,“51区”计算为 “ 5 -5 5 -5 5 5”。
4、合并,把上面各个单词算出来的序列值累加,变成只有一个序列串。
“美国”的 “4 -4 -4 4 -4 4”,“51区”的 “ 5 -5 5 -5 5 5”,把每一位进行累加, “4+5 -4+-5 -4+5 4+-5 -4+5 4+5” > “9 -9 1 -1 1 9”
5、降维,把算出来的 “9 -9 1 -1 1 9”变成 0 1 串,形成最终的simhash签名。

2.2.2.2. 签名距离计算
我们把数据库里的文本都转换为simhash签名,并转换为long类型存储,空间大大减少。现在我们虽然解决了空间,但是如何计算两个simhash的相似度呢?
我们通过海明距离(Hamming distance)就可以计算出两个simhash到底相似不相似。两个simhash对应二进制(01串)取值不同的数量称为这两个simhash的海明距离。
举例如下: 10101 和 00110 从第一位开始依次有第一位、第四、第五位不同,则海明距离为3。对于二进制字符串的a和b,海明距离为等于在a XOR(异或) b运算结果中1的个数(普遍算法)。
2.2.2.3. 导入simhash工程
参考项目:https://github.com/CreekLou/simhash.git
这个项目不能直接使用,因为jar包的问题,需要进行改造。这里使用课堂资料中已经改造好的。
导入工程simhash,并打开测试用例:
2.2.2.4. 测试simhash
按照测试用例的要求,准备两个文件,就是需要进行对比的文章。
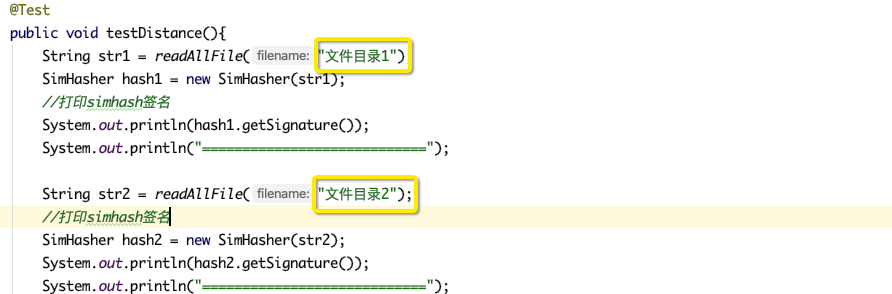
执行测试用例,结果如下:
- 文章内容完全一样

- 文章内容稍微不一样
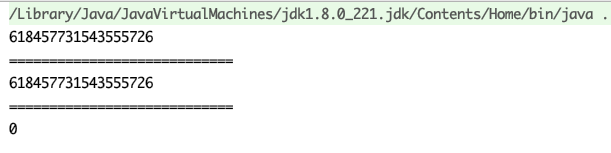
- 文章内容大部分不一样

2.2.2.5. 案例整合
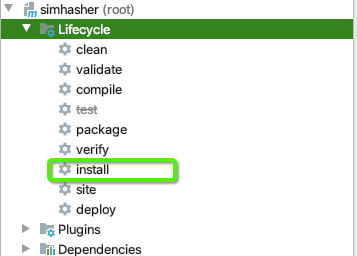
需要先把simhash安装到本地仓库:

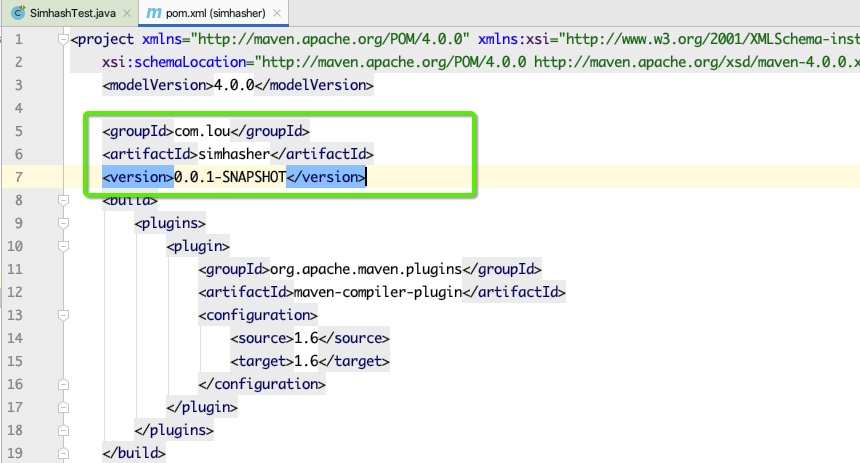
在案例的pom.xml中加入以下依赖:
<!--simhash网页去重-->

<dependency>

    <groupId>com.lou</groupId>

    <artifactId>simhasher</artifactId>

    <version>0.0.1-SNAPSHOT</version>

</dependency>
该依赖就在simhash的pom文件里
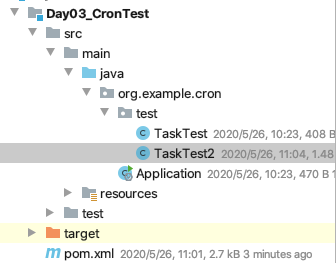
增加新的测试代码(TaskTest2),把simhash测试类的代码copy过来:
package org.example.cron.test;

import com.lou.simhasher.SimHasher;

import org.apache.commons.io.IOUtils;

import org.springframework.scheduling.annotation.Scheduled;

import org.springframework.stereotype.Component;

import java.io.FileInputStream;

import java.io.IOException;

import java.time.LocalDateTime;

/**

 * @author HackerStar

 * @create 2020-05-26 10:21

 */

@Component

public class TaskTest2 {

    @Scheduled(cron = "0/5 * * * * *")

    public void test() {

        String str1 = readAllFile("文件目录1");

        SimHasher hash1 = new SimHasher(str1);

        //打印simhash签名

        System.out.println(hash1.getSignature());

        System.out.println("============================");

        String str2 = readAllFile("文件目录2");

        //打印simhash签名

        SimHasher hash2 = new SimHasher(str2);

        System.out.println(hash2.getSignature());

        System.out.println("============================");

        //打印海明距离

        System.out.println(hash1.getHammingDistance(hash2.getSignature()));

    }

    /**

     * 测试用

     * @param filename 名字

     * @return

     */

    public static String readAllFile (String filename){

        String everything = "";

        try {

            FileInputStream inputStream = new FileInputStream(filename);

            everything = IOUtils.toString(inputStream);

            inputStream.close();

        } catch (IOException e) {

        }

        return everything;

    }

}
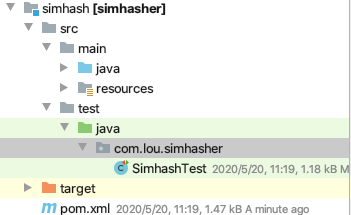
包结构:
测试结果:

2.3. 代理的使用
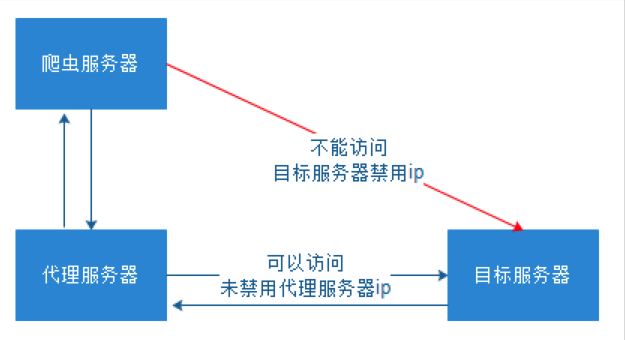
有些网站不允许爬虫进行数据爬取,因为会加大服务器的压力。其中一种最有效的方式是通过ip+时间进行鉴别,因为正常人不可能短时间开启太多的页面,发起太多的请求。
我们使用的WebMagic可以很方便的设置爬取数据的时间(参考第二天的的3.1. 爬虫的配置、启动和终止)。但是这样会大大降低我们爬取数据的效率,如果不小心ip被禁了,会让我们无法爬取数据,那么我们就有必要使用代理服务器来爬取数据。
2.3.1. 代理服务器
代理(英语:Proxy),也称网络代理,是一种特殊的网络服务,允许一个网络终端(一般为客户端)通过这个服务与另一个网络终端(一般为服务器)进行非直接的连接。
提供代理服务的电脑系统或其它类型的网络终端称为代理服务器(英文:Proxy Server)。一个完整的代理请求过程为:客户端首先与代理服务器创建连接,接着根据代理服务器所使用的代理协议,请求对目标服务器创建连接、或者获得目标服务器的指定资源。
我们需要知道代理服务器在哪里(ip和端口号)才可以使用。网上有很多代理服务器的提供商,但是大多是免费的不好用,付费的还行。
提供两个免费代理ip的服务商网站:
2.3.2. 使用代理
WebMagic使用的代理APIProxyProvider。因为相对于Site的“配置”,ProxyProvider定位更多是一个“组件”,所以代理不再从Site设置,而是由HttpClientDownloader设置。

ProxyProvider有一个默认实现:SimpleProxyProvider。它是一个基于简单Round-Robin的、没有失败检查的ProxyProvider。可以配置任意个候选代理,每次会按顺序挑选一个代理使用。它适合用在自己搭建的比较稳定的代理的场景。
如果需要根据实际使用情况对代理服务器进行管理(例如校验是否可用,定期清理、添加代理服务器等),只需要自己实现APIProxyProvider即可。
可以访问网址https://api.ipify.org测试当前请求的ip是多少。
为了避免干扰,把其他任务的@Component注释掉,在案例中加入新的测试代码:
package org.example.cron.test;

import org.jsoup.Jsoup;

import org.springframework.scheduling.annotation.Scheduled;

import org.springframework.stereotype.Component;

import us.codecraft.webmagic.Page;

import us.codecraft.webmagic.Site;

import us.codecraft.webmagic.Spider;

import us.codecraft.webmagic.downloader.HttpClientDownloader;

import us.codecraft.webmagic.processor.PageProcessor;

import us.codecraft.webmagic.proxy.Proxy;

import us.codecraft.webmagic.proxy.SimpleProxyProvider;

/**

 * @author HackerStar

 * @create 2020-05-26 11:24

 */

@Component

public class ProxyTest implements PageProcessor {

    @Scheduled(fixedDelay = 10000)

    public void testProxy() {

        HttpClientDownloader httpClientDownloader = new HttpClientDownloader();

        httpClientDownloader.setProxyProvider(SimpleProxyProvider.from(new Proxy("59.124.224.180", 3128)));

        Spider.create(new ProxyTest())

                .addUrl("https://api.ipify.org")

                .setDownloader(httpClientDownloader)

                .run();

    }

    @Override

    public void process(Page page) {

        //打印获取到的结果以测试代理服务器是否生效

        System.out.println(page.getHtml().css("body", "text"));

    }

    private Site site = new Site();

    @Override

    public Site getSite() {

        return site;

    }

}
包结构:
测试结果:

3. ElasticSearch环境准备
3.1. 安装ElasticSearch服务
将资料中的elasticsearch-5.6.8.zip进行解压
启动服务(windows > elasticsearch.bat MacOS > elasticsearch)
访问地址http://127.0.0.1:9200:
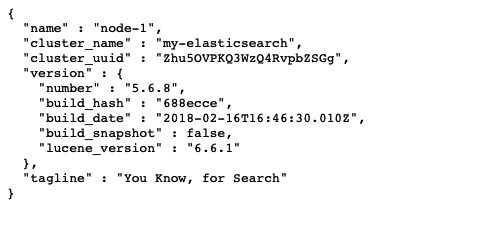
表示ElasticSearch安装启动完成
3.2. 安装ES的图形化界面插件
安装ElasticSearch的head插件,完成图形化界面的效果,完成索引数据的查看。采用本地安装方式进行head插件的安装。elasticsearch-5-*以上版本安装head需要安装node和grunt。
1)安装head插件
将head压缩包解压到任意目录,但是要和elasticsearch的安装目录区别开
2)安装nodejs( 参考链接)
3)将grunt安装为全局命令 ,Grunt是基于Node.js的项目构建工具
将grunt安装为全局命令 ,Grunt是基于Node.js的项目构建工具
在Terminal控制台中输入如下执行命令:
npm install -g grunt-cli
PS:如果安装不成功或者安装速度慢,可以使用淘宝的镜像进行安装:
npm install -g cnpm –registry=https://registry.npm.taobao.org后续使用的时候,只需要把npm xxx 换成 cnpm xxx 即可
4)修改elasticsearch配置文件:elasticsearch.yml,增加以下三句命令:
http.cors.enabled: true

http.cors.allow-origin: "*"

network.host: 127.0.0.1
重启elasticsearch
5)进入head目录启动head,在命令提示符下输入命令:
grunt server
浏览器访问http://127.0.0.1:9100,效果如下:

PS:如果第5步失败,执行以下命令
npm install grunt如果出现

再根据提示按以下方式依次安装组件

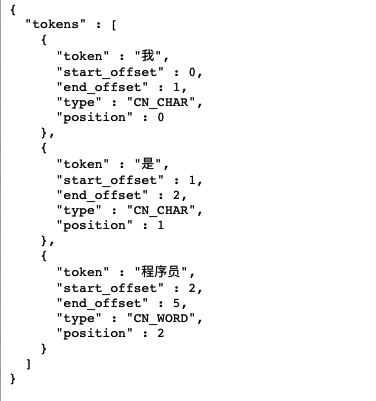
3.3. 安装IK分词器
解压资料里的IK分词器压缩包,将解压后的elasticsearch文件夹拷贝到elasticsearch-5.6.8\plugins下,并重命名文件夹为ik,重新启动elasticSearch,即可加载IK分词器。
测试:
在浏览器发起请求:http://127.0.0.1:9200/_analyze?analyzer=ik_smart&pretty=true&text=我是程序员
浏览器显示结果:
4. ElasticSearch回顾
4.1. 创建Maven工程
创建Maven工程,给pom.xml加入依赖:
		<build>

        <plugins>

            <plugin>

                <groupId>org.apache.maven.plugins</groupId>

                <artifactId>maven-compiler-plugin</artifactId>

                <configuration>

                    <source>8</source>

                    <target>8</target>

                </configuration>

            </plugin>

        </plugins>

    </build>

		<dependencies>

        <dependency>

            <groupId>org.elasticsearch</groupId>

            <artifactId>elasticsearch</artifactId>

            <version>5.6.8</version>

        </dependency>

        <dependency>

            <groupId>org.elasticsearch.client</groupId>

            <artifactId>transport</artifactId>

            <version>5.6.8</version>

        </dependency>

        <dependency>

            <groupId>org.apache.logging.log4j</groupId>

            <artifactId>log4j-to-slf4j</artifactId>

            <version>2.9.1</version>

        </dependency>

        <dependency>

            <groupId>org.slf4j</groupId>

            <artifactId>slf4j-api</artifactId>

            <version>1.7.24</version>

        </dependency>

        <dependency>

            <groupId>org.slf4j</groupId>

            <artifactId>slf4j-simple</artifactId>

            <version>1.7.21</version>

        </dependency>

        <dependency>

            <groupId>log4j</groupId>

            <artifactId>log4j</artifactId>

            <version>1.2.12</version>

        </dependency>

        <dependency>

            <groupId>junit</groupId>

            <artifactId>junit</artifactId>

            <version>4.12</version>

        </dependency>

        <dependency>

            <groupId>com.fasterxml.jackson.core</groupId>

            <artifactId>jackson-core</artifactId>

            <version>2.8.1</version>

        </dependency>

        <dependency>

            <groupId>com.fasterxml.jackson.core</groupId>

            <artifactId>jackson-databind</artifactId>

            <version>2.8.1</version>

        </dependency>

        <dependency>

            <groupId>com.fasterxml.jackson.core</groupId>

            <artifactId>jackson-annotations</artifactId>

            <version>2.8.1</version>

        </dependency>

        <dependency>

            <groupId>org.springframework.data</groupId>

            <artifactId>spring-data-elasticsearch</artifactId>

            <version>3.0.5.RELEASE</version>

        </dependency>

        <dependency>

            <groupId>org.springframework</groupId>

            <artifactId>spring-test</artifactId>

            <version>5.0.4.RELEASE</version>

        </dependency>

    </dependencies>
在Resource目录下添加配置文件applicationContext.xml
<?xml version="1.0" encoding="UTF-8"?>

<beans xmlns="http://www.springframework.org/schema/beans"

       xmlns:xsi="http://www.w3.org/2001/XMLSchema-instance"

       xmlns:context="http://www.springframework.org/schema/context"

       xmlns:elasticsearch="http://www.springframework.org/schema/data/elasticsearch"

       xsi:schemaLocation="http://www.springframework.org/schema/beans

        http://www.springframework.org/schema/beans/spring-beans.xsd

        http://www.springframework.org/schema/context

        http://www.springframework.org/schema/context/spring-context.xsd

        http://www.springframework.org/schema/data/elasticsearch

        http://www.springframework.org/schema/data/elasticsearch/spring-elasticsearch-1.0.xsd">

</beans>
4.2. 开发准备
4.2.1. 编写pojo
package org.example.es.pojo;

/**

 * @author HackerStar

 * @create 2020-05-26 14:55

 */

public class Item {

    private Integer id;

    private String title;

  	private String content;

    @Override

    public String toString() {

        return "Item{" +

                "id=" + id +

                ", title='" + title + '\'' +

                ", content='" + content + '\'' +

                '}';

    }

  	public Integer getContent() {

        return content;

    }

    public void setContent(String content) {

        this.content = content;

    }

    public Integer getId() {

        return id;

    }

    public void setId(Integer id) {

        this.id = id;

    }

    public String getTitle() {

        return title;

    }

    public void setTitle(String title) {

        this.title = title;

    }

}
4.2.2. 编写dao
package org.example.es.dao;

import org.example.es.pojo.Item;

import org.springframework.data.elasticsearch.repository.ElasticsearchRepository;

/**

 * @author HackerStar

 * @create 2020-05-26 14:57

 */

public interface ItemRepository extends ElasticsearchRepository<Item, Integer> {

}
4.2.3. 编写service
编写service接口
package org.example.es.service;

/**

 * @author HackerStar

 * @create 2020-05-26 14:59

 */

public interface ItemService {

}
编写serveice实现
package org.example.es.impl;

import org.example.es.service.ItemService;

/**

 * @author HackerStar

 * @create 2020-05-26 15:00

 */

@Service

public class ItemServiceImpl implements ItemService {

}
4.2.4. 修改配置文件
<?xml version="1.0" encoding="UTF-8"?>

<beans xmlns="http://www.springframework.org/schema/beans"

       xmlns:xsi="http://www.w3.org/2001/XMLSchema-instance"

       xmlns:context="http://www.springframework.org/schema/context"

       xmlns:elasticsearch="http://www.springframework.org/schema/data/elasticsearch"

       xsi:schemaLocation="http://www.springframework.org/schema/beans

        http://www.springframework.org/schema/beans/spring-beans.xsd

        http://www.springframework.org/schema/context

        http://www.springframework.org/schema/context/spring-context.xsd

        http://www.springframework.org/schema/data/elasticsearch

        http://www.springframework.org/schema/data/elasticsearch/spring-elasticsearch-1.0.xsd">

    <!--    配置ES的DAO扫描-->

    <elasticsearch:repositories base-package="org.example.es.dao"/>

    <!--    配置ES的连接-->

    <elasticsearch:transport-client id="ESClient" cluster-nodes="127.0.0.1:9300"  cluster-name="my-elasticsearch"/>

    <!--    配置ES模版-->

    <bean id="elasticsearchTemplate" class="org.springframework.data.elasticsearch.core.ElasticsearchTemplate">

        <constructor-arg name="client" ref="ESClient"/>

    </bean>

    <!--    配置Service扫描-->

    <context:component-scan base-package="org.example.es.service"/>

</beans>
4.2.5. 修改实体类
package org.example.es.pojo;

import org.springframework.data.annotation.Id;

import org.springframework.data.elasticsearch.annotations.Document;

import org.springframework.data.elasticsearch.annotations.Field;

import org.springframework.data.elasticsearch.annotations.FieldType;

/**

 * @author HackerStar

 * @create 2020-05-26 14:55

 */

@Document(indexName = "esitem", type = "Item")

public class Item {

    @Id

    @Field(index = true, store = true, type = FieldType.Integer)

    private Integer id;

    @Field(index = true, store = true, type = FieldType.text, analyzer = "ik_smart")

    private String title;

    @Field(index = true, store = true, type = FieldType.text, analyzer = "ik_smart")

    private String content;

    @Override

    public String toString() {

        return "Item{" +

                "id=" + id +

                ", title='" + title + '\'' +

                ", content='" + content + '\'' +

                '}';

    }

    public String getContent() {

        return content;

    }

    public void setContent(String content) {

        this.content = content;

    }

    public Integer getId() {

        return id;

    }

    public void setId(Integer id) {

        this.id = id;

    }

    public String getTitle() {

        return title;

    }

    public void setTitle(String title) {

        this.title = title;

    }

}
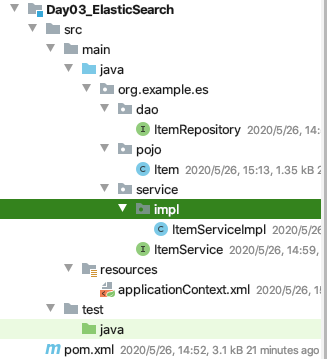
包结构:
4.3. ElasticSearch基本使用
4.3.1. 保存和修改文档
在pojo中设置了id为索引库的主键,索引根据id进行保存或修改。
如果id存在则修改,如果id不存在则更新。
本人做时,出现了两个异常:
异常一:NoNodeAvailableException[None of the configured nodes are available: [{#transport#-1}{C2iexctzTDmgP4kZVixr2Q}{127.0.0.1}{127.0.0.1:9300}]
因为之前学习过ElasticSearch,所以在之前安装了。而视频教学中是重新安装的,所以它配置文件(elasticsearch.yml)中没有修改cluster-name的值,默认为elasticsearch,而我在之前学习过程中过,设置了其为my-elasticsearch所以我要在applicationContext.xml配置cluster-name属性,即<elasticsearch:transport-client id="ESClient" cluster-nodes="127.0.0.1:9300" cluster-name="my-elasticsearch"/>,如果没有在elasticsearch.yml中修改cluster-name的值,可以不配置。
异常二:[ESItem] InvalidIndexNameException[Invalid index name [ESItem], must be lowercase
pojo实体类上的@Document注解中的indexName,即索引名必须是小写字母。elasticsearch添加的索引名必须全部是小写字母,不能包括大写字母。
package org.example.es.test;

import org.example.es.pojo.Item;

import org.example.es.service.ItemService;

import org.junit.Test;

import org.junit.runner.RunWith;

import org.springframework.beans.factory.annotation.Autowired;

import org.springframework.data.elasticsearch.core.ElasticsearchTemplate;

import org.springframework.test.context.ContextConfiguration;

import org.springframework.test.context.junit4.SpringJUnit4ClassRunner;

/**

 * @author HackerStar

 * @create 2020-05-26 15:17

 */

@RunWith(SpringJUnit4ClassRunner.class)

@ContextConfiguration(locations = "classpath:applicationContext.xml")

public class ESTest {

    @Autowired

    private ItemService itemService;

    @Autowired

    private ElasticsearchTemplate elasticsearchTemplate;

    /**

     * 创建索引和映射

     */

    @Test

    public void createIndex() {

        elasticsearchTemplate.createIndex(Item.class);

        elasticsearchTemplate.putMapping(Item.class);

    }

    /**

     * 新增

     */

    @Test

    public void testSave() {

        Item item = new Item();

        item.setId(100);

        item.setTitle("ElasticSearch");

        item.setContent("使用SpringData ES完成搜索功能。");

        itemService.save(item);

    }

}
在ItemService接口中添加save方法:
package org.example.es.service;

import org.example.es.pojo.Item;

import org.springframework.stereotype.Service;

/**

 * @author HackerStar

 * @create 2020-05-26 14:59

 */

public interface ItemService {

    void save(Item item);

}
在ItemService接口实现类中添加save方法:
package org.example.es.service.impl;

import org.example.es.dao.ItemRepository;

import org.example.es.pojo.Item;

import org.example.es.service.ItemService;

import org.springframework.beans.factory.annotation.Autowired;

import org.springframework.stereotype.Service;

/**

 * @author HackerStar

 * @create 2020-05-26 15:00

 */

@Service

public class ItemServiceImpl implements ItemService {

    @Autowired

    private ItemRepository itemRepository;

    @Override

    public void save(Item item) {

        itemRepository.save(item);

    }

}
4.3.2. 删除文档
在ESTest中添加删除代码:
 /**

     * 删除

     */

    @Test

    public void delete() {

        Item item = new Item();

        item.setId(100);

        itemService.delete(item);

    }
在ItemService接口中添加delete方法:
void delete(Item item);
在ItemService接口实现类中添加delete方法:
		@Override

    public void delete(Item item) {

        itemRepository.delete(item);

    }
4.3.3. 批量保存
在ESTest中添加批量保存代码:
/**

     * 批量保存

     */

    @Test

    public void saveAll() {

        List<Item> items = new ArrayList<>();

        for (int i = 1; i < 101; i++) {

            Item item = new Item();

            item.setId(i);

            item.setTitle("elasticSearch"+ i +".0版本发布..,更新");

            item.setContent("ElasticSearch批量插入第" + i + "次");

            items.add(item);

        }

        itemService.saveAll(items);

    }
在ItemService接口中添加saveAll方法:
void saveAll(List<Item> items);
在ItemService接口实现类中添加saveAll方法:
		@Override

    public void saveAll(List<Item> items) {

        itemRepository.saveAll(items);

    }
4.3.4. 查询所有
在ESTest中添加批量保存代码:
 /**

     * 查询所有

     */

    @Test

    public void findAll() {

        Iterable<Item> items = itemService.findAll();

        items.forEach(item -> System.out.println(item));

    }
在ItemService接口中添加saveAll方法:
Iterable<Item> findAll();
在ItemService接口中添加saveAll方法:
		@Override

    public Iterable<Item> findAll() {

        Iterable<Item> items = itemRepository.findAll();

        return items;

    }
4.3.4. 分页查询
在ESTest中添加批量保存代码:
/**

     * 分页查询

     */

    @Test

    public void findBypage() {

        Page<Item> items = itemService.findByPage(1, 20);

        for (Item item :

                items.getContent()) {

            System.out.println(item);

        }

    }
在ItemService接口中添加findByPage方法:
Page<Item> findByPage(int page, int rows);
在ItemService接口中添加findBypage方法:
		@Override

    public Page<Item> findByPage(int page, int rows) {

        Page<Item> items = itemRepository.findAll(PageRequest.of(page - 1, rows));

        return items;

    }
4.4. ElasticSearch复杂查询
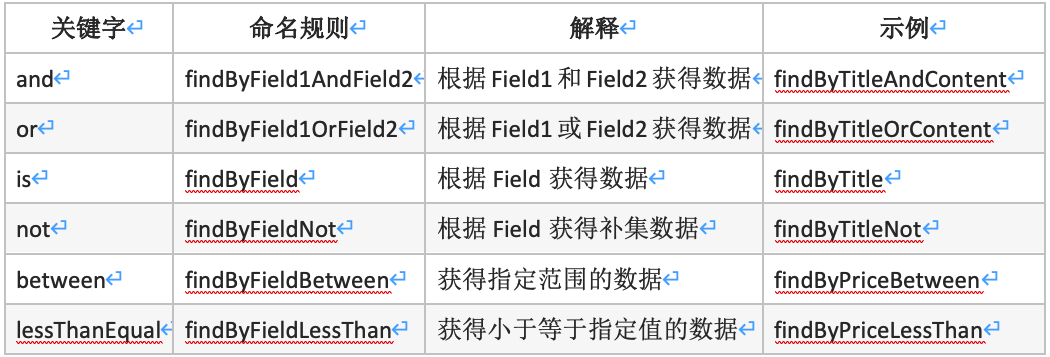
4.4.1. 查询方法示例
4.4.2. 根据title和Content查询
默认每页显示10条数据。
在ESTest中添加测试逻辑:
/**

     * 根据title和Content查询

     */

    @Test

    public void findByTitleAndContent() {

        List<Item> items = itemService.findByTitleAndContent("更新", "批量");

        items.forEach(item -> System.out.println(item));

    }
在ItemService接口中添加代码:
List<Item> findByTitleAndContent(String title, String content);
在ItemService接口中添加代码:
		@Override

    public List<Item> findByTitleAndContent(String title, String content) {

        List<Item> items = itemRepository.findByTitleAndContent(title, content);

        return items;

    }
在ItemRepository添加代码:
List<Item> findByTitleAndContent(String title, String content);
4.4.3. 根据title和Content分页查询
在ESTest中添加测试逻辑:
/**

     * 根据title或Content分页查询

     */

    @Test

    public void findByTitleOrContent(){

        Page<Item> items = itemService.findByTitleOrContent("更新", "批量", 2, 20);

        for (Item item :

                items.getContent()) {

            System.out.println(item);

        }

    }
在ItemService接口中添加代码:
Page<Item> findByTitleOrContent(String title, String content, Integer page, Integer rows);
在ItemService接口中添加代码:
		@Override

    public Page<Item> findByTitleOrContent(String title, String content, Integer page, Integer rows) {

        Page<Item> items = itemRepository.findByTitleOrontent(title, content, PageRequest.of(page-1, rows));

        return items;

    }
在ItemRepository添加代码:
Page<Item> findByTitleOrContent(String title, String content, Pageable pageable)
4.4.4. 根据多条件组合查询
在ESTest中添加测试逻辑:
 /**

     * 根据title和Content和id范围分页查询

     */

    @Test

    public void findByIdBetween() {

        Page<Item> items = itemService.findByTitleAndContentAndIdBetween("版本", "批量", 10, 20, 1, 10);

        int pageNumber = 0;//判断查询了多少条

        for (Item item :

                items.getContent()) {

            System.out.println(item);

            pageNumber++;

        }

        System.out.println(pageNumber);

    }
在ItemService接口中添加代码:
Page<Item> findByTitleAndContentAndIdBetween(String title, String content, Integer min, Integer max, int page, int rows);
在ItemService接口中添加代码:
		@Override

    public Page<Item> findByTitleAndContentAndIdBetween(String title, String content, Integer min, Integer max, int page, int rows) {

        Page<Item> items = itemRepository.findByTitleAndContentAndIdBetween(title, content, min, max, PageRequest.of(page-1, rows));

        return items;

    }
在ItemRepository添加代码:
Page<Item> findByTitleAndContentAndIdBetween(String title, String content, Integer min, Integer max, Pageable pageable);
5. 查询案例实现
把上一次抓取到的招聘数据作为数据源,实现招聘信息查询功能。首先需要把MySQL的数据添加到索引库中,然后再实现查询功能。我们这里使用的是SpringBoot,需要把Spring Data ElasticSearch 和项目进行整合。
5.1. 开发准备
我们这里使用的是SpringBoot,需要把Spring Data ElasticSearch 和项目进行整合。
需要修改之前的配置,网页去重排除lucene依赖,同时去重的依赖必须放在pom.xml的最下部。因为现在要使用ElasticSearch,需要用到新的lucene依赖。
添加ES依赖和单元测试依赖,并修改以前的去重依赖,pom.xml效果:
		<build>

        <plugins>

            <plugin>

                <groupId>org.apache.maven.plugins</groupId>

                <artifactId>maven-compiler-plugin</artifactId>

                <configuration>

                    <source>8</source>

                    <target>8</target>

                </configuration>

            </plugin>

        </plugins>

    </build>

    <dependencies>

        <!--SpringMVC-->

        <dependency>

            <groupId>org.springframework.boot</groupId>

            <artifactId>spring-boot-starter-web</artifactId>

        </dependency>

        <!--SpringData Jpa-->

        <dependency>

            <groupId>org.springframework.boot</groupId>

            <artifactId>spring-boot-starter-data-jpa</artifactId>

        </dependency>

        <!--MySQL连接包-->

        <dependency>

            <groupId>mysql</groupId>

            <artifactId>mysql-connector-java</artifactId>

        </dependency>

        <!--WebMagic核心包-->

        <dependency>

            <groupId>us.codecraft</groupId>

            <artifactId>webmagic-core</artifactId>

            <version>0.7.3</version>

            <exclusions>

                <exclusion>

                    <groupId>org.slf4j</groupId>

                    <artifactId>slf4j-log4j12</artifactId>

                </exclusion>

            </exclusions>

        </dependency>

        <!--WebMagic扩展-->

        <dependency>

            <groupId>us.codecraft</groupId>

            <artifactId>webmagic-extension</artifactId>

            <version>0.7.3</version>

        </dependency>

        <!--WebMagic对布隆过滤器的支持-->

        <dependency>

            <groupId>com.google.guava</groupId>

            <artifactId>guava</artifactId>

            <version>16.0</version>

        </dependency>

        <!--工具包-->

        <dependency>

            <groupId>org.apache.commons</groupId>

            <artifactId>commons-lang3</artifactId>

        </dependency>

        <!--ElasticSearch-->

        <dependency>

            <groupId>org.springframework.boot</groupId>

            <artifactId>spring-boot-starter-data-elasticsearch</artifactId>

        </dependency>

        <!--单元测试-->

        <dependency>

            <groupId>org.springframework.boot</groupId>

            <artifactId>spring-boot-starter-test</artifactId>

        </dependency>

        <!--simhash网页去重-->

        <dependency>

            <groupId>com.lou</groupId>

            <artifactId>simhasher</artifactId>

            <version>0.0.1-SNAPSHOT</version>

            <exclusions>

                <exclusion>

                    <groupId>org.apache.lucene</groupId>

                    <artifactId>lucene-core</artifactId>

                </exclusion>

            </exclusions>

        </dependency>

    </dependencies>
修改配置文件application.properties,添加以下内容:
#ElasticSearch Configuration

spring.data.elasticsearch.cluster-nodes=127.0.0.1:9300

spring.data.elasticsearch.cluster-name=my-elasticsearch
5.2. 导入数据库到索引库
5.2.1. 编写pojo
package org.example.jobs.pojo;

import org.springframework.data.annotation.Id;

import org.springframework.data.elasticsearch.annotations.Document;

import org.springframework.data.elasticsearch.annotations.Field;

import org.springframework.data.elasticsearch.annotations.FieldType;

/**

 * @author HackerStar

 * @create 2020-05-26 20:06

 */

@Document(indexName = "jobinfo", type = "JobInfoField")

public class JobInfoField {

    @Id

    @Field(index = true, store = true, type = FieldType.Long)

    private Long id;//主键ID

    @Field(index = false, store = true, type = FieldType.Text)

    private String companyName;//公司名称

    @Field(index = false, store = true, type = FieldType.Text)

    private String companyAddr;//公司联系方式

    @Field(index = false, store = true, type = FieldType.Text)

    private String companyInfo;//公司信息

    @Field(index = true, store = true, type = FieldType.Text, analyzer = "ik_smart", searchAnalyzer = "ik_smart")

    private String jobName;//职位名称

    @Field(index = true, store = true, type = FieldType.Text, analyzer = "ik_smart", searchAnalyzer = "ik_smart")

    private String jobAddr;//工作地点

    @Field(index = true, store = true, type = FieldType.Text, analyzer = "ik_smart", searchAnalyzer = "ik_smart")

    private String jobInfo;//职位信息

    @Field(index = true, store = true, type = FieldType.Integer)

    private Integer salaryMin;//最小工资

    @Field(index = true, store = true, type = FieldType.Integer)

    private Integer salaryMax;//最大工资

    @Field(index = true, store = true, type = FieldType.Text)

    private String url;//招聘信息详情页

    @Field(index = true, store = true, type = FieldType.Text)

    private String time;//职位最近发布时间

    @Override

    public String toString() {

        return "JobInfoField{" +

                "id=" + id +

                ", companyName='" + companyName + '\'' +

                ", companyAddr='" + companyAddr + '\'' +

                ", companyInfo='" + companyInfo + '\'' +

                ", jobName='" + jobName + '\'' +

                ", jobAddr='" + jobAddr + '\'' +

                ", jobInfo='" + jobInfo + '\'' +

                ", salaryMin=" + salaryMin +

                ", salaryMax=" + salaryMax +

                ", url='" + url + '\'' +

                ", time='" + time + '\'' +

                '}';

    }

    public Long getId() {

        return id;

    }

    public void setId(Long id) {

        this.id = id;

    }

    public String getCompanyName() {

        return companyName;

    }

    public void setCompanyName(String companyName) {

        this.companyName = companyName;

    }

    public String getCompanyAddr() {

        return companyAddr;

    }

    public void setCompanyAddr(String companyAddr) {

        this.companyAddr = companyAddr;

    }

    public String getCompanyInfo() {

        return companyInfo;

    }

    public void setCompanyInfo(String companyInfo) {

        this.companyInfo = companyInfo;

    }

    public String getJobName() {

        return jobName;

    }

    public void setJobName(String jobName) {

        this.jobName = jobName;

    }

    public String getJobAddr() {

        return jobAddr;

    }

    public void setJobAddr(String jobAddr) {

        this.jobAddr = jobAddr;

    }

    public String getJobInfo() {

        return jobInfo;

    }

    public void setJobInfo(String jobInfo) {

        this.jobInfo = jobInfo;

    }

    public Integer getSalaryMin() {

        return salaryMin;

    }

    public void setSalaryMin(Integer salaryMin) {

        this.salaryMin = salaryMin;

    }

    public Integer getSalaryMax() {

        return salaryMax;

    }

    public void setSalaryMax(Integer salaryMax) {

        this.salaryMax = salaryMax;

    }

    public String getUrl() {

        return url;

    }

    public void setUrl(String url) {

        this.url = url;

    }

    public String getTime() {

        return time;

    }

    public void setTime(String time) {

        this.time = time;

    }

}
5.2.2. 编写dao
package org.example.jobs.dao;

import org.example.jobs.pojo.JobInfoField;

import org.springframework.data.elasticsearch.repository.ElasticsearchRepository;

/**

 * @author HackerStar

 * @create 2020-05-26 20:20

 */

public interface JobRepository extends ElasticsearchRepository<JobInfoField, Long> {

}
5.2.3. 编写service
接口:
package org.example.jobs.service;

import org.example.jobs.pojo.JobInfoField;

import java.util.List;

/**

 * @author HackerStar

 * @create 2020-05-26 20:22

 */

public interface JobRepositoryService {

    /**

     * 保存

     */

    void save(JobInfoField jobInfoField);

    /**

     * 批量保存数据

     */

    void saveAll(List<JobInfoField> jobInfoFields);

}
实现类:
package org.example.jobs.service.impl;

import org.example.jobs.dao.JobRepository;

import org.example.jobs.pojo.JobInfoField;

import org.example.jobs.service.JobRepositoryService;

import org.springframework.beans.factory.annotation.Autowired;

import java.util.List;

/**

 * @author HackerStar

 * @create 2020-05-26 20:22

 */

@Service

public class JobRepositoryServiceImpl implements JobRepositoryService {

    @Autowired

    private JobRepository jobRepository;

    @Override

    public void save(JobInfoField jobInfoField) {

        jobRepository.save(jobInfoField);

    }

    @Override

    public void saveAll(List<JobInfoField> jobInfoFields) {

        jobRepository.saveAll(jobInfoFields);

    }

}
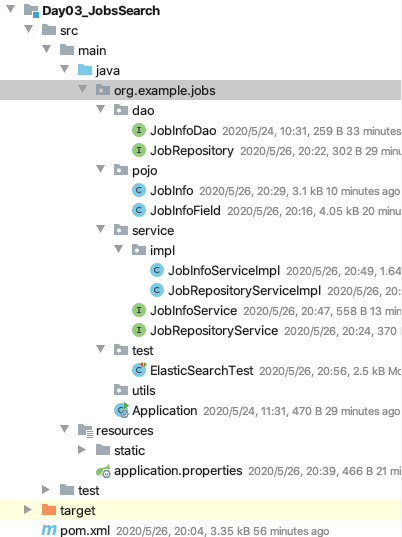
5.2.4. 编写测试用例
先执行createIndex()方法创建索引,再执行jobData()导入数据到索引库。
package org.example.jobs.test;

import org.example.jobs.Application;

import org.example.jobs.pojo.JobInfo;

import org.example.jobs.pojo.JobInfoField;

import org.example.jobs.service.JobInfoService;

import org.example.jobs.service.JobRepositoryService;

import org.junit.Test;

import org.junit.runner.RunWith;

import org.springframework.beans.BeanUtils;

import org.springframework.beans.factory.annotation.Autowired;

import org.springframework.boot.test.context.SpringBootTest;

import org.springframework.data.domain.Page;

import org.springframework.data.elasticsearch.core.ElasticsearchTemplate;

import org.springframework.test.context.junit4.SpringJUnit4ClassRunner;

import java.util.ArrayList;

/**

 * @author HackerStar

 * @create 2020-05-26 20:27

 */

@RunWith(SpringJUnit4ClassRunner.class)

@SpringBootTest(classes = Application.class)

public class ElasticSearchTest {

    @Autowired

    private JobInfoService jobInfoService;

    @Autowired

    private JobRepositoryService jobRepositoryService;

    @Autowired

    private ElasticsearchTemplate elasticsearchTemplate;

    /**

     * 创建索引和映射

     */

    @Test

    public void createIndex() {

        elasticsearchTemplate.createIndex(JobInfoField.class);

        elasticsearchTemplate.putMapping(JobInfoField.class);

    }

    /**

     * 导出数据库的数据到索引库

     */

    @Test

    public void jobData() {

        //声明当前页码数

        int count = 1;

        //声明查询数据条数

        int pageSize = 0;

        //循环查询

        do{

            //从MySQL数据库中分页查询数据

            Page<JobInfo> page = jobInfoService.findJobInfoByPage(count, 500);

            //声明存放索引库数据的容器

            ArrayList<JobInfoField> list = new ArrayList<>();

            //遍历查询结果

            for (JobInfo jobInfo :

                    page.getContent()) {

                //创建存放索引库数据的对象

                JobInfoField jobInfoField = new JobInfoField();

                //复制数据

                BeanUtils.copyProperties(jobInfo, jobInfoField);

                //把复制好的数据放到容器中

                list.add(jobInfoField);

            }

            //批量保存数据到索引库中

            jobRepositoryService.saveAll(list);

            //页面加一

            count++;

            //获取查询数据条数

            pageSize = page.getContent().size();

        }while (pageSize == 500);

    }

}
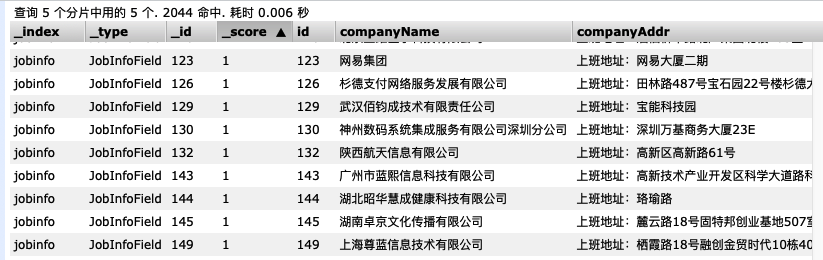
结果:
5.3. 查询案例实现
5.3.1. 页面跳转实现
添加资料的静态资源到resource目录下:
5.3.2. 编写pojo
package org.example.jobs.pojo;

import java.util.List;

/**

 * @author HackerStar

 * @create 2020-05-26 21:02

 */

public class JobResult {

    private List<JobInfoField> rows;

    private Integer pageTotal;

    @Override

    public String toString() {

        return "JobResult{" +

                "rows=" + rows +

                ", pageTotal=" + pageTotal +

                '}';

    }

    public List<JobInfoField> getRows() {

        return rows;

    }

    public void setRows(List<JobInfoField> rows) {

        this.rows = rows;

    }

    public Integer getPageTotal() {

        return pageTotal;

    }

    public void setPageTotal(Integer pageTotal) {

        this.pageTotal = pageTotal;

    }

}
5.3.3. 编写controller
package org.example.jobs.controller;

import org.example.jobs.dao.JobRepository;

import org.example.jobs.pojo.JobResult;

import org.example.jobs.service.JobRepositoryService;

import org.springframework.beans.factory.annotation.Autowired;

import org.springframework.web.bind.annotation.RequestMapping;

import org.springframework.web.bind.annotation.RequestMethod;

import org.springframework.web.bind.annotation.ResponseBody;

import org.springframework.web.bind.annotation.RestController;

/**

 * @author HackerStar

 * @create 2020-05-26 21:06

 */

@RestController

public class SearchController {

    @Autowired

    private JobRepositoryService jobRepositoryService;

    /**

     * 根据条件分页查询数据

     */

    @RequestMapping(value = "search", method = RequestMethod.POST)

    public JobResult indexSearch(String salary,String jobaddr,String keyword,Integer page) {

        JobResult jobResult = jobRepositoryService.search(salary, jobaddr, keyword, page);

        return jobResult;

    }

}
5.3.4. 编写service
在JobRepositoryService编写接口方法:
JobResult search(String salary, String jobAddr, String keyword, Integer page);
在JobRepositoryServiceImpl实现接口方法:
@Override

public JobResult search(String salary, String jobAddr, String keyWord, Integer page) {

    //薪资处理

    int salaryMin = 0, salaryMax = 0;

    String[] salarys = salary.split("-");

    //获取最小值

    if ("*".equals(salarys[0])) {

        salaryMin = 0;

    } else {

        salaryMin = Integer.parseInt(salarys[0]) * 10000;

    }

    //获取最大值

    if ("*".equals(salarys[1])) {

        salaryMax = 9000000;

    } else {

        salaryMax = Integer.parseInt(salarys[1]) * 10000;

    }

    //工作地址如果为空,只设置为*

    if (StringUtils.isBlank(jobAddr)) {

        jobAddr = "*";

    }

    //查询关键词为空,就设置为*

    if (StringUtils.isBlank(keyWord)) {

        keyWord = "*";

    }

    //获取分页,设置每页显示30条数据

    Pageable pageable = PageRequest.of(page - 1, 30);

    //执行查询

    Page<JobInfoField> jobInfoFields = jobRepository.findBySalaryMinBetweenAndSalaryMaxBetweenAndJobAddrAndJobNameAndJobInfo(salaryMin, salaryMax, salaryMin, salaryMax, jobAddr, keyWord, keyWord, pageable);

    JobResult jobResult = new JobResult();

    //设置结果集

    jobResult.setRows(jobInfoFields.getContent());

    //设置总页数

    jobResult.setPageTotal(jobInfoFields.getContent().size());

    return jobResult;

}
5.3.5. 编写dao
package org.example.jobs.dao;

import org.example.jobs.pojo.JobInfoField;

import org.springframework.data.domain.Page;

import org.springframework.data.domain.Pageable;

import org.springframework.data.elasticsearch.repository.ElasticsearchRepository;

/**

 * @author HackerStar

 * @create 2020-05-26 20:20

 */

public interface JobRepository extends ElasticsearchRepository<JobInfoField, Long> {

    Page<JobInfoField> findBySalaryMinBetweenAndSalaryMaxBetweenAndJobAddrAndJobNameAndJobInfo(int salaryMin, int salaryMax, int salaryMin1, int salaryMax1, String jobAddr, String keyWord, String keyWord1, Pageable pageable);

}
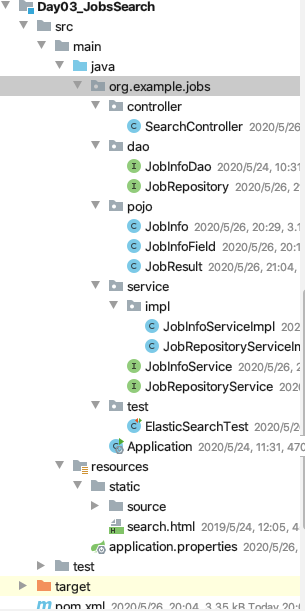
包结构:
测试结果:
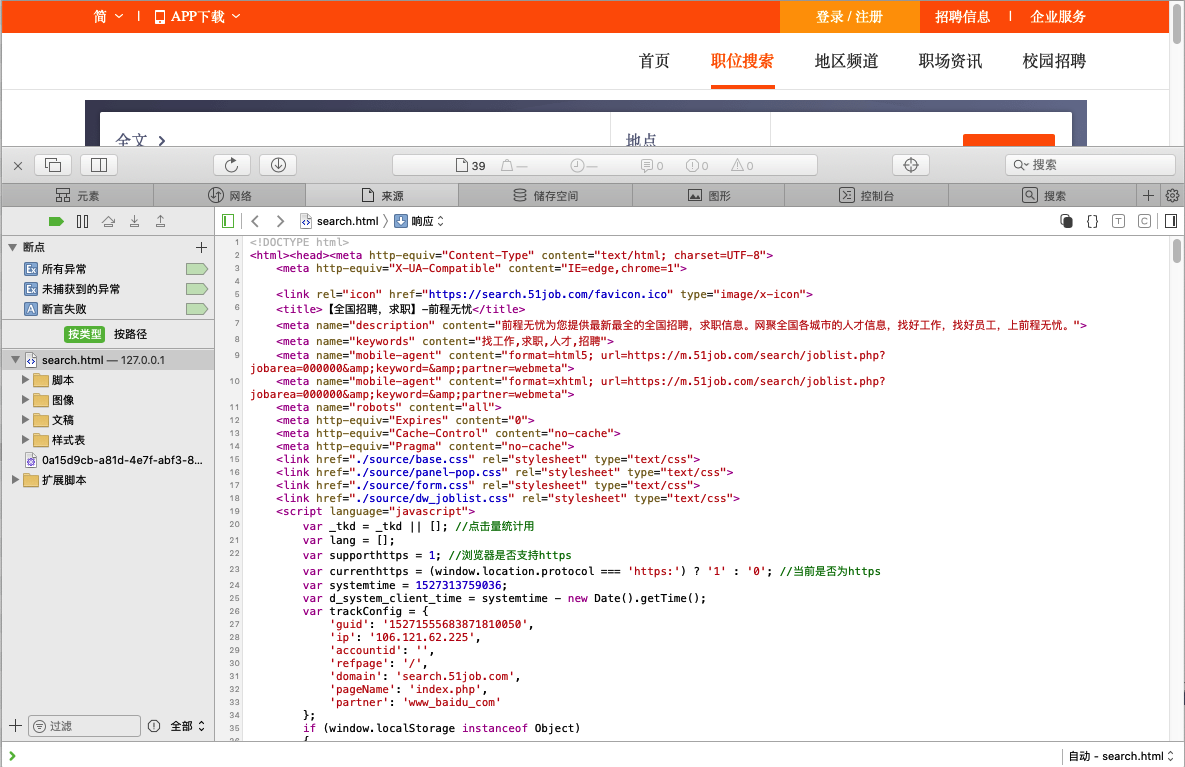
浏览器输入网址: http://127.0.0.1:8080/search.html

如果前端页面发送的请求数据参数不确定,可以打开浏览器调试终端查看发送了什么数据参数:
以Safar浏览器为例,其他的差不多
首先,打开浏览器浏览器调试终端:
然后找到网络:
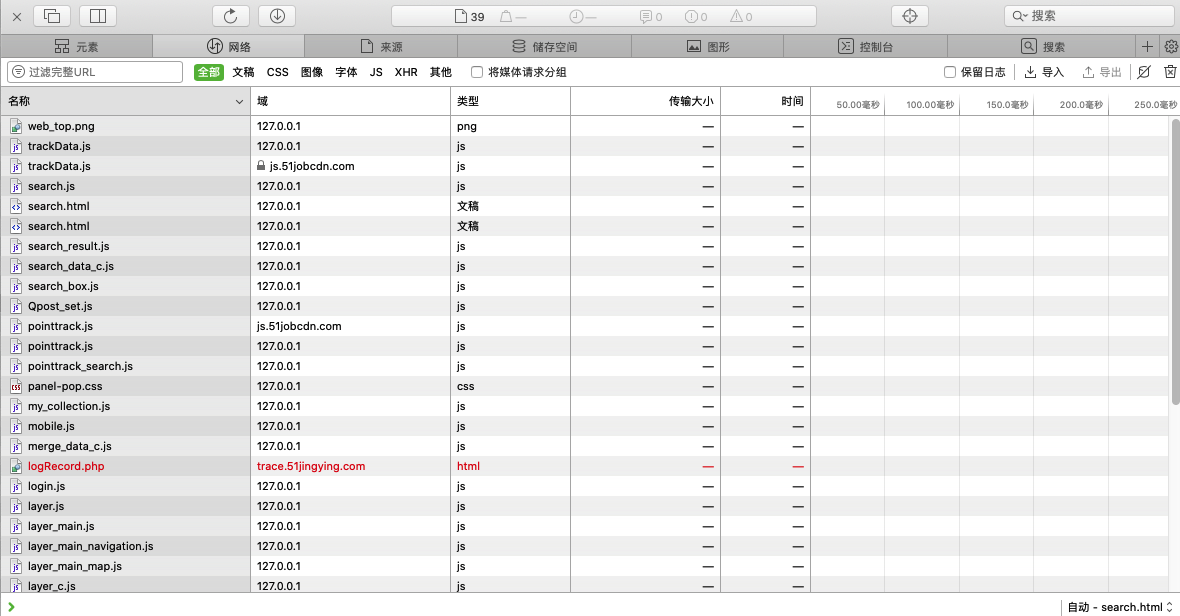
填写条件:
清空内容:
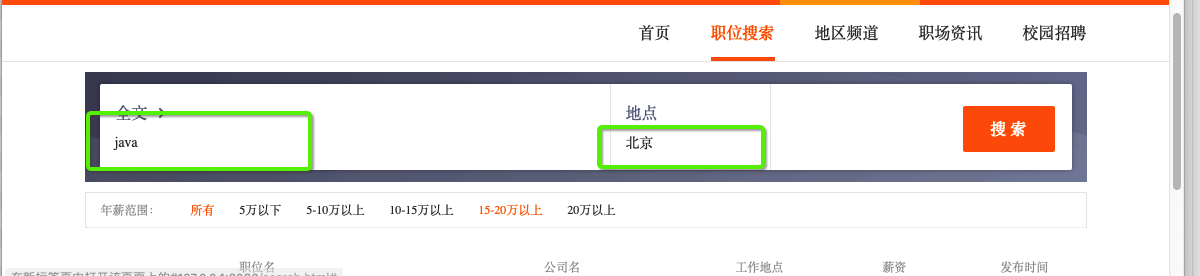
之后,点击搜索按钮发送请求:

点开search查看请求内容:
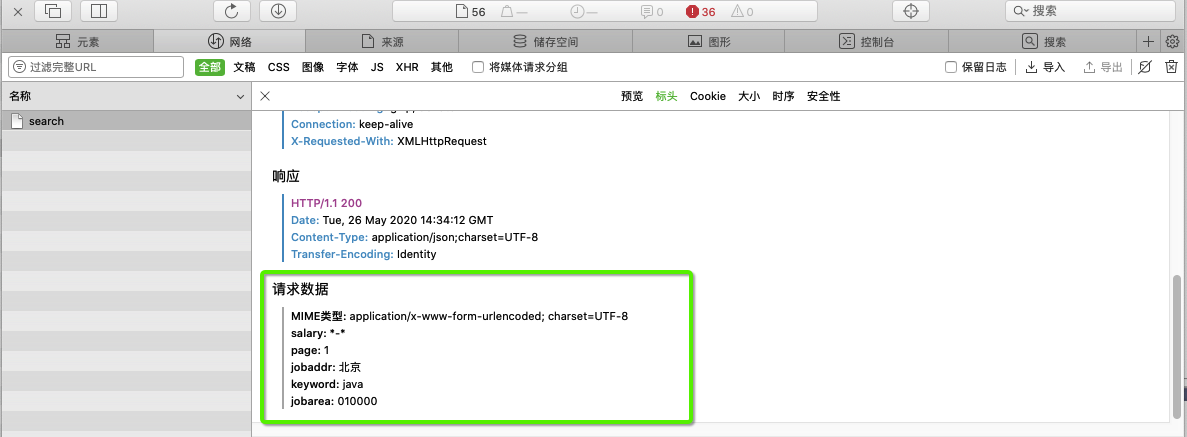
这样就可以确定SearchController中的参数命名了,从而来接收数据:
public JobResult indexSearch(String salary,String jobaddr,String keyword,Integer page) {

}
最新文章
- freemarker页面中文乱码
- 编译安装带ssl 模块指定版本Python
- PHP 错误与异常 笔记与总结(9)自定义错误处理器
- IIS 安装 pydio
- Java TCP异步数据接收
- Memcached‘process_bin_delete’函数安全漏洞
- magento后台 Fatal error: Call to a member function getId() on a non-object in错误
- &lt和&gt
- OOP in JS Public/Private Variables and Methods
- C#解析XML详解(XPath以及带命名空间NameSpace)
- vue有关小知识
- ES6知识点大汇总
- ftp上传与下载文件
- loadrunner 脚本录制-Action分类
- python3.5环境配置
- consul初步学习
- C#委托之我见
- 洛谷 P2587 [ZJOI2008]泡泡堂 解题报告
- Android 性能测试之CPU
- leetcode70—Climbing Stairs
热门文章
- css3动画添加间隔
- PLSQL导入dmp文件完整步骤(附图)
- 万变不离其宗之UART要点总结
- day24 常用模块(下)
- 安装更强大更美观的zsh,配置oh my zsh及插件
- python-----内存管理机制
- Scala 面向对象(十一):特质(接口) 四
- python爬虫拉钩网:{'msg': '您操作太频繁,请稍后再访问', 'clientIp': '113.57.176.181', 'success': False}
- Flask 基础组件(六):Session
- 5分钟带你快速入门和了解 OAM Kubernetes