Scrapy爬虫实例教程(二)---数据存入MySQL
书接上回 实例教程(一)
本文将详细描述使用scrapy爬去左岸读书所有文章并存入本地MySql数据库中,文中所有操作都是建立在scrapy已经配置完毕,并且系统中已经安装了Mysql数据库(有权限操作数据库)。
为了避免读者混淆,这里也使用tutorial作为scrapy project名称(工程的名字可以有读者自己定制)。
1. 建立tutorial工程
scrapy startproject tutorial
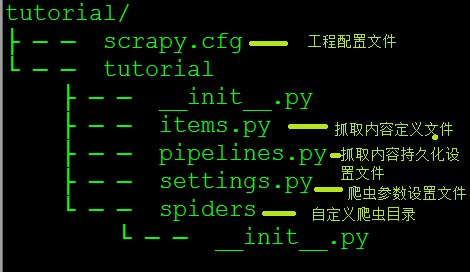
上述命令运行完毕后会得到tutorial(或者自定义名称)的目录,使用tree命令可以查看tutorial的目录结构,如下图所示
2. 解析左岸文章结构
左岸读书为读者提供了一些优美文章,喜欢的读者可以自行订阅(在这里提博主打广告啦[不用谢^_^])
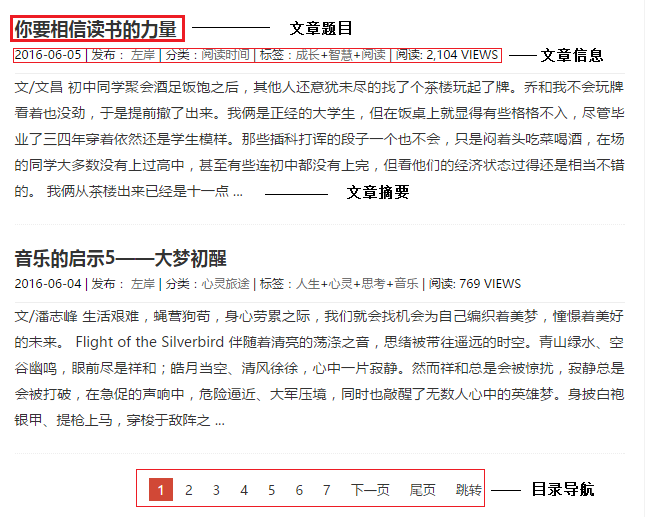
站中所有文章都以列表的形式列出,每篇文章链接都给出了文章摘要和相应的信息(如作者,发布时间,分类信息,阅读量等信息)在列表底端给出了下一个列表的链接,具体如下图所示
点击相应的文章题目可以链接到具体的文章内容页面,读者可以自己实验试下,这里不再赘述。
3. 建立mysql数据库
建立mysql数据库 crawed
 create database crawed;

 use crawed;
在数据库中建立zreading数据表,这里我们要抓取文章标题,作者,文章发表日期,文章类别,文章标签,阅读量及文章内容,建立如下数据表
 CREATE TABLE `zreading` (

   `title` varchar(100) NOT NULL,

   `author` varchar(50) NOT NULL,

   `pub_date` varchar(30) DEFAULT NULL,

   `types` varchar(50) DEFAULT NULL,

   `tags` varchar(50) DEFAULT NULL,

   `view_counts` varchar(20) DEFAULT '',

   `content` text

 ) ENGINE=InnoDB DEFAULT CHARSET=utf8;
4. 在items.py中编写需要抓取的内容
items.py是爬虫根据用户兴趣定义爬去内容的文件,用户可以根据自己的需求,定义相应的class,爬虫在解析网页时根据解析规则生成item类对象
这里根据我们步骤3中的数据类别建立如下类:
 class TutorialItem(scrapy.Item):

     # define the fields for your item here like:

     # name = scrapy.Field()

     title = scrapy.Field()

     author = scrapy.Field()

     pub_date = scrapy.Field()

     types = scrapy.Field()

     tags = scrapy.Field()

     view_count = scrapy.Field()

     content = scrapy.Field()
5. 编辑pipelines.py文件
pipelines.py是设置抓取内容存储方式的文件,例如可以存储到mysql或是json文件中,读者可以根据自己实际需求选择相应的方式,本例中选择存储到mysql中。
 from twisted.enterprise import adbapi

 import MySQLdb

 import MySQLdb.cursors

 from scrapy.crawler import Settings as settings

 class TutorialPipeline(object):

     def __init__(self):

         dbargs = dict(

             host = 'your host' ,

             db = 'crawed',

             user = 'user_name', #replace with you user name

             passwd = 'user_password', # replace with you password

             charset = 'utf8',

             cursorclass = MySQLdb.cursors.DictCursor,

             use_unicode = True,

             )

         self.dbpool = adbapi.ConnectionPool('MySQLdb',**dbargs)

     '''

     The default pipeline invoke function

     '''

         def process_item(self, item,spider):

             res = self.dbpool.runInteraction(self.insert_into_table,item)

                 return item

         def insert_into_table(self,conn,item):

                 conn.execute('insert into zreading(title,author,pub_date,types,tags,view_counts,content) values(%s,%s,%s,%s,%s,%s,%s)', (item['title'],item['author'],item['pub_date'],item['types'],item['tags'],item['view_count'],item['content']))
6. 在settings.py中设置pipeline
当使用pipeline保存抓取内容时,需要设置相应的pipeline类,以便让系统知道根据什么方式进行存储,在settings.py中加入一下代码
 ITEM_PIPELINES = {

     'tutorial.pipelines.TutorialPipeline': 300,

 }
7. 解析网页,抓取需要内容
经过以上6步,所有的配置的工作已经结束,接下来,我们的重点就是如何从网页中解析出我们所需要的内容,在解析过程中需要借助一些开发插件,比如firefox的firebug,chrome的开发者工具,本例中使用chrome的开发工具。
在这一步我们需要编写网页解析的具体逻辑-如何处理网页,得到我们所需的内容。在spiders目录下,新建zreading.py文件,然后定义zreadingCrawl爬虫(继承scrapy的BaseSpider即可)
 class zreadingCrawl(BaseSpider):

     name = "zreading" # the name of spider

     allowed_domain = ['zreading.cn'] # allowed domain for spiders

     start_urls = [

     'http://www.zreading.cn'  #the start url / the entrance of spider

     ]
具体的解析过程如下:
a. 首先解析左岸的文章列表,使用chrome的开发者工具,在文章标题处右击,点击检查,然后复制为xpath路径。在解析网页是就可以根据这个路径定位到你所需的内容,这里我们只是想获得文章的连接,所有我们只需要提取文章题目链接的
href属性值即可,在文章目录页中,有两种我们需要的链接,一种是文章内容的链接,另一种则是文章列表的下一页,对于文章内容链接我们可以直接请求响应的URL,然后解析内容即可;而对于目录链接则可以从头解析(也即请求目录页然后进一步解析)。
由上述可知,这是一个不断循环的过程,直至没有下一页为止。
b. 在解析的过程中,对于每次的解析内容,都需要进行处理,如在提取标题时,得到的内容前后包括很多空格,而且为了避免在数据库出现乱码,所有数据都编码成utf8。这里我们需要编写
c. 具体代码如下(在zreadingCrawl中添加如下函数):
 def parse(self,response):

         if response.url.endswith('html'):

             item = self.parsePaperContent(response)

         else:

             # get all the page links in list Page

             sel = Selector(response)

             links = sel.xpath('//*[@id="content"]/article/header/h2/a/@href').extract()

             for link in links:

                 yield Request(link,callback=self.parse)

             # get the next page to visitr

             next_pages = sel.xpath('//*[@id="content"]/div/a[@class="next"]/@href').extract()

             if len(next_pages) != 0:

                 yield Request(next_pages[0],callback=self.parse)

             # record the list page

         yield item
 def parsePaperContent(self,response):

         print "In parsse paper content function......"

         # get the page number  '5412.html'

         #  page_id = response.url.split('/')[-1].split('.')[0] ----- OK

         r  =re.match(r'\d+',response.url.split('/')[-1])

         page_id = r.group()

         # instantie the item

         zding = TutorialItem()

         sel = Selector(response)

         #add tilte

         title = sel.xpath("//div[@id='content']/article/header/h2/text()").extract()[0]

         s_title = title.encode("utf-8")

         zding['title'] = s_title.lstrip().rstrip()

         #add pub_date

         pub_date = sel.xpath('//*[@id="'+page_id+'"]/div[2]/span[1]/text()').extract()[0]

         s_pub_date = pub_date.encode("utf8")

         zding['pub_date'] = s_pub_date.lstrip().rstrip()

         #add author

         author = sel.xpath('//*[@id="'+page_id+'"]/div[2]/span[2]/a/text()').extract()[0]

         s_author = author.encode("utf8")

         zding['author'] = s_author.lstrip().rstrip()

         #add tags including type and paper tags

         tags = sel.xpath('//*[@id="'+page_id+'"]/div[2]/a/text()').extract()

         tags = [s.encode('utf8') for s in tags]

         zding['types'] = tags[0]

         zding['tags'] = "+".join(tags[1:])

         #add view count

         views = sel.xpath('//*[@id="'+page_id+'"]/div[2]/span[3]/text()').extract()[0]

         r = re.search(r'\d+',views)

         view_count = int(r.group())

         zding['view_count'] = view_count

         #add content

         content = sel.xpath('//*[@id="'+page_id+'"]/div[3]/p/text()').extract()

         zding['content'] = "\n".join(content)

         #return the item

         return zding
8. 在命令行下运行
scrapy crawl zreading
在屏幕中会闪解析过的网页和解析得到的item,等运行完毕后查看数据库中的zreading表的内容,这里因为文章较长,不再单独贴图。
*****声明:本帖纯粹是个人兴趣爱好,绝无其他任何恶意。本人很喜欢看左岸的文章,恰逢学习scrapy,就以此为例。在此声明,本帖只是技术解析,绝无转载。*****
最新文章
- MyBatis Cache配置
- MongoDB JAVA API Filters
- QQ互联登录 微博登录问题
- 【JavaScript】常用方法
- 他们在军训,我在搞OI(三)
- dedecms 按照栏目指定的id排序
- Echache整合Spring缓存实例讲解(转)
- cookie解决跨域问题
- 查找修补文件差异diff、patch
- Codeforces Round 1153(div. 2)
- WPF TextBlock IsTextTrimmed 判断文本是否超出
- nginx安装ngx_lua_waf防护
- XGBoost介绍
- npm使用国内淘宝镜像的方法
- js两种打开新窗口
- Hackerank-Array-NewYearChaos
- Python3 文件读写r,w,a
- 利用C#查看特定服务是否安装
- 洛谷 P2501 [HAOI2006]数字序列 解题报告
- python os模块练习题