(转)ConcurrentModificationException异常原因和解决方法
原文地址:
http://www.cnblogs.com/dolphin0520/p/3933551.html
一.ConcurrentModificationException异常出现的原因
先看下面这段代码:
public class Test {

    public static void main(String[] args)  {

        ArrayList<Integer> list = new ArrayList<Integer>();

        list.add(2);

        Iterator<Integer> iterator = list.iterator();

        while(iterator.hasNext()){

            Integer integer = iterator.next();

            if(integer==2)

                list.remove(integer);

        }

    }

}
运行结果:
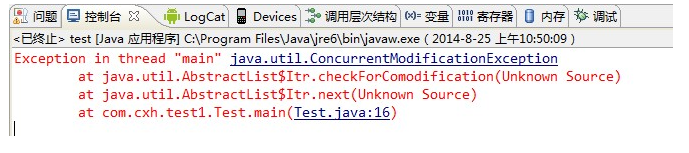
从异常信息可以发现,异常出现在checkForComodification()方法中。
我们不忙看checkForComodification()方法的具体实现,我们先根据程序的代码一步一步看ArrayList源码的实现:
首先看ArrayList的iterator()方法的具体实现,查看源码发现在ArrayList的源码中并没有iterator()这个方法,那么很显然这个方法应该是其父类或者实现的接口中的方法,我们在其父类AbstractList中找到了iterator()方法的具体实现,下面是其实现代码:
public Iterator<E> iterator() {

    return new Itr();

}
从这段代码可以看出返回的是一个指向Itr类型对象的引用,我们接着看Itr的具体实现,在AbstractList类中找到了Itr类的具体实现,它是AbstractList的一个成员内部类,下面这段代码是Itr类的所有实现:
private class Itr implements Iterator<E> {

    int cursor = 0;

    int lastRet = -1;

    int expectedModCount = modCount;

    public boolean hasNext() {

           return cursor != size();

    }

    public E next() {

           checkForComodification();

        try {

        E next = get(cursor);

        lastRet = cursor++;

        return next;

        } catch (IndexOutOfBoundsException e) {

        checkForComodification();

        throw new NoSuchElementException();

        }

    }

    public void remove() {

        if (lastRet == -1)

        throw new IllegalStateException();

           checkForComodification();

        try {

        AbstractList.this.remove(lastRet);

        if (lastRet < cursor)

            cursor--;

        lastRet = -1;

        expectedModCount = modCount;

        } catch (IndexOutOfBoundsException e) {

        throw new ConcurrentModificationException();

        }

    }

    final void checkForComodification() {

        if (modCount != expectedModCount)

        throw new ConcurrentModificationException();

    }

}
首先我们看一下它的几个成员变量:
cursor:表示下一个要访问的元素的索引,从next()方法的具体实现就可看出
lastRet:表示上一个访问的元素的索引
expectedModCount:表示对ArrayList修改次数的期望值,它的初始值为modCount。
modCount是AbstractList类中的一个成员变量
protected transient int modCount = 0;
该值表示对List的修改次数,查看ArrayList的add()和remove()方法就可以发现,每次调用add()方法或者remove()方法就会对modCount进行加1操作。
好了,到这里我们再看看上面的程序:
当调用list.iterator()返回一个Iterator之后,通过Iterator的hashNext()方法判断是否还有元素未被访问,我们看一下hasNext()方法,hashNext()方法的实现很简单:
public boolean hasNext() {

    return cursor != size();

}
如果下一个访问的元素下标不等于ArrayList的大小,就表示有元素需要访问,这个很容易理解,如果下一个访问元素的下标等于ArrayList的大小,则肯定到达末尾了。
然后通过Iterator的next()方法获取到下标为0的元素,我们看一下next()方法的具体实现:
public E next() {

    checkForComodification();

 try {

    E next = get(cursor);

    lastRet = cursor++;

    return next;

 } catch (IndexOutOfBoundsException e) {

    checkForComodification();

    throw new NoSuchElementException();

 }

}
这里是非常关键的地方:首先在next()方法中会调用checkForComodification()方法,然后根据cursor的值获取到元素,接着将cursor的值赋给lastRet,并对cursor的值进行加1操作。初始时,cursor为0,lastRet为-1,那么调用一次之后,cursor的值为1,lastRet的值为0。注意此时,modCount为0,expectedModCount也为0。
接着往下看,程序中判断当前元素的值是否为2,若为2,则调用list.remove()方法来删除该元素。
我们看一下在ArrayList中的remove()方法做了什么:
public boolean remove(Object o) {

    if (o == null) {

        for (int index = 0; index < size; index++)

            if (elementData[index] == null) {

                fastRemove(index);

                return true;

            }

    } else {

        for (int index = 0; index < size; index++)

            if (o.equals(elementData[index])) {

                fastRemove(index);

                return true;

            }

    }

    return false;

}

private void fastRemove(int index) {

    modCount++;

    int numMoved = size - index - 1;

    if (numMoved > 0)

        System.arraycopy(elementData, index+1, elementData, index,

                numMoved);

    elementData[--size] = null; // Let gc do its work

}
通过remove方法删除元素最终是调用的fastRemove()方法,在fastRemove()方法中,首先对modCount进行加1操作(因为对集合修改了一次),然后接下来就是删除元素的操作,最后将size进行减1操作,并将引用置为null以方便垃圾收集器进行回收工作。
那么注意此时各个变量的值:对于iterator,其expectedModCount为0,cursor的值为1,lastRet的值为0。
对于list,其modCount为1,size为0。
接着看程序代码,执行完删除操作后,继续while循环,调用hasNext方法()判断,由于此时cursor为1,而size为0,那么返回true,所以继续执行while循环,然后继续调用iterator的next()方法:
注意,此时要注意next()方法中的第一句:checkForComodification()。
在checkForComodification方法中进行的操作是:
final void checkForComodification() {

    if (modCount != expectedModCount)

    throw new ConcurrentModificationException();

}
如果modCount不等于expectedModCount,则抛出ConcurrentModificationException异常。
很显然,此时modCount为1,而expectedModCount为0,因此程序就抛出了ConcurrentModificationException异常。
到这里,想必大家应该明白为何上述代码会抛出ConcurrentModificationException异常了。
关键点就在于:调用list.remove()方法导致modCount和expectedModCount的值不一致。
注意,像使用for-each进行迭代实际上也会出现这种问题。
二.在单线程环境下的解决办法
既然知道原因了,那么如何解决呢?
其实很简单,细心的朋友可能发现在Itr类中也给出了一个remove()方法:
public void remove() {

    if (lastRet == -1)

    throw new IllegalStateException();

       checkForComodification();

    try {

    AbstractList.this.remove(lastRet);

    if (lastRet < cursor)

        cursor--;

    lastRet = -1;

    expectedModCount = modCount;

    } catch (IndexOutOfBoundsException e) {

    throw new ConcurrentModificationException();

    }

}
在这个方法中,删除元素实际上调用的就是list.remove()方法,但是它多了一个操作:
expectedModCount = modCount;
因此,在迭代器中如果要删除元素的话,需要调用Itr类的remove方法。
将上述代码改为下面这样就不会报错了:
public class Test {

    public static void main(String[] args)  {

        ArrayList<Integer> list = new ArrayList<Integer>();

        list.add(2);

        Iterator<Integer> iterator = list.iterator();

        while(iterator.hasNext()){

            Integer integer = iterator.next();

            if(integer==2)

                iterator.remove();   //注意这个地方

        }

    }

}
三.在多线程环境下的解决方法
上面的解决办法在单线程环境下适用,但是在多线程下适用吗?看下面一个例子:
public class Test {

    static ArrayList<Integer> list = new ArrayList<Integer>();

    public static void main(String[] args)  {

        list.add(1);

        list.add(2);

        list.add(3);

        list.add(4);

        list.add(5);

        Thread thread1 = new Thread(){

            public void run() {

                Iterator<Integer> iterator = list.iterator();

                while(iterator.hasNext()){

                    Integer integer = iterator.next();

                    System.out.println(integer);

                    try {

                        Thread.sleep(100);

                    } catch (InterruptedException e) {

                        e.printStackTrace();

                    }

                }

            };

        };

        Thread thread2 = new Thread(){

            public void run() {

                Iterator<Integer> iterator = list.iterator();

                while(iterator.hasNext()){

                    Integer integer = iterator.next();

                    if(integer==2)

                        iterator.remove();

                }

            };

        };

        thread1.start();

        thread2.start();

    }

}
运行结果:

有可能有朋友说ArrayList是非线程安全的容器,换成Vector就没问题了,实际上换成Vector还是会出现这种错误。
原因在于,虽然Vector的方法采用了synchronized进行了同步,但是由于Vector是继承的AbstarctList,因此通过Iterator来访问容器的话,事实上是不需要获取锁就可以访问。那么显然,由于使用iterator对容器进行访问不需要获取锁,在多线程中就会造成当一个线程删除了元素,由于modCount是AbstarctList的成员变量,因此可能会导致在其他线程中modCount和expectedModCount值不等。
就比如上面的代码中,很显然iterator是线程私有的,
初始时,线程1和线程2中的modCount、expectedModCount都为0,
当线程2通过iterator.remove()删除元素时,会修改modCount值为1,并且会修改线程2中的expectedModCount的值为1,
而此时线程1中的expectedModCount值为0,虽然modCount不是volatile变量,不保证线程1一定看得到线程2修改后的modCount的值,但是也有可能看得到线程2对modCount的修改,这样就有可能导致线程1中比较expectedModCount和modCount不等,而抛出异常。
因此一般有2种解决办法:
1)在使用iterator迭代的时候使用synchronized或者Lock进行同步;
2)使用并发容器CopyOnWriteArrayList代替ArrayList和Vector。
关于并发容器的内容将在下一篇文章中讲述。
参考资料:
http://blog.csdn.net/izard999/article/details/6708738
http://www.2cto.com/kf/201403/286536.html
最新文章
- Type.GetType(string)为空
- python操作mysql数据库
- mosquitto_pub和mosquitto_sub 命令参数说明
- 关于c语言模拟c++的多态
- puppet 安装
- 学习Linux第四天
- 一个酷炫的,基于HTML5,Jquery和Css的全屏焦点图特效,兼容各种浏览器
- AIX 常用命令和知识
- const和define的区别
- cocos2dx中Action汇总
- 怎样在Ubuntu中使用条件布局
- Jquery页面滚动动态加载数据,页面下拉自动加载内容
- ubuntu14.04 安装redis 2.8.9
- ubuntu:基本操作;
- [Hive_add_10] Hive 的 serde (序列化 & 反序列化) 操作
- Odoo
- Open SuSE中自定义的环境变量
- prompt更改MySQL登陆后的提示符
- Ubuntu 部署 nginx
- 最小 base64 图片