笔记43 Spring Web Flow——订购披萨应用详解
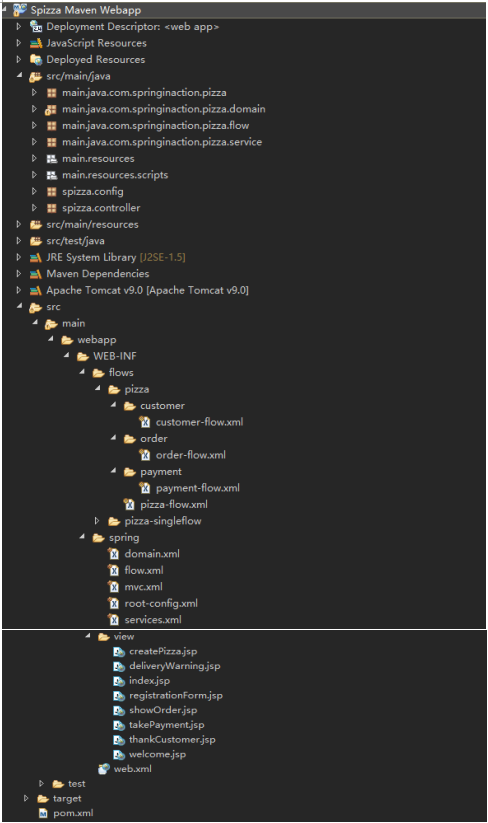
一、项目的目录结构
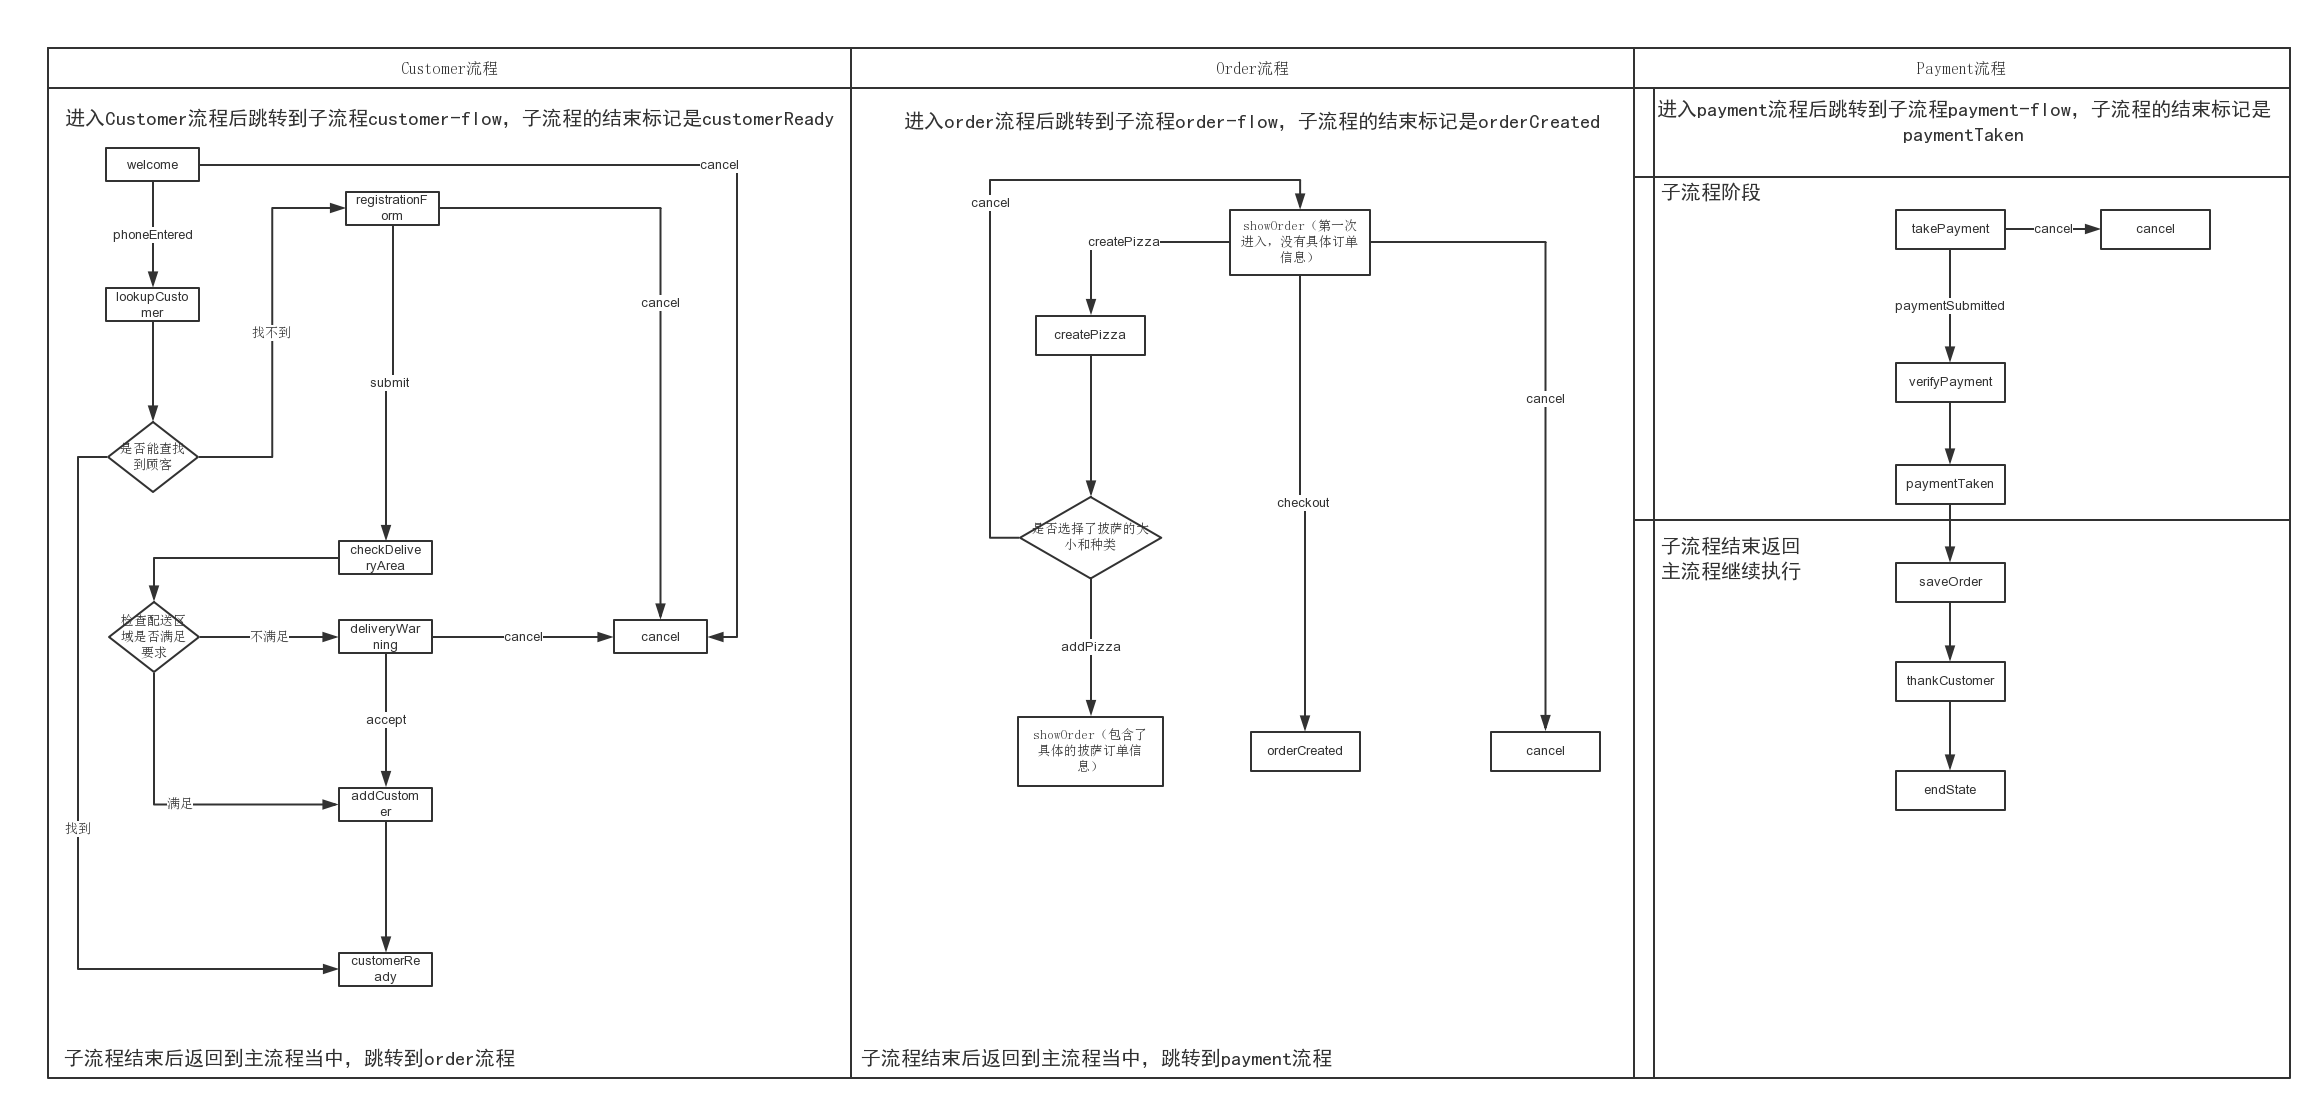
二、订购流程总体设计
三、订购流程的详细设计
1.定义基本流程pizza-flow.xml
 <?xml version="1.0" encoding="UTF-8"?>

 <flow xmlns="http://www.springframework.org/schema/webflow"

   xmlns:xsi="http://www.w3.org/2001/XMLSchema-instance"

   xsi:schemaLocation="http://www.springframework.org/schema/webflow

   http://www.springframework.org/schema/webflow/spring-webflow-2.0.xsd">

     <var name="order" class="main.java.com.springinaction.pizza.domain.Order"/>

     <!-- Customer -->

     <subflow-state id="customer" subflow="customer-flow">

       <input name="order" value="order"/>

       <transition on="customerReady" to="order" />

     </subflow-state>

     <!-- Order -->

     <subflow-state id="order" subflow="order-flow">

       <input name="order" value="order"/>

       <transition on="orderCreated" to="payment" />

     </subflow-state>

     <!-- Payment -->

     <subflow-state id="payment" subflow="payment-flow">

       <input name="order" value="order"/>

       <transition on="paymentTaken" to="saveOrder"/>

     </subflow-state>

     <action-state id="saveOrder">

         <evaluate expression="pizzaFlowActions.saveOrder(order)" />

         <transition to="thankCustomer" />

     </action-state>

     <view-state id="thankCustomer">

       <transition on="end" to="endState" />

     </view-state>

     <!-- End state -->

     <end-state id="endState" />

     <global-transitions>

       <transition on="cancel" to="endState" />

     </global-transitions>

 </flow>
在进入主流程时,必须先新建一个Order的实例,Order类会带有关于订单的所有信息,包含顾客信息、订购的披萨列表以及支付详情。然后进入Customer流程,对应的子流程为customer-flow,而且在进入子流程前,必须将订单对象作为子流程的输入进行传递,如果子流程结束的<end-state>状态ID为customerReady,那么当执行完子流程后就会跳转到名为order的状态。接下来,先介绍customer子流程。
2.子流程customer-flow.xml
 <?xml version="1.0" encoding="UTF-8"?>

 <flow xmlns="http://www.springframework.org/schema/webflow"

   xmlns:xsi="http://www.w3.org/2001/XMLSchema-instance"

   xsi:schemaLocation="http://www.springframework.org/schema/webflow

   http://www.springframework.org/schema/webflow/spring-webflow-2.0.xsd">

     <input name="order" required="true"/>

     <!-- Customer -->

     <view-state id="welcome">

         <transition on="phoneEntered" to="lookupCustomer"/>

         <transition on="cancel" to="cancel"/>

     </view-state>

     <action-state id="lookupCustomer">

         <evaluate result="order.customer" expression=

             "pizzaFlowActions.lookupCustomer(requestParameters.phoneNumber)" />

         <transition to="registrationForm" on-exception=

             "main.java.com.springinaction.pizza.service.CustomerNotFoundException" />

         <transition to="customerReady" />

     </action-state>

     <view-state id="registrationForm" model="order" popup="true" >

         <on-entry>

           <evaluate expression=

               "order.customer.phoneNumber = requestParameters.phoneNumber" />

         </on-entry>

         <transition on="submit" to="checkDeliveryArea" />

         <transition on="cancel" to="cancel" />

     </view-state>

     <decision-state id="checkDeliveryArea">

       <if test="pizzaFlowActions.checkDeliveryArea(order.customer.zipCode)"

           then="addCustomer"

           else="deliveryWarning"/>

     </decision-state>

     <view-state id="deliveryWarning">

         <transition on="accept" to="addCustomer" />

         <transition on="cancel" to="cancel" />

     </view-state>

     <action-state id="addCustomer">

         <evaluate expression="pizzaFlowActions.addCustomer(order.customer)" />

         <transition to="customerReady" />

     </action-state>

     <!-- End state -->

     <end-state id="cancel" />

     <end-state id="customerReady" />

 </flow>
第一个进入的流程是由<view-state>定义的“welcome”视图状态,即用户欢迎界面,需要用户输入电话号码,具体如下图所示,
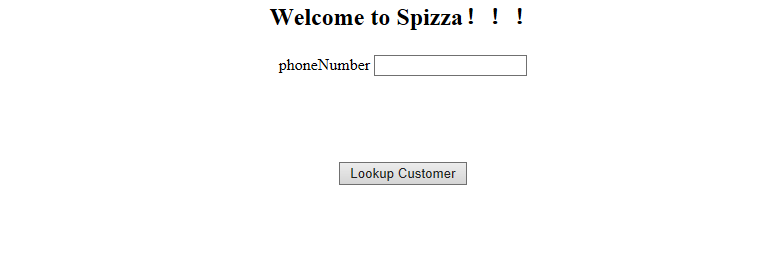
在welcome状态中有两个用<transition>定义的转移,如果触发了phoneEntered事件,即用户输入电话号码,然后点击Lookup Customer按钮后,会跳转到由<action-state>定义的lookupCustomer行为状态,对用户输入的电话号码进行查询。进入到lookupCustomer状态后,首先使用<evaluate>元素计算了一个表达式(SpEL表达式),将计算结果放在order对象的customer变量中。计算过程就是调用pizzaFlowActions(调用的时候首字母小写)类中的lookupCustomer方法,输入参数就是用户输入的电话号码,通过requestParameters.phoneNumber得到。在lookupCustomer中状态的转移是通过抛出异常触发的,因为如果通过电话号码找不到顾客,说明这个顾客是新客户,需要进行信息登记,所以就会抛出自定义异常CustomerNotFoundException,用来触发下一个流程——用户注册。相反,如果通过电话号码找到了用户,则说明是老顾客,那么就直接跳转到customerReady状态,即第一个Customer流程随之结束,跳转到下一个流程——Order。进入由<view-state>定义的registrationForm视图状态后,首先通过设置<view-state>的model属性为表单绑定order对象,具体如下图所示,
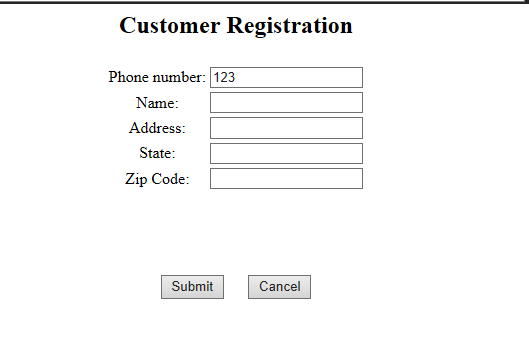
然后使用<on-entry>进行切入,即进入registrationForm状态后,先获取前一个页面用户输入的电话号码,通过requestParameters.phoneNumber得到,然后赋值给order.customer.phoneNumber。当用户输入完全部信息后,点击Submit按钮就会通过<transition>进行状态转移,转移到checkDeliveryArea状态中。如果点击Cancel就会返回首页。checkDeliveryArea是一个由<decision-state>定义的决策状态,通过表达式的值确定下一步的转移方向,表达式是通过调用pizzaFlowActions类中checkDeliveryArea方法对邮编进行判断。如果表达式结果为ture则转移到then属性指定的addCustomer状态中,如果为false,则转移到else属性指定的deliveryWarning状态中。deliveryWarning状态是由于用户所填写的地址超出配送范围,需要用户到店自取,判断用户是否接受这个请求,具体如下图所示。
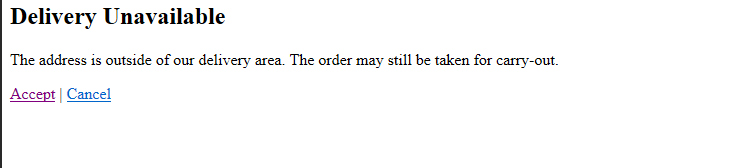
如果用户点击Accept则会跳转到addCustomer状态中,点击cancel就会返回首页。addCustomer状态是一个行为状态,使用表达式将刚注册的用户信息进行保存,然后跳转到customerReady状态,即子流程的结束状态,最后返回到主流程中,第一个customer流程执行完毕,跳转到order流程。
同样进入到order流程后,会跳转到子流程order-flow,也会需要一个订单对象作为输入。如果子流程结束的<end-state>状态ID为orderCreated,那么子流程执行完毕会跳转到payment状态。具体的流程下面进行详细介绍。
3.子流程order-flow.xml
 <?xml version="1.0" encoding="UTF-8"?>

 <flow xmlns="http://www.springframework.org/schema/webflow"

   xmlns:xsi="http://www.w3.org/2001/XMLSchema-instance"

   xsi:schemaLocation="http://www.springframework.org/schema/webflow

   http://www.springframework.org/schema/webflow/spring-webflow-2.0.xsd">

     <input name="order" required="true" /> <!-- 接收order作为输入 -->

     <!-- Order -->

     <view-state id="showOrder"><!-- 展现order的状态 -->

         <transition on="createPizza" to="createPizza" />

         <transition on="checkout" to="orderCreated" />

         <transition on="cancel" to="cancel" />

     </view-state>

     <view-state id="createPizza" model="flowScope.pizza"> <!-- 创建披萨的状态 -->

         <on-entry>

           <set name="flowScope.pizza"

               value="new main.java.com.springinaction.pizza.domain.Pizza()" />

           <evaluate result="viewScope.toppingsList"

               expression="T(main.java.com.springinaction.pizza.domain.Topping).asList()" />

         </on-entry>

         <transition on="addPizza" to="showOrder">

           <evaluate expression="order.addPizza(flowScope.pizza)" />

         </transition>

         <transition on="cancel" to="showOrder" />

     </view-state>

     <!-- End state -->

     <end-state id="cancel" /> <!-- 取消的结束状态 -->

     <end-state id="orderCreated" /> <!-- 创建订单的结束状态 -->

 </flow>
首先进入showOrder状态,其中包含三个可以进行转移的状态:createPizza,orderCreated,cancel。showOrder是一个视图状态,对应的页面如下图所示:
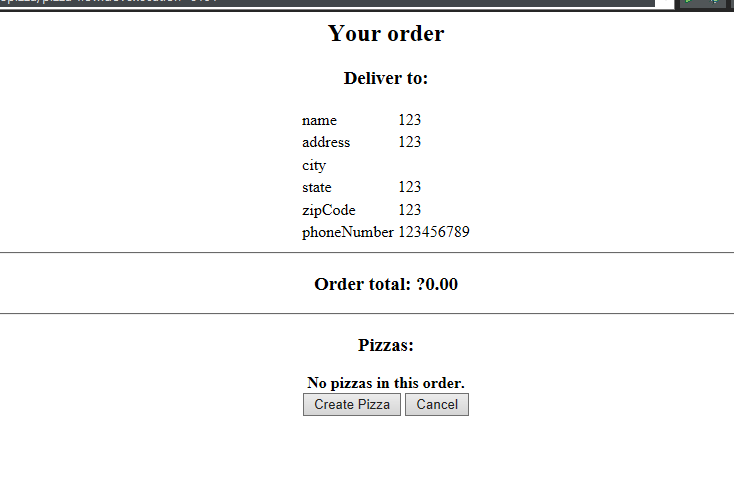
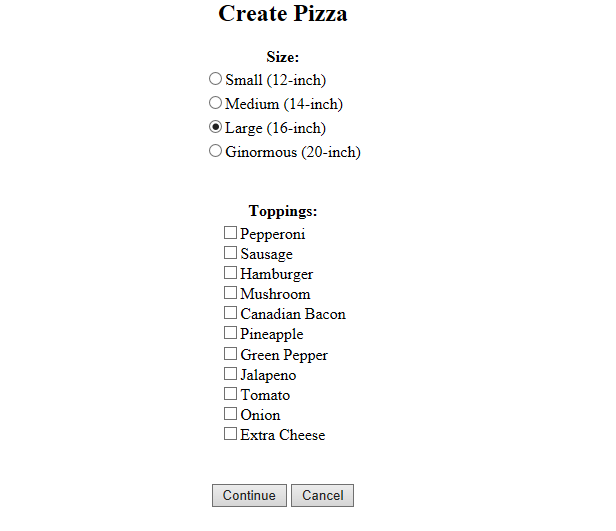
当用户点击Create Pizza按钮后,触发createPizza状态,因为createPizza页面中也有表单,所以先设置model属性进行表单与pizza对象进行绑定。需要注意的是这里的pizza对象的作用域范围是flow,即当流程开始时创建,在流程结束时销毁。只有在创建它的流程中是可见的。在进入createPizza流程后,先设置两个变量。第一个变量是pizza,作用域是flow,通过<set>设置,用于保存pizza信息,当表单提交时,表单的内容会填充到该对象中。需要注意的是,这个视图状态引用的model是流程作用域内的同一个Pizza对象。第二个是toppingsList,作用域是view,即当进入视图状态时创建,当这个状态退出时销毁,只在视图状态内时可见的,所以flow>view。toppingsList是用来保存披萨的种类的。具体的createPizza对应的页面如下所示:
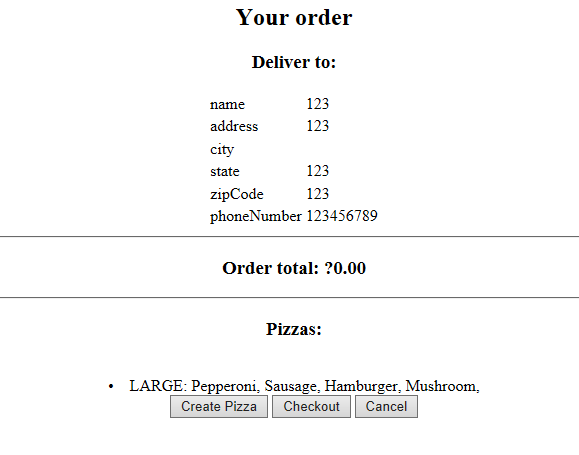
当用户选择完披萨的大小和种类后,点击Continue按钮后,通过触发addPizza进入到视图showOrder,在重新进入showOrder视图的时候,将刚才填充完毕的pizza对象加入到order对象当中,现在的order就不为空了,具体如下图所示:
当用户点击Checkout按钮时,转移到orderCreated状态,意味着order子流程的结束,需要跳转到payment流程。下面再对payment流程进行介绍。
4.子流程payment-flow.xml
 <?xml version="1.0" encoding="UTF-8"?>

 <flow xmlns="http://www.springframework.org/schema/webflow"

   xmlns:xsi="http://www.w3.org/2001/XMLSchema-instance"

   xsi:schemaLocation="http://www.springframework.org/schema/webflow

   http://www.springframework.org/schema/webflow/spring-webflow-2.0.xsd">

     <input name="order" required="true"/>

     <view-state id="takePayment" model="flowScope.paymentDetails">

         <on-entry>

           <set name="flowScope.paymentDetails"

               value="new main.java.com.springinaction.pizza.domain.PaymentDetails()" />

           <evaluate result="viewScope.paymentTypeList"

               expression="T(main.java.com.springinaction.pizza.domain.PaymentType).asList()" />

         </on-entry>

         <transition on="paymentSubmitted" to="verifyPayment" />

         <transition on="cancel" to="cancel" />

     </view-state>

     <action-state id="verifyPayment">

         <evaluate result="order.payment" expression=

             "pizzaFlowActions.verifyPayment(flowScope.paymentDetails)" />

         <transition to="paymentTaken" />

     </action-state>

     <!-- End state -->

     <end-state id="cancel" />

     <end-state id="paymentTaken" />

 </flow>
首先进入takePayment流程当中,先初始化两个变量。一个是flow级作用域的paymentDetails,另一个是view级的paymentTypeList。takePayment对应的页面如下所示:
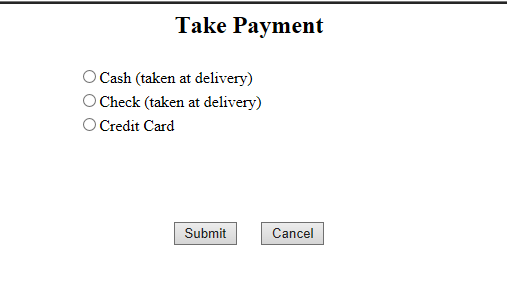
当用户点击Submit触发paymentSubmitted,然后转移到verifyPayment行为状态。verifyPayment主要是通过调用pizzaFlowActions类的verifyPayment方法对用户的支付类型进行判断。最后转移到paymentTaken状态,意味着子流程结束,返回到主流程中。
主流程中和payment相关的流程还有一个行为状态saveOrder,顾名思义将上述流程创建的订单进行保存,然后转移到thankCustomer状态。thankCustomer界面如下所示:
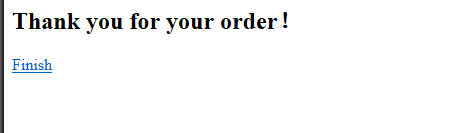
当点击finish就又跳转到首页,重新开始整个流程。
四、具体实现
Spring Web Flow 就是 Spring Web MVC 的一个扩展,如果粗略一些来讲,所谓 flow 就相当于 Spring Web MVC 中一种特殊的 controller ,这种 controller 可通过 XML 文件加以配置。所以必须对Spring Web MVC进行配置,然后再定义相应的flow。
(一)通过Java来配置SpringMVC,但是flow不能通过java配置,必须通过xml来进行配置。使用Java配置的目的是显示欢迎页面。
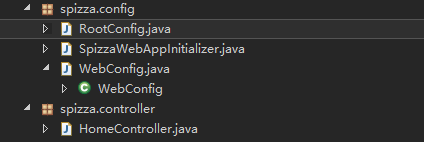
1.在src/main/java目录下分别创建两个包,一个是spizza.config用来配置SpringMVC,另一个是spizza.controller用来配置控制器。目录结构如下所示:
RootConfig.java
 package spizza.config;

 import org.springframework.context.annotation.ComponentScan;

 import org.springframework.context.annotation.ComponentScan.Filter;

 import org.springframework.context.annotation.Configuration;

 import org.springframework.context.annotation.FilterType;

 import org.springframework.web.servlet.config.annotation.EnableWebMvc;

 @Configuration("RootConfig")

 @ComponentScan(basePackages = { "spizza" }, excludeFilters = {

         @Filter(type = FilterType.ANNOTATION, value = EnableWebMvc.class) })

 public class RootConfig {

 }
SpizzaWebApplnitializer.java
 package spizza.config;

 import org.springframework.web.servlet.support.AbstractAnnotationConfigDispatcherServletInitializer;

 public class SpizzaWebAppInitializer extends AbstractAnnotationConfigDispatcherServletInitializer {

     @Override

     protected Class<?>[] getRootConfigClasses() {

         // TODO Auto-generated method stub

         return new Class<?>[] { RootConfig.class };

     }

     @Override

     protected Class<?>[] getServletConfigClasses() {

         // TODO Auto-generated method stub

         return new Class<?>[] { WebConfig.class };

     }

     @Override

     protected String[] getServletMappings() {

         // TODO Auto-generated method stub

         return new String[] { "/" };

     }

 }
WebConfig.java
 package spizza.config;

 import org.springframework.context.annotation.Bean;

 import org.springframework.context.annotation.ComponentScan;

 import org.springframework.context.annotation.Configuration;

 import org.springframework.web.servlet.config.annotation.DefaultServletHandlerConfigurer;

 import org.springframework.web.servlet.config.annotation.EnableWebMvc;

 import org.springframework.web.servlet.config.annotation.WebMvcConfigurerAdapter;

 import org.springframework.web.servlet.view.InternalResourceViewResolver;

 @Configuration("WebConfig")

 @EnableWebMvc

 @ComponentScan("spizza.controller")

 public class WebConfig extends WebMvcConfigurerAdapter {

     @Bean

     public InternalResourceViewResolver viewResolver() {

         InternalResourceViewResolver resolver = new InternalResourceViewResolver();

         resolver.setPrefix("/WEB-INF/view/");

         resolver.setSuffix(".jsp");

         resolver.setViewClass(org.springframework.web.servlet.view.JstlView.class);

         resolver.setExposeContextBeansAsAttributes(true);

         return resolver;

     }

     @Override

     public void configureDefaultServletHandling(DefaultServletHandlerConfigurer configurer) {

         // TODO Auto-generated method stub

         configurer.enable();

     }

 }
HomeController.java
 package spizza.controller;

 import org.springframework.stereotype.Controller;

 import org.springframework.web.bind.annotation.RequestMapping;

 import org.springframework.web.bind.annotation.RequestMethod;

 @Controller

 public class HomeController {

     public HomeController() {

     }

     @RequestMapping(value = "welcome", method = RequestMethod.GET)

     public String home() {

         return "index";

     }

 }
通过Java来配置SpringMVC也是一种复习回顾,Spring实战中推荐使用Java配置。
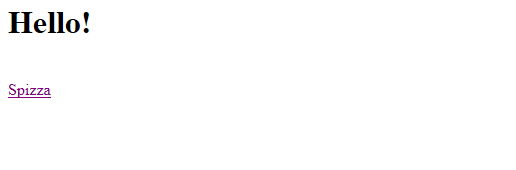
2.运行结果:
(二)配置Spring Web Flow
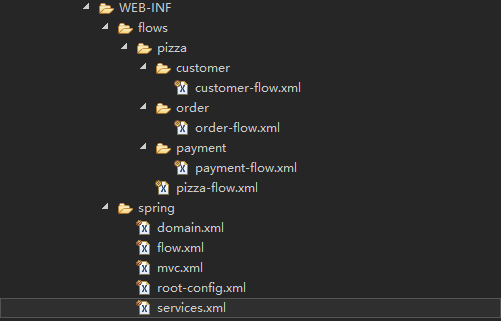
在WEB-IN目录下创建spring文件夹,用来存放有关flow的配置,在WEB-IN目录下创建flows文件夹,用来存放具体的flow流程。具体目录结构如下所示:
1.基础配置,将不同作用的配置文件分开,然后在root-config.xml中进行导入。
flow.xml
 <?xml version="1.0" encoding="UTF-8"?>

 <beans xmlns="http://www.springframework.org/schema/beans"

     xmlns:xsi="http://www.w3.org/2001/XMLSchema-instance" xmlns:flow="http://www.springframework.org/schema/webflow-config"

     xmlns:p="http://www.springframework.org/schema/p" xmlns:context="http://www.springframework.org/schema/context"

     xsi:schemaLocation="

    http://www.springframework.org/schema/beans

    http://www.springframework.org/schema/beans/spring-beans-4.0.xsd

    http://www.springframework.org/schema/context

    http://www.springframework.org/schema/context/spring-context-3.0.xsd

    http://www.springframework.org/schema/webflow-config

    http://www.springframework.org/schema/webflow-config/spring-webflow-config.xsd">

     <context:component-scan base-package="main.java.com.springinaction.pizza.flow" />

     <!-- 执行流程:进入Spring Web Flow系统的入口点 -->

     <flow:flow-executor id="flowExecutor" />

     <!-- 所有 flow 定义文件位置在此配置, flow-builder-services 用于配置 flow 的特性 -->

     <flow:flow-registry id="flowRegistry"

         flow-builder-services="flowBuilderServices">

         <flow:flow-location path="/WEB-INF/flows/pizza/pizza-flow.xml"

             id="pizza-flow" />

         <flow:flow-location path="/WEB-INF/flows/pizza/customer/customer-flow.xml"

             id="customer-flow" />

         <flow:flow-location path="/WEB-INF/flows/pizza/order/order-flow.xml"

             id="order-flow" />

         <flow:flow-location path="/WEB-INF/flows/pizza/payment/payment-flow.xml"

             id="payment-flow" />

     </flow:flow-registry>

     <!--Web Flow 中的视图通过 MVC 框架的视图技术来呈现 -->

     <flow:flow-builder-services id="flowBuilderServices"

         view-factory-creator="mvcViewFactoryCreator" />

     <!-- 指明 MVC 框架的 view resolver ,用于通过 view 名查找资源 -->

     <bean id="mvcViewFactoryCreator"

         class="org.springframework.webflow.mvc.builder.MvcViewFactoryCreator">

         <property name="viewResolvers" ref="viewResolver" />

     </bean>

 </beans>
mvc.xml
 <?xml version="1.0" encoding="UTF-8"?>

 <beans xmlns="http://www.springframework.org/schema/beans"

     xmlns:xsi="http://www.w3.org/2001/XMLSchema-instance"

     xsi:schemaLocation="http://www.springframework.org/schema/beans

     http://www.springframework.org/schema/beans/spring-beans.xsd">

     <bean id="viewResolver"

         class="org.springframework.web.servlet.view.InternalResourceViewResolver">

         <property name="viewClass"

             value="org.springframework.web.servlet.view.JstlView">

         </property>

         <property name="prefix" value="/WEB-INF/view/">

         </property>

         <property name="suffix" value=".jsp">

         </property>

     </bean>

     <bean id="viewMappings"

         class="org.springframework.web.servlet.handler.SimpleUrlHandlerMapping">

         <!-- /pizza-flow.do 请求由 flowController 来处理 -->

         <property name="mappings">

             <value> /pizza-flow.do=flowController </value>

         </property>

     </bean>

     <bean id="flowController" class="org.springframework.webflow.mvc.servlet.FlowController">

         <property name="flowExecutor" ref="flowExecutor" />

     </bean>

 </beans>
domain.xml,加载流程中需要的bean。
 <?xml version="1.0" encoding="UTF-8"?>

 <beans xmlns="http://www.springframework.org/schema/beans"

  xmlns:xsi="http://www.w3.org/2001/XMLSchema-instance"

  xmlns:context="http://www.springframework.org/schema/context"

  xsi:schemaLocation="http://www.springframework.org/schema/beans

      http://www.springframework.org/schema/beans/spring-beans-4.0.xsd

     http://www.springframework.org/schema/context

     http://www.springframework.org/schema/context/spring-context-3.1.xsd">

   <context:spring-configured />

   <bean id="order" class="main.java.com.springinaction.pizza.domain.Order" abstract="true">

     <property name="pricingEngine" ref="pricingEngine" />

   </bean>

 </beans>
services.xml,加载流程中需要的bean。
 <?xml version="1.0" encoding="UTF-8"?>

 <beans xmlns="http://www.springframework.org/schema/beans"

     xmlns:xsi="http://www.w3.org/2001/XMLSchema-instance"

     xsi:schemaLocation="http://www.springframework.org/schema/beans

         http://www.springframework.org/schema/beans/spring-beans-2.0.xsd">

   <bean id="pricingEngine"

       class="main.java.com.springinaction.pizza.service.PricingEngineImpl" />

 <!--

   <lang:groovy id="pricingEngineGroovy"

       script-source="classpath:scripts/PricingEngineImpl.groovy" />

  -->

    <bean id="customerService"

       class="main.java.com.springinaction.pizza.service.CustomerServiceImpl" />

   <!-- Payment processing bean, as discussed on page 606 -->

   <bean id="paymentProcessor"

       class="main.java.com.springinaction.pizza.service.PaymentProcessor" />

   <bean id="orderService"

       class="main.java.com.springinaction.pizza.service.OrderServiceImpl" />

 </beans>
root-config.xml
 <?xml version="1.0" encoding="UTF-8"?>

 <beans xmlns="http://www.springframework.org/schema/beans"

     xmlns:xsi="http://www.w3.org/2001/XMLSchema-instance" xmlns:context="http://www.springframework.org/schema/context"

     xsi:schemaLocation="http://www.springframework.org/schema/beans http://www.springframework.org/schema/beans/spring-beans-4.0.xsd

         http://www.springframework.org/schema/context http://www.springframework.org/schema/context/spring-context-3.1.xsd">

     <context:component-scan base-package="main.java.com.springinaction.pizza" />

     <import resource="domain.xml" />

     <import resource="flow.xml" />

     <import resource="mvc.xml" />

     <import resource="services.xml" />

 </beans>
web.xml,虽然以及使用Java配置过Servlet,参考SpizzaWebAppInitializer.java,但是为了执行flow,还需要在web.xml中进行相应的配置。
 <web-app xmlns:xsi="http://www.w3.org/2001/XMLSchema-instance"

     xmlns="http://xmlns.jcp.org/xml/ns/javaee"

     xsi:schemaLocation="http://xmlns.jcp.org/xml/ns/javaee http://xmlns.jcp.org/xml/ns/javaee/web-app_3_1.xsd"

     id="WebApp_ID" version="3.1">

     <servlet>

         <servlet-name>CartServlet</servlet-name>

         <servlet-class>org.springframework.web.servlet.DispatcherServlet</servlet-class>

         <init-param>

             <param-name>contextConfigLocation</param-name>

             <param-value>

                 /WEB-INF/spring/root-config.xml

             </param-value>

         </init-param>

         <load-on-startup>1</load-on-startup>

     </servlet>

     <servlet-mapping>

         <servlet-name>CartServlet</servlet-name>

         <url-pattern>*.do</url-pattern>

     </servlet-mapping>

 </web-app>
2.Flow的定义
整个顾客订购披萨的过程可以分为三个部分,第一部分就是顾客相关信息验证以及查询,第二个部分是订单的创建,第三个部分是支付。所以不应该将全部的流程都放在一个文件中进行定义,应该分别定义为子流程,然后在主流程中进行调用。具体内容参照第三小节。
(三)视图,只给出了主要内容。
1.index.jsp
     <h1>Hello!</h1><br/>

     <a href="pizza-flow.do">Spizza</a>
2.welcome.jsp
     <h2 align="center">Welcome to Spizza!!!</h2>

     <form:form>

         <table align="center">

             <tr>

                 <td>phoneNumber</td>

                 <td><input type="hidden" name="_flowExecutionKey"

                     value="${flowExecutionKey}" /> <input type="text"

                     name="phoneNumber" /><br /></td>

             </tr>

             <tr height="80px"></tr>

             <tr>

                 <td colspan="2" align="center"><input type="submit" name="_eventId_phoneEntered"

                     value="Lookup Customer" /></td>

             </tr>

         </table>

     </form:form>

     <!-- 首先要注意的是隐藏的“_flowExecutionKey”输入域。

     当进入视图 状态时,流程暂停并等待用户采取一些行为。

     赋予视图的流程执行 key(flow execution key)就是一种返回流程的“回程票”(claim ticket)。

     当用户提交表单时,流程执行key会 在“_flowExecutionKey”输入域中返回并在流程暂停的位置进行恢 复。

     -->
3.registrationForm.jsp
<h2 align="center">Customer Registration</h2>
<form:form commandName="order">
<table align="center">
<tr>
<td><input type="hidden" name="_flowExecutionKey"
value="${flowExecutionKey}" /></td>
</tr>
<tr>
<td align="center">Phone number:</td>
<td><form:input path="customer.phoneNumber" /></td>
</tr>
<tr>
<td align="center">Name:</td>
<td><form:input path="customer.name" /></td>
</tr>
<tr>
<td align="center">Address:</td>
<td><form:input path="customer.address" /></td>
</tr>
<tr>
<td align="center">State:</td>
<td><form:input path="customer.state" /></td>
</tr>
<tr>
<td align="center">Zip Code:</td>
<td><form:input path="customer.zipCode" /></td>
</tr>
<tr height="80px"></tr>
<tr>
<td colspan="2" align="center"><input type="submit"
name="_eventId_submit" value="Submit" />
<input type="submit" name="_eventId_cancel" value="Cancel" /></td>
</tr>
</table>
</form:form>
4.deliveryWarning.jsp
     <h2>Delivery Unavailable</h2>

     <p>The address is outside of our delivery area. The order may still be taken for carry-out.</p>

     <a href="${flowExecutionUrl}&_eventId=accept">Accept</a> |

     <a href="${flowExecutionUrl}&_eventId=cancel">Cancel</a>
5.showOrder.jsp
 <div align="center">

         <h2>Your order</h2>

         <h3>Deliver to:</h3>

         <table>

             <tr>

                 <td>name</td>

                 <td>${order.customer.name}</td>

             </tr>

             <tr>

                 <td>address</td>

                 <td>${order.customer.address}</td>

             </tr>

             <tr>

                 <td>city</td>

                 <td>${order.customer.city}</td>

             </tr>

             <tr>

                 <td>state</td>

                 <td>${order.customer.state}</td>

             </tr>

             <tr>

                 <td>zipCode</td>

                 <td>${order.customer.zipCode}</td>

             </tr>

             <tr>

                 <td>phoneNumber</td>

                 <td>${order.customer.phoneNumber}</td>

             </tr>

         </table>

         <hr />

         <h3>

             Order total:

          <fmt:formatNumber type="currency" value="${order.total}"></fmt:formatNumber>

         </h3>

         <hr />

         <h3>Pizzas:</h3>

         <c:if test="${fn:length(order.pizzas) eq 0}">

             <b>No pizzas in this order.</b>

         </c:if>

         <br />

         <table border="1">

             <tr>

                 <th>Size</th>

                 <th>Toppings</th>

                 <th>IsCombo</th>

                 <th>Price</th>

             </tr>

             <c:forEach items="${order.pizzas }" var="pizza">

                 <tr>

                     <td align="center">${pizza.size}</td>

                     <td align="center">

                         <c:forEach items="${pizza.toppings}" var="topping">

                         <c:out value="${topping}" />

                         </c:forEach>

                     </td>

                     <td align="center">${pizza.isCombo }</td>

                     <td>${pizza.price }</td>

                 </tr>

             </c:forEach>

         </table>

         <form:form>

             <input type="hidden" name="_flowExecutionKey"

                 value="${flowExecutionKey}" />

             <input type="submit" name="_eventId_createPizza" value="Create Pizza" />

             <c:if test="${fn:length(order.pizzas) gt 0}">

                 <input type="submit" name="_eventId_checkout" value="Checkout" />

             </c:if>

             <input type="submit" name="_eventId_cancel" value="Cancel" />

         </form:form>

     </div>
6.createPizza.jsp
 <div align="center">

         <h2>Create Pizza</h2>

         <form:form commandName="pizza" >

             <input type="hidden" name="_flowExecutionKey"

                 value="${flowExecutionKey}" />

             <b>Size: </b>

             <br />

             <table>

                 <tr>

                     <td><form:radiobutton path="size" label="Small (12-inch)——————¥6.99"

                             value="SMALL" /></td>

                 </tr>

                 <tr>

                     <td><form:radiobutton path="size" label="Medium (14-inch)——————¥7.99"

                             value="MEDIUM" /></td>

                 </tr>

                 <tr>

                     <td><form:radiobutton path="size" label="Large (16-inch)——————¥8.99"

                             value="LARGE" /></td>

                 </tr>

                 <tr>

                     <td><form:radiobutton path="size" label="Ginormous (20-inch)——————¥9.99"

                             value="GINORMOUS" /></td>

                 </tr>

             </table>

             <br />

             <br />

             <b>Toppings: PRICE_PER_TOPPING 0.20¥</b>

             <br />

             <table>

                 <tr>

                     <td>

                     <form:checkboxes name="topping" path="toppings" items="${toppingsList}"

                     delimiter="<br/>" />

                     </td>

                 </tr>

             </table>

             <br />

             <br />

             <b>Hyperchannel</b>

             <table>

                 <tr>

                     <td><form:checkbox path="specialPizza" label="MEAT"

                             value="MEAT" /></td>

                 </tr>

                 <tr>

                     <td><form:checkbox path="specialPizza" label="VEGGIE"

                             value="VEGGIE" /></td>

                 </tr>

                 <tr>

                     <td><form:checkbox path="specialPizza" label="THEWORKS"

                             value="THEWORKS" /></td>

                 </tr>

             </table>

             <input type="submit" class="button" name="_eventId_addPizza"

                 value="Continue" />

             <input type="submit" class="button" name="_eventId_cancel"

                 value="Cancel" />

         </form:form>

     </div>
7.takePayment.jsp
<div align="center">
<script>
function showCreditCardField() {
var ccNumberStyle = document.paymentForm.creditCardNumber.style;
ccNumberStyle.visibility = 'visible';
}
function hideCreditCardField() {
var ccNumberStyle = document.paymentForm.creditCardNumber.style;
ccNumberStyle.visibility = 'hidden';
}
</script>
<h2>Take Payment</h2>
<form:form commandName="paymentDetails" name="paymentForm">
<table>
<tr>
<td><input type="hidden" name="_flowExecutionKey"
value="${flowExecutionKey}" /></td>
</tr>
<tr>
<td><form:radiobutton path="paymentType" value="CASH"
label="Cash (taken at delivery)" onclick="hideCreditCardField()" /></td>
</tr>
<tr>
<td><form:radiobutton path="paymentType" value="CHECK"
label="Check (taken at delivery)" onclick="hideCreditCardField()" /></td>
</tr>
<tr>
<td><form:radiobutton path="paymentType" value="CREDIT_CARD"
label="Credit Card" onclick="showCreditCardField()" /></td>
<td><form:input path="creditCardNumber"
cssStyle="visibility:hidden;" /></td>
</tr>
<tr height="80px"></tr>
<tr>
<td colspan="2" align="center"><input type="submit"
class="button" name="_eventId_paymentSubmitted" value="Submit" />
<input type="submit" class="button"
name="_eventId_cancel" value="Cancel" /></td>
</tr>
</table>
</form:form>
</div>
8.thankCustomer.jsp
     <h2>Thank you for your order!</h2>

     <h3>付款方式</h3>

     ${order.payment}

     <br>

     <a href="${flowExecutionUrl}&_eventId=end">Finish</a>
(四)后台
1.用于保存信息的类Customer,Pizza,PaymentDetails,Order。
Customer保存用户的姓名、地址、城市、详细地址、邮政编码、电话号码等。
 package main.java.com.springinaction.pizza.domain;

 import java.io.Serializable;

 @SuppressWarnings("serial")

 public class Customer implements Serializable {

     private Integer id;

     private String name;

     private String address;

     private String city;

     private String state;

     private String zipCode;

     private String phoneNumber;

     public Customer() {

     }

     public Customer(String phoneNumber) {

         this.phoneNumber = phoneNumber;

     }

     public String getCity() {

         return city;

     }

     public void setCity(String city) {

         this.city = city;

     }

     public Integer getId() {

         return id;

     }

     public void setId(Integer id) {

         this.id = id;

     }

     public String getName() {

         return name;

     }

     public void setName(String name) {

         this.name = name;

     }

     public String getPhoneNumber() {

         return phoneNumber;

     }

     public void setPhoneNumber(String phoneNumber) {

         this.phoneNumber = phoneNumber;

     }

     public String getState() {

         return state;

     }

     public void setState(String state) {

         this.state = state;

     }

     public String getAddress() {

         return address;

     }

     public void setAddress(String address) {

         this.address = address;

     }

     public String getZipCode() {

         return zipCode;

     }

     public void setZipCode(String zipCode) {

         this.zipCode = zipCode;

     }

 }
Pizza保存披萨的大小、添加的配料、价格等信息。
 package main.java.com.springinaction.pizza.domain;

 import java.io.Serializable;

 import java.util.List;

 @SuppressWarnings("serial")

 public class Pizza implements Serializable {

     private PizzaSize size;

     private List<Topping> toppings;

     private List<String> specialPizza;

     private String isCombo;

     private float price;

     public Pizza() {

         size = PizzaSize.LARGE;

     }

     public float getPrice() {

         return price;

     }

     public void setPrice(float price) {

         this.price = price;

     }

     public String getIsCombo() {

         return isCombo;

     }

     public void setIsCombo(String isCombo) {

         this.isCombo = isCombo;

     }

     public List<String> getSpecialPizza() {

         return specialPizza;

     }

     public void setSpecialPizza(List<String> specialPizza) {

         this.specialPizza = specialPizza;

     }

     public PizzaSize getSize() {

         return size;

     }

     public void setSize(PizzaSize size) {

         this.size = size;

     }

     public void setSize(String sizeString) {

         this.size = PizzaSize.valueOf(sizeString);

     }

     public List<Topping> getToppings() {

         return toppings;

     }

     public void setToppings(List<Topping> toppings) {

         this.toppings = toppings;

     }

     public void setToppings(String[] toppingStrings) {

         for (int i = 0; i < toppingStrings.length; i++) {

             toppings.add(Topping.valueOf(toppingStrings[i]));

         }

     }

 }
因为在披萨选择页面顾客可以自行选择配料,也可以直接选择已经提供好的套餐,用户可以自由选择。所以在Pizza类中会有specialPizza字段用来存放顾客是否选择了套餐。
其中PizzaSize和Topping都是自定义的枚举类型的类,用来存放披萨大小和配料种类,具体如下所示:
PizzaSize.java
 package main.java.com.springinaction.pizza.domain;

 import java.io.Serializable;

 public enum PizzaSize implements Serializable {

     SMALL, MEDIUM, LARGE, GINORMOUS;

 }
Topping.java
 package main.java.com.springinaction.pizza.domain;

 import java.io.Serializable;

 import java.util.Arrays;

 import java.util.List;

 import org.apache.commons.lang3.text.WordUtils;

 public enum Topping implements Serializable {

     PEPPERONI, SAUSAGE, HAMBURGER, MUSHROOM, CANADIAN_BACON, PINEAPPLE, GREEN_PEPPER, JALAPENO, TOMATO, ONION, EXTRA_CHEESE;

     public static List<Topping> asList() {

         Topping[] all = Topping.values();

         return Arrays.asList(all);

     }

     @Override

     public String toString() {

         return WordUtils.capitalizeFully(name().replace('_', ' '));

     }

 }
PaymentDetails保存顾客的付款信息,其中主要包括付款类型,以及卡号(如果使用信用卡)。
 package main.java.com.springinaction.pizza.domain;

 import java.io.Serializable;

 public class PaymentDetails implements Serializable {

     private static final long serialVersionUID = 1L;

     private PaymentType paymentType;

     private String creditCardNumber;

     public PaymentType getPaymentType() {

         return paymentType;

     }

     public void setPaymentType(PaymentType paymentType) {

         this.paymentType = paymentType;

     }

     public String getCreditCardNumber() {

         return creditCardNumber;

     }

     public void setCreditCardNumber(String creditCardNumber) {

         this.creditCardNumber = creditCardNumber;

     }

 }
其中PaymentType是自定义的一个枚举类型的类,用来存放支付的方式,具体如下所示:
 package main.java.com.springinaction.pizza.domain;

 import java.util.Arrays;

 import java.util.List;

 import org.apache.commons.lang3.text.WordUtils;

 public enum PaymentType {

     CASH, CHECK, CREDIT_CARD;

     public static List<PaymentType> asList() {

         PaymentType[] all = PaymentType.values();

         return Arrays.asList(all);

     }

     @Override

     public String toString() {

         return WordUtils.capitalizeFully(name().replace('_', ' '));

     }

 }
Order类中保存整个订单的信息。
 package main.java.com.springinaction.pizza.domain;

 import java.io.Serializable;

 import java.util.ArrayList;

 import java.util.List;

 import org.springframework.beans.factory.annotation.Configurable;

 import org.springframework.util.StringUtils;

 import main.java.com.springinaction.pizza.flow.SpecialtyPizza;

 import main.java.com.springinaction.pizza.service.PricingEngineImpl;

 @Configurable("order")

 public class Order implements Serializable {

     private static final long serialVersionUID = 1L;

     private Customer customer;

     private List<Pizza> pizzas;

     private Payment payment;

     public Order() {

         pizzas = new ArrayList<Pizza>();

         customer = new Customer();

     }

     public Customer getCustomer() {

         return customer;

     }

     public void setCustomer(Customer customer) {

         this.customer = customer;

     }

     public List<Pizza> getPizzas() {

         return pizzas;

     }

     public void setPizzas(List<Pizza> pizzas) {

         this.pizzas = pizzas;

     }

     public void addPizza(Pizza pizza) {

         // System.out.println(StringUtils.isEmpty(pizza.getToppings()));

         // System.out.println(StringUtils.isEmpty(pizza.getSpecialPizza()));

         Boolean pizza1 = StringUtils.isEmpty(pizza.getToppings());

         Boolean pizza2 = StringUtils.isEmpty(pizza.getSpecialPizza());

         if (pizza1 == false && pizza2 == true) {

             pizza.setIsCombo("—");

             pizzas.add(pizza);

         } else if (pizza1 == true && pizza2 == false) {

             SpecialtyPizza specialtyPizza = new SpecialtyPizza();

             List<Pizza> newPizzas = specialtyPizza.getPizza(pizza);

             for (Pizza temp : newPizzas) {

                 pizzas.add(temp);

             }

         } else if (pizza1 == false && pizza2 == false) {

             pizza.setIsCombo("—");

             pizzas.add(pizza);

             SpecialtyPizza specialtyPizza = new SpecialtyPizza();

             List<Pizza> newPizzas = specialtyPizza.getPizza(pizza);

             for (Pizza temp : newPizzas) {

                 pizzas.add(temp);

             }

         }

     }

     public float getTotal() {

         PricingEngineImpl pricingEngineImpl = new PricingEngineImpl();

         List<Pizza> pizzas = this.getPizzas();

         return pricingEngineImpl.calculateOrderTotal(pizzas);

     }

     public Payment getPayment() {

         return payment;

     }

     public void setPayment(Payment payment) {

         this.payment = payment;

         payment.setAmount(this.getTotal());

     }

 }
<1>需要注意的是在添加披萨到订单当中时,即方法addPizza,其参数是一个Pizza类型的列表。因为在表单中直接绑定了pizza的三个对象,size、topping和specialPizza,而其中topping与specialPizza可以不用同时赋值,所以再添加pizza对象到订单中的时候要对这两个对象判断是否为空,然后根据实际情况添加相应的pizza对象到订单当中。所以还需要一个SpecialtyPizza类返回特殊的pizza对象,具体如下所示:
 package main.java.com.springinaction.pizza.flow;

 import java.util.ArrayList;

 import java.util.List;

 import main.java.com.springinaction.pizza.domain.Pizza;

 import main.java.com.springinaction.pizza.domain.Topping;

 public class SpecialtyPizza {

     public List<Pizza> getPizza(Pizza pizza) {

         List<Pizza> newPizza = new ArrayList<Pizza>();

         if (pizza.getSpecialPizza().size() != 0) {

             for (String type : pizza.getSpecialPizza()) {

                 if ("MEAT".equals(type)) {

                     List<Topping> meats = new ArrayList<Topping>();

                     meats.add(Topping.CANADIAN_BACON);

                     meats.add(Topping.HAMBURGER);

                     meats.add(Topping.PEPPERONI);

                     meats.add(Topping.SAUSAGE);

                     Pizza tempt = new Pizza();

                     tempt.setSize(pizza.getSize());

                     tempt.setToppings(meats);

                     tempt.setIsCombo("MEAT");

                     newPizza.add(tempt);

                 } else if ("VEGGIE".equals(type)) {

                     List<Topping> meats = new ArrayList<Topping>();

                     meats.add(Topping.GREEN_PEPPER);

                     meats.add(Topping.MUSHROOM);

                     meats.add(Topping.PINEAPPLE);

                     meats.add(Topping.TOMATO);

                     Pizza tempt = new Pizza();

                     tempt.setSize(pizza.getSize());

                     tempt.setToppings(meats);

                     tempt.setIsCombo("VEGGIE");

                     newPizza.add(tempt);

                 } else if ("THEWORKS".equals(type)) {

                     List<Topping> meats = new ArrayList<Topping>();

                     System.out.println("THE WORKS!");

                     meats.add(Topping.CANADIAN_BACON);

                     meats.add(Topping.HAMBURGER);

                     meats.add(Topping.PEPPERONI);

                     meats.add(Topping.SAUSAGE);

                     meats.add(Topping.GREEN_PEPPER);

                     meats.add(Topping.MUSHROOM);

                     meats.add(Topping.PINEAPPLE);

                     meats.add(Topping.TOMATO);

                     meats.add(Topping.EXTRA_CHEESE);

                     meats.add(Topping.ONION);

                     meats.add(Topping.JALAPENO);

                     Pizza tempt = new Pizza();

                     tempt.setSize(pizza.getSize());

                     tempt.setToppings(meats);

                     tempt.setIsCombo("THEWORKS");

                     newPizza.add(tempt);

                 }

             }

             return newPizza;

         } else {

             return newPizza;

         }

     }

 }
<2>在初始化payment对象时,同时用订单总金额来初始化payment对象中amount变量,其中的payment是一个抽象类的实例,代码如下所示:
Payment.java
 package main.java.com.springinaction.pizza.domain;

 import java.io.Serializable;

 public abstract class Payment implements Serializable {

     private static final long serialVersionUID = 1L;

     private float amount;

     private String creditCardNumber;

     public String getCreditCardNumber() {

         return creditCardNumber;

     }

     public void setCreditCardNumber(String creditCardNumber) {

         this.creditCardNumber = creditCardNumber;

     }

     public void setAmount(float amount) {

         this.amount = amount;

     }

     public float getAmount() {

         return amount;

     }

 }
这个抽象类主要包含两个成员变量:amount(需要付款的总金额),creditCardNumber(使用信用卡付款时的卡号)。然后添加了两个类CshOrCheckPayment和CreditCardPayment,它们都继承Payment。
CshOrCheckPayment
 package main.java.com.springinaction.pizza.domain;

 public class CashOrCheckPayment extends Payment {

     public CashOrCheckPayment() {

     }

     public String toString() {

         return "CASH or CHECK:  ¥" + getAmount();

     }

 }
CreditCardPayment
 package main.java.com.springinaction.pizza.domain;

 public class CreditCardPayment extends Payment {

     public CreditCardPayment() {

     }

     public String toString() {

         return "CREDIT:  ¥" + getAmount() + " ; AUTH: " + this.getCreditCardNumber(); //调用父类的成员变量

     }

 }
2.流程执行过程中需要用到的方法。
<1>CustomerServiceImpl,实现CustomerService接口,接口中只有一个方法,lookupCustomer。
 package main.java.com.springinaction.pizza.service;

 import main.java.com.springinaction.pizza.domain.Customer;

 public class CustomerServiceImpl implements CustomerService {

     public CustomerServiceImpl() {

     }

     public Customer lookupCustomer(String phoneNumber) throws CustomerNotFoundException {

         if ("9725551234".equals(phoneNumber)) {

             Customer customer = new Customer();

             customer.setId(123);

             customer.setName("Craig Walls");

             customer.setAddress("3700 Dunlavy Rd");

             customer.setCity("Denton");

             customer.setState("TX");

             customer.setZipCode("76210");

             customer.setPhoneNumber(phoneNumber);

             return customer;

         } else {

             throw new CustomerNotFoundException();

         }

     }

 }
<2>OrderServiceImpl将用户订单保存到日志当中,因为没有连接数据库。
 package main.java.com.springinaction.pizza.service;

 import org.apache.log4j.Logger;

 import main.java.com.springinaction.pizza.domain.Order;

 public class OrderServiceImpl {

     private static final Logger LOGGER = Logger.getLogger(OrderServiceImpl.class);

     public OrderServiceImpl() {

     }

     public void saveOrder(Order order) {

         LOGGER.debug("SAVING ORDER:  ");

         LOGGER.debug("   Customer:  " + order.getCustomer().getName());

         LOGGER.debug("   # of Pizzas:  " + order.getPizzas().size());

         LOGGER.debug("   Payment:  " + order.getPayment());

     }

 }
<3>PricingEngineImpl实现PricingEngine接口,接口中只有一个方法calculateOrderTotal,计算每个披萨的价格,以及订单中披萨的总价。
 package main.java.com.springinaction.pizza.service;

 import java.io.Serializable;

 import java.util.HashMap;

 import java.util.List;

 import java.util.Map;

 import org.apache.log4j.Logger;

 import main.java.com.springinaction.pizza.domain.Pizza;

 import main.java.com.springinaction.pizza.domain.PizzaSize;

 @SuppressWarnings("serial")

 public class PricingEngineImpl implements PricingEngine, Serializable {

     private static final Logger LOGGER = Logger.getLogger(PricingEngineImpl.class);

     private static Map<PizzaSize, Float> SIZE_PRICES;

     static {

         SIZE_PRICES = new HashMap<PizzaSize, Float>();

         SIZE_PRICES.put(PizzaSize.SMALL, 7.00f);

         SIZE_PRICES.put(PizzaSize.MEDIUM, 8.00f);

         SIZE_PRICES.put(PizzaSize.LARGE, 9.00f);

         SIZE_PRICES.put(PizzaSize.GINORMOUS, 10.00f);

     }

     private static float PRICE_PER_TOPPING = 2.00f;

     public PricingEngineImpl() {

     }

     public float calculateOrderTotal(List<Pizza> pizzas) {

         float total = 0.0f;

         if (pizzas.size() == 0) {

             return total;

         } else {

             for (Pizza pizza : pizzas) {

                 float pizzaPrice = SIZE_PRICES.get(pizza.getSize());

                 if (pizza.getToppings().size() > 0) {

                     pizzaPrice += (pizza.getToppings().size() * PRICE_PER_TOPPING);

                 }

                 pizza.setPrice(pizzaPrice);

                 total += pizzaPrice;

             }

             return total;

         }

     }

 }
3.在执行总流程中调用所需的方法时通过PizzaFlowActions类。
 package main.java.com.springinaction.pizza.flow;

 import org.apache.log4j.Logger;

 import org.springframework.beans.factory.annotation.Autowired;

 import org.springframework.stereotype.Service;

 import main.java.com.springinaction.pizza.domain.CashOrCheckPayment;

 import main.java.com.springinaction.pizza.domain.CreditCardPayment;

 import main.java.com.springinaction.pizza.domain.Customer;

 import main.java.com.springinaction.pizza.domain.Order;

 import main.java.com.springinaction.pizza.domain.Payment;

 import main.java.com.springinaction.pizza.domain.PaymentDetails;

 import main.java.com.springinaction.pizza.domain.PaymentType;

 import main.java.com.springinaction.pizza.service.CustomerNotFoundException;

 import main.java.com.springinaction.pizza.service.CustomerService;

 @Service

 public class PizzaFlowActions {

     private static final Logger LOGGER = Logger.getLogger(PizzaFlowActions.class);

     public Customer lookupCustomer(String phoneNumber) throws CustomerNotFoundException {

         Customer customer = customerService.lookupCustomer(phoneNumber);

         if (customer != null) {

             return customer;

         } else {

             throw new CustomerNotFoundException();

         }

     }

     public void addCustomer(Customer customer) {

         LOGGER.warn("TODO: Flesh out the addCustomer() method.");

     }

     public Payment verifyPayment(PaymentDetails paymentDetails) {

         Payment payment = null;

         if (paymentDetails.getPaymentType() == PaymentType.CREDIT_CARD) {

             payment = new CreditCardPayment();

         } else {

             payment = new CashOrCheckPayment();

         }

         return payment;

     }

     public void saveOrder(Order order) {

         LOGGER.warn("TODO: Flesh out the saveOrder() method.");

     }

     public boolean checkDeliveryArea(String zipCode) {

         LOGGER.warn("TODO: Flesh out the checkDeliveryArea() method.");

         return "75075".equals(zipCode);

     }

     @Autowired

     CustomerService customerService;

 }
五、程序源码
https://github.com/lyj8330328/Spizza.git
最新文章
- spark读取hdfs上的文件和写入数据到hdfs上面
- socket网络编程
- 11.12模拟考T2(GCD)
- 【Android】用MediaRecorder录制视频太短崩的问题
- C#图片读取和保存
- myeclipse报错:Could not create the view: An unexpected exception was thrown.
- Validation Rule和Binding Group
- 学习iOS开发的前言
- 在Xbox和Hololens 上部署、调试UWP App
- wget命令企业级应用参数详解
- easyUI datagrid 多行多列数据渲染异常缓慢原因以及解决方法
- turtle画王思聪吃热狗(杨艳春,何金凝小组)
- C# 加载并显示菜单
- SQL Server获取星期几
- vue 之 筛选功能实现
- Java 解析Excel(xls、xlsx两种格式)
- 【BZOJ4773】负环 [SPFA][二分]
- 批处理:根据进程名称查询进程,如果有进程就输出up没有就输出donw
- Meta referrer标签的,可以防止CSRF的攻击
- ajax控制页面跳转
热门文章
- Spring学习笔记(8)——依赖注入
- LeetCode Array Easy121. Best Time to Buy and Sell Stock
- myeclipse中使用maven插件的时候,报错-Dmaven.multiModuleProjectDirectory system propery is not set.
- 检查目录下 文件的权限-linux shell脚本
- sysprep
- ios执行失去焦点,不执行点击事件
- windows下注册ocx控件
- jsp service bean
- C/C++ GBK和UTF8之间的转换
- 在ag-grid表格上实现类似Excel中的按下enter键自动跳转到下一行对应的输入框功能,Angular4开发