KVM管理工具webvirtmgr的使用
WebVirtMgr的日常配置:添加宿主机,创建虚拟机,磁盘扩容,快照等
具体操作记录如下:
一、创建虚拟机
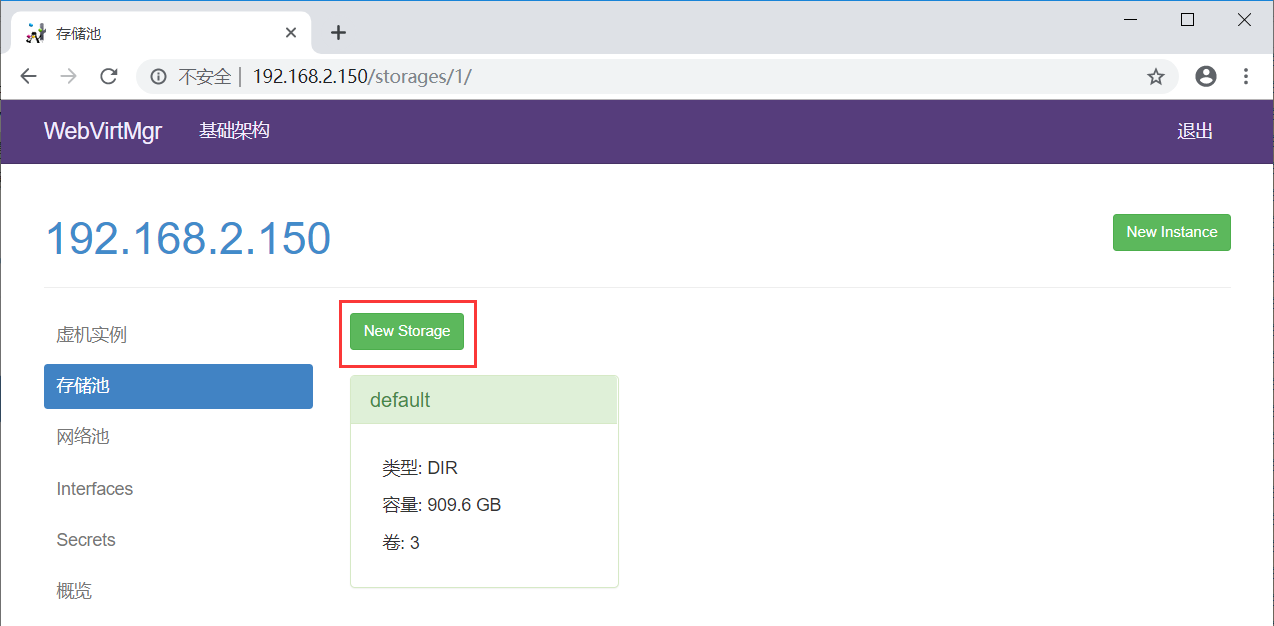
1、创建存储池
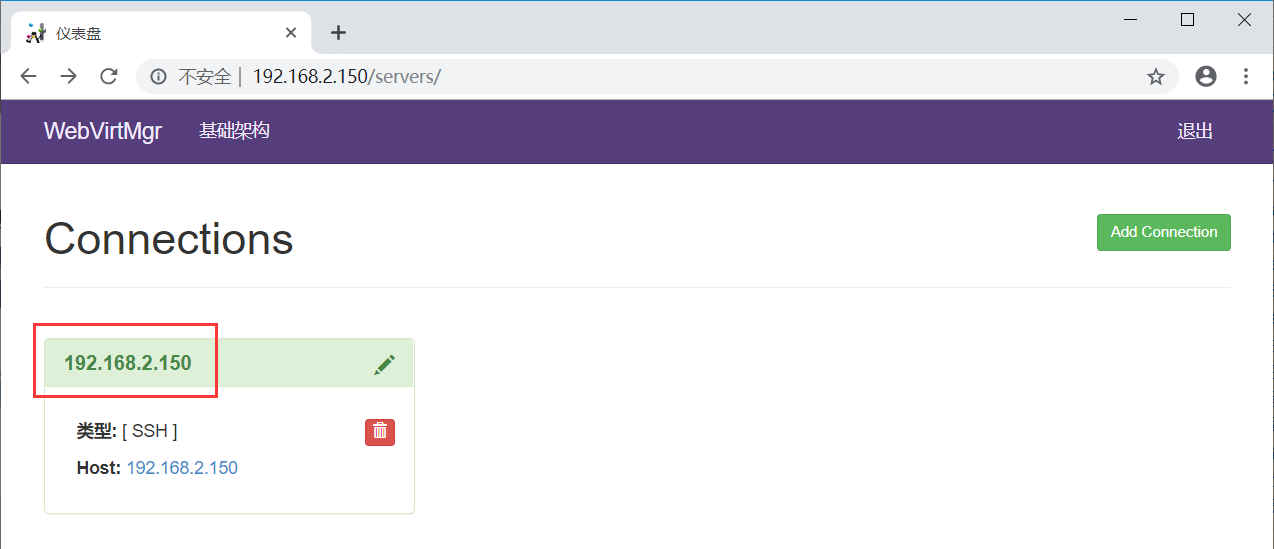
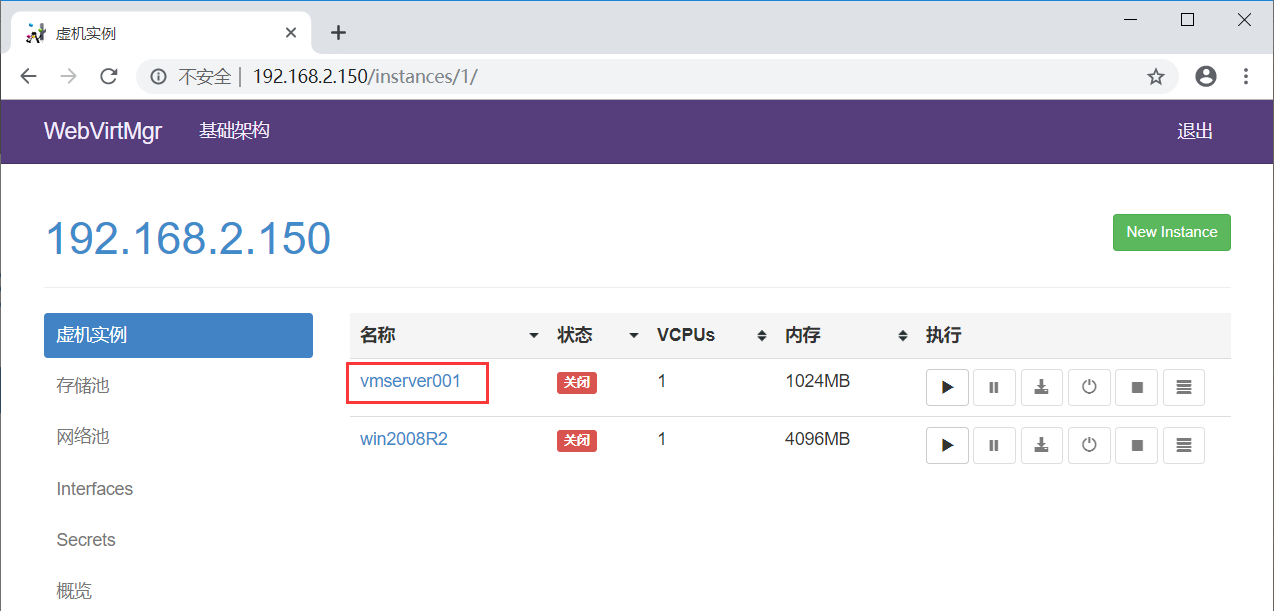
点击创建的宿主机,进入虚拟机部署界面
点击“存储池”按钮,创建存储池(即创建磁盘镜像存放的位置)
创建存储池时,首先要在宿主机上创建一个目录,然后在”路径“设置栏中添加该目录
例:# mkdir -p /home/kvm/kvmstorage
[把提前下载好的centos镜像拷贝到上面创建的存储池目录/home/kvm/kvmstorage下;这里可以放不同版本的系统镜像(windows也可以),以便在下面安装过程中选择不同镜像安装系统]
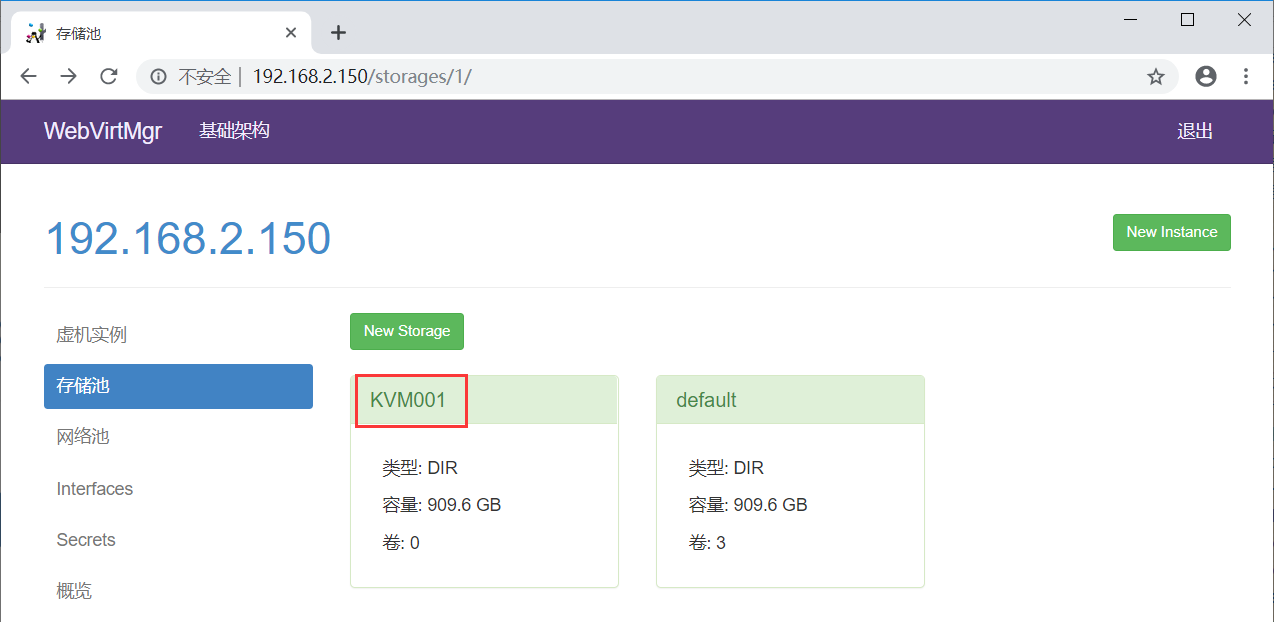
输入名称和路径

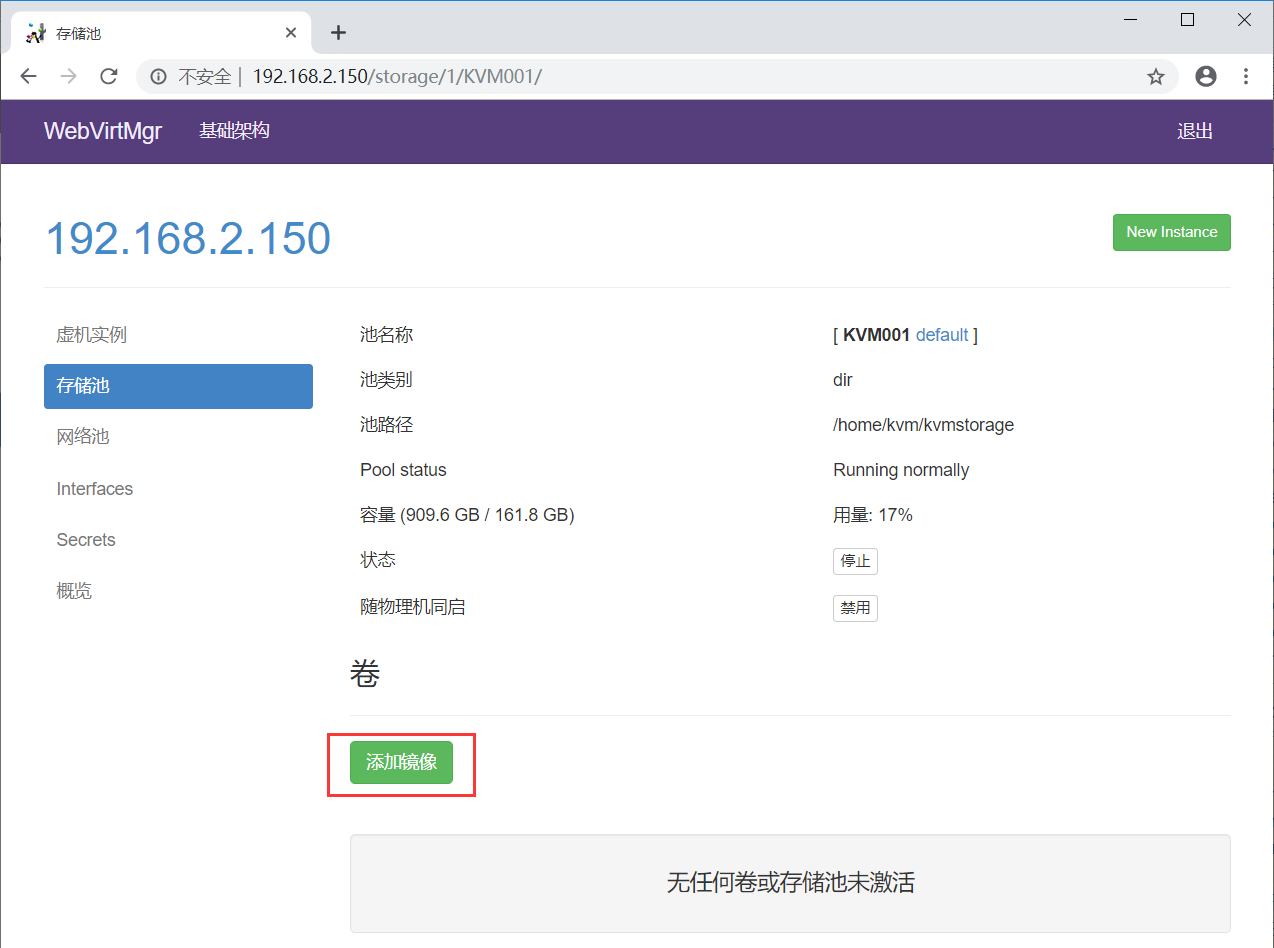
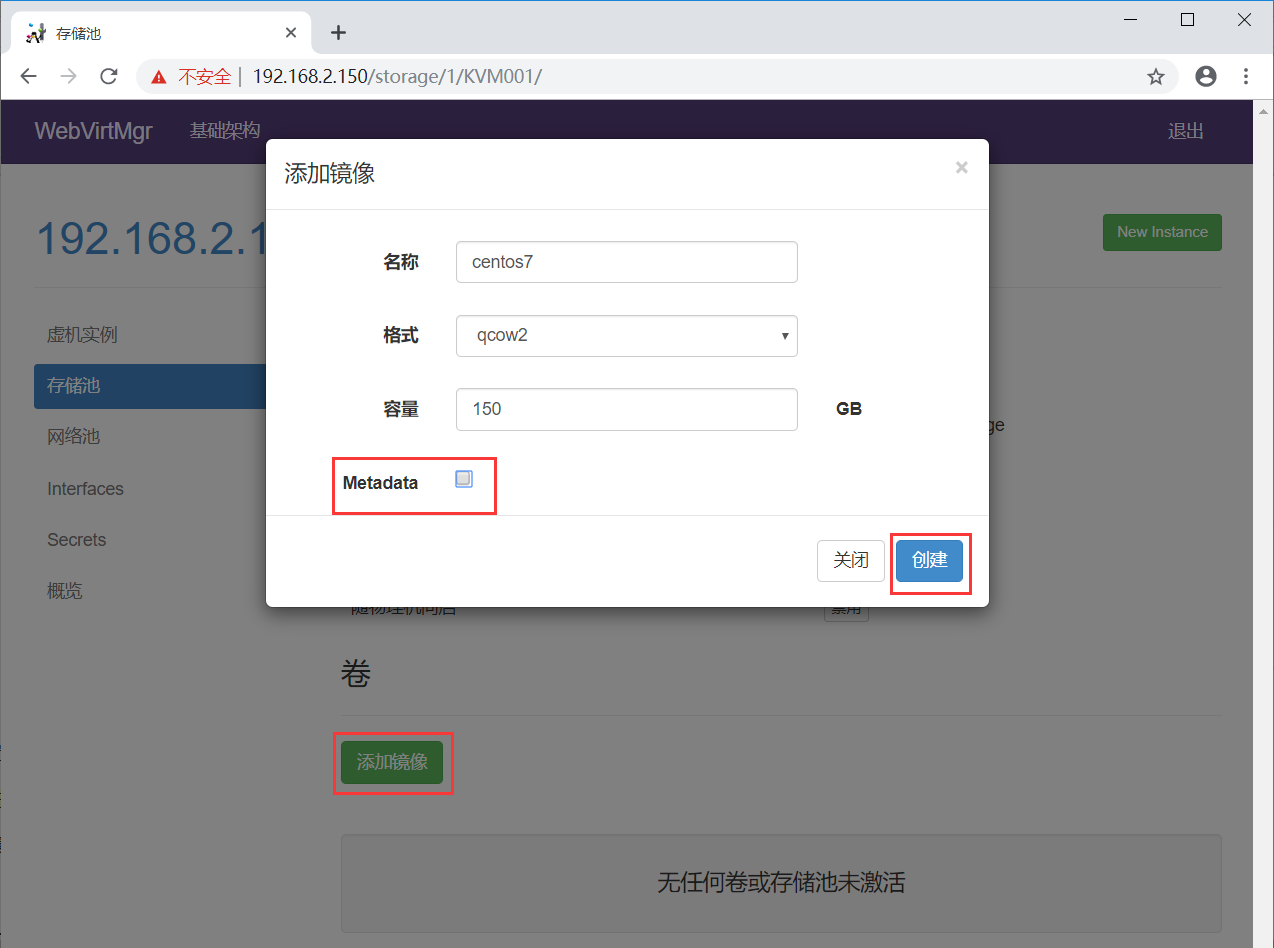
2、添加磁盘镜像
选择KVM001
注意:
下面“Metadata”前的小方框一定不能勾选(默认是勾选的,要去掉!)
这里添加的“镜像”就是所创建虚拟机的硬盘空间(我测试环境给了150G)
虚拟机所占用的空间就是这个“镜像”所在的宿主机下路径所在的分区空间(也就是/home/kvm/kvmstorage/,即宿主机的home分区)
创建完成后如下:

3、宿主机网卡的桥接模式设置
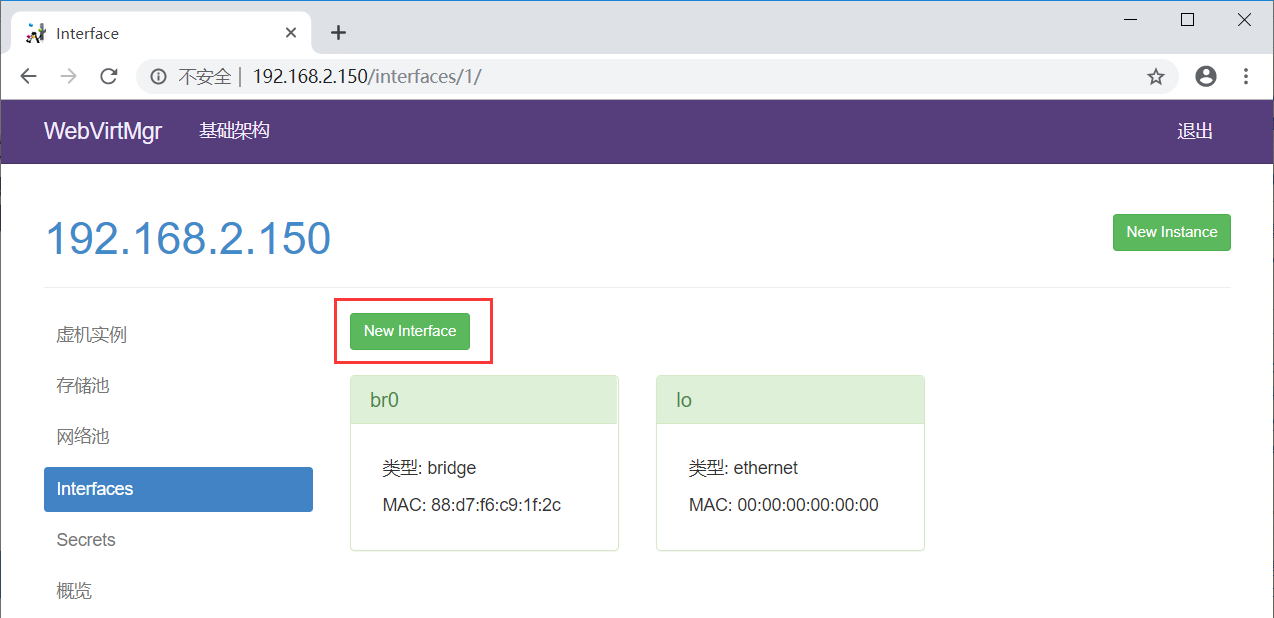
注意下面的“设备”一项要填写桥接的物理网卡(即br0对应的那个网卡,这里填的是宿主机之前的内网卡enp2s0)
网关地址也一定要填写正确,不然虚拟机和宿主机同网段机器则会网络不通。(如下这一步其实就是创建桥接的网卡配置,也可以在服务器上手动创建)
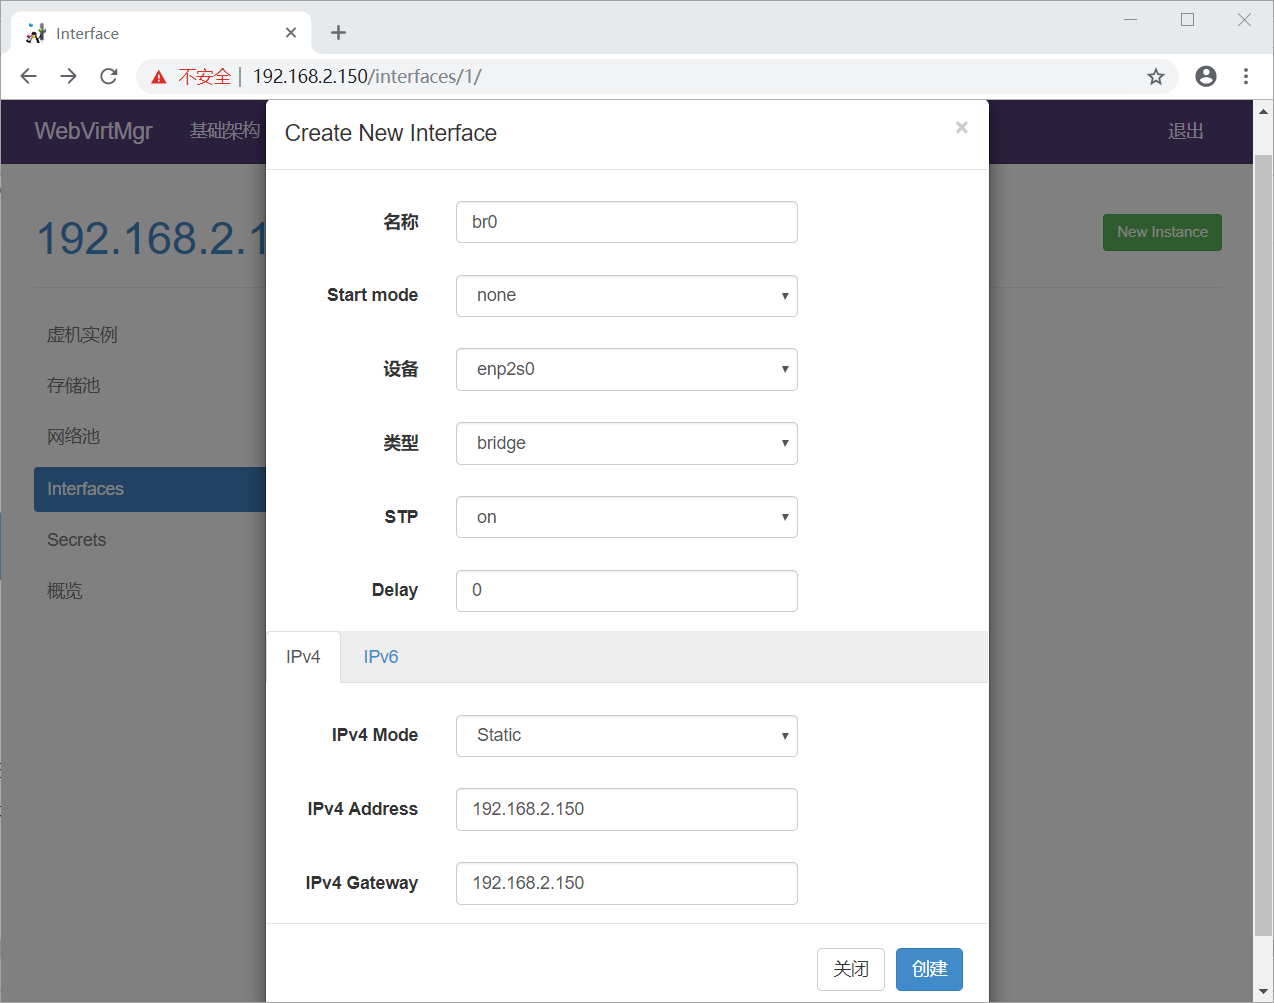
我在服务器上已经手动创建完桥接网络,所以和上面的配置是一样的,如下:
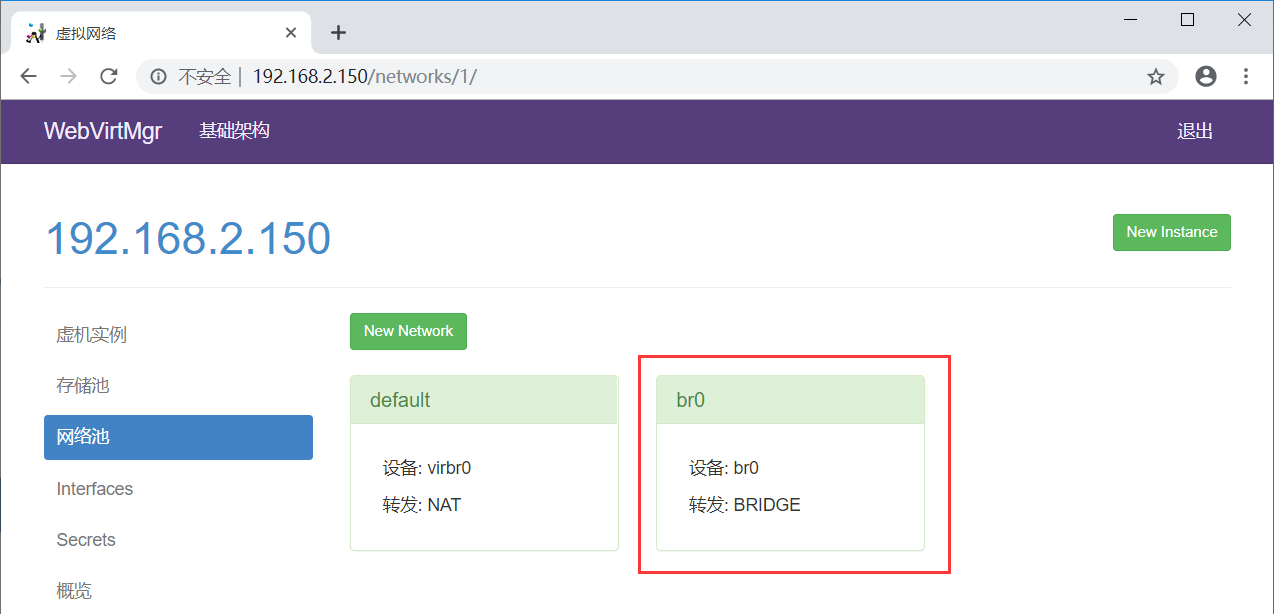
4、创建网络池
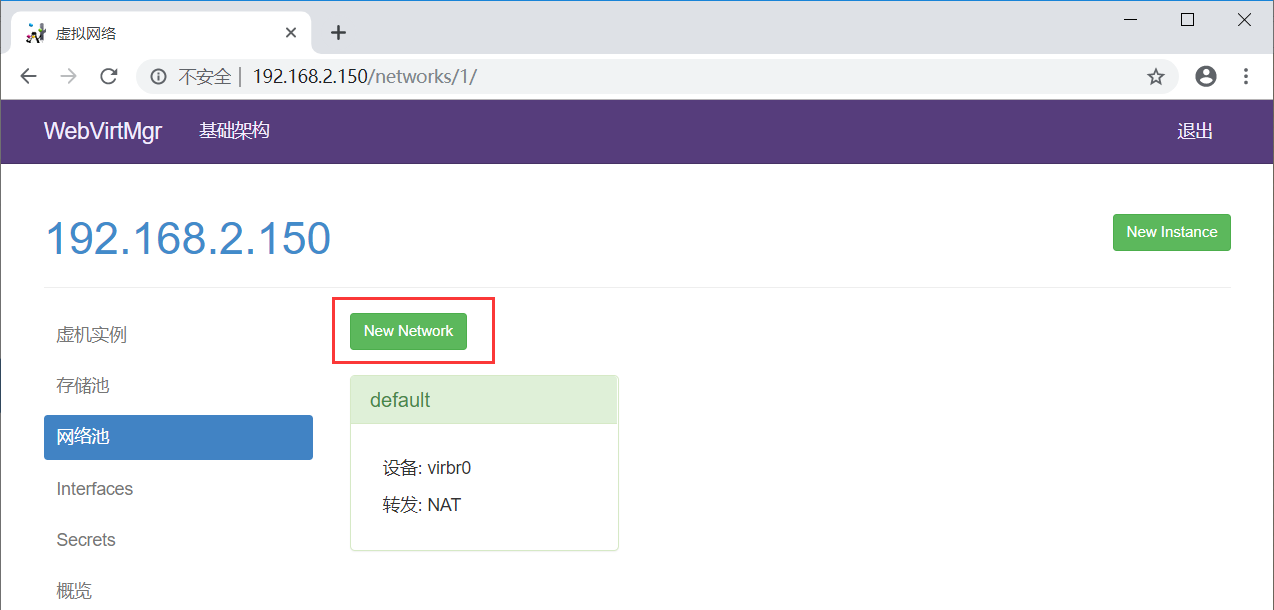
选择桥接模式

配置如下:

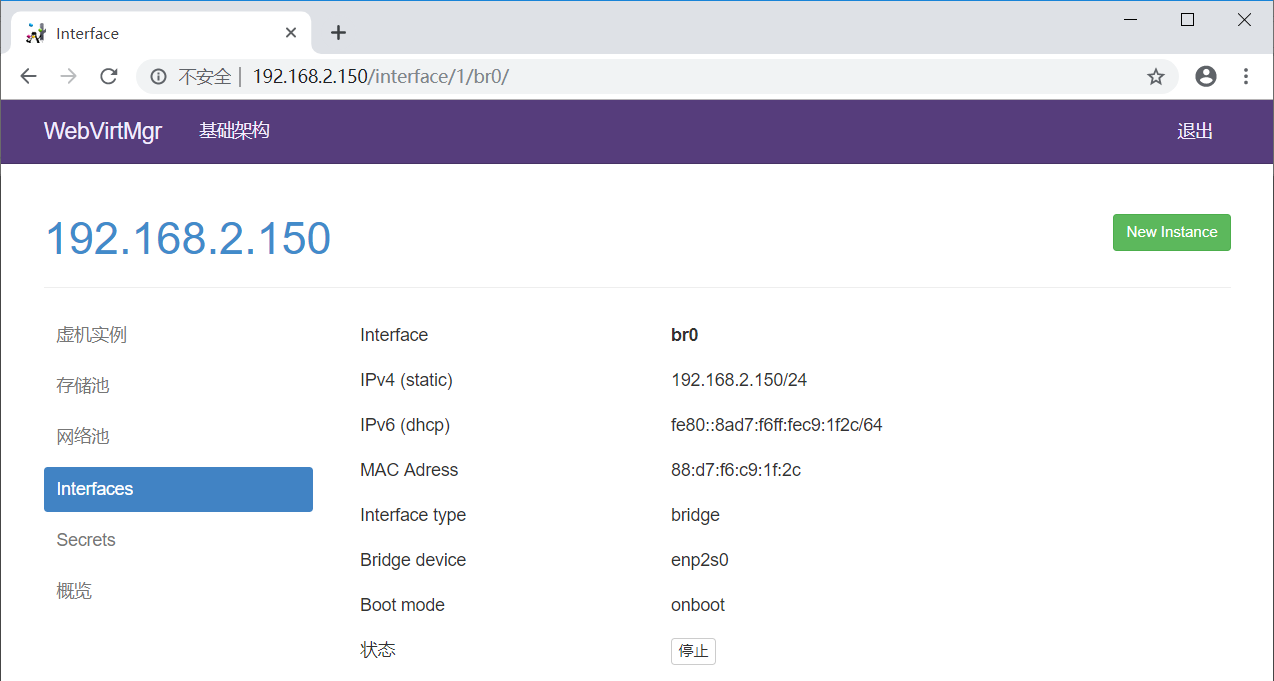
成功添加br0
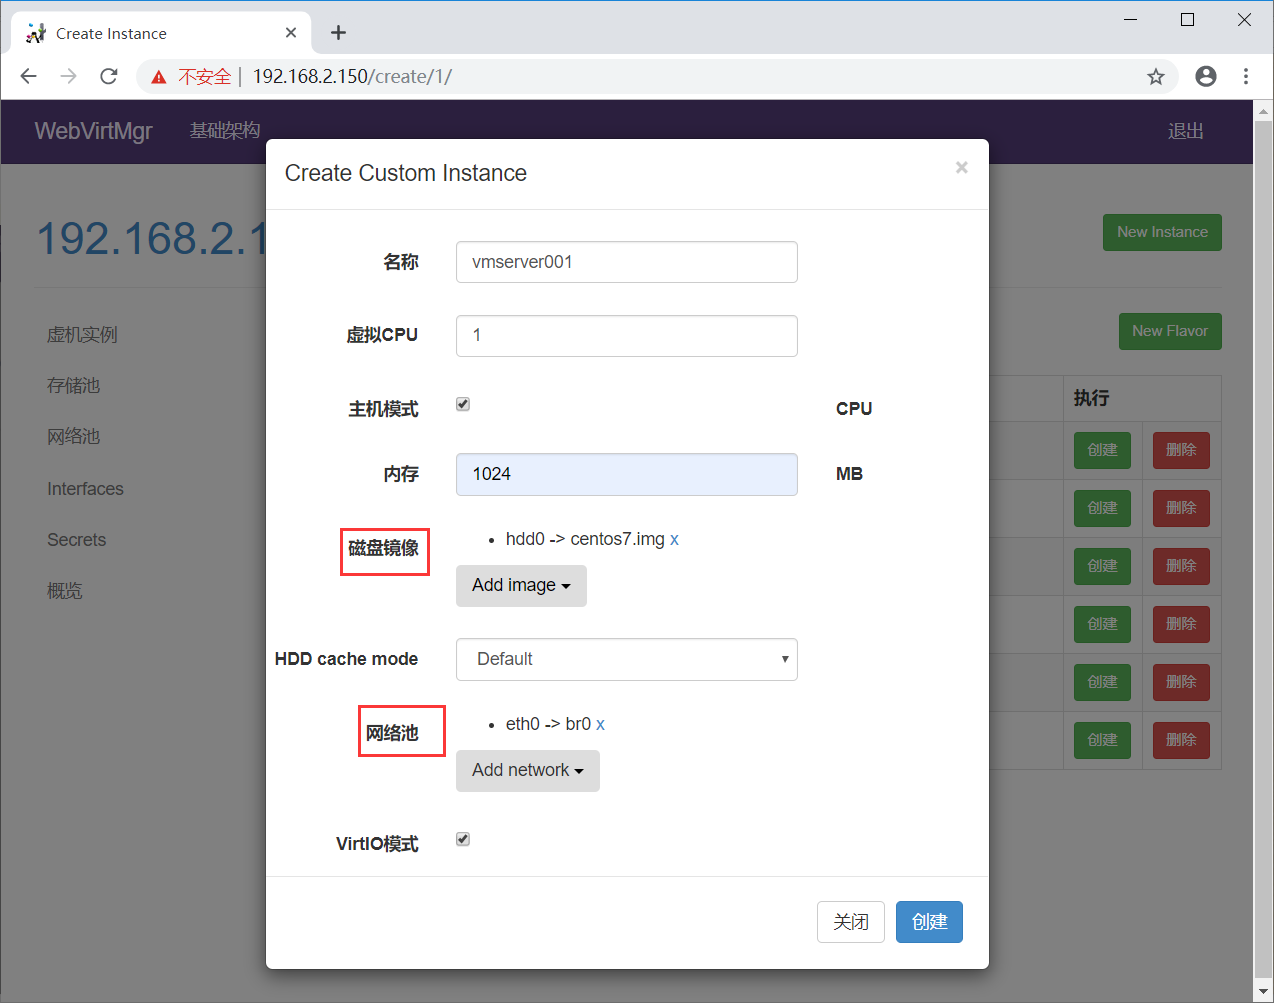
5、创建虚机
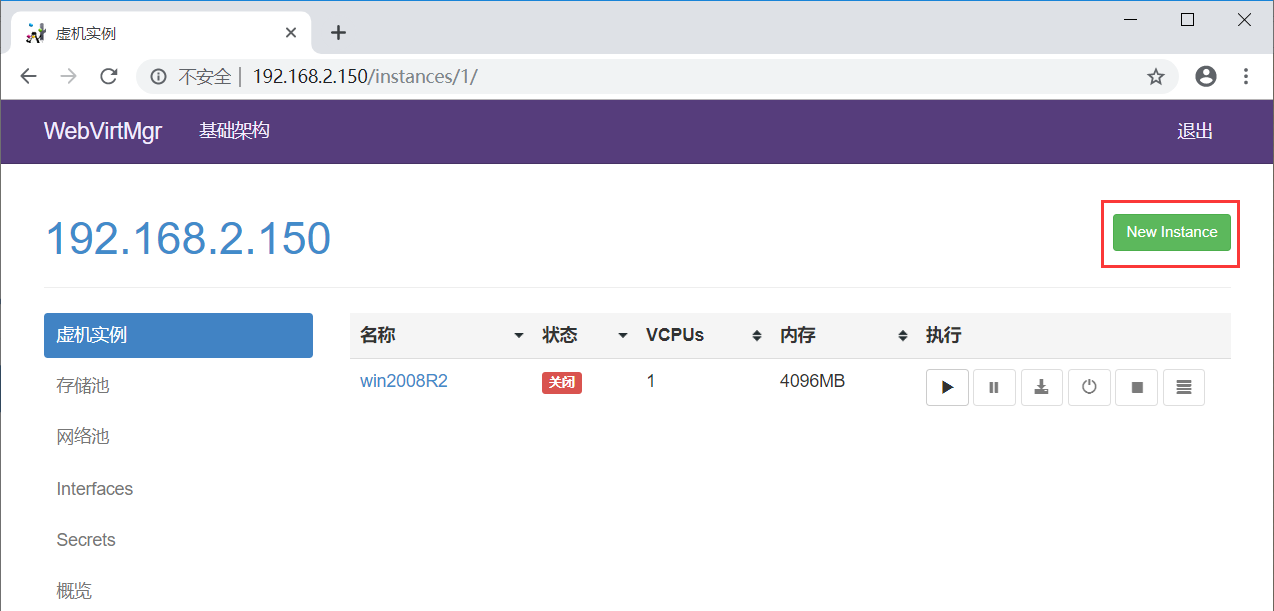
点击“Custom Instance”

添加虚拟机配置
6、虚机挂载ISO镜像
点击连接
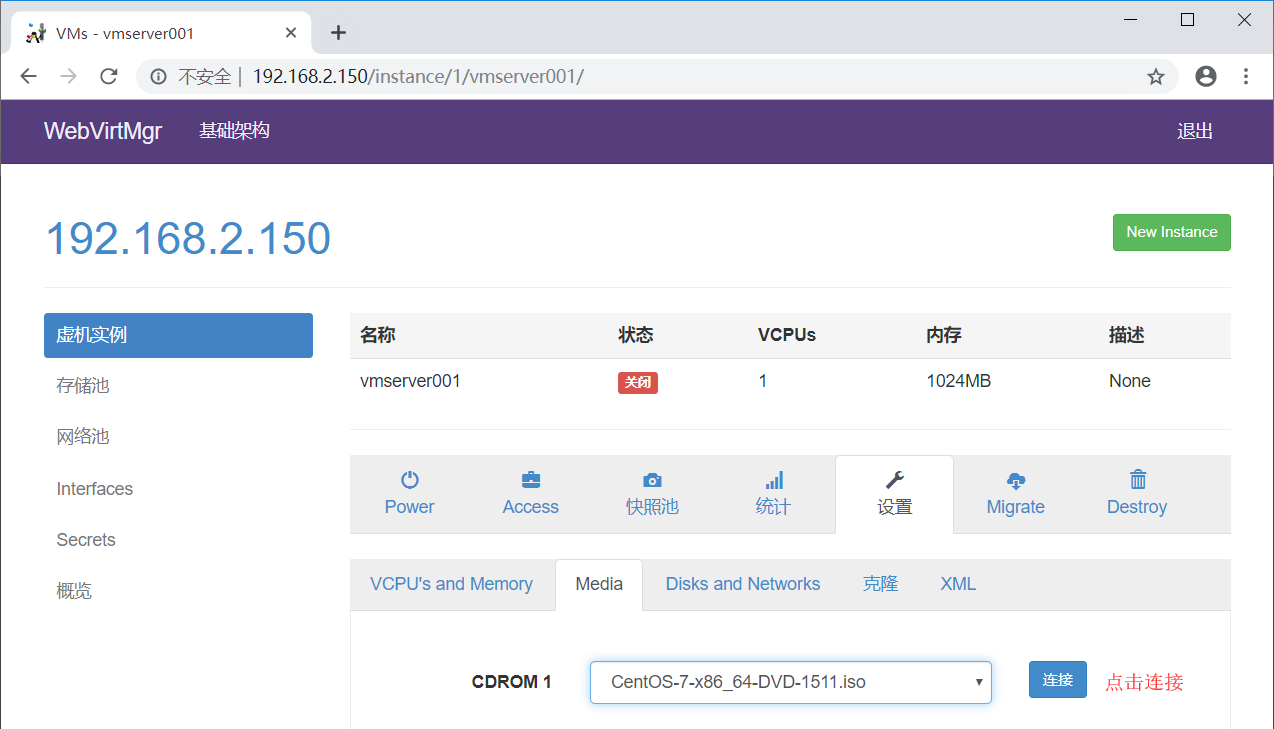
下面选择系统安装时使用的镜像,这个镜像是上面放到默认/var/lib/libvirt/images/目录下的,如果下载了各种镜像版本放到里面,那么就可以在这里选择你想安装的版本了!
# ls /var/lib/libvirt/images/
[root@localhost ~]# ls /var/lib/libvirt/images/

CentOS--x86_64-DVD-.iso                                                                           win2008R2.qcow2

cn_windows_server_2008_r2_standard_enterprise_datacenter_and_web_with_sp1_vl_build_x64_dvd_617396.iso

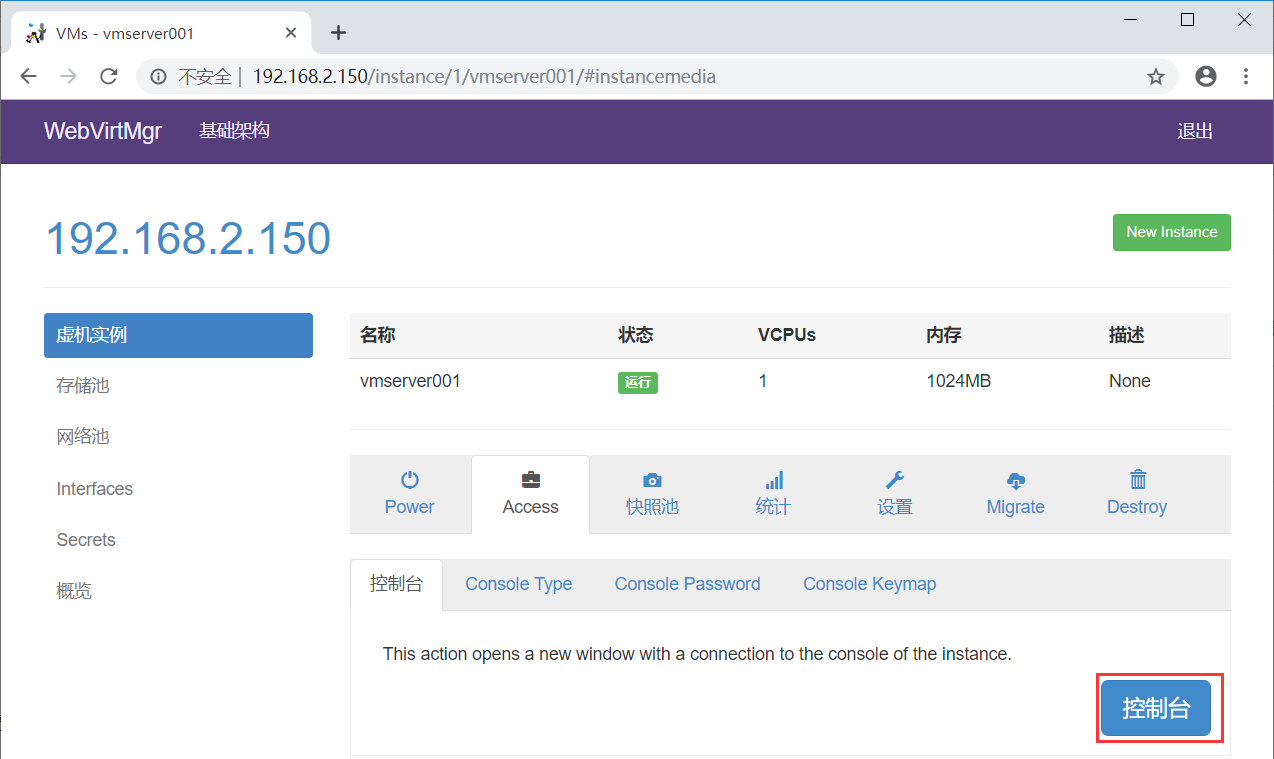
7、启动虚机
点击“启动”按钮后,打开虚机电源。

点击控制台按钮,进入操作系统安装界面
进入centos7安装界面
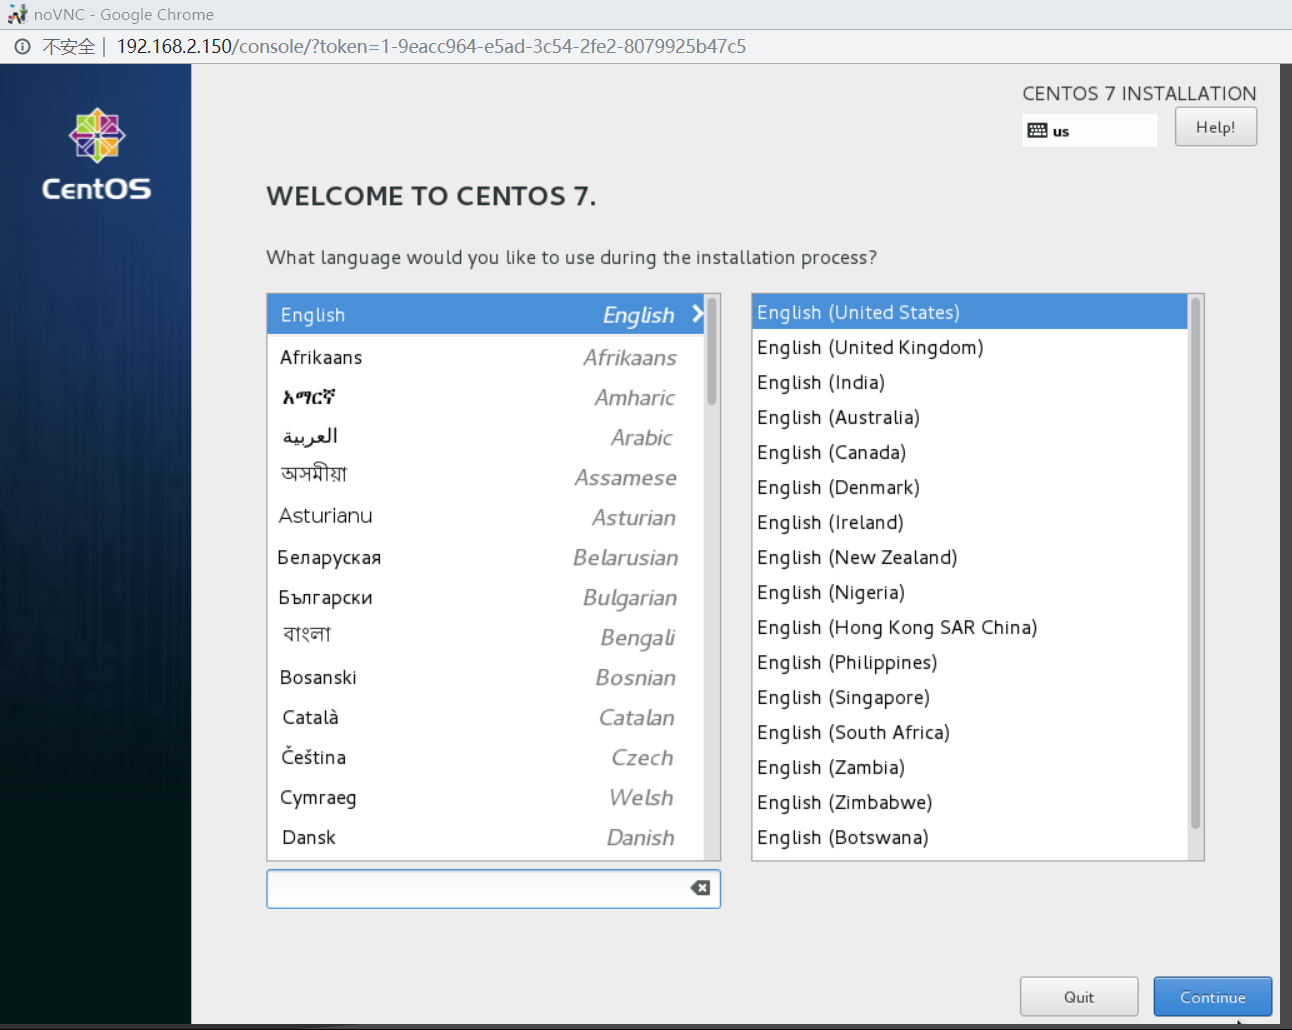
按步骤进行安装centos7系统
配置网络并能正常上网,如下图

二、webvirtmgr虚机磁盘扩容
kvm虚拟机磁盘空间扩展与xen虚拟机磁盘空间扩展思路一致。原因在于xen/kvm默认的虚拟机磁盘格式为raw,所以方式可以通用。
qcow2磁盘格式扩展思路如下
(1) 可以采用raw磁盘格式磁盘的扩展方式一致的方式进行。
(2) qcow2格式磁盘,直接通过qemu-img 直接扩展qcow2磁盘, 新添加一块raw格式的磁盘加入到KVM虚拟机,然后通过虚拟机系统lvm逻辑卷管理方式进行管理,扩展磁盘空间。
下面将开始通过qcow2格式添加磁盘。
1 关闭虚机
2 对虚机的xml文件的disk域添加如下代码:
场景一:新增一块磁盘
添加如下代码
<disk type='file' device='disk'>

    <driver name='qemu' type='qcow2' cache='none'/>       ---添加改行代码找到新增磁盘格式

    <source file='/home/kvm/teststorage/entd01.img'/>     --指定新增磁盘路径

    <target dev='vda' bus='virtio'/>                      --指定磁盘设备名称,和传输总线类型

</disk>
场景二:新增多块磁盘
已新增两块盘为例:
添加如下代码
<disk type='file' device='disk'>

   <driver name='qemu' type='qcow2' cache='none'/>

   <source file='/home/kvm/teststorage/entd01.img'/>

   <target dev='vda' bus='virtio'/>

</disk>

<disk type='file' device='disk'>

   <driver name='qemu' type='qcow2' cache='none'/>

   <source file='/home/kvm/vm/waq02-clone.qcow2'/>

   <target dev='vdb' bus='virtio'/>

</disk>
方法一:直接扩展qcow2磁盘(纵向扩容)
查看磁盘格式信息
# qemu-img info /var/lib/libvirt/images/win2008R2.qcow2
[root@localhost ~]# qemu-img info /var/lib/libvirt/images/win2008R2.qcow2

image: /var/lib/libvirt/images/win2008R2.qcow2

file format: qcow2

virtual size: 150G ( bytes)

disk size: 150G

cluster_size:

Format specific information:

    compat: 1.1

    lazy refcounts: true
给镜像增加100G容量
# qemu-img resize /var/lib/libvirt/images/win2008R2.qcow2 +100G
此方法并不是立即分配存储空间
[root@localhost ~]# qemu-img resize /var/lib/libvirt/images/win2008R2.qcow2 +100G

Image resized.

[root@localhost ~]# qemu-img info /var/lib/libvirt/images/win2008R2.qcow2

image: /var/lib/libvirt/images/win2008R2.qcow2

file format: qcow2

virtual size: 250G ( bytes)

disk size: 150G

cluster_size:

Format specific information:

    compat: 1.1

    lazy refcounts: true
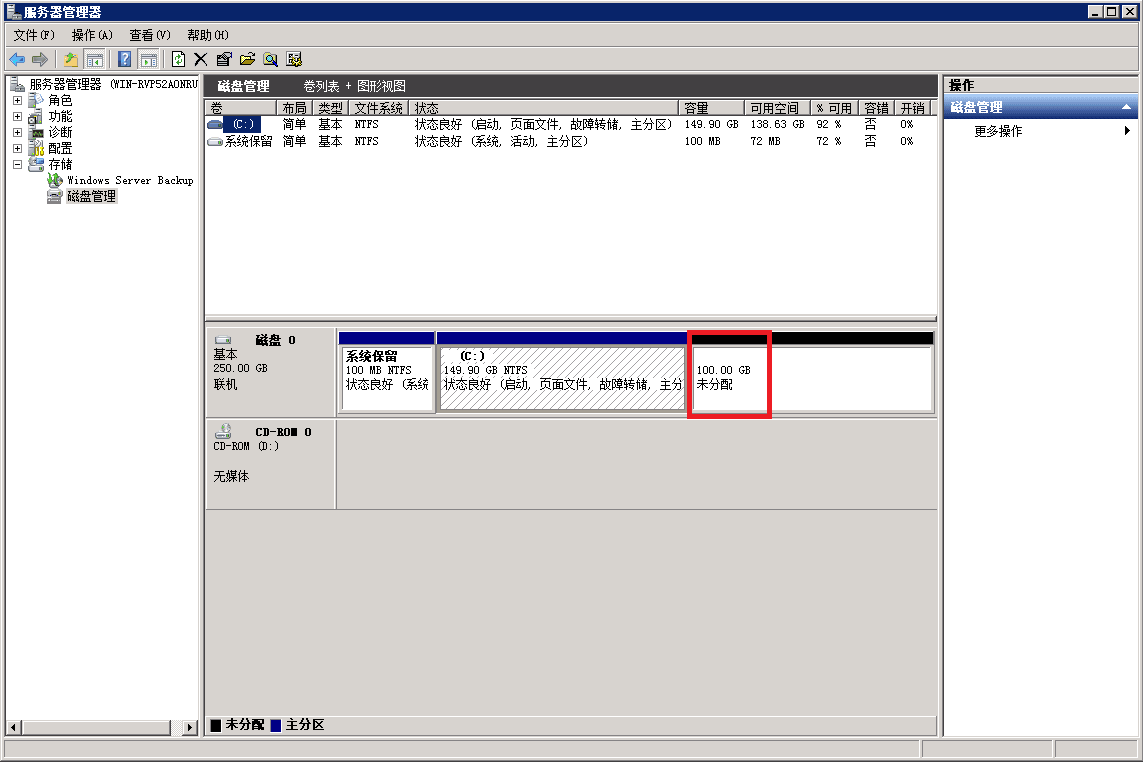
开启虚拟机查看是否添加成功
方法二:添加一块qcow2磁盘(横向扩容)
创建虚拟硬盘
# qemu-img create -f qcow2 win2008R2_disk1.qcow2 100G
[root@localhost ~]# cd /var/lib/libvirt/images/

[root@localhost images]#

[root@localhost images]# ls

CentOS--x86_64-DVD-.iso                                                                           win2008R2.qcow2

cn_windows_server_2008_r2_standard_enterprise_datacenter_and_web_with_sp1_vl_build_x64_dvd_617396.iso

[root@localhost images]#

[root@localhost images]# qemu-img create -f qcow2 win2008R2_disk1.qcow2 100G

Formatting 'win2008R2_disk1.qcow2', fmt=qcow2 size= encryption=off cluster_size= lazy_refcounts=off

[root@localhost images]#

[root@localhost images]# ls

CentOS--x86_64-DVD-.iso                                                                           win2008R2_disk1.qcow2

cn_windows_server_2008_r2_standard_enterprise_datacenter_and_web_with_sp1_vl_build_x64_dvd_617396.iso  win2008R2.qcow2

[root@localhost images]#

[root@localhost images]# du -sh win2008R2_disk1.qcow2

196K    win2008R2_disk1.qcow2
添加一块qcow2磁盘信息加入配置文件
<disk type='file' device='disk'>

  <driver name='qemu' type='qcow2' cache='none'/>

  <source file='/data/test01_add.qcow2'/>

  <target dev='hdb' bus='ide'/>

 </disk>
参考博客:
https://www.cnblogs.com/kevingrace/p/5739009.html
KVM虚拟机扩展磁盘空间
https://www.cnblogs.com/pigdragon/p/9506556.html
最新文章
- Hawk 4. 数据清洗
- C++ 快排
- iOS通讯录开发
- join的理解
- addsubview跟insertsubview的区别
- 【leetcode❤python】171. Excel Sheet Column Number
- React-Native错误笔记-EPERM
- Java [leetcode 18]4Sum
- PHP中使用curlL实现GET和POST请求的方法
- redis数据类型:lists
- nfs服务器的建立
- python中numpy对函数进行矢量化转换
- 【Android Developers Training】 39. 获取文件信息
- doubi -- 初创
- CF715B. Complete The Graph
- 安卓学习 Drawable对象
- Codeforces 767D - Cartons of milk
- 【4-1】js函数、事件、补充知识
- C#设计模式(6)——原型模式(Prototype Pattern) C# 深浅复制 MemberwiseClone
- 使用eclipse 开发lisp